523326
42
Zoom out
Zoom in
Previous page
1/56
Next page
Terug naar inhoudsopgave
Printplaat voor de aan-uitknop
OnderhoudshandleidingDell™XPS™L502X
De printplaat voor de aan-uitknop verwijderen
De aan-uitknopkaart terugplaatsen
De printplaat voor de aan-uitknop verwijderen
1. Volg de instructies in Voordat u begint.
2. Verwijder de batterij (zie De batterij verwijderen).
3. Verwijder de polssteun (zie De polssteun verwijderen).
4. Draai de polssteun om.
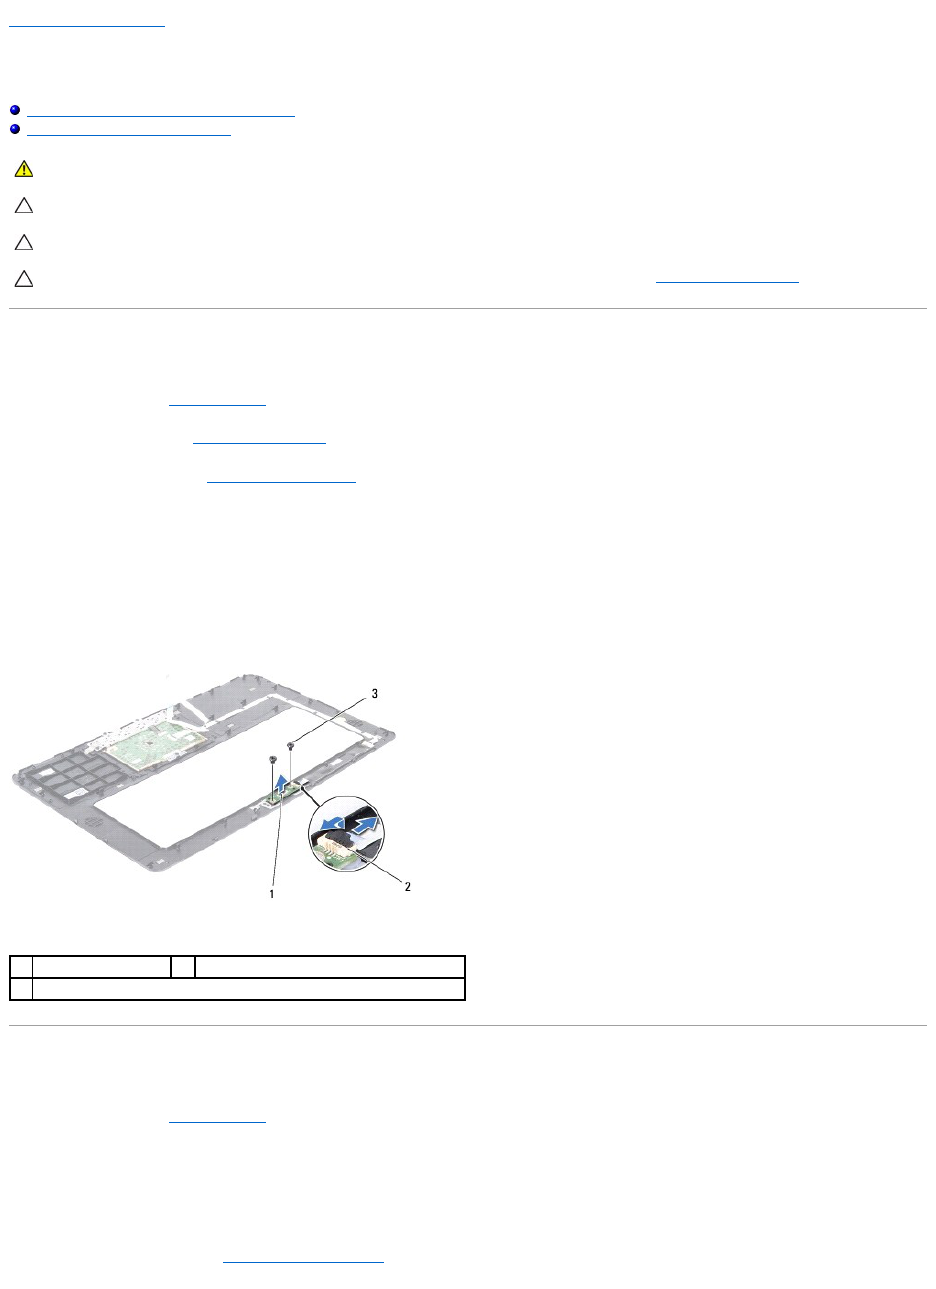
5. Open de connectorvergrendeling en trek aan het treklipje om de kabel van de aan-uitknop los te koppelen van de connector op de kaart voor de aan-
uitknop.
6. Verwijder de twee schroeven waarmee de printplaat voor de aan-uitknop op de polssteun is bevestigd.
7. Til de aan-uitknopkaart van de polssteun.
De aan-uitknopkaart terugplaatsen
1. Volg de instructies in Voordat u begint.
2. Plaats de printplaat voor de aan-uitknop op de polssteun en plaats de twee schroeven terug waarmee de printplaat voor de aan-uitknop vastzit op de
polssteun.
3. Schuif de kabel van de aan-uitknop in de connector op de kaart voor de aan-uitknop en druk de connectorvergrendeling omlaag om de kabel van de
aan-uitknop vast te zetten.
4. Plaats de polssteun terug (zie De polssteun terugplaatsen).
GEVAAR: Volg de veiligheidsinstructies die bij de computer werden geleverd alvorens u werkzaamheden binnen de computer uitvoert. Raadpleeg
voor meer informatie over veiligheidsrichtlijnen onze website over wet- en regelgeving op www.dell.com/regulatory_compliance.
WAARSCHUWINGEN: Alleen een bevoegde onderhoudsmonteur mag reparaties aan uw computer uitvoeren. Schade als gevolg van
onderhoudswerkzaamhedendienietdoorDell™zijngoedgekeurd,valtnietonderdegarantie.
WAARSCHUWINGEN: Voorkom elektrostatische ontlading door uzelf te aarden met een aardingspolsbandje of door regelmatig een niet-geverfd
metalen oppervlak aan te raken (zoals een connector van de computer).
WAARSCHUWINGEN: Voorkom schade aan het moederbord door de hoofdbatterij te verwijderen (zie De batterij verwijderen) voordat u in de
computer gaat werken.
1
aan-uitknopkaart
2
connector voor de kabel van de aan-uitknop
3
schroeven (2)
42


Need help? Post your question in this forum.

Forumrules


Report abuse

Libble takes abuse of its services very seriously. We're committed to dealing with such abuse according to the laws in your country of residence. When you submit a report, we'll investigate it and take the appropriate action. We'll get back to you only if we require additional details or have more information to share.

Product:

For example, Anti-Semitic content, racist content, or material that could result in a violent physical act.

For example, a credit card number, a personal identification number, or an unlisted home address. Note that email addresses and full names are not considered private information.

Forumrules

To achieve meaningful questions, we apply the following rules:

Register

Register getting emails for Dell XPS L502X at:


You will receive an email to register for one or both of the options.


Get your user manual by e-mail

Enter your email address to receive the manual of Dell XPS L502X in the language / languages: Dutch as an attachment in your email.

The manual is 1,49 mb in size.


You will receive the manual in your email within minutes. If you have not received an email, then probably have entered the wrong email address or your mailbox is too full. In addition, it may be that your ISP may have a maximum size for emails to receive.

Others manual(s) of Dell XPS L502X

Dell XPS L502X User Manual - English - 55 pages

Dell XPS L502X User Manual - German - 56 pages


The manual is sent by email. Check your email

If you have not received an email with the manual within fifteen minutes, it may be that you have a entered a wrong email address or that your ISP has set a maximum size to receive email that is smaller than the size of the manual.

The email address you have provided is not correct.

Please check the email address and correct it.

Your question is posted on this page

Would you like to receive an email when new answers and questions are posted? Please enter your email address.


Info