723534
45
Zoom out
Zoom in
Previous page
1/45
Next page
CRP-HW10 Fuzzy Series
1.8L(2~10Persons) / 1.8L(2~10 )
Operating Instructions
NO.1 CUCKOO
CUCKOO IH PRESSURE JAR COOKER
Read the following instruction manual before use. Save this
instruction manual for future reference. This manual will be useful if
you have any questions or have problems operating the rice cooker.
Important safeguards
3
4
35~38
39
40~42
43
43
44
44
45
46
47
48~49
50~52
53~54
55
56~57
57
58~60
61
61
61
62~64
74~83
Important safeguards 3
Specifications
4
Safety precautions
5~8
Name of each part
9
How to clean
10~12
Function operating part
13
Error code and possible cause
13
How to set current time 14
How to set or cancel voice guide function
14
Night voice volume reduction / voice setting function
15
Before cooking rice
16
For the best taste of rice
17
How to cook
18~19
MY MODE (Cuckoo Customized Taste Function)
20~22
How to use “GABA Rice (Brown rice)”
23~24
How to cook the MULTI-COOK and NU RUNG JI
25
How to preset timer for cooking
26~27
Simple Soft Function
27
To keep cooked rice warm and tasty
28~30
How to use power saving function
31
Display Lighting power saving mode
31
How to lock buttons
31
Check before asking for service 32~34
Cooking Guide 65~73
CONTENTS
1. Read all instructions before using this appliance.
2. Do not touch hot surfaces. Use handles or knobs.
3. To protect against fire, electric shock and / or injury to persons do not immerse cord, plugs, or Pressure
Cooker Body in water or any other liquid.
4. Close supervision is necessary when this appliance is used by or near children.
This appliance is not intended for use by young children without supervision.
5. Unplug from outlet when not in use and before cleaning.
Allow appliance to cool before putting on or taking off parts, and before cleaning the appliance.
6. Do not operate any appliance with a damaged cord or plug, after the appliance malfunctions, or has
been damaged in any manner. Return the appliance to the nearest authorized service facility for
examination, repair or adjustment.
7. The use of accessory attachments not recommended by the appliance manufacturer may result in fire,
electric shock, and / or injury to persons.
8. If the supply cord is damaged, it must be replaced by a special cord or assembly available from the
manufacturer or your service agent.
9. Do not use outdoors.
10. Do not let the cord hang over the edge of a table or counter, or touch hot surfaces.
11. Do not place on or near a hot gas, electric burner, or in a heated oven.
12. Always attach the plug to the appliance first, then plug the cord into the wall outlet. To disconnect, or
set all control to off , then remove the plug from the wall outlet.
13. Do not use this appliance for other than its intended use.
14. Extreme caution must be used when moving an appliance containing hot oil or any hot liquids.
15. Oversized foods, metal foil packages, or utensils must not be inserted into the appliance as they are a
risk of fire or electric shock.
16. A fire may occur if the appliance is covered or touching flammable material, including curtains,
draperies, walls, etc while in operation.
17. To reduce the risk of electric shock, cook only in the provided removable container.
18. This appliance cooks under pressure. Improper use may result in scalding injury.
Before operating the unit, properly secure and close the unit. See “Operating Instructions.”
19. Do not cook foods such as applesauce, cranberries, cereals, macaroni, spaghetti, or other foods.
These foods tend to foam, froth, and sputter, and may block the pressure releasing device.
20. Before use always check the pressure releasing device for clogging.
21. Do not open the pressure cooker until the unit has cooled and internal pressure has been reduced.
See “Operating Instructions.”
22. Do not use this pressure cooker to fry in oil.
23. Be sure that handles are assembled and fastened properly before each use.
Cracked, broken or charred handles should be repalced.
SAVE THESE INSTRUCTIONS
THIS APPLIANCE IS FOR HOUSEHOLD USE ONLY
WARNING : This appliance generates heat and releases steam during use. Use proper precaution to
prevent risk of burns, fires, other injuries, or damage to property.
1. Keep hands and face away from the Pressure Release Valve when releasing pressure.
2. Take extreme caution when opening the Lid after cooking. Severe burns can result from steam inside.
3. Never open the Lid while the unit is in operation.
4. Do not use without the inner Pot in place.
5. Do not cover the Pressure Valve with anything as an explosion may occur.
6. Do not touch the inner pot nor any heating parts, immediately after use.
Allow the unit to cool down completely first.
ADDITIONAL IMPORTANT SAFEGUARDS
IMPORTANT SAFEGUARDS
Note:
A. A short power-supply cord (or cord set) is provided to reduce the hazards from entanglement by a longer cord.
B. Extension cord should be used properly.
C. Extension cord usage for the rice cooker:
(1) The correct rated voltage should be used for the rice cooker.
(2) If the appliance is set on the ground, the extension cord should also be set on the ground.
(3) The cord wires and extension cord should always be arranged to prevent hazards to children.
This appliance has a polarized plug : (one blade is wider than the other).
As a safety feature, this plug will fit in a polarized outlet only one way.
If the plug does not properly fit in the outlet, turn the plug over.
If it still does not fit, contact a qualified electrician.
Please, keep this safety feature.
CRP-HW10 Fuzzy Series
AC120V, 60Hz
1295W
0.36~1.8L (2~10cups)
0.18~0.36L (1~3cups)
1.0m
88.2KPa(0.9kgf/cm
2
)
5.8kg
29.7cm
40.9cm
29cm
HOW TO USE EXTENSION CORD
SPECIFICATIONS /
HOW SERVICE IS HANDLED
The East and the Central Districts
Tel. No. (718) 888-9144
The West and the Central Districts
Tel. No. (213) 687-9828
TORONTO
Tel. No. 905 707 8224 / 416 878 4561
VANCOUVER
Tel. No. 604 540 1004/604 523 1004
USA Canada
0.36~1.08L (2~6cups)
0.36~0.72L (2~4cups)
0.36~1.44L (2~8cups)
SAFETY PRECAUTIONS
www.cuckoo.co.kr
ENGLISH
Do not alter, reassemble,
disassemble or repair.
It can cause fire, electric
shock or injury.
For repair, contact dealer
or the service center.
Do not use the cooker near
hot things such as stove,
gas stove or direct ray
of light.
It can cause an electric shock,
fire, deformation, malfunction or discoloration.
Please check the power cord and plug frequently.
Do not cover the automatic
steam outlet or pressure
weight with your hand or
face.
It can cause burns.
Especially be careful to keep
it out of children’s reach.
Do not let the cooker contact any water
by sprinkling water on the cooker.
It can cause an electric shock or fire.
If it contacts water, please separate power cord
and contact dealer and service center.
Do not use damaged
power cord, plug or
loose socket.
Please check the power cord frequently for damage.
Serious damage can cause electric shock or fire.
If the plug is damaged, contact the dealer or a service
center.
Use a single socket with
the rated current
above 15A.
Using several lines in one socket
can cause overheating or fire.
Please check the power cord and plug frequently.
Use an extension cord with the rated current
above 15A.
Please pay careful
attention against water
and chemicals.
It can cause an electric
shock or fire.
Read the following product safety guide carefully to prevent any accidents and/or serious danger.
‘Warning’ and ‘Caution’ are different as follows.
This sign is intended to remind and alert that something
may cause problems under the certain situation.
Please read and follow the instruction to avoid any harmful
situation.
Indicates a prohibition
This means that the action it describes may
result in death or severe injury.
This means that the action it describes may
result in injury or property damage.
Indicates an instruction
Warning
Caution
Warning Do not
Do not insert metal objects
such as pins and wires or any
other external substances in
the automatic steam exhaust
outlet or any other slot.
It can cause an electric shock or fire.
Especially be careful to keep it out of reach of children.
Steam plate
Metal
objects
Damages by impact can cause an
electric shock or fire.
Please check the power cord and plug frequently.
Be careful that both the plug
and power cord are not to be
bit by animals, or pierced by
sharp metal materials.
It can cause an electric shock or
short circuit resulting in fire.
Please check the power cord and plug frequently.
Do not bend, tie or pull the
power cord by force.
SAFETY PRECAUTIONS
Do not use pots that are not
designed for the cooker.
Do not use abnormal pot and
do not use without inner pot.
It can cause an electric shock or fire.
<Inner pot>
Do not cover the automatic
steam outlet or pressure
weight with a duster,
a towel, or apron, etc.
It can cause deformation or a breakdown.
It can cause an explosion by pressure.
Don’t spray or put any
insecticide and chemicals.
It can cause an electric shock or fire.
If cockroaches or any insects
get inside the cooker, please call a dealer
or a service center.
Do not put any needle, cleaning pin etc in
the ventilator or any gap of the cooker.
Do not turn the Lock/Unlock Handle to
“Unlock” during cooking.
The hot steam or any hot content within the cooker
can cause burns.
After you finish the cooking do not try to open the
cooker by force until the steam is completely
exhausted.
Do not insert cleaning pins to other parts except to
the valve hole of the pressure weight.
It can cause an electric shock or fire.
Keep the cooker out of children’s reach.
It can cause burns, electric shock or injury.
Do not use it without the inner pot.
It can cause electric shock or malfunction.
Do not pour rice or water without the inner pot.
If rice or water gets in then do not turn the product over
or shake it please contact to dealer or service center.
Remove external substances on plug with
a clean cloth.
It can cause fire.
Please check the power cord and plug frequently.
Do not place heavy things on the power cord.
It can cause an electric shock or fire.
Do not open the top cover during heating
and cooking.
It can cause burns.
If you need to open the lid while cooking, keep
pressing the cancel button for 2 seconds and confirm
internal steam is released, completely turning the
pressure weight over.
Warning Do not
SAFETY PRECAUTIONS
www.cuckoo.co.kr
ENGLISH
When this unit is working, it can influence any
electrical medical equipment.
If you use cardiac pacemakers
or electrical medical supporting
equipment, consult a doctor
before using this unit.
Do not use on a rice chest
or a shelf.
Do not place the power cord
between furniture. It can cause
an electric shock resulting in fire.
Please check the power cord and plug frequently.
When using on furniture be cautious of steam release
As it can cause damage, fire and and/or electric shock.
Don’t use the cooker near a
magnetic field.
It can cause burns or breakdown.
Please use the cooker for original purposes.
It can cause the malfunction or smell.
Do not touch the metallic surface of the inner
pot and pressure weight after cooking or
warming.
It can cause burns.
Remaining hot steam can cause burns when you tilt
the pressure weight during and after the cooking.
It can cause overflow or breakdown.
Do not cook over capacity stated for cooking of
chicken soup and congee.
Use product on a flat surface.
Do not use on a cushion.
Please avoid using it on an
unstable location prone to
falling down.
Please contact dealer or service center
when strange smell or smoke has occurred.
Do not use over the maximum capacity.
It can cause malfunction or a fire. Please check the
power cord and plug frequently.
Do not plug or pull the power cord with
wet hands.
It can cause an electric shock.
Please pull out the plug when not in use.
It can cause electric shocks or fire.
Use AC 120V only.
Clean any dust or external
substances off the
temperature sensor and
inner pot.
It can cause a system malfunction or fire.
Do not drop the cooker or impact.
It can cause malfunction.
Don’t use for various purposes for inner pot.
It can cause defomation of the inner pot.
It can cause to spill the inner coating.
First pull out the power cord.
Caution Do not
Warning Remember
SAFETY PRECAUTIONS
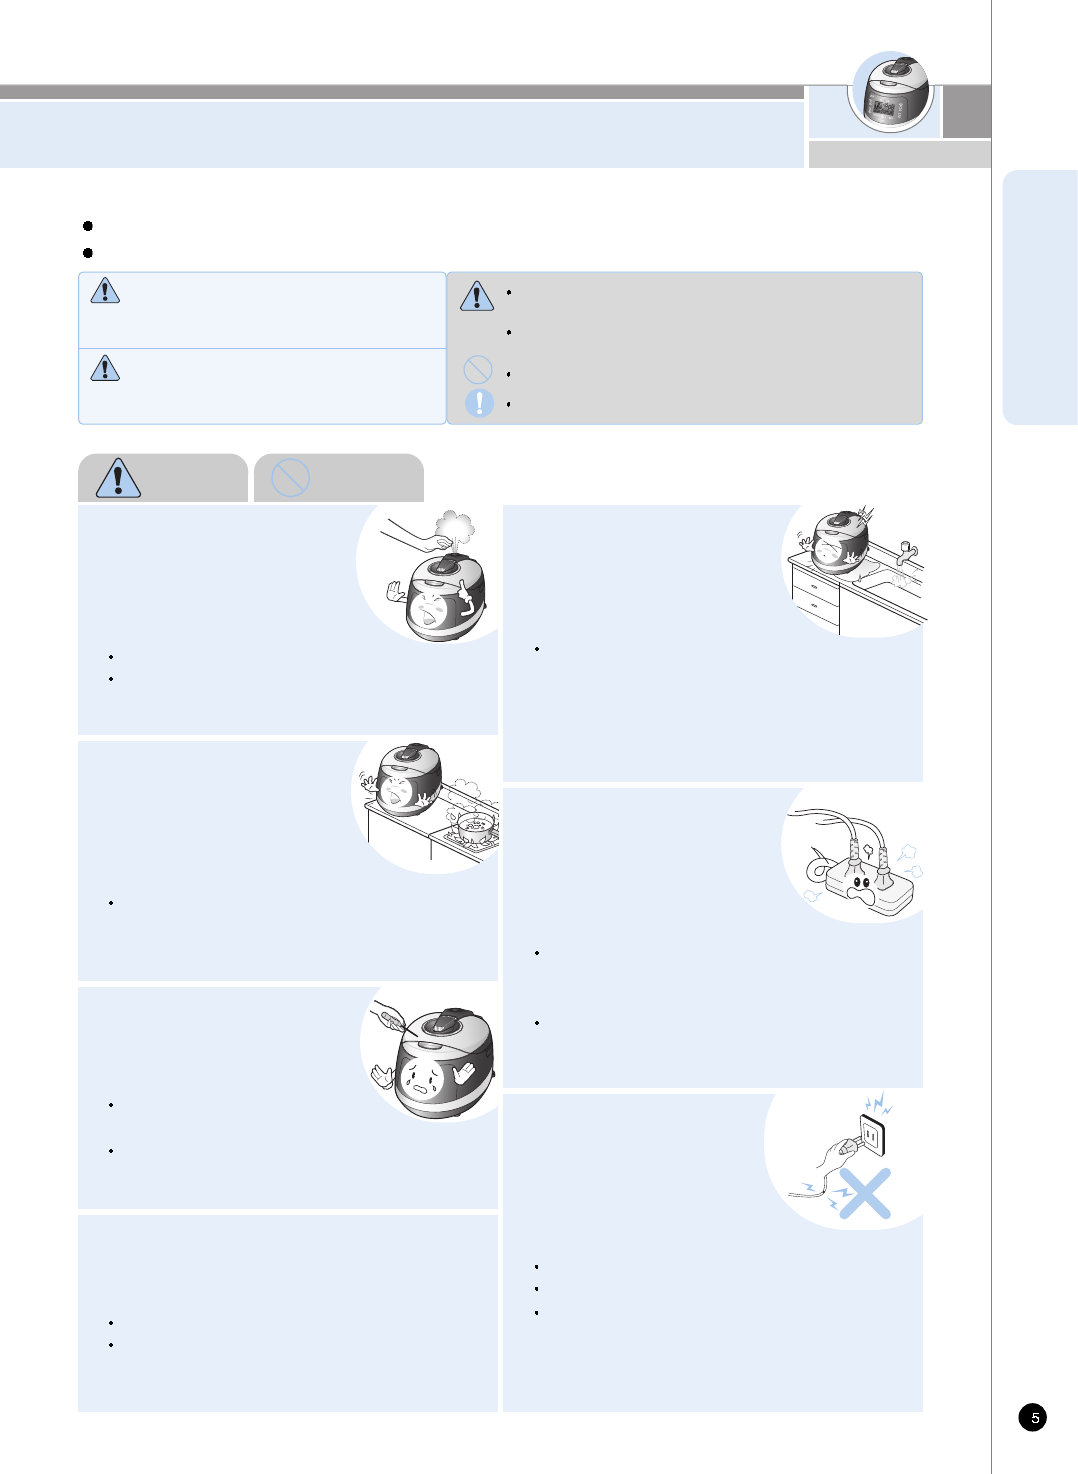
Do not place on rough top
or tilted top.
It can cause burns or breakdowns.
Be careful to install the power cord
to pass without disruption.
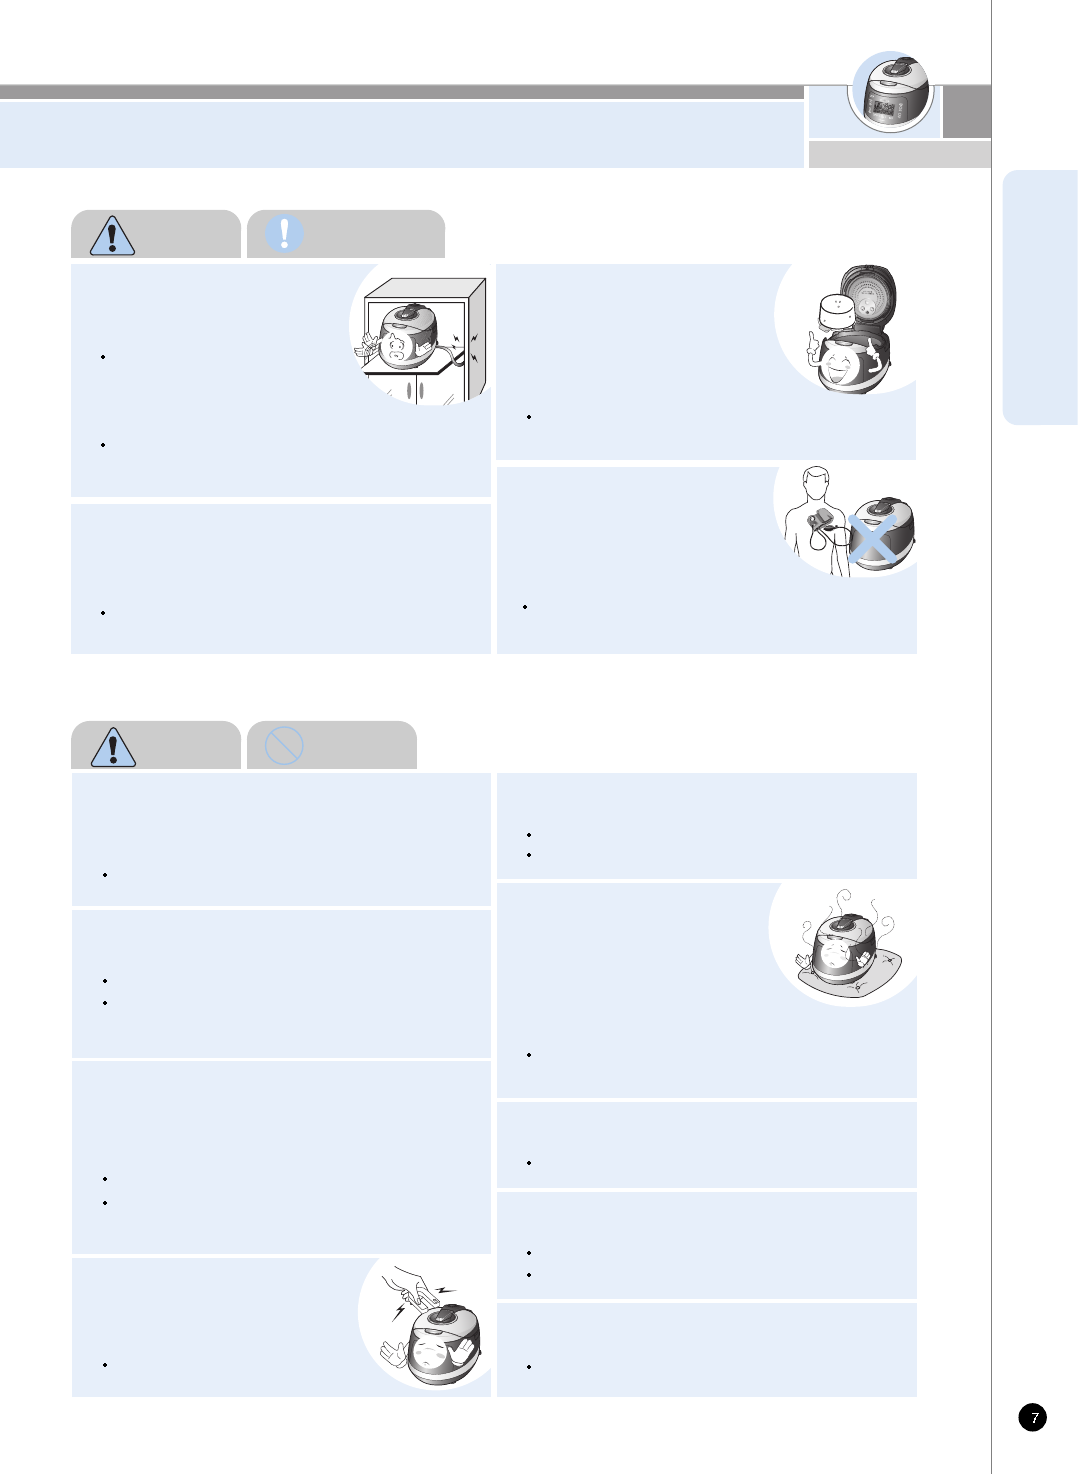
Do not hold the cooker by the inner pot handle.
It can cause problems and danger. There are portable
handles on the bottom right and left side of the
cooker. Hold the handles with both hands and move
it carefully.
Wipe off any excessive water on the cooker
after cooking.
It can cause odor and discoloration.
Wipe off water that is left behind from dew.
If power fails during rice cooking, automatic
vapor emission device may work,
leading to dispersion of contents.
Cook rice with specified amounts of rice and water.
In particular, water more than specified amount may
cause overflowing of contents.
Cook rice while soft steam cap is mounted.
Maintain more than 30cm of distance from
the product while using.
A magnetic field can be released from electronic goods.
Do not keep easily spoiled food warm in the
product such as red bean rice, mixed food,
croquette or gratin.(Except white rice)
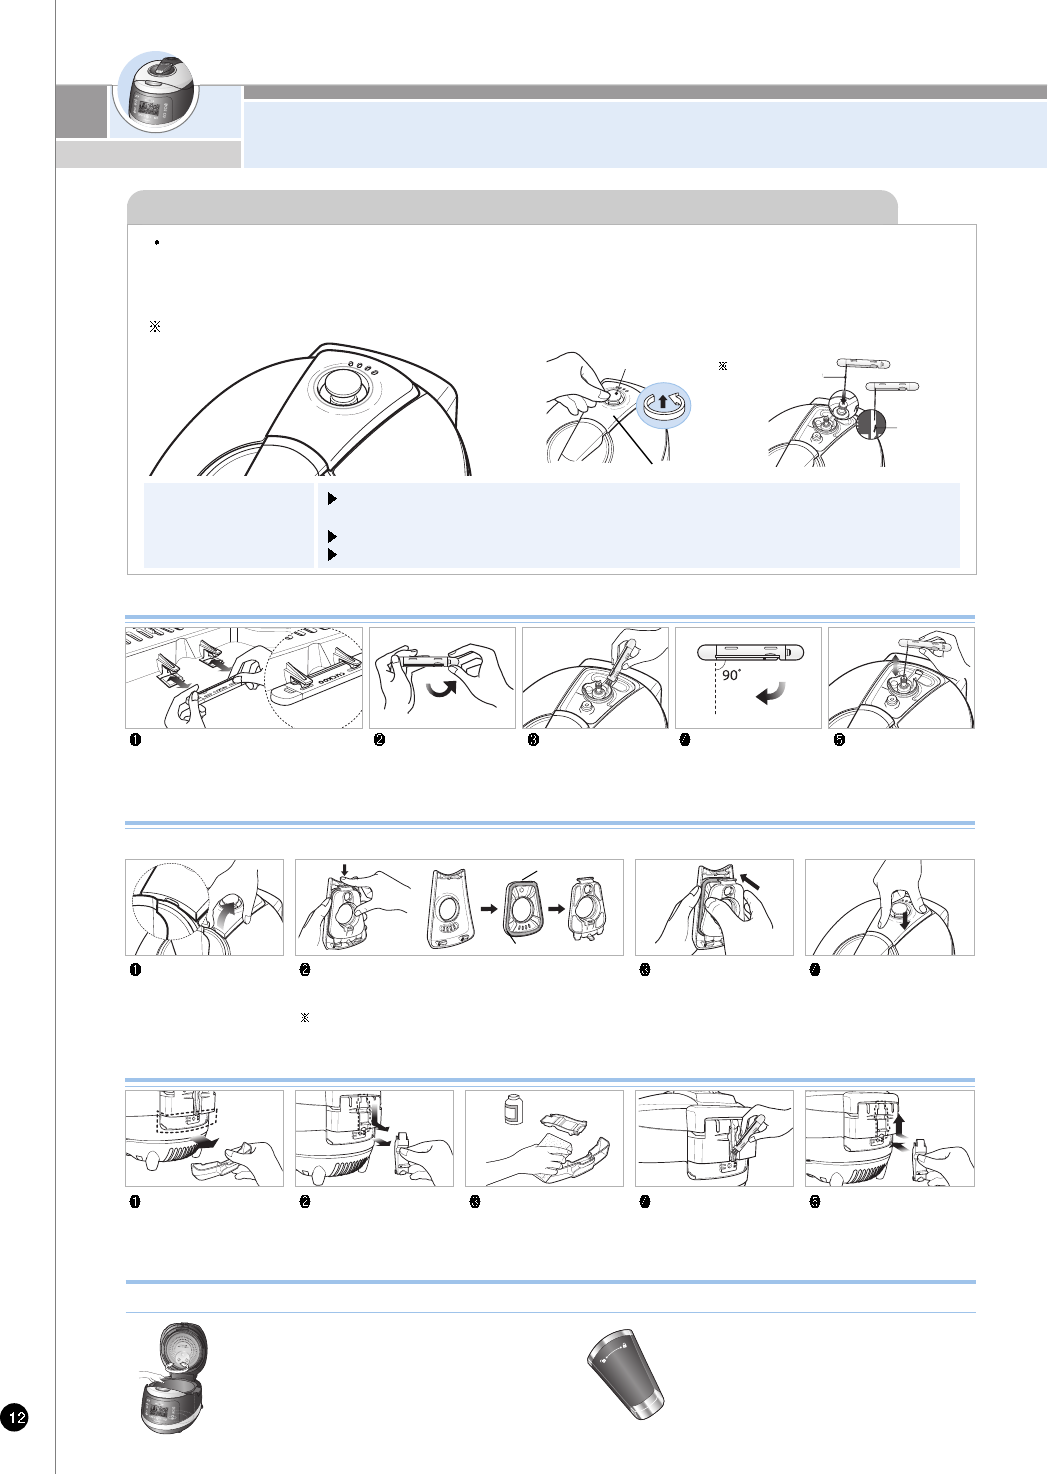
Even if power plug is unplugged,
turn lid combining hand grip
always to (Lock) location.
When you pull out the power
plug, don’t pull the power
cord. Please, safely pull out
the power plug.
If you inflict impact on power cord,
it can cause an electric shock or fire.
Be cautious when steam is being released
Please clean the body and
other parts after cooking.
When the steam is released don’t be surprised.
Please keep the cooker out of reach of children.
After cooking chicken soup or, multi
cook dishes, etc., the smell may be absorbed.
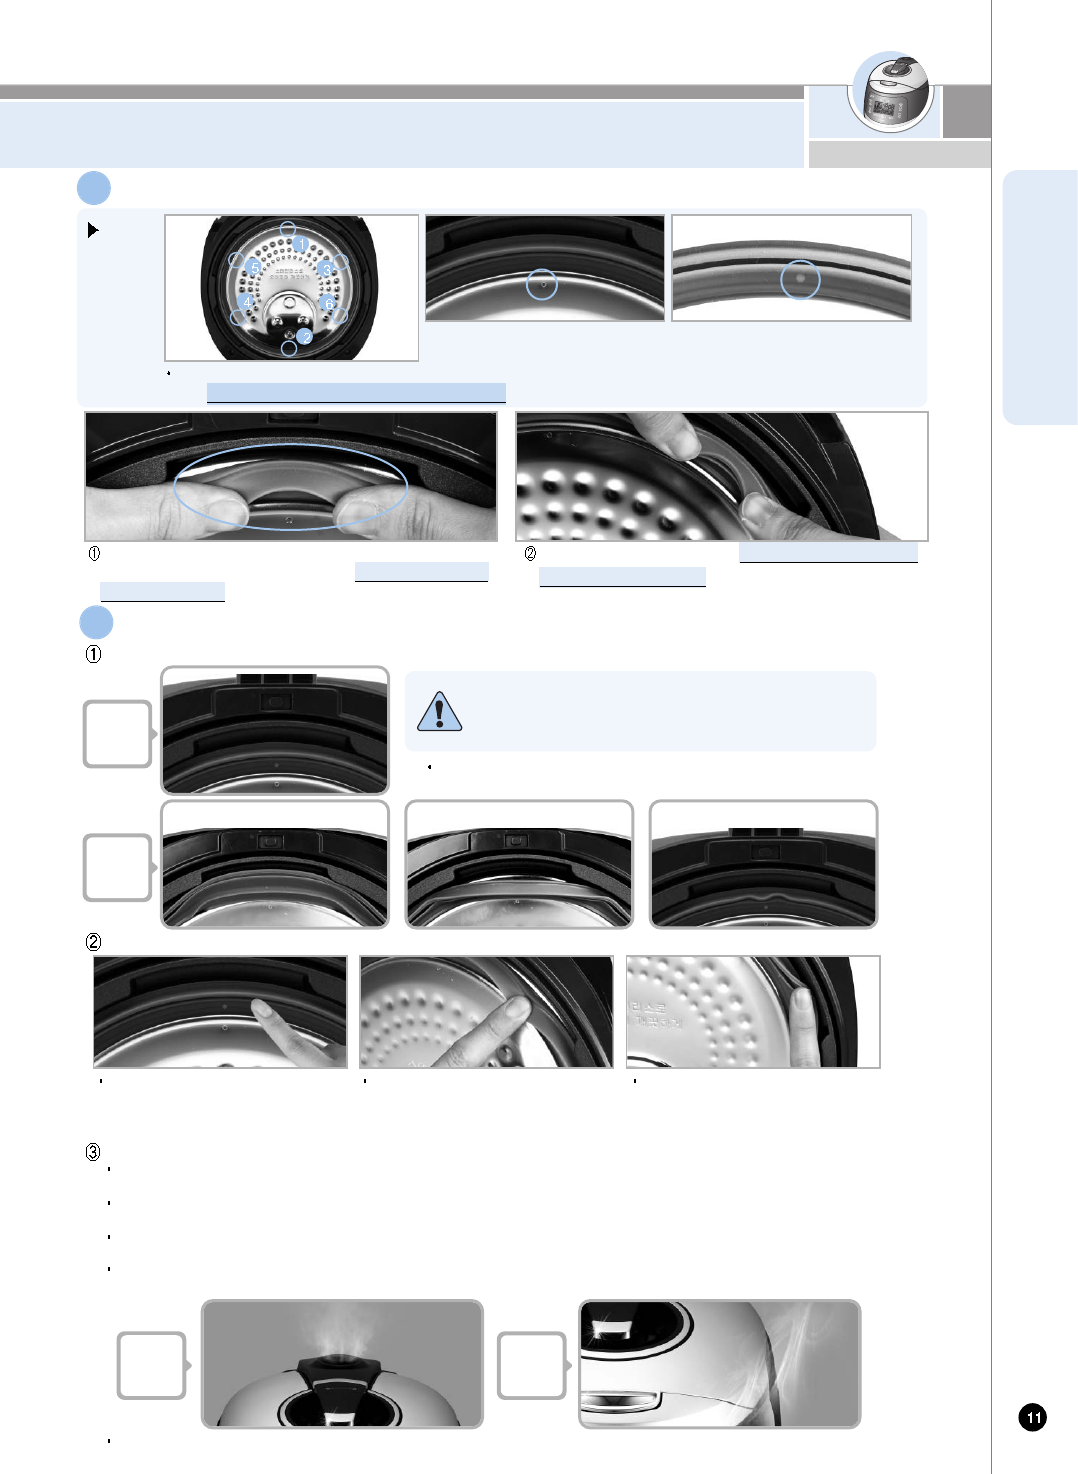
Clean the oven packing, top heater plate and
inner pot every time you cook any of those.
Use dry kitchen cleaner or sponge to clean the inner pot,
since rough scrub or metallic ones are abrasive to the coating.
(Refer ro page 10~11)
Depending on the using methods or user's circumstances
inner pot coating might rise.
Please call the customer service for those cases.
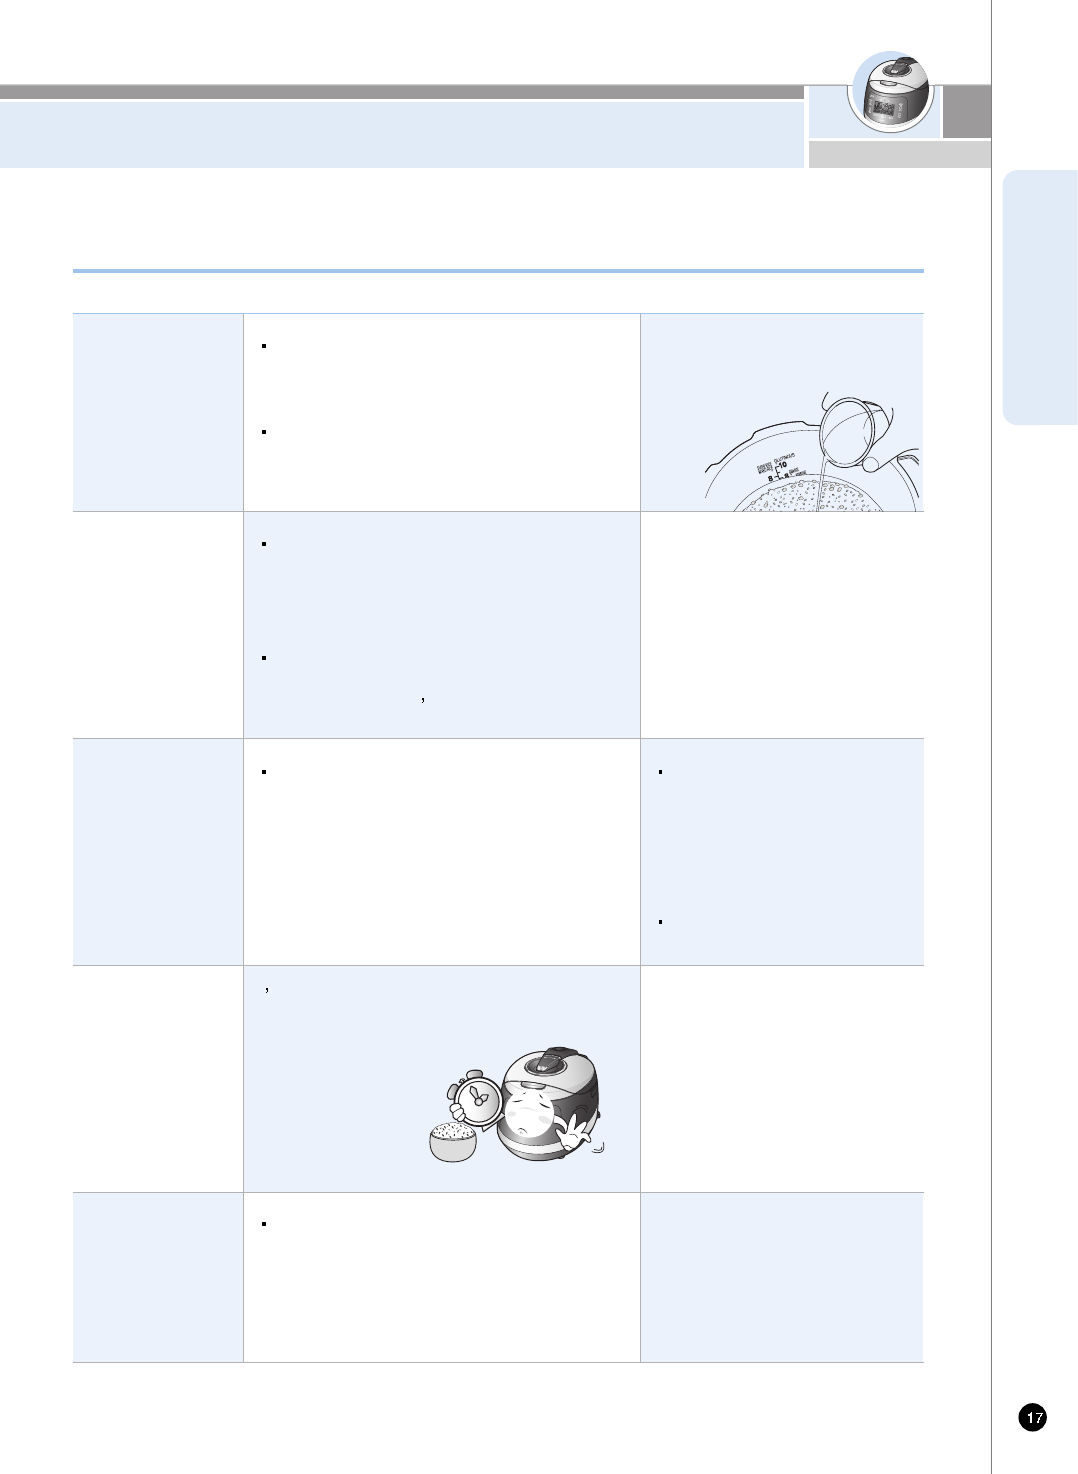
After you finish cooking, do
not try to open the cooker
by force until the steam is
completely exhausted.
The hot steam or any hot content within
the cooker can cause burns.
Cautiously open the top cover after cooking is
done to avoid dangerous steam and burns.
Please call customer
service if the inner pot
coating peels off.
Oven coating may wear away
after long use.
When cleaning the inner pot, do not use tough scrubber,
metallic scrubber, brush, abrasive metallic etc.
When the exterior of inner pot is diamond
shield plated.
Use dry kitchen cleaner or sponge to clean the inner
pot since rough scrub or metallic ones might cause
scratch on the exterior of the plating.
The friction of the inner pot with sink or other
appliances can cause its plating’s coming off.
(No problem to use it)
In case My Cauldron is hot or hot cooked
rice is left after cooking is completed, close
lid and turn lid combining hand grip to (Lock) direction
even after unplugging power plug. Otherwise product
deformation or damage may occur by internal pressure.
Be sure to turn lid combining hand grip to (Lock) direction
during cooking and heat preservation before use.
Caution Remember
Caution Do not
Tough crubber
Abrasive
Material Brush
Metallic crubber
NAME OF EACH PART
www.cuckoo.co.kr
ENGLISH
Name of each part
Name of each part
Pressure Weight
Always keep it horizontal.It stabilizes
steam inside of the oven. Pressure weight
is twisted, it release steam.
Soft Steam Cap
Automatic Steam Exhaust Outlet
(Solenoid valve)
When finished cooking or during warming,
steam is automatically released.
Lock/Unlock Handle
(Set the handle to lock when
cooking or warming the rice)
The handle has to turn to ‘Lock’ for operation.
Clamp Knob
Turn handle to ‘Unlock’, and then press
Clamp knob to open.
Control Panel
Accessories
Manual&Cooking Guide
Rice Scoop
Rice Measuring Cup
Steam Plate
Cleaning Pin
(Attached on the
bottom of the unit)
(Refer to page12)
(Refer to cook guide)
Dew Dish
Empty the water out of a
dew dish after cooking or
keepwarming. Leaving the
water in the dew dish results
in bad smell.
Cover Packing
Inner Pot(Oven)
Place the inner pot Into
the body property.
Power Plug
Power Cord
Temperature Sensor
Rice Scoop holder
Pot Handle
Top Cover Assy
HOW TO CLEAN
-To prevent foul odor clean the top cover assy after the rice cooker has cooled and the rice cooker is unplugged
-Body and cover should be cleaned with a dry dish towel. Do not use betel while using rice cooker, starch can remain.
No effect on health.
-Do not put materials like screws into holes of detachable cover. Check the back cover and front cover.
Wipe the water on the outside and bottom of the
Inner Pot. A rough sponge, a brush or an abrasive
can cause scratches on the coating. Use a
dishwashing liquid and a soft cloth or a sponge.
Keeping the contact area of the Inner Pot with
the pressure packing always clean, increases
the product’s durability.
Inner Pot
While cleaning, make sure the pressure packing
is well in place. Clean it by wiping it gently. If the
pressure packing partially hangs off, press the
part that is hanging back into its original position
with your fingers.
Pressure Packing
Wipe any water on the Inner pot lid with a well
wrung dish cloth. Clean the Inner Pot with care
as it has a metallic edge.
Inner Pot Lid
This part is designed to gather the moisture
coming through the stem vent during cooking.
When the cooking is done, wipe it clean with a
well wrung dish cloth.
Moisture Dishof the Main Body
Keep clean the Steam Vent before and after use.
Steam Vent
Remove gently any substance that might
contaminate the temperature sensor.
Inside of the Main Body
Rubber
packing
contact
surface
1. Handle must be located at “Lock” during Cooking.
The lamp turning on means the top cover is closed perfectly, so you can cook.
2. After cooking, the handle must be turned from
“Lock” to “Unlock”, and then push clamp knob to open.
It is hard to open when there is remaining steam in the Inner pot. At the time,
twist pressure weight and let the steam out. Do not open by force.
3. Handle must be located at “Unlock” when open and close.
If the lamp does not turn on, it would not
operate “Cook” and “Preset” buttons. Make
sure the handle is located at “Lock”.
How to use handle
Proper maintenance of the pressure packing helps keep high airtightness, adds durability to the packing and ensures the taste of the food.
Read the directions below carefully to handle the packing properly.
How to remove and clean the pressure packing
How to handle the Double Motion Packing (Pressure Packing)
The all-stainless cover is not only delamination-free and easy to clean, but it also lasts long,
In addition, CUCKOO’s special stainless CSV-a CUCKOO’s patented technology, improves
the product’s durability and makes it easier to clean.
Unplug the power cord and wait until the
pot cools down before opening the Top
Cover.
After hand washing it with a neutral
cleaning liquid and a sponge, wipe it
clean with a well wrung dish cloth.
To remove the pressure packing, hold it
as shown in the picture and pull it.
1
HOW TO CLEAN
www.cuckoo.co.kr
ENGLISH
Visual inspection
check the entire circumference carefully for any crack or damage between
the Inner Pot lid and the pressure packing.
Since a badly assembled packing can cause the rice to be
half-cooked or burned by steam leakage, double check the
packing thoroughly as described below.
Normal
assembly
Abnormal
assembly
Normal
assembly
(look for parts sticking out of the inner) (look for parts sticking out of outer rim) (look for parts sticking out of damaged parts)
Water boiling test
Pour water in the Inner Pot up to water level 2 (for “Rice”) and press the Menu/Selection button to select the self-cleaning mode.
Then push the Pressure Cook/Turbo button.
Within 10 minutes, the pressure regulator weight will start rattling and hissing while emitting steam. If there is no steam coming out from the
pot other than through the pressure regulator weight the packing is well reassembled.
If steam comes out from other parts, stop the test and pull out the power cord. Wait until the pot cools down before removing the pressure
packing from the lid and reassembling them again. Then start the water boiling test again.
For a more precise water boiling test, you can wrap plastic around the circumference of the closed Top Cover. By doing so, you can easily
check where the steam leakage is.
If you still have a problem with reassembling the packing, please contact our Customer Service.
How to double check whether the packing is well assembled.
Check if the pressure packing is thoroughly
put into the groove by rubbing the inside rim
of the packing with a finger around the entire
circumference as shown in the picture.
Check if the pressure packing is properly put
into the groove of the Inner Pot lid by pushing
the outer rim with a finger around the entire
circumference as shown in the picture.
Check if the pressure packing is thoroughly
put into the groove by pushing the inside of
the rim packing with a finger around the entire
circumference as shown in the picture.
How to double check whether the packing is well assembled
3
Figure.1
Standard points
on the pressure packing.
Standard notches
on the Inner Pot lid.
First match the standard notches on the Inner Pot lid with the standard points on the pressure packing following the numerical order (1, 2, 3, 4, 5, 6).
Then, press the outer rim of the packing to insert it into the groove. To reassemble the pressure packing follow the order described below:
After matching the standard points 1 to 6, press the rest of the packing into the
groove by pushing on its outer rim.
As the Figure 1 shows, put the point #1 on the pressure packing with the standard
notch #1 on the Inner Pot lid together before pressing the outer rim of the packing
to insert it into the groove. Repeat with points #2 to # 6.
How to reassemble the pressure packing
2
Abnormal
assembly
HOW TO CLEAN
2. To close the top cover, place the handle
in the “Unlock” position as shown in the
picture on the right.
1. Check to see if the inner pot is correctly
placed inside the main body.
3. If there are hot foods in the inner
pot, the top cover might not lock
properly. In this case twist the
pressure weight and allow the steam
to release then try to lock the handle.
Do not try to close the top cover by force. It can cause problems.
Cautions when top cover does not close perfectly
Separate cover as the
arrow points.
Use brush kit. you can
easily clean a drain use
the ditch cap and
tough part to clean.
When using cleaning
pin, pull out cleaning pin
and make it meet at
right angles.
Only use for the valve
hole of the pressure
weight.
Separate cleaning pin Attached on
the bottom of the unit from main
body as shown in picture
How to use cleaning pin and brush kit
Separate dew dish. Separate the drain ditch
cap by pushing it down.
Clean the drain ditch cap
and dew dish with a
neutral detergent.
neutral
detergent
Clean the drain ditch cap
with brush kit.
Securely put in the dew dish
after cleaning.
How to clean dew dish
How to clean the soft steam cap
Do not touch the surface of the soft steam cap right after cooking. You can get burned.
Detach the soft steam
cap like the picture.
Press the hook in the back, and follow the arrow to detach
and clean. Make sure you clean frequently with a sponge or a
neutral detergent.
When fitting the rubber packing into the plate, please make
sure the packing is facing the correct direction.
Assemble the vent so that
it fits into the groove
perfectly.
After you attach the soft
steam cap to fit into the
groove, press ‘A’part firmly
to assemble the soft steam
cap into the product.
Packing
Packing guide
The valve hole of the pressure weight that allows steam to escape should be checked regularly to ensure that
it is not blocked.
If you use the valve hole of pressure weight as it is blocked, the hot steam or any hot content within the
cooker can cause injury.
Do not use a Cleaning Pin for other use except cleaning the valve hole of the pressure weight.
Soft steam cap
Cleaning Pin
If the valve hole of the pressure weight part is clogged, punch it with the cleaning pin
How to
disassemble the
pressure weight
After the Lock/Unlock handle is locked(located on “Lock”) turn the pressure weight counter-
clockwise while pulling it up, and pull it out.
Punch the clogged valve hole with the cleaning pin and reassemble it by turning it clockwise.
When the pressure weight is properly assembled, it can freely be turned.
Attached on the
botton of the unit.
Alien
Substance
Pressure Weight
FUNCTION OPERATING PART /
ERROR CODE AND POSSIBLE CAUSE
www.cuckoo.co.kr
ENGLISH
This function is used to select from among glutinous rice, turbo glutinous rice,
mixed rice, turbo mixed rice, sushi rice, GABA rice, baby food, nutritious porridge, chicken soup,
nu rung ji, multi cook, black bean, nutritious rice and to modify preset time. See page 18, 19, 26.
For setting selected action with mode button and setting gaba time multi-cook time. See page 24, 25.
Keep Warm /
Reheat button
Used to warm or reheat.
(Refer to page 28~30)
Preset/AUTO
CLEAN Button
Used to preset preferred
cooking time
(Refer to page 26~27)
When you use automatic
steam cleaning function
(Refer to page 19)
Mode button
This function is used to customize
individual (Refer to page 20~22)
cooking preference,
time-setting(Refer to page 14),
voice volume setting
(Refer to page 14),
keep warm temperature setting
(Refer to page 29), and power
saving mode(Refer to page 31).
Menu / Selection
button
Pressure
Cook/Turbo Button
This function is used to start
cooking. (Refer to page 18)
Cancel button
This function is used to
cancel a selection or release
remaining steam in the inner
pot. (Refer to page 34)
When using Power saving
function. (Refer to page 31)
Display
Set button
This function is used to
select a function or to
button-lock function.
(Refer to page 31)
If the product has any problems or is used inappropriately, you can follow the marks below. If error persistently shows up,
in normal using conditions or after taking recommended measures, inquire with customer service.
Error Code and Possible Cause
Function Operating Part
When the inner pot is not placed into the unit.
When pressing the Pressure Cook and Timer botton, while the Lock/Unlock handle is on “Unlock”
Turn the Lock/Unlock handle “Lock”
When boiling only water.
Problem on fan motor.
marks blink.
When setting preset time longer than 13 hours Set the preset time within 13 hours. (Refer to page 26~27)
It is appears on the display when you press Start button again, or if the cooking has finished and you’ve never
ever turned the handle to ‘Unlock’. It can be solved by turning handle to ‘Unlock’ and then turn to ‘Lock’.
Problem on micom power.
Problem on environment sensor.
Problem on micom memory.
This code indicates the function of checking for abnormulity of power or product.
Please contact customer center.
Problem on temperature sensor. (“ ”mark, “ ”mark, “ ”mark blink. )
If no operation is done while power cord is plugged, the system while be on standby mode as shown in the figure.
(The menu on standby screen, time, voice and customized rice taste stage may differ depending on user configuration.)
If cancel button is pressed during cook, the rice cooker will go on standby mode.
Press the button until the buzzer sounds. Picture may vary depending on model.
<Standby condition screen>
HOW TO SET CURRENT TIME / HOW TO SET
OR CANCEL VOICE GUIDE FUNCTION
To enter this function, press Mode button 2 times. Mode button needs to be pressed for over 1 second at the first time.
Voice guide volume control (The function which can control volume and cancel)
Press mode button once.
Press mode button for more than 1sec
“Current time mode press yes button” after setting current time with
selection button
Menu/Selection button blinks and Mode, Set and Cancel buttons turn ON.
Colon mark (:) on the sec. screen is blinking once per second.
1
About Lithium battery
This product contains lithium battery for improving blackout
compensation and time. Lithium battery lasts for 3 years.
When current time is not displayed on the screen, it means the
battery is exhausted. It should be replaced.
What is blackout compensation
This product remembers and maintains previous condition and
processes. After finishing blackout, it operates immediately.
If blackout happens during cooking, the cooking time will
be delayed depending on blackout time.
If the rice became cold because of blackout, warming will
be cancelled.
How to set current time during keep
warming mode
1. Press Cancel button to cancel keep warm and
then press Mode button over 1 time to set
current time.
2. After setting time, press keep warm button to
re-start keep warm.
ex)8:25am now
How to set current time
When finishing to set time you want, press “Set”button.
Set button blinks and Mode, Menu/Selection and Cancel buttons
turn ON.
If it is over 7sec without yes button, setting time will be canceled
with voice, “it is canceled due to overtime”.
3
Set o'clock and minute as pressing
menu/selection button.
2
Set button blinks and Mode, Menu/Selection and Cancel buttons
turn ON.
Keep the button pressed, and the button will turn to Continuous.
Set to desired voice volume, and press Set button.
‘ ’ sign is displayed when entered volume control mode by
pressing Mode button 2 times.
If set value became ‘ ’ by pressing button, voice guide function
is off.
Press button to set ‘ ’, that is the maximum volume sound.
When finish setting desired volume, press Mode button to store.
1 min up “ ” button
1 min down “ ” button
10 min up or down “ ”, “ ” keep pressing.
Careful of setting am,pm.
In case of 12:00 it is 12:00 pm.
<Standby mode>
NIGHT VOICE VOLUME REDUCTION /
WOMAN AND MAN VOICE SETTING FUNCTION
www.cuckoo.co.kr
ENGLISH
Night Voice Volume Reduction
1. Press mode button 10 times in standby status, and you will enter Night Voice Volume Reduction mode. When pressing
mode button initially, press the button for 1 second or longer to enter Night Voice Volume Reduction mode.
2. When you enter Night Voice Volume Reduction mode, a voice comes up saying “You have entered Night Voice Volume
Reduction. Select or inactivate Night Voice Volume Reduction mode with ‘Menu/Selection’ button and press ‘Set’ button.”
3. Press ‘Menu/Selection’ button, and as process progress bar changes, voice volume will change. Select desired voice
volume, and press ‘Set’ button.
4. Once process progress bar reach full condition through adjustment of ‘Menu/Selection’ button, a voice will come saying
“The function of Night Voice Volume Reduction is inactivate.” Inactivate the function by pressing ‘Set’ button.
5. If ‘Set’ button is pressed or no button is pressed for 7 seconds after you enter Night Voice Volume Reduction mode, the
function will be inactivated along with voice “As set time is elapsed, the function is inactivated”, and the system will be
back to standby mode.
1. Press mode button 11 times in standby status, and you will enter Voice mode. When pressing mode button initially,
press the button for 1 second or longer to enter Voice mode.
2. When you enter Voice mode, a voice comes up saying “You have entered Voice function. Select or inactivate Woman,
English and Chinese Voice mode with ‘Menu/Selection’ button and press ‘Set’ button.”
3. After setting Auto voice with ‘Menu/Selection’ button, woman voice or English or Chinese, and press ‘Set’ button.
4. If ‘Set’ button is pressed or no button is pressed for 7 seconds after you enter Volume, the function will be inactivated
along with voice “As set time is elapsed, the function is inactivated”, and the system will be back to standby mode.
Example) 60% of day time voice volume
Example) When set to woman voice Example) When set to English voice
Night voice volumes by the setting of process progress
Set the function of night voice volume reduction, the function to reduce the volume of voice during
night time(10:00PM-05:59AM) on need-to-do basis. This function works only during night time.
How to set night voice volume reduction
Voice Setting Function
This function helps you select Auto voice for either a woman or English or Chinese’s voice.
With this function, you can set to your desired voice.
How to set voice function
Zero volume
20% of day time voice volume
40% of day time voice volume
60% of day time voice volume
80% of day time voice volume
Example) When set to Chinese voice
BEFORE COOKING RICE
Clean the inner pot and wipe the water on the inner pot with dry cloth.
Use the soft cloth to wash the inner pot.
Tough scrubber can make the coating come off.
1
Measure the amount of rice you want to cook using the measuring cup.
Make the rice flat to the top of measuring cup and it is serving for
1 person.
(ex: for 3 servings 3 cups, for 6 servings 6 cups)
2
Wash the rice with another container until the water becomes clear.
3
Put rinsed rice into the inner pot.
4
Put the inner pot into the main body and close the topcover.
Put the inner pot correctly.
If there is any external substance on the temperature sensor or the bottom
of the inner pot, wipe it off before putting the pot into the main unit.
Top cover will not close if the inner pot is not placed correctly in the main
body (Place the inner pot to the corresponding parts of the main body)
6
According to menu, adjust the water amount.
For measuring, place the inner pot on a leveled surface and adjust
the amount of water.
The marked line of the inner pot indicates water level when putting
the rice and water into inner pot together.
About water scale
Glutinous rice, Turbo Glutinous rice, Nu rung ji and Nutritious rice : Adjust water
level to the water scale for ‘GLUTINOUS’. Glutinous rice can be cooked to max
10 servings, Turbo Glutinous Rice to max 6 servings, Nu rung ji to max 4 servings,
Nutritious Rice to max 6 servings.
Mixed Rice, Turbo Mixed Rice, Sushi Rice, Black Bean : Adjust water level to the
water scale for ‘Sushi Rice, Mixed Rice’. Mixed Rice and be cooked to max 8
servings, Turbo Mixed Rice to max 6 servings, Sushi Rice to max 8 servings,
Black Bean to max 6 servings.
GABA Rice : Adjust water level to the water scale for ‘GABA Rice’.
GABA Rice can be cooked to max 6 servings
Nutritious porridge: Adjust water level to the water scale for ‘nutritious porridge’.
Nutritious porridge can be cooked to max 2 servings
5
Glutinous Rice for 8 persons
(8 cups) : Set the water to scale
8 of “GLUTINOUS”
For overcooked rice : pour less
water than the measured scale
When you want to cook the old
rice or want the soft rice :
pour more water than the
measured scale
Rice for 8 persons (8 cups)
Connect power plug and turn the handle to “Lock”
The lamp turning on means closed perfectly.
If you press the cook button without setting the Lock/Unlock
handle to “Lock”, the cooker will not operate. You will hear
“beep beep beep” sound and “ ” is shown in the LCD.
If you want to select another function while cooking, push cancel button.
7
If ‘ ’ mark shows up in other instance, turn cover handle to “Open”
direction, and turn it toward “Lock”. Then the cooker will work normally.
(The operation of cover lock sensing device can be checked.)
Note: This instruction is not applicable if cover handle is turned toward “Open”
direction once or more after cooking was completed in previous cooking.
FOR THE BEST TASTE OF RICE
www.cuckoo.co.kr
ENGLISH
Use the measuring
cup!
Pour the water until
water level marking
in the inner pot!
How to keep the
rice
It’s better to set
the preset time
shortly.
It’s better to set
the Keep
warming time
shortly.
Keep the product
clean.
When measuring the rice, Use the measuring cup.
(The amount of the rice may vary depending on the
quality of the rice.)
Place the inner pot on a flat surface and adjust the
water to water level in the inner pot.
If possible, buy a small amount of rice and keep
the rice some place where ventilates well and
avoid a direct ray of light. It can prevent
evaporation of rice moisture.
If the rice has been unsealed for long, rice can be
dry and stale. In this case, you should pour the
half of water more. It s tastier.
If possible, do not use the preset time function if
rice is too dry and pour more water more.
It s better to set the keep warming in 12 hours.
Clean the product often.
(Especially clean the top of the cover for external
substance.)
When the propotion between the
amount of rice is not proper, rice can
be crisp or hard.
When rice is too dry, it can be crips
even though measuring the amount
of rice is accurate.
If you set “Preset” over the 10 hours
or “Preset” dried rice, rice can be crisp
or half cooked. Even worse condition,
rice can be cooked different tastes
each level.
If the preset time is longer, the
melanoizing effect could be increased.
If rice is kept warm for a long period
of time, rice color will change, and
can cause odor.
Wipe the top cover heating part well
for any rice or external substance.
For the best taste of rice, check the following points carefully.
Cook tasty rice with Cuckoo pressure rice cooker
HOW TO COOK
Choose menu with menu/selection button
Start cooking by pressing Pressure
Cook/Turbo button.
Select button.
Each time “Menu” button is pressed, the selection
switches in the sequential order, Glutinous Rice Turbo
Glutinous Rice Mixed Rice Turbo Mixed Rice
Sushi Rice GABA Rice Baby food Nutritious
porridge Chicken soup Nu rung ji Multi cook
Black bean Nutritious rice Auto clean.
If the button is pressed, repeatedly, the menu switches
continuously in sequential order.
In the cases of glutinous rice, mixed rice, sushi, GABA
rice, and black bean the menu remains memorized once
each cooking is completed, so for continuous use of the
same menu, no selection of menu is required.
You must turn lid handle to lock before cooking.
Then press the pressure Cook/Turbo button.
Unless lid handle is not turned to close, you get
alarm with “ ” , and sound “turn lid handle
to lock”.
12
The end of cooking
When cooking is completed. warming will start with
the voice "cuckoo completed glutinous".
When cooking ends, stir rice equally and
immediately. If you don't stir rice at once and keep
it stagnant, rice will go bad and smell bad.
If the lid handle is not working well, take out the steam
completely out of inner pot by turning over pressure weight.
While cooking, do not press cancel button.
4
ex)In case of selecting Sushi
You can hear a voice, Sushi. when you cook Sushi,
automatic steam outlet operates while cooking.
ex)In case of cooking Glutinous.
Cooking thoroughly
The cooktime remaining on the display is shown
from cooking thoroughly. The cook time is
different according to the menu.
Be careful not to burn yourself from the
automatic steam outlet.
3
ex)In case of 14minutes ieft.
After cooking chicken soup and multi cook etc, the smell may permeate into the unit, use the Unit after cleaning the rubber packing and lid
part according to page 10~11.
Cooking time by menus may vary to some degree depending on the using environment of the product.
Glutinous
Turbo
Glutinous rice
Sushi
Rice
Turbo
Mixed Rice
GABA
Rice
Mixed
Rice
Porridge
Nutritious
Rice
Chicken
Soup
Nu Rung Ji
Black
Bean
Multi Cook Baby Food
Automatic Sterilization
(Steam Cleaning)
Cooking
Capacity
Cooking
Time
Menu
HOW TO COOK
www.cuckoo.co.kr
ENGLISH
Put water until water scale 2, make sure to close and lock the cover.
Method 1. After choosing automatic cleaning menu by pressing “Menu/Selection”
button, and then press “Pressure cook/turbo” button.
Method 2. After choosing automatic cleaning function by pressing “Preset/Auto
clean” button twice in standby mode, press “Pressure Cook/turbo”
button.
How to do Automatic Sterilization (Steam Cleaning)
1. Put salt into the black soy, wash clean and take out water.
2. Put cleanly washed rice into My Cauldron, and after seasoning with sake and salt, pour water up to white rice water
graduation 2, add 1/2 measuring cup of it.
3. Place black soy on top of it, and after locking lid and selecting black soy with Menu/Selection button, press
Pressure Cooking Turbo.
Cook black soy only up to 6 servings.
Cook Black Bean as follows
After cooking in white rice turbo mode or cooking of small serving, discard water.
In case of small servings white rice turbo cooking, more water may be required than other menu.
Please refer to the cooking guide. (Refer to page 65~73)
The cooked rice can be light yellow at the bottom of the oven, because this product is designed to improve pleasant
flavor and taste. Especially, melanoizing is more serious at the
Preset cooking than just Cooking .
It does not mean malfunction.
When mixing other rice with Glutinous, Melanoizing effect could increase more than Glutinous Rice setting.
Melanoizing effect
Glutinous
When you want to have sticky and
nutritious white rice.
Sushi Rice
When you want to have a little more sticky and
nutritious white rice than Glutinous rice.
How to use the cooking menu
Mixed
/Brown
This menu is used to cook a variation
of mixed rice or brown rice.
GABA Rice
Used to cook germinated brown rice.
Black
Bean
Use when cooking black soy rice.
Baby Food
This menu is used to cook various baby foods
by setting a time mannually.
Nu Rung Ji
(Scorched rice)
Used to cook Nu Rung Ji(scorched rice).
Nutritious
Rice
Used to cook nutritious rice.
Porridge
For cooking porridge.
Multi
Cook
This menu is used to cook various dishes
by setting a time mannually.
Automatic
Sterilization
(Steam
Cleaning)
This menu is used to eliminate smell
soaked after cooking or warming.
Chicken
Soup
This menu cooks samgyetang automatically.
Turbo
function
for
Glutinous
rice
Pressing twic “Pressure Cook/Turbo” twice will switch to quick cooking and shorten the cooking time.
(It takes about 14 minutes when you cook the Glutinous rice for 2 persons.)
Use this turbo cooking function only for cooking rice for less than 4 persons.
(The condition of the rice will not be good for more than 4 persons)
The turbo cooking function is allowed up to 6 persons.
If you soak the rice in water for about 20 minutes before cooking the rice and then cook the rice in turbo
cooking course, the rice will taste good.
Mixed rice
Turbo
If selected turbo mixed rice , total cooking time will be reduced.
(It takes about 26minutes for cooking mixed rice for two people.)
Turbo mixed rice cooking lessens the quality of food, so only use for less than six people.
For better taste, we recommend soaking mixed rice or boiling hard beans before cooking.
MY MODE (Cuckoo Customized Taste Function)
Cuckoo’s patented technology based on variable circuit design. User can select the degree of “softness” and
“glutinosity & tastiness” to meet a user’s desire.
What is “MY MODE”?
Longer “SOFT” Time : rice becomes soft and glutinous. (selectable in 4 steps)
Longer “SWEET” Time : rice becomes tasty (selectable in 4 steps) [amelanizing will occur]
Above 2 functions can be selected both or individually.
MY MODE Function
To enter Customized Rice Taste Setting Mode,
select desire menu and press Mode button once
for 1 second or longer.
Menu/Selection button will blink, and Set,
Pressure Cook and Cancel buttons will turn ON.
“MENU”setting screen
To enter “Customized Rice Taste Setting Mode”, select the menu in which Customized Rice Taste is supported such as glutinous rice, mixed rice, GABA,
Black Bean, nu rung ji, and press the mode button for 1 second or longer. Then, you are going to enter “Customized Rice Taste Setting Mode” while hearing
the voice saying “You've entered Customized Rice Taste Setting Mode. Select swelling and heating stage with Selection button, and press Set button.”
How to use “MY MODE”
“MY MODE” setting screen
Select desired heating extension time by pressing the button, and press Set button.
Set button will blink, and Pressure Cook, Cancel and Menu/Selection button will turn ON.
Note: For 16 customized rice tastes, refer to the graph for 6 rice tastes. (See page 21.)
Set up desired customized rice taste,
and press Pressure Cook.
If you press cancel or do not press a
button within 7seconds, the function
will deactivate and return to the standby
mode.
Select desired swelling time by pressing
the button.
Set button will blink, and Pressure Cook,
Cancel and Menu/Selection buttons will
turn ON.
Select menu you want with menu/selection
button and press the set button.
Soak time control mode
Heat time control mode
Setting completed screen after
Press Mode button once or more for
1 second or longer after selecting desire
menu, and you will enter Customized
Cooked Rice Taste mode.
“MENU”setting screen
You can set the major cooked rice taste of customized cooked rice taste by entering Customized Cooked Rice Taste mode and
pressing Mode button. At each press of Mode button, the major cooked rice taste will show up in the sequential order ‘Sticky
Cooked Rice Taste –> Soft Cooked Rice Taste -> Soothing Cooked Rice Taste -> Soft and Soothing Cooked Rice Taste’.
How to Use Cuckoo Customized Cooked Rice Taste
“MY MODE” setting screen
Press Mode button two times, and the
display will change as in the figure.
At this time, Soothing Cooked Rice Taste
4th Step will be selected.
Set up desired customized rice taste,
and press Pressure Cook.
If you press cancel or do not press
a button within 7 seconds, the
function will deactivate and return
to the standby mode.
Press Mode button once, and the display
will change as in the figure.
At this time, Soft Cooked Rice Taste 4th
Step will be selected.
Select a menu for which customized
cooked rice taste is supported by pressing
Menu/Select button.
Soak time control mode
Heat time control mode
Setting completed screen after
Press Mode button three times, and the
display will change as in the figure.
At this time, Soft, Soothing Cooked Rice
Taste will be selected.
Soak and Heat time control mode
MY MODE (Cuckoo Customized Taste Function)
www.cuckoo.co.kr
ENGLISH
The display of my mode
This is a graph the flavors of 16 types of cuckoo custom-made rice
If you press the mode button 5times, customized cooking function is setup. Select heating power by
selection button. You can see all means with cuckoo customized cooking function on the display.
*1. The rice becomes solid and glutinous.
*2. The rice becomes soft and well-raised rice.
*3. The rice becomes soft and glutinous.
Note: Rice taste number from 1 to 16 will be
displayed on the display window.
How to use Cuckoo Customized cooking function
1 . ‘Cuckoo customized cooking function’ applies to Glutinous Rice, Turbo Glutinous Rice, Sushi Rice, Mixed Rice, GABA Rice,
Nutritious Rice, Black Bean collectively.
2 . Set up the step of customized cooking function to taste. The scorch can occur when cooking in high step.
3 . Cook is subject to be set differently depending on the percentage of water content and the condition of rice.
Initialization is set up “ ” get step by step as the case may be.
- High step : for cooking cereals, soft-boiled rice.
- Low step : for cooking the year’s crop of rice.
While cooking you can control the heating temperature (both high an low) depending on, your prefenence.
Cuckoo customized cooking function
The display Cuckoo
customized cooking
function
Make the screen changed by
pressing menu button.
push the menu/selection button, then the
screen will be changed as above picture.
High level mode
If you press the “set” button,
established menu will be set
up automatically.(If you press
cancel or do not press a
button within 7 seconds, the
function will deactivate and
return to the standby mode.)
If you push the mode button
5times, the display for
customized cooking function
will be set up. Initiation is
like above picture.
Setting completed
screen after
Low level mode
Set button will blink, and Mode, Menu/Selection
and Cancel buttons will turn ON.
Keep pressing the button, and the menu will
switch continuously.
Set button will blink, and Mode, Menu/Selection and Cancel
buttons will turn ON.
Keep pressing the button, and the menu will switch continuously.
Menu/Selection button will blink, and Mode,
Set and Cancel buttons will turn ON.
1. ‘MY MODE’ function may influence scorching or cooking quality.
Ensure that cooking time is not changed, by children.
Default settings are “SOFT” 1 step, “SWEET” 1 step.
2. ‘MY MODE” function may elongate cooking time according to set-up time.
3. Scorching of rice may occur by longet “SWEET” Time.
Cautions
The stage mark will show up as in the figure above on the display as much as the time set during setting swelling time and heating
maintenance time, and the mark will continue to show up during cooking, reservation, keeping warm and reheating as well.
Cuckoo customized taste function is applied to glutinous, mixed, GABA, Black bean, Nu Rung Ji.
Set-up time is stored untill the next reset. No need to set-up at every cooking.
During cooking, warming and preset time cooking modes, “soak” and “heat” time cannot be readjusted.
MY MODE (Cuckoo Customized Taste Function)
When cooking nu rung ji, please set it up for your taste with function which controls the level of burning nu rung ji.
How to set up the enhanced burning nu rung ji (for enhanced burning nu rung ji).
1. If you push mode button 7 times at the waiting state, enhanced burning nu rung ji mode will be set up
when pushing mode button more than it will be possible to set up.
2. When enhanced burning nu rung ji mode is set up, it says “after removed or selection of enhanced
burning nu rung ji, push the yes button”. At this time, Menu/Selection button will blink, and Mode, Set
and Cancel buttons will turn ON.
3. If you push the Menu/Selection button it says “enhanced burning nu rung ji chosen press the Set
button after choosing a mode you want. press the Set button”.
4. Without any button within 7 seconds or cancel button, enhanced burning nu rung ji mode will be
canceled and on standby.
How to set up the function of burning nu rung ji
How to cancel the enhanced burning nu rung ji
1. If you push mode button 7 times at the waiting state, enhanced burning nu rung ji mode will be set up
when pushing mode button more than it will be possible to set up.
2. When enhanced burning nu rung ji mode is set up, it says “after removed or selection of enhanced
burning nu rung ji, push the set button”. At this time, Menu/Selection button will blink, and Mode, Set
and Cancel buttons will turn ON.
3. If you push the menu/selection button it says “enhanced burning nu rung ji chosen press the Set
button after choosing a mode you want. press the set button”.
4. Without any button within 7 seconds or cancel button, enhanced burning nu rung ji mode will be
canceled and on standby.
Set up this function as the situation demands because this function is on the condition of cancel
for enriched scorch at the first use.
HOW TO USE GABA Rice (Brown rice)
www.cuckoo.co.kr
ENGLISH
Check the dates of harvest and pounding.
The dates should be within 1year from harvest, 3 months from pounding.
Inspect rice with your eyes.
Check that embryo is alive
Rice surface should be light yellow and glazing. Whitely stirred up surface, or darkish colored Brown rice is not suitable
for germination
Avoid fractured, not fully corned, or empty ear’s. Empty ear’s may generate odors during germination and bluish- nor
corned Brown rice cannot be germinated.
(Regular brown rice)
Brown rice has richer nutrients than polished rice. However, brown rice is rather tough and harder to be digested.
By germination, the enzymes in the brown rice are activated, generating nutrients and become more digestible.
What is Germinated Brown rice?
Germinated Brown rice increases nutrients and enhances taste which is a weak point of brown rice.
Germinated Brown rice also improves digestion.
Taste will be greatly enhanced.
Digestive and rich in nutrients.
Diabetic hormone is generated improving digestion.
Good as a health food for children or students.
- Rich with dietary fiber.
Germinated brown rice has rich GABA Rice (Gamma Amino Butryc Acid)
- GABA promotes metabolism in liver and kidneys, suppresses neutral fat, lowers blood pressure, promotes metabolism
in brain cells - these effects have been proven by medical science.
Features of Germinated Brown rice
Tips to Buy Quality Brown Rice
(Poor brown rice
- Empty ear and nit fully corned brown rice)
< Comparison of Germinated brown rice s nutrition
and Glutinous rice
s (6 hours) nutrition. >
Phytic acid 10.3Times
Ferulic acid 1.4Times
Gamma-orizanol 23.9Times
Gammma-aminobutyric 5Times
Inositol 10Times
Food fiber 4.3Times
HOW TO USE GABA Rice (Brown rice)
First setting time 0H(0 Hours)
Using GABA Rice Menu
Precautions for GABA Rice Cooking
If smaller germ is preferred, omit pre-germination process. Select “GABA Rice” menu, set-up appropriate
germination time, and start cooking (nutrient ingredients do not vary significantly by the size of germ).
During hot seasons, longer germination time may generate odor. Reduce germination time.
GABA Rice cooking is allowed up to 6 persons.
City water can be used for germination. However, spring water is recommended. Germination may not be properly
performed in hot or boiled water even after cooling.
Germination rate, germ growth may differ by the Brown rice type, condition or period of storing, etc.
- Germinated brown rice is sprouted brown rice. Germination rate and growth may differ by the Brown rice type.
The brown rice should be within 1 year from harvest, and not long since pounded.
In GABA Rice mode, preset on 3H may not be possible. If you want to preset the GABA, set up ‘ ’.(See the page 26)
The taste of rice could be different as depending on a kind of brown rice. Use customized taste function or control the
amount of water for your taste. (Refer to page 20~22)
In order to promote germination, soak brown rice for 16 hours in water.
Method of Pre-germination
Put washed brown rice in an appropriate container, pour sufficient water to soak the rice.
Pre-germination shall not exceed 16 hours. Make sure to wash rice clean with flowing water before using
GABA Rice menu. Be careful that hard washing may take off embryos which generate the germination.
Unique smell may be generated according to the soaking time of pre-germination.
When pro-germination has been completed, wash the rice and put in inner pot (Oven). Pour appropriated volume
of water, and use
GABA Rice menu.
In summer or hot temperature environment odor may be generated. Reduce germination time and wash clean
when cooking.
1
Set the Lock/Unlock handle
at “Lock”, press
“Menu/Selection” button to
select “GABA Rice”.
When the “GABA Rice” is
selected, “0H” is indicated in
the display.
Set button will blink, and
Mode, Menu/Selection,
Cancel and Pressure
Cook/Turbo buttons will turn
ON.
2
Press “Set” and “Menu/
Selection” buttons to set time.
Menu/Selection button will
blink, and Mode, Cancel and
Pressure Cook/Turbo buttons
will turn ON.
1.Pressing “Menu/Selection”
button changes
germination time by 3hours.
2.Pressing “Menu/Selection”
button changes
germination time by 0hours.
3.“GABA Rice” time can be set
up by 0, 3 hours.
If GABA time is set “0”hours,
pressing “Pressure Cook/Turbo”
button will start cooking
immediately.
To cook without germination
or cooking germinated Brown
rice, set the time at “0”.
3
3 more hours for germination
Press
Pressure
Cook/Turbo
button.
Pressing “Pressure Cook/Turbo
button will begin the “GABA Rice
process, after which. cooking will
begin immediately.
During “GABA Rice
mode,
indicator will show the
remaining time and will be
displayed in minutes with the
“3H
mark going around
clockwise.
4
HOW TO COOK THE MULTI-COOK AND NU RUNG JI
www.cuckoo.co.kr
ENGLISH
Press “Set”, “Menu/Selection” button to set up the time.
It says after setting cooking time with selection button press the cook button.
Menu/Selection button will blink, and Cancel and Pressure Cook/Turbo buttons will turn ON.
2
Use the preset time of Multi-cook as following instruction.
4
How to use the Multi-cook and preset time
Turn the top handle to Lock, press menu to
select the Multi-cook.
Set button will blink, and Menu/Selection, Cancel and Pressure
Cooking buttons will turn ON.
When selecting Multi-cook, the display indicates cooking time to
be 20 minutes.
1
1. Check the
present time.
2. Turn the
Lock/Unlock
handle to
Lock
and press the
“Preset/Auto clean”
button.
6. Press the “Set”
button. Then
press pressure
cook/Turbo
button.
1.
Each time you press
“Menu/Selection” button, the time
increases 5 minutes.
(After 90min, each 10min increase.)
Press Menu/Selection to choose
desired Menu
3. Press the
Menu/Selection to
preset time.
Then press the
Set button.
4. Press menu/
selection button
to select the
Multi-cook.
Then press the
Set button.
5. Set up the
cooking time for
pressing menu/
selection button.
2.
Each time you press
“Menu/Selection” button, the time
decreases 5 minutes.
(After 90min, each 10min decrease.)
Press Menu/Selection to choose
desired Menu
3. Available setting time is
10 ~ 120 minutes.
(Please refer to cooking
guide for time setting of
each menu.)
If you press the yes button
after choosing time you
want it says "press cook or
tineer button"
Press “Pressure Cook/Turbo” button.
Pressure Cook button will blink, and Menu/Selection and Cancel buttons will turn ON.
Press the Pressure Cook/Turbo button and the Multi-cook will start.If the Multi-cook
starts, the display shows the
cooking mark and remaining minutes.
3
4.
How to make Nu rung ji
1. Turn the Lock/Unlock handle to “Lock” and press menu/selection the ‘Nu Rung Ji.’ Refer to page 22
2. Press the “Pressure Cook/Turbo” button to start cooking.
3. When cooking is completed, scoop out the boiled rice. The “Nu Rung Ji” on the jar bottom can be
prepared for your taste (e.g. scorched rice tea)
Nu Rung Ji can be prepared for up to 4 people.
For Nu Rung Ji cooking, set the water volume at Glutinous level.
Not too much washing rice.
If you want enhanced burning nu rung ji, cook after soaking rice in water for 30minutes.
HOW TO PRESET TIMER FOR COOKING
Check if the current time and the menu are correct.
Refer to page 14 for the time setting.
If the current time is not set correctly, the presetting time will
also be incorrect.
Make sure not to confuse AM and PM.
1
Press the “Preset/AUTO CLEAN” button.
If this function is set at “Turbo Melanoizing”, Cuckoo will display “MY”
on the Display Panel while cooking Nu Rung Ji.
Press the Preset/Auto Clean button once to select the Preset 1. Press
the button twice for the Preset 2.
When Cuckoo is released to the market, Preset 1 is set at 6:30 am and
Preset 2 at 7:00 pm. If you want to accept these preset times, select
Preset 1 and/or Preset 2.
If you press the Preset/Auto Clean button while the Lock/Unlock handle
is unlocked, you will not be able to set the preset time.
If you press the Preset/Auto Cleaning button, the previous preset time
will be displayed as shown in the picture and Preset 1 and Preset 2 will
blink. Then you will hear a voice message: “Please set the cooking
finish time with Menu/Selection button and press Pressure Cook/Turbo
button or Set button.
n GABA mode, preset on “ ”is possible.
If you want to preset “Timer” while keeping warm, cancel keep
warm and preset the “Timer”
2
Preset the time.
3
Press “Pressure Cook/Turbo” button.
“Pressure Cook/Turbo” button will blink, and “Menu/Selection” and
“Cancel” buttons will be turned ON.
It says that preset cook for glutinous is booked
Preset cook will be completed at the timer
Once cook is completed with preset time,
preset time is stored in the memory.Don't need to set up time again.
If a small amount of rice is cooked, cook could be finished earlier
than time you set up.
5
Select menu with “Menu/Selection” button
If you select “Preset/Auto clean” menu with Menu/selection
button, it says “Please, press the “Pressure Cook/Turbo”
button.
“Set button” will blink, and “Menu/Selection”,
“Pressure Cook/Turbo” and “Cancel” buttons will turn ON.
4
How to preset timer for cooking
How to use timer function
“Set” button will blink, and “Menu/Selection”,
“Cancel” and “Pressure Cook/Turbo” buttons will turn ON.
In case of setting up timer while warming
10min increase by pressing “ ”button
Please set up timer after canceling warming
10min decrease when you press “ ”button
If you keep pressing, It can be changed continuously.
Please be careful not to change from AM to PM.
When preset time is set to AM07:40
HOW TO PRESET TIMER FOR COOKING /
HOW TO USE SIMPLE SOFT FUNCTION
www.cuckoo.co.kr
ENGLISH
Precautions for preset cooking
In case of preset cooking
If the rice is old and dry, the result may not be good.
If the rice is not well cooked, add more water by about half-scale.
If the preset time is longer, melanization could be increased.
Rinsed rice adds precipitated starch, Preset Cook may cause scorching.
To reduce scorching, cook washed rice by rinsing in running water or reduce cooking amount.
1
The change of preset time
Press “cancel” button for more than 2 seconds and restart it to change the preset time.
2
If the preset time is shorter than cooking time, cooking will immediately begin.
If set time is shorter than preset time, cooking will immediately begin.
3
In case the preset time is over 13 hours.
“”
will be displayed and the preset time will be changed to 13 hours automatically.
ex)
If cooking is preset to AM07:00 of the following day at PM5:00 of the day, where preset time is 14 hours,
” will be displayed, and preset time automatically changes to AM06:00. (Preset time is 13 hours)
If the preset time is over 13 hours, it can cause bad smell. The limited preset time is set up less than 13 hours
because the rice spoils easily during the summer time.
When you want to finish presetting P.M 12:00, preset P.M 12:00.
Use this function when you want to finish cooking between 1 hour to 13 hours based on the preset time.
If you press the set button to check the present time during the preset cooking function, the preset time will be
displayed for 2 second.
4
Glutinous
Rice
Sushi
Rice
Mixed
Rice
GABA
Rice
Nutritious
Rice
Nutritious
Porridge
Multi Cook/
Baby Food
Automatic
Sterilization
(Steam Cleaning)
From
(37minutes
+ My mode)
to 13 hours
Turbo
Glutinous
Rice
From
(24minutes
+ My mode)
to 13 hours
Turbo
Mixed
Rice
From
(50minutes
+ My mode)
to 13 hours
From
58minutes
to 13 hours
From
35minutes
to 13 hours
From
(60minutes
+ My mode)
to 13 hours
From
(51minutes
+ My mode)
to 13 hours
From
(41minutes
+ My mode)
to 13 hours
From
33minutes
to 13 hours
From
96minutes
to 13 hours
From
(1minutes
+ My mode)
to 13 hours
Chicken
Soup
From
90minutes
to 13 hours
From
19minutes
to 13 hours
Black
Bean
Nu Rung ji
Possible
time
Setting
Menu
Class
Simple Soft Function
You can soak grains before starting cooking by setting a desired soaking time with this function.
Setting Method
1. To activate the Simple Soft Function, press “Preset/Auto Clean” button within 5 seconds right after
CUCKOO started the menu for Glutinous Rice, Turbo Glutinous Rice, Mixed Rice, Turbo Mixed Rice, Sushi
Rice, Nutritious Rice, Nu Rung Ji or Black bean.
2. To change the soaking time, press “Preset/Auto Clean” button in Simple Soft Function: the time setting can
change from 10 to 30 minutes, 60 minutes, and No Soaking Time.
3. If you do not press any button for more than 5 seconds while setting the soaking time, it will be
automatically set back to the current soaking time. After the soaking time is over, the cooking will start.
Soaking time is counted by 1 minute unit.
If you unlock the Lock/Unlock Handle during the Simple Soaking Function, the cooking will be canceled.
The longer the soaking time, the greater the melanoizing effect.
TO KEEP COOKED RICE WARM AND TASTY
<Keep warming>
indicates the time elapsed
as warming time.
<Finishing reheat>
When the reheat finishes with the beep
sound, keep warming function will be
operated and show the time elasped.
Having a meal
If you want to have warm rice, press the “Keep warm/Reheat” button. Then “Reheat” function will be started and
you can eat fresh rice in 9 minutes.
<Reheating>
The lamp blinks and indicator will
show the reheat remaining time
displayed in minutes with the mark
going around clockwise.
It will be hard to open the lid during warming or right after it has
finished cooking, So push the pressure weight to the side and
allow the steam to release.
Make sure the handle is in the “Lock” position during warming or
reheating.
It is recommended to evenly stir the cooked rice after cooking.
The rice taste is improved. (For a small quantity of rice, pile up the
rice on the center area of the inner pot to keep warm)
Do not keep the scoop inside the pot while warming the rice.
When using a wooden scoop it can create serious bacteria and
odors.
It would be better to warm the rice for less than 12 hours because
of odors and color change.
The cooked rice, which cooked by pressure cooker is more prone
to changing color than the rice cooked by general cooker.
During warm mode, the rice can arise and turn white and rise. In
this case, mix the rice.
Do not mix small amount of rice or leftovers with the rice under
keeping warm. Doing so may cause an odor. (Use a microwave
oven for the cold rice.)
Cautions for Keeping Warm
The mixed and brown rice cannot be in such good condition as
white rice while in warm function due to their characteristics.
Therefore do not keep mixed and brown rice in function for a long
period of time.
If you change the present time during warming, see the page 14.
The frequent use of the “Reheat” function may cause the cooked rice to be discolored or dried. Use it once or twice per day.
If a separate heating appliance or gas burner is used to cook rice, put the cooked rice into the cooker and press the “Keep
Warm/Reheat” button to keep the rice warm. At this time, “ ” is shown on the display. (Like this, transferring hot rice to a cold
cooker may cause the rice to be discolored or develop an odor)
After 24 hours of heat preservation, the lamp of heat preservation time lapse blinks, indicating that long time has passed in heat
preservation condition.
In case the lid combining hand grip is in open status during heat preservation, the cooker does not go for reheating. For reheating,
lock the lid combining hand grip to (Locked) position, and then press Keep warm/reheat button.
If the lid combining hand grip is turned to open status during reheating, function display will show “ ”. At this time, reheating
will be cancelled, and heat preservation will proceed.
<
Enhanced warming mode
>
For glutinous menu, you can select different keep warm modes to help minimize any
discoloration or dryness. When keeping rice warm for a long time depending on the
circumstance, if there is an odor, select the “Enhanced warming mode” to help minimize it.
For My Mode function (see page 29), if you press the “Keep warm/Reheat” button, the
“Enhanced warming mode” will be activated or deactivated. When “Enhanced warming mode”
is selected (see picture), warming sign will be blinking on the screen, and when it is released
the blinking will be stopped. After selecting the desired warm mode, if you press the “set”
button it will store your desired warm mode selection. (The initial setting is at the regular
warming mode state (Enhanced warming mode off), so activate it as needed)
: Setting : Cancelling
TO KEEP COOKED RICE WARM AND TASTY
www.cuckoo.co.kr
ENGLISH
Press “Mode” button over
1 time during warming. It displays
as picture with buzzer. At the time,
means current warming
temperature.
“M enu/Selection” button will blink, and
“Mode”, “Set” and “Cancel” buttons will be
turned ON.
Press “Menu/Selection” button to
change the temperature as
Press “Menu/Selection” button
to change the temperature as
1. If too much water is spilled out when you open the lid : Press “Menu/Selection” button to raise the setting mode.
2. If the edge of rice is too soft : Press “Menu/Selection” button to reduce the setting mode.
Controlling method of warming temperature
If the temperature in the oven is not proper, it will smell bad and the color of the rice will change
so make sure to adjust the temperature.
Press “Menu/Selection” button
to change as the picture(up)
Select the menu you want, then the press the
“Mode” button and set-up time will be
automatically entered with a buzzer.
(If you press the “Cancel” button or do not press
a button within 7 seconds, the function will be
cancelled and returned to standby mode.)
After setting temperature, press “Mode”
select button. Preset temperature will be
stored with buzzer sound.
(It will be cancelled once press “Cancel”
button or after 7 seconds without
pressing any button.)
Press “Menu/Selection” button
as the picture(down)
How to operate My Mode function.
Use it while opening the lid when there is too much water or rice becomes too soft.
In standby mode, push the
“mode” button 4times.
The voice says that it is
programmed warming
mode, control the
temperature you want.
Note: The reference temperature programmed when the product
is shipped may differ from the Instruction.
If you want to change cooking temperature in the standby mode, press “Mode select” button over
2 seconds, and press it 2 more times. You can change cooking temperature.
Change of temperature
To raise temperature
To lower temperature
“Set” button will blink, and “Mode”, “Menu/Selection” and
“Cancel ” buttons will be turned ON.
To switch the functions continuously, keep pressing the button.
“Set” button will blink, and “Mode”, “Menu/Selection” and
“Cancel ” buttons will be turned ON.
To switch the functions continuously, keep pressing the button.
“Set” button will blink, and “Mode”, “Menu/Selection” and “Cancel ”
buttons will be turned ON.
To switch the functions continuously, keep pressing the button.
“Set” button will blink, and “Mode”, “Menu/Selection” and
“Cancel ” buttons will be turned ON.
To switch the functions continuously, keep pressing the button.
TO KEEP COOKED RICE WARM AND TASTY
1. Hold “mode” button for one second, then press the “mode” button 6times to set up sleeping mode.
If sleeping mode is not shown, keep on pressing the “mode”button until it is heard or displayed.
2. When you are in sleeping mode, it says “After selecting or canceling sleeping mode, press the set button.”
At this time, “Menu/Selection”button will blink, and the “Mode”, “Set”, and “Cancel”button will turn on.
3. Press the “Menu/Selection” button until you hear or see “Sleeping mode”, then Press “set”button.
You will see nothing surrounding the rice cooker on the screen.
4. In the Sleep/Warm mode, if you press “Cancel” button, the Voice message will state: “Time is over.
The function setting has been canceled.” If no button is pressed for more than 7 seconds, you’ll return to
the Standby mode.
1. Hold “mode” button for one second, then press the “mode” button 6times to set up sleeping mode.
If sleeping mode is not shown, keep on pressing the “mode”button until it is heard or displayed.
2. When you are in sleeping mode, it says “After selecting or canceling sleeping mode, press the set button.”
At this time, “Menu/Selection”button will blink, and the “Mode”, “Set”, and “Cancel”button will turn on.
3. Press the “Menu/Selection” button until you hear “Sleeping mode has been canceled”, then Press
“set”button. You will see rings around the rice cooker on the screen.
4. In the Sleep/Warm mode, if you press “Cancel” button, the Voice message will state: “Time is over.
The function setting has been canceled.” If no button is pressed for more than 7 seconds, you’ll return to
the Standby mode.
How to activate “Sleeping” mode.
When keeping rice warm for a long time, set up the temperature low to prevent the following quality of rice:
smelly, dry, change of color; from PM10:00 ~ AM 04:00.
When odors are rising during the warming mode
Clean the lid frequently. It can cause bacteria and odors.
Even though exterior looks clean, there might be germs and it can cause odor so please be sure to use automatic
sterilization (steam cleaning) menu for cleaning. Clean the inner pot completely after automatic cleaning function is
done. (refer to 19)
After you cook soups and steamed dishes, clean the inner pot properly to prevent rice from smelling.
How to set up
How to release
If you need to keep the rice warm during sleeping, do not use this function. This function makes the rice
cooler than normal. In summer, the rice can be spoiled and may smell bad because of high temperature.
If possible, do not use the “Custom-made warming” mode while sleeping.
This function is set up as cancel state.
HOW TO USE POWER SAVING FUNCTION / HOW TO USE
DISPLAY LIGHTING POWER SAVING MODE / LUCK BUTTONS
www.cuckoo.co.kr
ENGLISH
What is power saving in “Standby” mode?
A little electricity is wasted if power cord is not plugged in. It is called manual way as standby electric power.
The power saving of “Standby” mode is technology which minimises elcetricity consumption.
How to start power saving
Push Cancel button for 3seconds at waiting state
Saving power function is set up.
Automatic Method
If the standby time is chosen as a number without "0" at the automatic power saving mode, the automatic saving power function will be operated.
If you move lid handle or push any button before passing waiting time, the waiting time which is reduced will go back to the setting.
Manual Method
How to end power saving
method 1) Push any button then it will be returned
to waiting mode.
method 2) If lid handle is turned to open or close,
power saving mode will be canceled
and back to waiting state.
How to set up
1. If you push “mode” button 8times at the standby state, automatic power saving mode is set up.
2. When automatic power saving mode is set up, it says that this is automatic power saving mode. Press the “Set”
button after selecting waiting time.
3. If you select '0'minute with “Menu/Selection” button. automatic power saving will be canceled. After setting up
waiting time you want, press the “Set”button.
4. Without pressing any button within 7seconds or pushing “Cancel” button. Automatic power saving function will
be canceled and back to waiting mode
Display Lighting/Power-Saving Mode
This mode adjusts the brightness of the display panel during cooking, warming or reservation cooking.
How to set and unset the mode
1. In the Standby mode, press the Mode button 9 times to activate the Display Lighting/Power-Saving mode.
(Press the Mode button for more than 1 second to enter into the Display Lighting/Power-Saving mode.)
2. When the Display Lighting/Power-Saving mode starts, a Voice message will state “Set or cancel the Display Lighting Function by pressing the Selection button.
Then, please press the Display button.” At that moment the Menu/Selection button will be switched off and the Mode, Set and Cancel button will appear.
3. When you press the Menu/Selection button, a Voice message will give one of these two statements: “The Display the Lighting/Power-Saving Function is selected.
Please, press the Set button.” or “The Display Lighting/Power-Saving Function is canceled. Please press the Set button.” The Set button will then disappear and the Mode,
Set and Cancel button will be turned on.
4. Press the Set button and the Display Lighting/Power-Saving Function will start with a Voice message stating “The Display Lighting/Power-Saving Function has been set.”
5. In the Display Lighting/Power-Saving mode, press the Cancel button or do not press any button for more than 7 seconds. The setting will be canceled and you return to the
Standby mode with a Voice message stating “Time is over. The function has been canceled.”
How to set “LOCK BUTTONS”
1. Button will be locked if “SET” button is pressed for 3 seconds or longer during
cooking,presetting, warming, reheating or in standby condition.
2. When button is locked, a voice will sound saying “Button lock is selected.”
At this time, button lock is displayed on the screen.
Lock can be set for touch button to prevent malfuncion during cleaning with touch button or by children touch.
Setting Method
1. To cancel button lock, press "Set" button for 3 seconds or longer on locked the button.
2. “Lock” sign on the display disappears when button lock is cancelled, a voice will be
saying “Button lock is cancelled.”
Cancelling Method
Note: Any button other than Set button is pressed while button lock is set, buzzer will sound.
Note: Desired function can be set after cancelling button lock by pressing Set button for 3 seconds or longer.
Note: Button lock function is cancelled automatically when the power is off even though the button lock function is already set.
If there is a problem with your cooker, check the following details before requesting service to your dealer.
Sometimes the cooker may not operate as desired if used incorrectly.
Case
When the rice is not cooked.
When the rice is not well
cooked.
Bean(other grains) is half
cooked.
Rice is too watery or stiff.
When the water overflows.
When you smell odors while
warming.
signs show up.
signs show up.
Rice has gotten cold or a lot of
water flow during keeping warm
If “ ” sign is appears.
Check points
“Pressure Cook/Turbo” button is pressed?
Is there power cut while in cooking?
Did you use the measuring cup for the
rice?
Did you put proper amount of water?
Did you rinse the rice before cooking?
Did you put rice in water for a long time?
Is the rice old or dry?
Is bean (other grains) too dry?
Is the menu selected correctly?
Did you properly measure water?
Did you open the top cover before
cooking was finished?
Did you use the measuring cup?
Did you use proper amount of water?
Is the menu selected correctly?
Did you close the top cover?
Please check it the power cord is plugged.
Did it warm over 12 hours?
Is there any other substance such as rice
scoop or cold rice?
Temperature sensor or fan motor does
not work properly.
Keeping warm was set in “Sleeping”
mode
It shows on the display when pressing
“Pressure Cook/Turbo” button again, or when
the cooking has finished and you
ve never
ever open turned the handle to ‘Unlock’.
Warming passed time mark
blinks during keeping warm
24 hours has not passed yet after keeping
warm
Do the following
Keep warm after cancelling or setting “Sleep
Keeping Warm” mode depending on the necessity
It can be solved by turning handle to ‘Unlock’
and then turn to ‘Lock’.
This function alarms if the rice remained warm
for more than 24 hours.
Unplug the power cord and call the Service
center.
Close the top cover perfectly.
Always keep the power on while warming.
As possible, keep warming time within 12 hours.
Don’t warm rice with other substance.
Refer to page 16~17.
Select the correct menu.
Properly measure water.
Open the top cover after cooking finished.
Soak or steam beans and other grains before
cooking in the pressure cooker in order to avoid
partially cooked beans or grains. Beans should be
soaked for-2-minutes or steamed for-2-minutes
prior to cooking, depending on your taste.
Refer to page 16~17.
Add water about half the notch and then cook.
Press the “Pressure Cook/Turbo” button
once. And check “ ”sign on the display.
Re-press the “Pressure Cook/Turbo” button.
CHECK BEFORE ASKING
FOR SERVICE
ENGLISH
www.cuckoo.co.kr
CHECK BEFORE ASKING
FOR SERVICE
If there is a problem with your cooker, check the following details before requesting service to your dealer.
Sometimes the cooker may not operate as desired if used incorrectly.
Case Check points Do the following
When the Pressure
“Cook/Turbo” Timer
button does not operate
with “ ”
When the rice is badly sticky.
Did you turn the Lock/Unlock Handle
to “Lock”
Is “pressure” lamp on?
Is there any rice or any other alien
substance on the temperature sensor or
the bottom surface of the inner pot?
When the button cannot
operate with “ ”
Is the inner pot inserted?
Check the rated voltage?
Clean all the alien substances on the
temperature sensor or the bottom surface of the
inner pot.
When the time cannot be
preset.
When you smell after and
before cooking?
When the top cover cannot
be closed.
Is the current time correct?
Is AM or PM set properly?
Did you set the reservation time over
13 hours?
Did you clean it after cooking?
Is the inner pot correctly inserted in the main
body?
Is the Lock/Unlock handle on the top cover
set to “Lock”?
Is there hot food in the inner pot?
Set the current time. (Refer to page 14)
Check the AM and PM.
Maximum reservation time is 13 hours.
(Refer to page 26~27)
Please clean it after cooking.
Micom power is out. Please cut the power and contact customer service.
When “ ”, “ ” are
shown on the LCD by turns.
The sensor is broken.
Micom memory is out.
Please cut the power and contact customer service.
When “ ”, “ ” are
shown on the LCD by turns.
“ ”mark shows up
during the product operation
“ ” sign is displayed
during the warming or
“ ” sign is displayed
during the cooking.
Please cut the power and contact customer service.
This function checks to see if power or product has
abnormality. If the mark shows up continuously,
contact customer service.
Please insert inner pot.
This product is 120V only.
Please turn the “Lock/Unlock” handle to “Lock”.
Please put in the inner pot perfectly.
Please turn the “Lock/Unlock” handle to “Lock”.
Pull the pressure handle to aside once.
CHECK BEFORE ASKING
FOR SERVICE
Case
When cannot turn to “Unlock”.
When the top cover cannot
open although the Lock/Unlock
handle is turned to “Unlock”.
When the steam exhausted
between the top cover.
When the “Cancel” button
does not operate while
cooking.
When you hear weird noises
during cooking and warming
Brown rice is not germinated
properly
Check points
Did you turn the “Lock/Unlock” handle while
cooking?
Did you turn the “Lock/Unlock” handle
before exhausting steam perfectly?
Is there an external substance on the
packing?
Is packing too old?
Is the inner pot hot?
Is currently the setting to lock mode?
Is there a wind blowing sound when
cooking the rice?
Is there a “Chi” sound when warming
the rice?
Does the amount of rice exceed the
specified maximum capacity?
Is the brown rice too old?
Do the following
Don’t open the top cover while cooking. If you want
to open top cover while cooking, press the “Cancel”
button more than 2 seconds and release the steam.
Pull the pressure handle to the side once and allow
the steam to release.
Because of the pressure.
Pull the pressure handle to aside once and exhaust
the steam perfectly.
Clean the packing with duster.
Keep the packing clean.
If the steam is exhausted through the top cover,
please power off and contact the service center
and dealer.
Packing life cycle is 12 month, please replace the
packing per 1 year.
Keep pressing the “Cancel” button for 2 seconds for
safety reason if you want to cancel while cooking.
Be careful of hot steam emission or hot contents
spattered from the automatic steam outlet during
cancellation.
Please press “Set” button for over 3 seconds to
release.
This is the sound of the fan motor to cool
the internal parts. This is normal.
The “Chi” sound during the warming process is the
sound of IH cooker operating. This is normal.
Put the specified maximum capacity of brown rice.
Old rice or contaminated rice may not be
germinated properly. (Refer to page 23)
If there is a problem with your cooker, check the following details before requesting service to your dealer.
Sometimes the cooker may not operate as desired if used incorrectly.
COOKING GUIDE
www.cuckoo.co.kr
RECIPE
COOKING GUIDE
COOKING GUIDE
www.cuckoo.co.kr
RECIPE
COOKING GUIDE
COOKING GUIDE
www.cuckoo.co.kr
RECIPE
COOKING GUIDE
COOKING GUIDE
www.cuckoo.co.kr
RECIPE
COOKING GUIDE
COOKING GUIDE
www.cuckoo.co.kr
RECIPE
e n j o y c o o k i n g
www.cuckoo.co.kr
RECIPE
100% Recycled paper 383-880B Rev.0
CUCKOO ELECTRIC RICE COOKER/WARMER
LIMITED WARRANTY
KEY Company, P&K USA TRADING CORP and Cuckoo Trading Canada. will repair at its option replace,
without charge, your product which proves to be defective in material or workmanship under normal use,
during the warranty period listed below from the date of original purchase. This warranty is good only to the
original purchaser of the product during the warranty period. P&K USA TRADING CORP covers the east and
the central districts, KEY Company covers the west and the central districts, Cuckoo Trading Canada covers
the whole Canada.
WARRANTY PERIOD
MODEL# #LABOR PARTS HOW SERVICE IS HANDLED
CRP-HW10 1YEAR 1YEAR The East and the Central Districts
Call : 718 888 9144
Address : 129-04 14th Avenue College Point, NY 11356, USA
The West and the Central Districts.
Call : 213 687 9828 Toll Free : 877 481 9828
Address : 700 Jackson Street, L.A, CA 90012, USA
Canada (TORONTO)
Call : 416 878 4561 / 905 707 8224
Address :
#D8-7398 Yonge Street
Thornhill Ontario Canada L4J 8J2
Canada (VANCOUVER)
Call : 604 540 1004 / 604 523 1004
Address :
945 Lougheed Hwy Coquitlam BC Canada V3K 3T4
No other express warranty is applicable to this product. THE DURATION OF ANY IMPLIED WARRANTIES,
INCLUDING THE IMPLIED WARRANTY OF MERCHANTABILITY, IS LIMITED TO THE DURATION OF
THE EXPRESS WARRANTY HEREIN. CUCKOO ELECTRONICS CO.,LTD, SHALL NOT BE LIABLE FOR
THE LOSS, THE USE OF THE PRODUCT, INCONVENIENCE, LOSS OR ANY OTHER DAMAGES,
DIRECT OR CONSEQUENTIAL, ARISING OUT OF THE USE OF, OR INABILITY TO USE, THIS PRODUCT
OR FOR ANY BREACH OF ANY EXPRESS OR IMPLIED WARRANTY, INCLUDING THE IMPLIED
WARRANTY OF MERCHANTABILITY APPLICABLE TO THIS PRODUCT
.
Some states do not allow the exclusion or limitation of incidental or consequential damages or limitations on
how long an implied warranty lasts : so these limitations or exclusions may apply to you. This warranty gives
you specific legal rights and you may also have other rights which vary from state to state.
THE ABOVE WARRANTY DOES NOT APPLY IN THESE CASES:
To damages problems which result from delivery or improper installation.
To damages problems which result from misuse, abuse, accident, alteration,
or incorrect electrical current or voltage.
To serve call which do not involve defective workmanship or material and explaining the operation of the unit.
Therefore, these costs are paid by the consumer. Customer assistance numbers :
To Prove warranty Coverage :
Retain your Sales Receipt to prove date of purchase
Copy of your Sales Receipt must submitted at the time
warranty service is provided.
To Obtain Product, Customer, or Service Assistance and Nearest Authorized service center,
Parts Distributor or Sales Dealer:
The West and the Central Districts.
Call : 213 687 9828
Toll Free : 877 481 9828
Address : 700 Jackson Street, L.A,
CA 90012, USA
Canada (Toronto)
Call : 416 878 4561 / 905 707 8224
Address : #D8-7398 Yonge Street
Thornhill Ontario Canada
L4J 8J2
Canada (Vancouver)
Call : 604 415 9858/604 524 8282
Address : 103-4501 North Road
Burnaby BC Canada
V3R 4R7
The East and the Central Districts
Call : 718 888 9144
Address :129-04 14th Avenue
College Point, NY 11356, USA
45


Need help? Post your question in this forum.

Forumrules


Report abuse

Libble takes abuse of its services very seriously. We're committed to dealing with such abuse according to the laws in your country of residence. When you submit a report, we'll investigate it and take the appropriate action. We'll get back to you only if we require additional details or have more information to share.

Product:

For example, Anti-Semitic content, racist content, or material that could result in a violent physical act.

For example, a credit card number, a personal identification number, or an unlisted home address. Note that email addresses and full names are not considered private information.

Forumrules

To achieve meaningful questions, we apply the following rules:

Register

Register getting emails for Cuckoo CRP-HW10 Fuzzy Series at:


You will receive an email to register for one or both of the options.


Get your user manual by e-mail

Enter your email address to receive the manual of Cuckoo CRP-HW10 Fuzzy Series in the language / languages: English as an attachment in your email.

The manual is 13,92 mb in size.


You will receive the manual in your email within minutes. If you have not received an email, then probably have entered the wrong email address or your mailbox is too full. In addition, it may be that your ISP may have a maximum size for emails to receive.

The manual is sent by email. Check your email

If you have not received an email with the manual within fifteen minutes, it may be that you have a entered a wrong email address or that your ISP has set a maximum size to receive email that is smaller than the size of the manual.

The email address you have provided is not correct.

Please check the email address and correct it.

Your question is posted on this page

Would you like to receive an email when new answers and questions are posted? Please enter your email address.


Info