At the bottom of the main Corel AfterShot Pro window, this panel shows thumbnails for the folder, container, search or
browse category selected with the Browse panel. All the images in the folder are initially visible in the Thumbnail panel, but
you can filter the images to show only the thumbnails that match a specific set of criteria.
8. AfterShot Pro toolbar
This toolbar contains editing tools and viewing options for the Preview panel.
9. Browse panel
The Browse panel is your main access point for your photos. The panel has tabs for the Library, File System, and Output
pages. Some pages are further divided into sections. For example, the Library page consists of a Catalogs section and a
Metadata Browser section. The Browse panel can be hidden so that more room is available for viewing your images. Just
click the left arrow at the top of the Browse panel tabs to hide or show the panel.
There are many ways to adjust and customize the Corel AfterShot Pro workspace. For more information, see
Adjusting the
workspace
.
Understanding non-destructive editing
Corel AfterShot Pro is a non-destructive image editor, meaning that adjustments you make to your images in Corel
AfterShot Pro will never alter the data in the original image. You are free to experiment as much as you want, knowing
that you can always revert to the original version. As a non-destructive image editor, the adjustments you create are
stored either in a sidecar XMP file, within the Corel AfterShot Pro catalog database, or both. This means that when you're
ready to share or export your work, you need to output the versions you want to a standard file format.
When you edit a photo in Corel AfterShot Pro, a new version is created that contains the adjustments you've made. Corel
AfterShot Pro allows more than one set of image adjustments to be made on a single photo, allowing you to efficiently
make many versions of a single image. Creating a new version does not make a copy of the original master file, but rather
just allows you to apply different image adjustments and metadata to the same Master file.
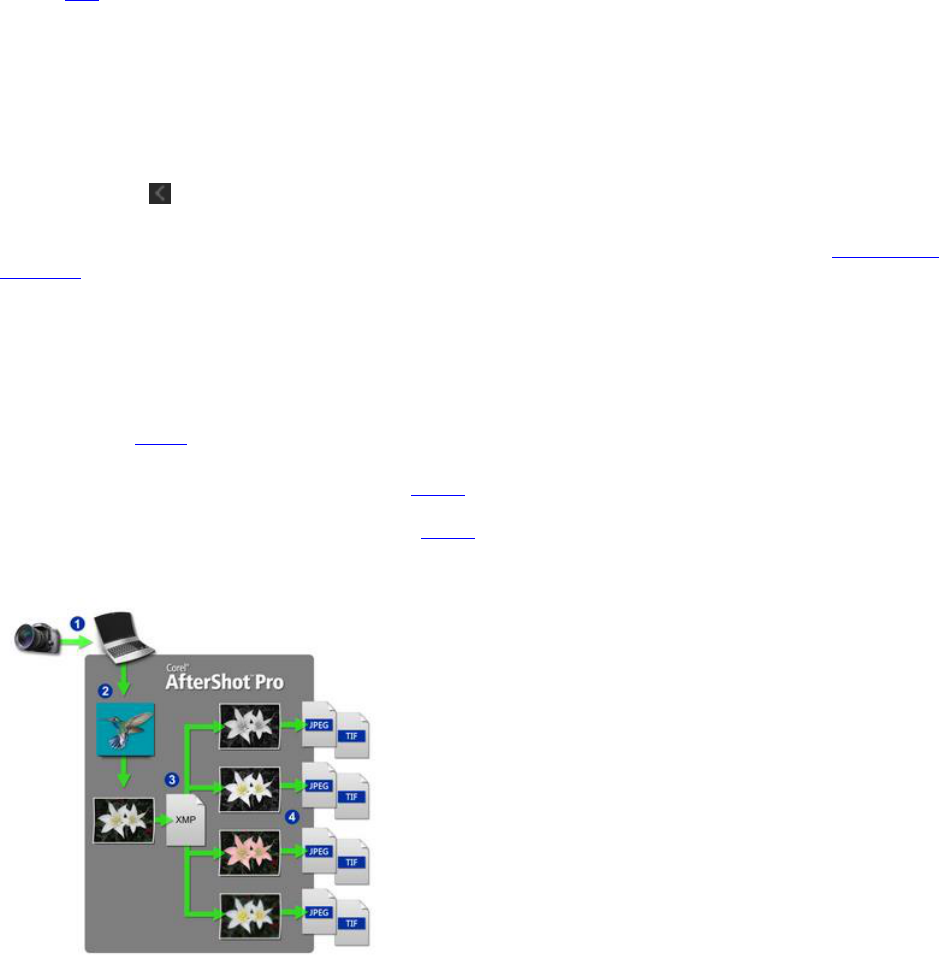
Photo workflow: 1. Transfer photos from your camera to your computer, 2. Import the photos into Corel AfterShot Pro, 3. Edit your photos, creating one or
more versions, 4. Export a version to a JPEG or TIFF file.
XMP files
Corel AfterShot Pro stores its settings in an XMP file that is slightly different from other popular image editors and photo
management applications. We do this to prevent Corel AfterShot Pro from overwriting settings created by other
applications and to circumvent limitations inherent in the current XMP standard (such as only being able to export the
metadata from one version at a time, or the inability to save different settings for a RAW file and a JPEG that were created
Libble takes abuse of its services very seriously. We're committed to dealing with such abuse according to the laws in your country of residence. When you submit a report, we'll investigate it and take the appropriate action. We'll get back to you only if we require additional details or have more information to share.
Product:
Forumrules
To achieve meaningful questions, we apply the following rules:
First, read the manual;
Check if your question has been asked previously;
Try to ask your question as clearly as possible;
Did you already try to solve the problem? Please mention this;
Is your problem solved by a visitor then let him/her know in this forum;
To give a response to a question or answer, do not use this form but click on the button 'reply to this question';
Your question will be posted here and emailed to our subscribers. Therefore, avoid filling in personal details.
Register
Register getting emails for Corel AfterShot Pro 2 at:
new questions and answers
new manuals
You will receive an email to register for one or both of the options.
Get your user manual by e-mail
Enter your email address to receive the manual of Corel AfterShot Pro 2 in the language / languages: English as an attachment in your email.
The manual is 2,85 mb in size.
You will receive the manual in your email within minutes. If you have not received an email, then probably have entered the wrong email address or your mailbox is too full. In addition, it may be that your ISP may have a maximum size for emails to receive.
The manual is sent by email. Check your email
If you have not received an email with the manual within fifteen minutes, it may be that you have a entered a wrong email address or that your ISP has set a maximum size to receive email that is smaller than the size of the manual.
The email address you have provided is not correct.
Please check the email address and correct it.
Your question is posted on this page
Would you like to receive an email when new answers and questions are posted? Please enter your email address.