596569
37
Zoom out
Zoom in
Previous page
1/42
Next page
HQ 2SHUDWLQJLQVWUXFWLRQV
6WDUW


5HVHWVHF
$%&














en
3
Table of contents
8 Intended use . . . . . . . . . . . . . . . 4
( Safety instructions . . . . . . . . . . 4
Before you switch ON
the appliance . . . . . . . . . . . . . . . . . . . 4
Delivery. . . . . . . . . . . . . . . . . . . . . . . . 5
Installation. . . . . . . . . . . . . . . . . . . . . . 5
In daily use . . . . . . . . . . . . . . . . . . . . . 6
Door lock . . . . . . . . . . . . . . . . . . . . . . 6
Damage . . . . . . . . . . . . . . . . . . . . . . . 6
Disposal . . . . . . . . . . . . . . . . . . . . . . . 6
7 Protection of the
environment . . . . . . . . . . . . . . . . 8
Packaging. . . . . . . . . . . . . . . . . . . . . . 8
Old appliances . . . . . . . . . . . . . . . . . . 8
* Getting to know
your appliance . . . . . . . . . . . . . . 9
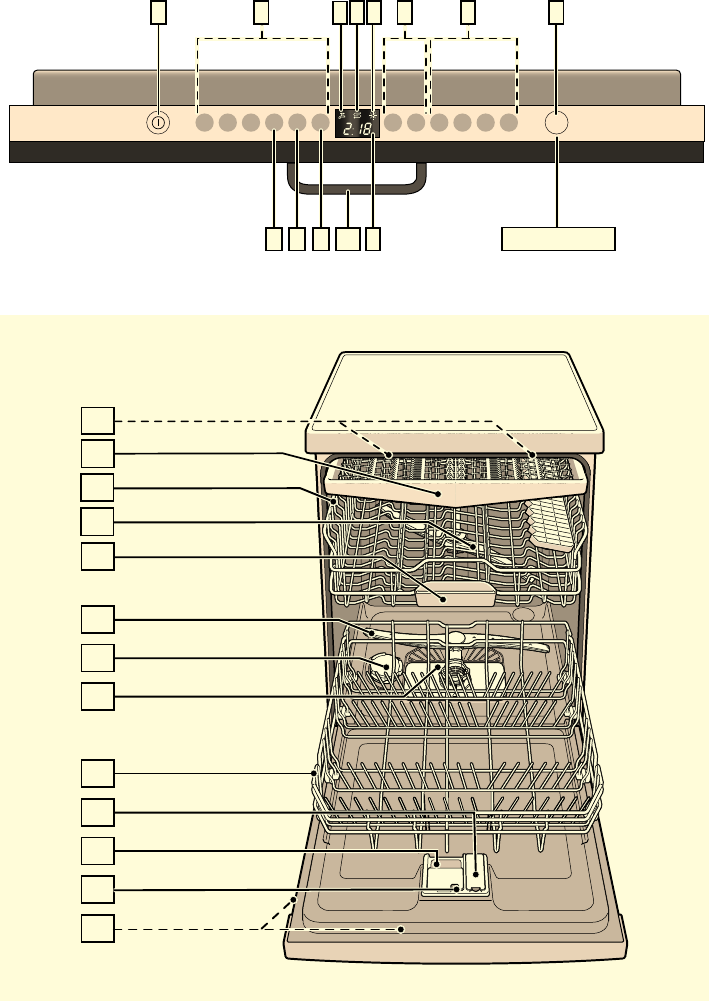
Control panel . . . . . . . . . . . . . . . . . . . 9
Appliance interior . . . . . . . . . . . . . . . . 9
Overview of menu. . . . . . . . . . . . . . . . 9
+ Water softening system/
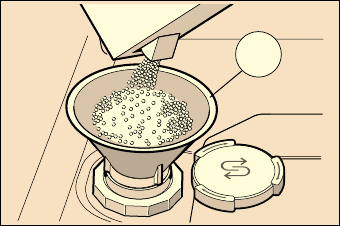
Special salt . . . . . . . . . . . . . . . 10
Setting . . . . . . . . . . . . . . . . . . . . . . . 10
Water hardness table . . . . . . . . . . . . 10
Using special salt . . . . . . . . . . . . . . . 11
Detergents with salt component . . . . 11
Switching off water
softening system. . . . . . . . . . . . . . . . 11
, Rinse aid . . . . . . . . . . . . . . . . . 12
Setting amount of rinse aid. . . . . . . . 12
Switching off rinse aid
refill indicator . . . . . . . . . . . . . . . . . . 13
- Utensils . . . . . . . . . . . . . . . . . . . 13
Not suitable. . . . . . . . . . . . . . . . . . . . 13
Glass and utensil damage . . . . . . . . 13
Loading the dishwasher . . . . . . . . . . 13
Unloading the dishwasher . . . . . . . . 14
Cups and glasses. . . . . . . . . . . . . . . 14
Pans . . . . . . . . . . . . . . . . . . . . . . . . . 14
Cutlery drawer. . . . . . . . . . . . . . . . . . 15
Folding spikes . . . . . . . . . . . . . . . . . 15
Small accessories holder . . . . . . . . . 15
Adjusting the height
of the basket. . . . . . . . . . . . . . . . . . . 16
. Detergent . . . . . . . . . . . . . . . . . 16
Adding detergent . . . . . . . . . . . . . . . 17
Combination detergent . . . . . . . . . . . 17
/ Overview of programmes . . . . 19
Programme selection . . . . . . . . . . . . 20
Information for test institutes . . . . . . . 20
0 Additional options . . . . . . . . . . 20
Express Wash/ Speed Perfect
(VarioSpeed). . . . . . . . . . . . . . . . . . . 20
Half load . . . . . . . . . . . . . . . . . . . . . . 20
Hygiene. . . . . . . . . . . . . . . . . . . . . . . 20
Intensive zone . . . . . . . . . . . . . . . . . . 20
Extra drying. . . . . . . . . . . . . . . . . . . . 20
1 Operating the appliance . . . . . 21
Programme data . . . . . . . . . . . . . . . . 21
Aqua sensor . . . . . . . . . . . . . . . . . . . 21
Switching on the appliance . . . . . . . . 21
Optical display while the
programme is running . . . . . . . . . . . 22
Remaining running time display . . . . 22
Timer programming . . . . . . . . . . . . . 22
End of programme . . . . . . . . . . . . . . 23
en Intended use
4
Automatic switch off / interior light . . 23
Switching off the appliance. . . . . . . . 24
Interrupting the programme . . . . . . . 24
Terminating the programme . . . . . . . 24
Changing the programme. . . . . . . . . 24
Intensive drying. . . . . . . . . . . . . . . . . 25
2 Cleaning and maintenance . . . 25
Overall condition of the machine . . . 25
Special salt and rinse aid . . . . . . . . . 26
Filters . . . . . . . . . . . . . . . . . . . . . . . . 26
Spray arms . . . . . . . . . . . . . . . . . . . . 26
3 Fault, what to do? . . . . . . . . . . 27
Waste water pump . . . . . . . . . . . . . . 27
Fault table. . . . . . . . . . . . . . . . . . . . . 28
4 Customer service . . . . . . . . . . 36
5 Installation and connection . . 36
Product package . . . . . . . . . . . . . . . 36
Safety instructions. . . . . . . . . . . . . . . 37
Delivery. . . . . . . . . . . . . . . . . . . . . . . 37
Technical specifications . . . . . . . . . . 37
Installation. . . . . . . . . . . . . . . . . . . . . 37
Waste-water connection . . . . . . . . . . 37
Drinking water connection . . . . . . . . 38
Warm water connection . . . . . . . . . . 38
Electrical connection. . . . . . . . . . . . . 39
Removing the appliance . . . . . . . . . . 39
Transportation. . . . . . . . . . . . . . . . . . 40
Protection against frost
(Emptying the appliance) . . . . . . . . . 40
8 Intended use
Intended use
This appliance is intended for
use in the home and
the home environment.
Use the dishwasher
only in the household
and only for its designed
purpose: for washing
domestic dishes.
( Safety instructions
Safety instructions
Children from 8 years of age
or people whose physical,
sensory or mental abilities
or their lack of experience
or knowledge prevent them
from using the appliance safely
must not use this appliance
without supervision
or instruction by a responsible
person.
Before you switch ON
the appliance
Please read the operating
and installation instructions
carefully. They contain
important information on how to
install, use and maintain
the appliance.
Retain all documents for
subsequent use or for the next
owner.
Safety instructions en
5
Delivery
1. Check the packaging and
dishwasher immediately for
damage caused in transit. Do
not switch on a damaged
appliance, but contact your
supplier.
2. Please dispose of the
packaging material in an
environmentally friendly
manner.
3. Do not let children play with
packaging and its parts.
There is a risk of suffocation
from collapsible boxes and
film.
Installation
Following installation, ensure
that the back
of the dishwasher is not
freely accessible (protection
against contact due to hot
surface).
Install and connect
the appliance according
to the installation
and assembly instructions.
Prior to installation,
disconnect the dishwasher
from the power supply.
Ensure that the protective
conductor system
of the domestic supply has
been correctly installed.
The electrical connection
conditions must correspond
with the specifications
on the dishwasher rating
plate 92.
If the power cord of this
appliance is damaged,
it must be replaced with
a particular power cord.
To prevent injury, the power
cord may be purchased from
customer service only.
If the dishwasher is installed
in a high-sided unit, the unit
must be secured properly.
If the dishwasher is installed
below or above other
domestic appliances, follow
the information for installation
in combination with
a dishwasher
in the installation instructions
for the particular appliances.
Also follow the installation
instructions for
the dishwasher to ensure
that all appliances are
operated safely.
If there is no information or if
the installation instructions
do not include
the appropriate information,
contact the manufacturer
of these appliances
to ensure that
the dishwasher can be
installed above or below
these appliances.
en Safety instructions
6
If you cannot obtain any
information from
the manufacturer, you must
not install the dishwasher
above or below these
appliances.
If you install a microwave
oven above the dishwasher,
the microwave oven may be
damaged.
Install built-under
or integratable appliances
only under continuous
worktops which have been
screwed to adjacent
cupboards to ensure stability.
Do not install the appliance
near heat sources (radiators,
heat storage tanks, cookers
or other appliances which
generate heat) and do not
install under a hob.
After installing the appliance,
ensure that the plug is easily
accessible.
(See Electrical connection)
Some models:
The plastic housing on the
water connection contains
an electric valve,
the connecting cables
are in the supply hose.
Do not cut through this hose,
do not immerse the plastic
housing in water.
In daily use
Read and observe the safety
information and instructions
for use on the packaging
for cleaning and rinsing agents.
Childproof lock (door lock)
Door lock
*
The description of the
childproof lock is at the back in
the envelope.
* depending on model
Damage
The appliance may be
repaired and opened up by a
technician only. To do this,
disconnect the appliance
from the power supply. Pull
out the mains plug or switch
off the fuse. Turn off the tap.
If the appliance is damaged,
especially the fascia (cracks,
holes, broken buttons), or the
door function is impaired,
stop operating the appliance.
Pull out mains plug or switch
off fuse. Turn off tap, call
customer service.
Disposal
1. Make redundant appliances
unusable to prevent
subsequent accidents.
2. Dispose of the appliance in a
n environmentally friendly
manner.
Safety instructions en
7
m Warning
Risk of injury!
To prevent injuries, e.g.
caused by stumbling, open
the dishwasher only briefly
in order to load and unload
the dishwasher.
Knives and other utensils
with sharp points must
be placed horizontally in the
cutlery drawer.
Do not lean or sit
on the open door.
In the case of free-standing
appliances, ensure that the
baskets are not overloaded.
If the appliance
is not in a cavity and a side
panel is accessible, the door
hinge area must be covered
at the side
for reasons of safety
(risk of injury). The covers
are available as optional
accessories from customer
service or specialist outlets.
m Warning
Risk of explosion!
Do not add any solvents
to the washing chamber.
Danger of explosion!
m Warning
Risk of scalding!
Open the door carefully when
the programme is still running.
There is a risk of hot water
spraying out of the appliance.
m Warning
Risks to children!
If fitted, use the childproof
lock. An exact description
can be
found in the back of the enve
lope.
Do not allow children to play
with or operate
the appliance.
Keep children away from
detergents and rinse aid.
These may cause chemical
burns in the mouth, throat
and eyes or asphyxiation.
Keep children away from
open dishwasher.
The water in the rinsing
compartment is not drinking
water and could contain
detergent residue.
en Protection of the environment
8
Ensure that children do not
place fingers in the tablet
collecting tray 1B. Small
fingers could become
caught in the slots.
When opening and closing
the door on an eye-level
appliance, ensure that
children do not become
jammed or crushed between
the appliance door and the
cupboard door below.
Children could become
locked in the appliance
(danger of suffocation) or get
into another dangerous
situation.
Redundant appliances: Pull
out the mains plug, sever
and dispose of the power
cord. Destroy the door lock
so that the door can no
longer be closed.
7 Protection of the
environment
Protection of the environment
Both the packaging of new appliances
and the old appliances themselves
contain valuable raw materials
and recyclable materials.
Please dispose of the individual parts
separated according to type.
Please ask your dealer or inquire at your
local authority about current means
of disposal.
Packaging
All plastic parts of the appliance are
identified with internationally
standardised abbreviations (e.g. >PS<
polystyrene). Therefore, plastic waste
can be sorted out when the appliance is
being disposed of.
Please follow the safety instructions
under “Delivery”.
Old appliances
Please follow the safety instructions
under “Disposal of your appliance”.
This appliance is labelled in
accordance with European
Directive 2012/19/EU
concerning used electrical and
electronic appliances (waste
electrical and electronic
equipment - WEEE). The
guideline determines the
framework for the return and
recycling of used appliances as
applicable throughout the EU
Getting to know your appliance en
9
* Getting to know your
appliance
Getting to know your appliance
Diagrams of the control panel
and the interior of the appliance can be
found in the envelope at the front.
Individual positions are referred
to in the text.
Control panel
* depending on model
** Number depending on model
Appliance interior
* depending on model
Overview of menu
The settings can be found in the
individual chapters.
( ON/OFF switch
0 Programme buttons **
8 Display “Check water supply”
@ Salt refill indicator
H Rinse aid refill indicator
P Timer programming *
X Additional options **
` START button
h Digital display
)" Door opener
1" Interior light *
1* Cutlery drawer
12 Top basket
1: Top spray arm
1B Tablet collecting tray
1J Bottom spray arm
1R Dispenser for special salt
1Z Filters
1b Bottom basket
1j Dispenser for rinse aid
9" Detergent dispenser
9* Lock for detergent dispenser
92 Rating plate
Water Hardness :‹‹ -:‹ˆ
š Intensive drying š:‹‹ - š:‹‚
§ Rinse aid §:‹‹ - §:‹‡
Hot water :‹‹ - :‹‚
End of programme buzzing sound
:‹‹ - :‹„
˜ Automatic disconnection ˜:‹‹ - ˜:
‹ƒ
Optical display while the programme
is running :‹‹ -:‹‚
Water softening system/Special salt en
11
Using special salt
Always refill with special salt
immediately before switching on the
appliance. This ensures that overrun
special salt solution is immediately
washed out and does not corrode the
rinsing tank.
1. Open the screw-type cap of the
compartment 1R.
2. Fill the tank with water (only required
when switching on the appliance for
the first time).
3. Then add dishwasher salt (not table
salt or tablets).
The water is displaced and runs out.
As soon as the salt refill indicator @
on the fascia is lit, top up the salt.
* depending on model
Using detergents with salt
component
Detergents with salt component
If combined detergents with a salt
component are used, salt can usually be
omitted up to a water hardness of
21° dH (37° fH, 26° Clarke, 3.7 mmol/
l). If the water hardness is over 21° dH,
special salt must be used.
Switching off salt refill
indicator/water softening
system
Switching off water softening system
If the salt refill indicator @ is impaired
(e.g. when using combined detergents
containing salt component), it can be
switched off.
Proceed as described under
“Adjusting the water softening
system” and set the value to :‹‹.
The water softening system and salt
refill indicator are now switched off.
m Caution
Never fill the salt dispenser with
detergent. You will destroy the water
softening system.
Installation and connection en
37
Safety instructions
Please follow the safety instructions
under “Installation”.
Delivery
Your dishwasher has been checked
thoroughly in the factory to ensure that it
is in working order. This may cause
small water stains. These will disappear
after the first wash cycle.
Technical specifications
Weight:
max. 60 kg
Voltage:
220–240 V, 50 Hz or 60 Hz
Connected load:
2.0–2.4 kW
Fuse:
10/16 A (UK 13A)
Power input:
switched off 0.10 W
not switched off 0.10 W
Water pressure:
at least 0.05 MPa (0.5 bar), maximum
1 MPa (10 bar). At a higher water
pressure: connect pressure-reducing
valve ahead.
Inlet rate:
minimum 10 litres/minute
Water temperature:
cold water; hot water max. temperature
60 °C.
Capacity:
12–15 place settings (depending
on model).
Installation
The required installation dimensions can
be found in the installation instructions.
Level the appliance with the aid of the
height-adjustable feet. Ensure that the
appliance is situated securely on the
floor.
A built-under or integrated appliance
which is installed subsequently as a
free-standing appliance must be
secured to prevent it from
overturning, e.g. by screwing it to the
wall or by installing it under
a continuous worktop which is
screwed to adjacent cupboards.
The appliance can easily be
installed in a fitted kitchen between
wooden and plastic walls.
Waste-water connection
1. The required work sequence can be
found in the installation instructions.
If required, fit a siphon with an
drainage connection.
2. Connect the waste-water hose to the
drainage connection of the siphon
with the enclosed parts.
Ensure that the drainage hose is not
kinked, crushed or twisted and that
there is no cover plate in the
drainage to prevent the waste water
from flowing out!
37


Need help? Post your question in this forum.

Forumrules


Report abuse

Libble takes abuse of its services very seriously. We're committed to dealing with such abuse according to the laws in your country of residence. When you submit a report, we'll investigate it and take the appropriate action. We'll get back to you only if we require additional details or have more information to share.

Product:

For example, Anti-Semitic content, racist content, or material that could result in a violent physical act.

For example, a credit card number, a personal identification number, or an unlisted home address. Note that email addresses and full names are not considered private information.

Forumrules

To achieve meaningful questions, we apply the following rules:

Register

Register getting emails for Constructa CG6A54V8 at:


You will receive an email to register for one or both of the options.


Get your user manual by e-mail

Enter your email address to receive the manual of Constructa CG6A54V8 in the language / languages: English as an attachment in your email.

The manual is 2,43 mb in size.


You will receive the manual in your email within minutes. If you have not received an email, then probably have entered the wrong email address or your mailbox is too full. In addition, it may be that your ISP may have a maximum size for emails to receive.

Others manual(s) of Constructa CG6A54V8

Constructa CG6A54V8 User Manual - German - 44 pages

Constructa CG6A54V8 User Manual - Dutch - 44 pages

Constructa CG6A54V8 User Manual - French - 48 pages


The manual is sent by email. Check your email

If you have not received an email with the manual within fifteen minutes, it may be that you have a entered a wrong email address or that your ISP has set a maximum size to receive email that is smaller than the size of the manual.

The email address you have provided is not correct.

Please check the email address and correct it.

Your question is posted on this page

Would you like to receive an email when new answers and questions are posted? Please enter your email address.


Info