14
• 2 rear whe
• Rear a
•
• Bump
• Hoo
•
• Carr
• Rain cover
TIPS FOR CLEANING AND MAINTENANCE
W
Th
carr
CLEANI
Clean th
T
remov
inst
cleanin
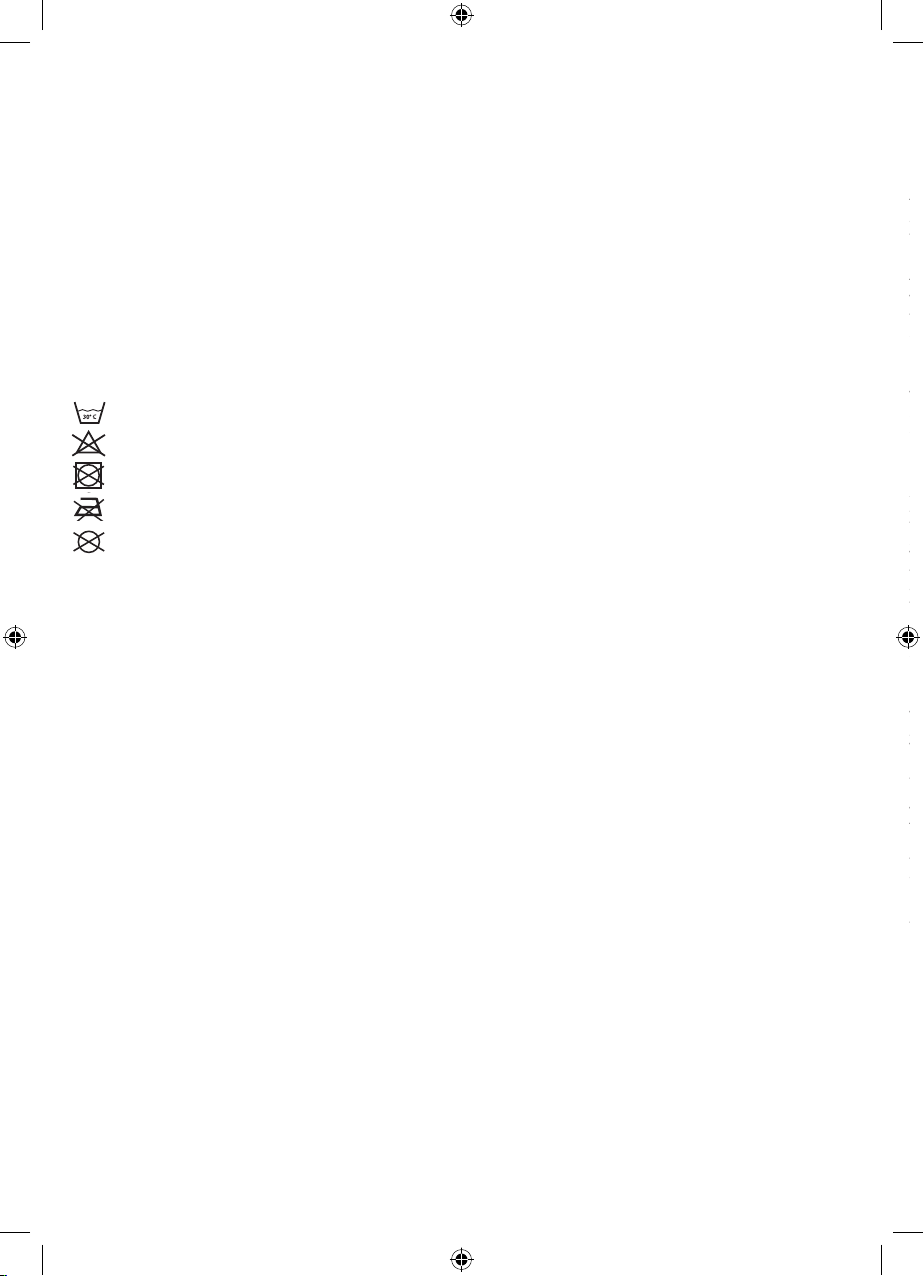
Wash by hand w
Do not b
Do not t
Do not i
Do not d
Rou
use so
to prevent th
contac
MAINTENANCE
If ne
cant. R
off all dus
the cor
par
san
OPENING A
1
hear a clic
2.
(Fig. 2). Repeat th
WARNING: Befo
at
3.
par
• whe
• washe
• sprin
• plug (D)
Make sure you i
diagr
pin. R
the s
4.
slot
WARNING: Befo
are corre
5.
(Fig. 5A-5B)
as in Figure 5C
6.
matching th
(Fig. 6A-
out
7
until they
children’s tray p
you (Fig. 7B).
WARNING: Never use th
stro
SAFET
On th
consist
with b
consist
8.
your chil
9.
in the b
by pressin
the wa
1
wais
le (Fig. 10A)
but
WARNING: Th
harn
WARNING: Af
ensure that th
ancho
HOW TO ADJ
1
lever at th
push th
back
WARNING: Th
is sit
REAR BR
Th
simult
1
of the rea
1
sides o
SUN C
WARNING: Th
stro
1
1
increas
wings an
cano
CLOSING THE STROLLER
WARNING: Wh
or othe
thes
into contac
sure that th
Th
16.
1
1
FIT
1
compl
(Fig. 18A)
right) f
lining f
t h e b u t t o n s u n d e r t h e s e at a n d r e m o v e t h e f a b r i c f r o m t h e
s e at (F i g . 1 8 D ) . T h e n r e m o v e t h e s a f e t y h a r n e s s b y p a s si n g
t h e s t r a p s t h r o u g h t h e h o l e s o n t h e b a c k r e s t a n d t h e s e at
( F i g . 18 E - 18 F - 18 G ) .
1 9 . T o r e m o v e t h e f a b r i c f r o m t h e r e a r s e at , p a s s t h e c r o t c h
s t r a p a n d w a i s t s t r a p t h r o u g h t h e h o l e s a s s h o w n i n F i g u r e s
19 A a n d 19 B .
T o r e p l a c e t h e c o v e r o n t h e s t r o l l e r , r e p e at t h e s e s t e p s i n r e v e r s e
o r d e r a n d r e a s s e m b l e t h e s a f e t y h a r n e s s b y p a s si n g t h e s t r a p s
t h r oug h t h e f a br i c ho le s .
I N S T A L L I N G T H E C H I C C O K E Y F I T C A R S E A T
T h e C H I C C O K E Y F I T c a r s e at c a n b e at t a c h e d t o t h e s t r o l l e r .
W A R N I N G : T h e C H I C C O K E Y F I T c a r s e at c a n o n l y b e at t a c h e d
t o t h e s t r o l l e r i n t h e f o r w a r d f a c i n g p o si t i o n .
2 0 . T o i n s t a l l t h e C H I C C O K E Y F I T c a r s e at t o t h e s t r o l l e r r e m o v e
t h e b u m p e r b a r / t r a y a n d c o m p l e t e l y l o w e r t h e b a c k r e s t
(F i g . 2 0 A ) . P o si t i o n t h e c a r s e at a s s h o w n i n F i g u r e 2 0 B u n t i l
y o u h e a r a d o u b l e c l i c k .
W A R N I N G : M a ke s u r e i t i s at t a c h e d p r o p e r l y b y p u l l i n g t h e c a r
s e at u p w a r d s .
2 1 . T o r e m o v e t h e c a r s e at f r o m t h e s t r o l l e r s t r u c t u r e p u s h t h e
l e v e r o n t h e c a r s e at a n d l i f t i t u p (F i g . 2 1 ) .
R E AR F O O T B O AR D
A t t h e b a c k o f t h e s t r o l l e r t h e r e i s a f o o t b o a r d f o r t r a n s p o r t i n g
a s e co n d c h i l d i n t h e s t a n d i n g p o si t i o n . T h i s c a n o n l y b e u s e d
w h e n t h e r e a r s e at h a s b e e n c o m p l e t e l y r a i s e d .
2 2 . T o r a i s e t h e s e at p us h i t u p w a r d s (F i g . 2 2 ) .
W A R N I N G : W h e n p u s h i n g t h e s t r o l l e r d o n o t a l l o w y o u r c h i l d
t o s t a n d o n t h e f o o t b o a r d f a c i n g b a c k w a r d s . D o n o t a l l o w y o u r
c h i l d t o s t a n d o n t h e s e at . T o p r e v e n t f a l l s , y o u r c h i l d m u s t h o l d
t h e h a n d l e s a n d ke e p b o t h f e e t o n t h e f o o t b o a r d (F i g . 2 2 A - 2 2 B ) .
R A I N C OV E R
2 3 . T o fi t t h e r a i n c o v e r , f a s t e n t h e s t r a p s a r o u n d t h e s t r o l l e r ’ s
f r a m e , i n t h e p o si t i o n s s h o w n i n F i g . 2 3 ( t h e s t e p s a r e t o b e
r e p e at e d o n b o t h si d e s o f t h e s t r o l l e r ) . W h e n y o u h a v e fi n -
i s h e d u si n g t h e r a i n c o v e r , a l l o w i t t o d r y p r o p e r l y i f i t i s w e t .
W A R N I N G : T h e r a i n c o v e r c a n n o t b e us e d o n t h e s t r o l l e r w i t h o u t
a h o o d , a s i t m a y c a us e s u ff o c at i o n .
W A R N I N G : W h e n t h e r a i n c o v e r i s fi t t e d o n t h e s t r o l l e r , n e v e r
l e a v e i t e x p o s e d t o d i r e c t s u n l i g h t w i t h y o u r c h i l d i n si d e , a s t h e
t emp er a t ur e w i l l r i s e c o n s i d er a b l y .
W AR R AN T Y
T h e p r o d u c t i s g u a r a n t e e d a g a i n s t a n y c o n f o r m i t y d e f e c t i n
n o r m a l c o n d i t i o n s o f u s e a s p r o v i d e d f o r b y t h e i n s t r u c t i o n s
f o r u s e . T h e w a r r a n t y s h a l l n o t t h e r e f o r e a p p l y i n t h e c a s e o f
d a m a g e s c a u s e d b y i m p r o p e r u s e , w e a r o r a c c i d e n t a l e v e n t s .
F o r t h e d u r at i o n o f w a r r a n t y o n c o n f o r m i t y d e f e c t s p l e a s e
r e f e r t o t h e s p e c i fi c p r o v i si o n s o f n at i o n a l l a w s a p p l i c a b l e i n
t h e c ou n t r y of p u r c h a s e , wh e r e pr o v i de d.
30° C