704017
38
Zoom out
Zoom in
Previous page
1/106
Next page
.
WSD-F30
User’s Guide
Thank you for purchasing this watch.
Before trying to use this watch, be sure to read the Safety Precautions in
the Quick Start Guide that comes with it. Make sure you use the watch
correctly.
EN
© 2019 CASIO COMPUTER CO., LTD.
Contents
Introduction ....................................................................................... EN-2
Watch Features ............................................................................ EN-2
Measurement Functions ............................................................... EN-4
Overview ...................................................................................... EN-6
About This Manual ....................................................................... EN-7
Getting Ready ................................................................................... EN-8
Basic Operations You Should Remember ................................... EN-14
Using Outdoor Watch Functions - Using CASIO Watch Faces and Apps
........................................................................................................... EN-19
Using CASIO Watch Faces ........................................................ EN-20
Using the Location Memory App ................................................ EN-23
Using Point Navigation ............................................................... EN-30
Using the TOOL App .................................................................. EN-33
Using the Activity App ................................................................ EN-48
Using the MOMENT SETTER App ............................................. EN-54
Using the Extend Mode App ....................................................... EN-58
Using the Multi Timepiece App ................................................... EN-63
Common Outdoor Function Settings .......................................... EN-67
Troubleshooting ............................................................................. EN-82
Important! ........................................................................................ EN-84
Precautions During Use .............................................................. EN-84
User Maintenance ...................................................................... EN-94
Chargeable Battery Handling (Please recycle!) .......................... EN-95
Personal Information Protection Precautions .............................. EN-95
Main Specifications ........................................................................ EN-96
Supplementary Information ......................................................... EN-102
EN-1
Introduction
Attention iPhone Owners!
When using this watch while it is paired with an iPhone, be sure to have the
Wear OS by Google
TM
app running on the iPhone. If the Wear OS by Google
app is not running, functions that require communication with the iPhone
will not operate.
Some watch functions are restricted when it is paired with an iPhone. For
details, visit the website below.
https://support.casio.com/wsd/en/
Watch Features
Dual-layer Display for Improved Readability
Your watch comes with a dual-layer color and monochrome display. The color
display employs high contrast ratio organic electroluminescence (EL). The
monochrome display is designed to show a greater amount of information
(compared with previous CASIO products).
Extend Mode
Extend Mode activates an original power management system for the dual-
layer display, which allows access to maps and GPS, even during overnight
activities. For details, visit the website below.
https://support.casio.com/wsd/en/
Powered with Wear OS by Google
Google, Android, Wear OS by Google, Google Play and other related marks
and logos are trademarks of Google LLC.
Wear OS by Google works with phones running Android
TM
4.4+ (excluding
Go edition) or iOS 10+
*1
. Supported features may vary between platforms
and countries.
*1 Recommended. However, a WSD-F30 watch that is already paired with
a smartphone running iOS 9.3+ can also be used.
EN-2
Five-atmosphere Water Resistance + MIL-STD
*2
Even though this watch has a built-in voice recognition microphone, it still is
water resistant up to five atmospheres. This means you can wear your watch
while swimming, fishing, etc. MIL-STD-810G standard environment
resistance allows you to wear your watch while engaged in a variety of
vigorous outdoor activities, including: mountain climbing, cycle sports,
fishing, and more.
*2 United States Department of Defense Military Standard
Built-in GPS
This watch has GPS
*3
built in, and you can acquire location information
without connecting with a phone. The watch itself can display a map
*4
of your
current location, measure and record data for a variety of activities, and more.
*3 In addition to GPS (U.S.), your watch also supports GLONASS (Russia)
and QZSS (Japan) positioning. This manual uses “GPS” to refer to all of
the above positioning systems.
*4 To display the map when you do not have a smartphone, you need to have
the map data downloaded beforehand.
Three Side Buttons Designed for Sure Operation
The three side buttons are designed for sure operation even when outdoors.
Apps can be freely assigned to the MAP button and the TOOL button.
EN-3
Measurement Functions
Your watch can take barometric pressure, altitude, bearing, and other
readings. Its built-in watch faces and applications can use readings for display
and other useful functions. Note that this watch is not a special purpose
measuring instrument. Readings produced by measurement functions are
intended as general reference information only.
Compass (Bearing Measurement)
For serious mountain climbing and other activities that require accurate
bearing readings, take along a highly reliable compass to use in combination
with the watch’s compass.
Important!
Note that accurate compass readings and/or correction will not be possible
in the areas described below.
In the vicinity of a permanent magnet (magnetic accessory, etc.), metal
objects, high-voltage wires, aerial wires, or electrical household
appliances (TV, computer, cellphone, etc.)
On trains, on boats, on aircraft, etc.
Indoors, especially inside of reinforced concrete structures.
EN-4
Altimeter, Barometer
The watch’s Altimeter uses a pressure sensor to measure barometric
pressure, and then calculates and displays relative altitude based on the
measured value. Because of this, readings taken at different times at the
same location may produce different altitude values due to changes in
temperature, humidity, barometric pressure, and other factors. Also note that
values displayed by the watch may be different from elevations indicated for
areas where you are located. When using the watch’s altimeter while
mountain climbing, it is recommended that you perform regular correction in
accordance with the local altitude (elevation) indications.
Tide Graph (Graphic Display of Tide Information)
The Tide Graph feature of your watch is intended to provide a rough image
of current tide conditions. Do not use its tide information for navigation
purposes. For navigation purposes, be sure to use official tide charts issued
by a reliable agency or authority for the area you are navigating.
EN-5
Overview
Package Contents
Watch, AC adaptor, charger cable, Quick Start Guide, warranty
General Guide
A
Charge LED
B
Charger terminal
C
Pressure sensor
D
Microphone
E
MAP button
F
Power button
G
TOOL button
H
Touch screen
EN-6
About This Manual
The contents of this manual are subject to change without notice.
Copying of this manual, either in part or its entirety, is forbidden. You are
allowed to use this manual for your own personal use. Any other use is
forbidden without the permission of CASIO COMPUTER CO., LTD.
CASIO COMPUTER CO., LTD. shall not be held liable for any lost profits
or claims from third parties arising out of the use of this product or this
manual.
CASIO COMPUTER CO., LTD. shall not be held liable for any loss or lost
profits due to loss of data caused by malfunction or maintenance of this
product, or any other reason.
The watch and sample screens depicted in the illustrations in this manual
may be different from the actual appearance of the watch.
EN-7
Getting Ready
Be sure to read the precautions in the “Quick Start Guide”, and also perform
all of the steps under “Preparing the Watch for First Use” and “Preparing the
Watch for Outdoor Use”.
Preparing the Watch for First Use
You must perform the steps below before using the watch for the first time.
1.
Charge the watch
Plug the provided AC adaptor into a power outlet, and then connect the
provided charger cable and AC adaptor as shown in the illustration.
The charge LED lights red during charging, and green when a full
charge is achieved.
AC adaptor*
Charge LED
* The shape of the AC adaptor supplied in your geographic area may be
different from the one shown in the illustration.
Important!
To help promote longer battery life, regular charging of the watch (about
once a month) is recommended even if you do not use it for a long time.
EN-8
2.
Install the Wear OS by Google App on a Smartphone
Android smartphone: Download the Wear OS by Google app on Google
Play
TM
.
iPhone: Download the Wear OS by Google app from the App Store.
3.
Pair the Watch with Your Smartphone
If the watch is turned off, hold down the power button for about two
seconds to turn it on.
When pairing, it is recommended that you have the smartphone and
watch within one meter of each other. Refer to the websites below for
information about how to pair the watch with a smartphone.
Wear OS by Google Help
https://support.google.com/wearos/
CASIO Smart Outdoor Watch Support Site
https://support.casio.com/wsd/en/startup/
4.
Update Your CASIO Apps
In order to use all of the functionality provided by this watch, be sure to
update all of your related CASIO apps to their latest versions before
using your watch. For information about the update procedure, visit the
website below.
https://support.casio.com/wsd/en/basic/preparation.html
5.
Install the CASIO MOMENT SETTER+ App on the
Smartphone (Android Only)
If you are using an Android smartphone, download the “CASIO MOMENT
SETTER+” app on Google Play and install it. Installing the app enables
use of the functions below.
Notifications you specify with MOMENT SETTER as you approach or
move away from a registered point
Display of the smartphone’s battery level
EN-9
Important!
There are two versions of the CASIO MOMENT SETTER+ app. Make sure
you have the latest version installed on your phone. Icons shown on Google
Play indicate whether the app is the old version or new version.
Old version icon New version icon
EN-10
Preparing the Watch for Outdoor Use
Performing the steps below prepares the watch’s outdoor functions (CASIO
watch faces and apps) for optimal operation. Perform these steps after you
have completed the procedure under “Preparing the Watch for First Use”.
1.
Configure watch settings to enable use of Play Store.
1. If you are using the watch while it is connected with an iPhone, connect
the watch to Wi-Fi.
2. While a watch face is displayed, short press the power button to
display the App menu.
3. Scroll the list of apps upwards or downwards until “Play Store” is
displayed, and then tap it.
This will give you access to Play Store. Install the app you want to
try.
2.
Update your CASIO apps to their latest versions.
1. On the app menu, tap “Play Store”.
2. Select “Apps on your watch” to display a list of the apps currently
installed on your watch.
If the previous option is not available, swipe from top to bottom to
open Play Store menu. Tap the “My Apps” icon.
3. Apps for which updates are available will be shown under “Updates”.
If there is an update available for CASIO MOMENT SETTER+, be sure
to update it.
EN-11
3.
Configure the location settings of the watch and
smartphone.
Watch Operation
1. While the watch face is displayed, swipe the touch screen from top to
bottom and then tap D.
2. Scroll downwards and tap “Connectivity”.
3. On the screen that appears, enable “Location”.
Smartphone Operation
Go to “Settings” and turn on “Location”. Next, select “High Accuracy”
mode. If your smartphone does not have “High Accuracy” setting, turn on
its GPS, Wi-Fi, and mobile network (data communication) settings.
The settings in the steps below are required to enable the following functions:
CASIO watch faces, the Location Memory app, the TOOL app, the Activity
app, and all functions of the MOMENT SETTER app.
4.
Enable the CASIO MOMENT SETTER+“Permissions”
setting.
1. While the watch face is displayed, swipe the touch screen from top to
bottom and then tap D.
2. Scroll the screen downwards, and then tap in the following sequence:
“Apps & notifications”, “App permissions”, “System Apps”, “CASIO
MOMENT SETTER+”.
3. Tap the items that appear on the display (“Calendar”, “Microphone”,
“Location”, etc.) and enable all of them.
EN-12
5.
Turn on the “Save daily activity records” setting.
1. While a watch face is displayed, press the TOOL button to display the
Tool app.
2. Swipe the touch screen from right to left. On the “Settings” screen that
appears, tap D to display the settings menu.
3. Scroll the setting menu downwards. When “Save daily activity
records” is displayed, check to make sure that its setting is “OFF”.
Next, tap the setting.
A dialog box will appear to confirm if you want to save activity
records. Carefully read the text of the dialog box.
4. Tap “I agree.”.
This changes the “Save daily activity records” setting to “ON”.
6.
Turn on the “Save Daily Location Info” setting.
1. While a watch face is displayed, press the MAP button to display the
Location Memory app.
2. Swipe the touch screen from bottom to top. On the menu that appears,
tap “Settings”.
This displays the setting menu.
3. Scroll the setting menu downwards. When “Save Daily Location Info”
is displayed, check to make sure that its setting is “OFF”. Next, tap the
setting.
A dialog box will appear to confirm if you want to save location
information. Carefully read the text of the dialog box.
4. Tap “Every 6 minutes” or “Every 1 minute”.
This changes the “Save Daily Location Info” setting to “ON”.
Note that selecting “Every 1 minute” will cause a large amount of
power to be consumed.
EN-13
Basic Operations You Should Remember
Important!
Note that the operations described here are subject to change due to the
type and version of the operating system being used by the smartphone
connected with the watch, changes that occur when the watch’s operating
system is updated, and other factors. For details about Wear OS by Google
operations, visit the website below.
https://support.google.com/wearos/
Button Functions
Power button
Press to restore display brightness after it goes dark.
Pressing while a watch face is displayed will display the
App menu (app list for launching apps).
If watch power is off, hold down the power button for at
least two seconds to turn the watch on.
MAP button
(Top right)
Pressing while a watch face is displayed starts up a
previously specified app (Location Memory under initial
default settings).
TOOL button
(Bottom right)
Pressing while a watch face is displayed starts up a
previously specified app (TOOL under initial default
settings).
Each press of this button while TOOL is displayed
switches between TOOL functions.
Note
Visit the website below for information about changing the apps that are
started up by pressing the MAP button and TOOL button.
https://support.google.com/wearos/
EN-14
Wake Up
If you don’t tap the touch screen for a few seconds, the watch screen will dim.
To wake up the watch and restore it to normal brightness, tap the touch screen
or press the power button.
Power Supply Operations
To do this: Perform this operation:
Charge the
watch
See step 1 under “Preparing the Watch for First Use”.
Turn off power 1. While the watch face is displayed, swipe the touch
screen from top to bottom and then tap D.
2. Scroll the screen downwards. Tap “System” and
then “Power off” in sequence. On the confirmation
screen that appears, tap .
Turn on power Hold down the power button for about two seconds.
EN-15
Watch Face Operations
To do this: Perform this operation:
Switch to
another watch
face
1. While a watch face is displayed, touch and hold the
center of the touch screen for about two seconds.
2. Scroll a list of favorite watch faces left and right.
When the watch face you want to use is displayed,
tap it.
Add a watch
face to favorites
1. Scroll a list of favorite watch faces as far as it will go
to the right and then tap the + button.
This displays a list of all watch faces.
2. Scroll the list of all watch faces upwards and
downwards. When the watch face you want to add
to favorites is displayed, tap it.
Remove a
watch face from
favorites
On a list of favorite watch faces, swipe upwards on the
watch face you want to remove.
Favorite watch faces
Your watch has a wide selection of watch faces built in. You can add the ones
you most often use to a list of favorite watch faces for easier selection when
you need them.
Note
For details about watch face operations, visit the website below.
https://support.google.com/wearos/
For information about CASIO watch faces, see “Using CASIO Watch
Faces”.
EN-16
Using Apps
To do this: Perform this operation:
Start up an app 1. While a watch face is displayed, short press the
power button to display the App menu.
2. Scroll the list of apps upwards or downwards. When
the app you want to run is displayed, tap it.
Return to the
watch face
Press the power button.
Using a Specific App
For information about the Location Memory, Point Navigation, TOOL,
Activity, MOMENT SETTER, Extend Mode and Multi Timepiece apps, see
Using Outdoor Watch Functions - Using CASIO Watch Faces and Apps”.
For details about Google
TM
apps (standard Wear OS by Google apps), visit
the website below.
https://support.google.com/wearos/
For information about third-party apps, refer to the website, user
documentation, and other information provided by the developer.
EN-17
Wear OS by Google Functions
The Wear OS by Google operating system of this watch provides the
functions below as standard.
Dictation and voice command operation
Messaging and incoming phone call notification
Google Fit
TM
, Timer, Agenda, Translate and other standard Wear OS by
Google apps
Watch faces and apps can be added using the Play Store app
Wear OS by Google Settings
For details, visit the website below.
https://support.google.com/wearos/
Smartphone Dependent Functions
Though you can use a wide range of functions without connecting to a
smartphone, some apps and services (dictation, smartphone related apps,
etc.) are not available unless there is a connection between the watch and a
smartphone. For details, visit the websites below.
https://support.google.com/wearos/
You can also visit the website below, enter “What can I do with the watch
without connection with a phone?”, and then tap the [Search] button.
https://support.casio.com/en/support/faq.php?cid=019
EN-18
Using Outdoor Watch Functions - Using
CASIO Watch Faces and Apps
This section explains how to interpret the contents of CASIO watch faces and
how to use CASIO apps and make your outdoor adventures more interesting
and enjoyable.
Use this app: To do this:
Location Memory Check your current location on a color map.
Point Navigation Display the direction and distance to your
destination.
TOOL Find out more about the natural environment around
you.
Activity Keep track of current information about your
activities.
MOMENT SETTER Get useful notifications when they really matter.
Extend Mode Record multiple days of location information without
charging along the way.
Multi Timepiece Save power by limiting operation to timekeeping
and certain functions.
Important!
In order to get the very best out of the outdoor functions of your watch, be
sure to perform the operation under “Preparing the Watch for Outdoor
Use” before using them.
Speeds and distances displayed by the Location Memory, Point
Navigation, Activity, and TOOL apps are values measured by the watch’s
or your smartphone’s GPS function. This means displayed values may not
be exact due to GPS reception conditions and position sensing error.
EN-19
Using CASIO Watch Faces
Your watch comes with the CASIO Watch Faces described below built in.
Watch face names are used in the list of favorite watch faces and the list of
all watch faces (see “Watch Face Operations”).
Frontier Analog watch face on which areas you visit are color
highlighted on a map.
2 Layers Digital watch face that combines easy-to-read
monochrome LCD and a color LCD. Either of two
display styles can be selected: “Daily Style” (day of the
week, day, time, battery level, step count) or “Outdoor
Style” (time, barometer, altimeter, compass).
Place Analog watch face that can be linked with Google
Calendar
TM
so the locations of specific scheduled
events appear as the background image. A map of your
current location is shown if there is no event specified.
Authentic Simple analog watch face. In addition to a fixed 24-hour
time dial, there are two more dials whose contents can
be changed by tapping them.
Journey Analog watch face that shows a map of your current
location. The watch will display up to three events
saved to Google Calendar. Tapping an event displays
a map to its location.
Traveler Analog watch face that shows useful information about
your travel destination, etc. Each tap of the dial at 10
o’clock changes the information displayed at the
bottom of the watch screen.
Multi Casual digital watch face with three dials whose
content can be changed by tapping them.
Location Analog watch face that shows your current latitude and
longitude based on the watch’s GPS, along with a
background image of a world map centered on your
current location.
World Time Digital watch face that shows the date, time, and city
name (time zone name) in your current location, the
time offset between your current location and your
home city time, and the current date, time, and city
name (time zone name) of your home city.
EN-20
Important!
While the “Always-on screen
*
” setting is off (default setting), the watch will
automatically switch to the monochrome LCD when display illumination
dims after the prescribed period of non-use, regardless of the currently
selected watch face. To switch back to the original watch face, tap the touch
screen.
When remaining battery power is 0%, the watch will automatically switch to
the monochrome LCD when display illumination dims after the prescribed
period of non-use, regardless of the currently selected watch face, and even
if the “Always-on screen” setting is on.
* “Always-on screen” is a Wear OS by Google setting item. For details, visit
the website below.
https://support.google.com/wearos/
If the message “Perform magnetization correction.”
appears...
The “Perform magnetization correction.” notification may appear while you
are using a watch face that includes a compass.
To calibrate the compass, tap the notification and then tap D. Move the watch
around as shown in the animation that appears on the watch display.
EN-21
If you feel that altitude, barometric pressure, or other
readings are not correct...
Perform the operation required to calibrate the readings you feel are incorrect.
See “Common Outdoor Function Settings” and perform one or more of the
operations below.
To calibrate this: See the information here:
Barometer Barometric Pressure Calibration
Altimeter Altitude Calibration”, “Correct Altitude Using
Location
Compass Compass Calibration”, “Compass Magnetic
Declination Calibration
Changing CASIO Watch Face Settings
See “Common Outdoor Function Settings”.
EN-22
Using the Location Memory App
The Location Memory app makes it quick and easy to record map-related
information. You can use the Location Memory app to perform the operations
described below.
Display a map to check your current location.
Select from a variety of different map skins including street view, geographic
view, satellite view, and more.
While the app is running, you can track your route on the map.
Use dictation to create a text memo about your current location.
Use marks to leave quick memos or when a network connection is not
available.
Use “Revisit” marks to record a memo and have the watch alert you with a
notification and navigation instructions back to the marked point whenever
you are in the vicinity.
EN-23
Location Memory App Basic Operations
You can perform main Location Memory app operations using the MAP button and
TOOL button. The operations you can perform with these two buttons are indicated
by on-screen icons displayed to the left of each button. You can also perform the
operations by tapping the icons.
Icon Pressing the button or tapping the icon does this:
Changes the functions of the two buttons to zoom in and zoom out
(see below).
Changes the functions of the two buttons to mark and dictation (see
below).
Zooms in on the map.
Zooms out from the map.
Records a memo with a mark.
Records a dictated memo.
Downloading Mapbox Maps
If you are planning to go to a location where there is no net access but you
still want to use maps, you can download them ahead of time while you still
have net access.
Using the procedure below to download a map automatically changes the
Map Type” setting to “Mapbox”.
1.
While the map is displayed, swipe the touch screen from bottom to top.
On the menu that appears, tap “Download Map”.
2.
Perform the procedure from step 2 under “Download Map”.
“Revisit” Marks
Use “Revisit” marks ( ) to record a memo and have the watch alert you with
a notification whenever you are in the vicinity (within 5 km under initial default
settings). For information about changing the notification distance setting and
disabling notification, see “Changing the “Revisit” Mark Notification Setting”.
EN-24
Important!
In order to be able to receive notifications triggered by “Revisit” marks, your
Android phone must have the CASIO MOMENT SETTER+ app installed,
and there must be a connection between the phone and watch.
Note that notification receipt triggered by “Revisit” marks is not supported
when the watch is connected with an iPhone.
You can have up to 50 “Revisit” marks registered at one time. Adding a new
Revisit mark while there are already 50 marks in memory will delete the
oldest one in memory to make room for the new one.
Point Navigation and Show Direction
Using “Point Navigation” and “Show Direction” at the same time provides you
with intuitive information about your destination.
Point Navigation
This setting can be used to have the direction and distance to a destination
displayed on the map. While a map is displayed, swipe from bottom to top.
On the menu that appears, tap “Point Navigation”.
For details, see “Using Point Navigation”.
Show Direction
This setting can be used to have the direction that the 12 o’clock position
of the watch is pointing displayed on the map. While a map is displayed,
swipe from bottom to top. On the menu that appears, tap “Show Direction”
to change the setting to “ON”.
While the “Show Direction” setting is “ON”, directions also are displayed on
the Activity app maps.
When the direction to the destination (linear) indicated by “Point Navigation”
and the cone of view displayed by “Show Direction” are aligned with each
other, it means that 12 o’clock on the watch is pointed in the direction of your
destination.
EN-25
Other Operations
To view a recorded memo, swipe the displayed map from bottom to top. On
the menu that appears, tap “History”.
For information about how to track your route on a map, see Enabling Route
Tracking on the Map (Route Display)”.
For information about map display settings, see “Common Outdoor
Function Settings” and perform one or more of the operations below.
To switch the map between Google Maps
TM
and Mapbox: Map Type
To change the map skin to geographic view or satellite view: Map Skin
Location Memory App Settings
This section explains settings that are particular to the Location Memory app
(“Route Display” and “Revisit”). For information about other setting items, see
Common Outdoor Function Settings”.
Enabling Route Tracking on the Map (Route Display)
Your route can be tracked on the map.
Your route is normally displayed as a blue line. However, the portion of your
route where you performed an Activity app measurement operation is
indicated by a red line.
EN-26
To display your route, use the procedure below to change “Route Display” on
the setting menu from “OFF” (initial default setting) to “ON”.
1.
While the map is displayed, swipe the touch screen from
bottom to top. On the menu that appears, tap “Settings”.
2.
Scroll the setting menu downwards. After confirming
that the “Route Display” setting is “OFF”, tap to change
it to “ON”.
Important!
This watch acquires location information at regular intervals and tracks your
route on a map. To conserve battery power, the frequency of GPS
information acquisition is normally low. Because of this, the route tracking
displayed while you are traveling by car, train, or other higher speed mode
of transportation may appear rather rough. Very high-speed transportation
may make it impossible to obtain GPS information and display route
correctly.
If you want smoother route display, start a data measurement operation with
the Activity app. GPS information is acquired more frequently during an
Activity app data measurement operation, so this will make the route display
smoother.
The watch saves route information, marks, memos, and other data in
internal storage. Data is retained as long as memory capacity is available.
When memory becomes full, the watch automatically deletes the oldest
data to make room for newly recorded data.
EN-27
Changing the “Revisit” Mark Notification Setting
Use “Revisit” marks to record a mark and have the watch alert you whenever
you are in the vicinity. Under the watch’s initial default settings, notification is
performed when both of the conditions below are satisfied.
You are <<within five kilometers>> of the “Revisit” mark location.
<<At least one day>> has passed since you were last <<within one
kilometer>> of the “Revisit” mark location.
The parts of the above conditions enclosed in double angle brackets (<< >>)
can be specified by you. You can also disable notifications, if you want. You
can use the steps below to configure settings.
1.
While the map is displayed, swipe the touch screen from
bottom to top. On the menu that appears, tap “Settings”.
2.
Scroll the setting menu downwards. When “Revisit” is
displayed, tap it.
3.
On the screen that appears, configure the required
settings.
Perform the steps below to modify notification conditions.
1.
If the “Notifications” setting is “OFF”, tap to change it to “ON”.
2.
Tap “Region”. On the list that appears, tap the distance you want to
specify.
3.
Tap “Notification Control”. On the list that appears, tap the interval you
want to specify.
To disable notification, tap “Notifications” to change its setting to
“OFF”.
EN-28
Viewing Your Route on a Phone
You can perform the procedure below to export a route stored in watch
memory and view it on a phone using Google Earth
TM
, etc. Note that your
phone needs to have “Google Drive
TM
” and “Google Earth” installed in order
to perform this procedure.
To output a traveled route from the history display
1.
While the map is displayed, swipe the touch screen from
bottom to top. On the menu that appears, tap “History”.
2.
Select the date of the history data you want to display.
3.
Tap “Show on Map”.
This displays the history data of the route you traveled on the map.
4.
Swipe the touch screen from bottom to top. On the menu
that appears, tap “Output as KML file”.
If this is the first time for you to perform this operation, an account
selection screen will appear. The KML file will be stored on Google
Drive, so select your Google account.
Once export starts, do not perform any operation on the watch until it
is complete.
The exported KML file will be stored on your Google Drive in a folder
named “CASIO-WSD”.
To output a traveled route from a normal map display
1.
While the map is displayed, swipe the touch screen from
bottom to top. On the menu that appears, tap “Settings”.
2.
Scroll the setting menu downwards. Tap “Export” and
then “Output as KML file” in sequence.
If this is the first time for you to perform this operation, an account
selection screen will appear. The KML file will be stored on Google
Drive, so select your Google account.
3.
Select the date of the route you want to export.
This will start export. Do not perform any operation on the watch until
the export is complete.
The exported KML file will be stored on your Google Drive in a folder
named “CASIO-WSD”.
EN-29
Using Point Navigation
You can use Point Navigation to have the direction and distance to a
destination displayed on the map. In addition to being available with the Point
Navigation app, this capability can also be used with the Location Memory
app and the Activity app.
Navigation in progress (current location map)
Note
You can also have the direction to the destination specified with Point
Navigation displayed on the TOOL app compass. For more information see
Point Navigation” under “Common Outdoor Function Settings”.
EN-30
Point Navigation Basics
To do this: Perform this operation:
Start navigation 1. Use one of the operations below to start up
Point Navigation.
On the app menu, tap “Point Navigation”.
While a map is displayed in the Location
Memory app, swipe the touch screen from
bottom to top and then tap “Point
Navigation”.
While the Activity app “START” screen
*1
is displayed, swipe the touch screen from
bottom to top and then tap “Point
Navigation”.
2.
Tap “Specify Destination”.
*2*3
3. Position your destination so it is aligned with
the cross mark in the center of the displayed
map, and then tap “Destination”.
4. To start navigation, tap “START”.
*1 This operation can be performed from the Trekking, Fishing, Cycling, or
Paddle “START” screen.
*2 If you started the operation from the Activity app, you can set the start point
of the activity as the navigation destination by tapping “Back to Start
Point” here.
*3 If you used Point Navigation to specify a destination in the past, you can
also tap “Destination History” and then select a destination from the list of
past destinations that appears. History will show up to the last 10 entries
only.
EN-31
To do this: Perform this operation:
Change the destination
during a navigation
operation
1. Perform step 1 of “Start navigation”.
This will display the message “Navigation
being performed.”.
2. Scroll the message downwards, and then
tap “Reset Destination”.
3. On the confirmation message screen that
appears, tap “Stop”.
4. Perform the “Start navigation” procedure
from step 2.
Stop a navigation
operation
1. Perform step 1 of “Start navigation”.
This will display the message “Navigation
being performed.”.
2. Scroll the message downwards, and then
tap “Stop Navigation”.
3. On the confirmation message screen that
appears, tap “Stop”.
Reaching Your Destination During a Navigation Operation
When you arrive in the vicinity (within approximately 80 meters) of your
destination while a Point Navigation map is displayed, a notification message
will appear on the display. To stop the navigation operation tap “Stop”. To
resume it, tap “Resume”.
EN-32
Using the TOOL App
The TOOL app displays a wide variety of information about the natural
environment around the watch.
TOOL Function List
Compass Shows a compass needle on the face. A color display
shows the latitude and longitude of the current location.
Altimeter Two color screens are available. An Altimeter Screen
(A) that shows a value and dial indication of the altitude
at your current location, and an Altitude Graph Screen
(B) that shows a graph of altitude changes over the
past 24 hours.
Barometer Two color screens are available. A Barometer Screen
(A) that shows a value and dial indication of the
barometric pressure at your current location, and a
Barometric Pressure Graph Screen (B) that shows a
graph of barometric pressure changes over the past 24
hours.
Sunrise/sunset
Two color screens are available. A Time Screen (A)
that shows details of the sunrise and sunset times at
your current location, and an Azimuth Screen (B) that
shows the sunrise and sunset times and azimuths.
Tide Graph Two color screens are available. A Tide Graph Screen
(A) that shows a Tide Graph of a preset point (port),
and a Fishing Time Screen (B) that shows
recommended fishing times for an ocean or river in the
vicinity of your current location.
My Graph Graphically represents the amount of time during the
current date spend engaging in the following activities:
resting, walking, running, riding.
EN-33
Basic TOOL Operations
To do this: Perform this operation:
Change the
TOOL function
While the TOOL app is running, press the TOOL
button or MAP button.
While the TOOL app is running, swipe the touch
screen from top to bottom, or from bottom to top.
Switch between
the two color
screens (A and
B) (See “TOOL
Function List”.)
To switch from screen A to screen B, swipe the touch
screen from right to left. To switch from screen B to
screen A, swipe the touch screen from left to right.
Change TOOL
app settings
See “Common Outdoor Function Settings”.
TOOL App Color Display and Monochrome Display
You can switch the TOOL app screen between color display and
monochrome display. Outdoors in bright sunlight, the monochrome display
provides better readability than the color display.
To do this: Perform this operation:
Switch from the color display to
the monochrome display
Hold down the TOOL button or MAP
button for about three seconds.
Switch from the monochrome
display to the color display
Hold down the TOOL button or MAP
button for about three seconds or tap
the touch screen.
Note
While the TOOL app is running, it will shut down automatically after about
one minute of non-use.
“My Graph” TOOL app function cannot be displayed under the watch’s initial
default settings. For information about the operation required to display My
Graph, see “Using My Graph”.
EN-34
Using Compass
The pointer indicates true north.
*1
The value in the center of the display shows how many degrees there are in
a clockwise direction from the north indication (which is 0°) to 12 o’clock on
the watch. For example, if 12 o’clock on the watch is facing due east, the value
will show 90°. Letters on the display also indicate the direction that 12 o’clock
is facing (16 directions).
*1 Initial default setting. For information about how to change settings and
have magnetic north indicated, see “Compass Magnetic Declination
Calibration”.
To lock the direction
You can use Compass to lock the indicated direction to help you maintain a
specific bearing while trekking, etc. While the watch’s 12 o’clock position is
pointed in the direction you want, tap the touch screen. If the watch’s 12
o’clock position deviates from the locked direction, the amount of the
deviation will be indicated in blue.
To unlock a direction, tap the touch screen again.
Compass Calibration (Magnetization Correction)
The “Perform magnetization correction.” message may appear while you are
using Compass. To calibrate the compass, move the watch around as shown
in the animation that appears on the watch display. Keep moving your arm
until the message disappears, indicating that magnetization correction is
complete.
Note
The watch normally performs magnetization correction automatically. You
only need to perform the above operation when the message appears.
EN-35
Using Altimeter
Altimeter has a color display Altimeter Screen (left), a color display Altitude
Graph Screen (right), and a monochrome display.
All of the screens show the altitude at your current location.
The Altitude Graph Screen shows a graph of altitude changes over the past
24 hours, along with the low altitude (Min) and high altitude (Max) during
that period.
Your watch measures altitude within the range of –700 to 10,000 meters (or
–2,300 to 32,800 feet), in units of 1 meter (or 5 feet).
EN-36
Before Using Altimeter
The watch’s Altimeter can be configured to use positioning information
(GPS) to correct altitude readings automatically. Configure the settings
below to use this function.
Correctly configure the “Location” setting on the watch and smartphone.
For more information, see step 1 under “Preparing the Watch for Outdoor
Use”.
Select “ON” for the “Correct Altitude Using Location” setting.
After reading “Common Outdoor Function Settings”, perform the
operation under “Correct Altitude Using Location”.
Since the watch displays relative altitude based on changes in barometric
pressure, it may display different altitude readings for the same location, or
incorrect readings due to changes in the local barometric pressure. “Correct
Altitude Using Location” uses GPS information to correct altitude. Even so,
since GPS information generally includes some error, there may be large
error between the altitude readings produced by this watch and actual
altitudes indicated locally. If you want more accurate altitude readings while
climbing or hiking, manually inputting locally indicated altitude values is
recommended. After reading “Common Outdoor Function Settings”,
perform the operation under “Altitude Calibration”.
When taking altitude readings, keep the watch at as stable a temperature
as possible. For better accuracy, strap the watch to your wrist for some time
before taking readings in order to allow the watch’s temperature to stabilize.
Changes in pressure sensor temperature can cause measurement error.
EN-37
Altimeter Precautions
Do not use this watch while skydiving, hang gliding, paragliding, gyrocopter
flying, glider flying, or engaged in other activities where altitude changes
suddenly.
Altitude readings produced by this watch are not intended for special-
purpose or industrial level use.
In an aircraft, the watch measures the in-cabin pressurized air pressure, so
readings will not match altitudes announced by the crew.
Large changes in barometric pressure due to atmospheric conditions, large
temperature changes, or subjecting the watch to strong impact may make
correct readings impossible.
Displayed Altitude Values (Relative Altitude)
The two ways to express altitude are described below.
Relative Altitude:
This is the difference in the altitudes between two locations.
Example: Height measured from the ground to the top of a building (A)
Sea Level Altitude (Elevation):
Altitude measured from sea level.
Example: Height measured from sea level to the top of a building (B)
Sea level
Your watch’s Altimeter use a pressure sensor to measure barometric
pressure, and then calculates and displays relative altitude based on the
measured value. The altitude values displayed by your watch are based on
International Standard Atmosphere (ISA) relative altitude data defined by the
International Civil Aviation Organization (ICAO).
EN-38
Using Barometer
Barometer has a color display Barometer Screen (left), a color display
Barometric Pressure Graph Screen (right), and a monochrome display.
All of the screens show the barometric pressure at your current location.
The Barometric Pressure Graph Screen shows a graph of pressure
changes over the past 24 hours, along with the low pressure (Min) and high
pressure (Max) during that period.
Your watch measures barometric pressure within the range of 260 to 1,100
hPa (or 7.6 to 32.5 inHg), in units of 1 hPa (or 0.1 inHg).
Calibrating Barometric Pressure Readings Manually
Though the pressure sensor built into the watch is adjusted at the factory and
normally does not require calibration, you can perform the calibration
operation above if you notice that readings are very different from those from
other sources. After reading “Common Outdoor Function Settings”, perform
the operation under “Barometric Pressure Calibration”.
Barometer Precautions
The barometric pressure graph produced by this watch can be used to
obtain an idea of upcoming weather conditions. Note that this graph
provides only a rough idea of barometric pressure trends, and it is not
intended for official weather predictions or reporting activities.
Pressure sensor readings can be affected by sudden changes in
temperature. Because of this, there may be some error in the readings
produced by the watch.
EN-39
Using Sunrise/Sunset
Sunrise/Sunset has a color display Time Screen (left), a color display Azimuth
Screen (right), and a monochrome display.
The Time Screen shows the following times: sunrise time (upper left), pre-
dawn nautical twilight start time (lower left), sunset time (upper right), post-
sunset nautical twilight end time (lower right), and the current time (bottom
center).
The Azimuth Screen shows the current time, the sunrise time, and the
sunset time. The outer circumference of the display shows a compass, with
a red pointer indicating north. indicates the sunrise azimuth while
indicates the sunset azimuth.
The monochrome display alternates at 10-second intervals between
sunrise time (RISE) and sunset time (SET).
Nautical Twilight
Twilight is the time when the sky brightens as the sun is at or just below the
horizon (water horizon or visible horizon). There are actually three types of
twilight: nautical twilight, civil twilight, and astronomical twilight. Nautical
twilight is normally defined as occurring when the sun is from 6 to 12 degrees
below the horizon.
EN-40
Using Tide Graph
Tide Graph has a color display Tide Graph Screen (left), a color display
Fishing Time Screen (right), and a monochrome display.
The Tide Graph Screen shows the current tide level and time (red
characters in the center of the screen), along with the high tide (High) and
the low tide (Low) that will occur up to 12 hours later. The graph shows
changes in the tide level for 24 hours (12 hours before and after the current
time).
The number of white fish marks on the Fishing Time Screen indicates the
projected probability of fishing success. Anywhere from zero to four white
fish marks are displayed, and more white fish marks indicate that better
success can be expected. Note however, that this in no way specifically
guarantees your fishing success.
The monochrome display alternates at 10-second intervals between high
tide time (HIGH) and low tide time (LOW).
Before Using Tide Graph
To use the Tide Graph Screen, you need to specify the point (port) whose
tide information you want to view. After reading Common Outdoor Function
Settings”, perform the operation under “Port setting”.
The information the watch displays on the Fishing Time Screen is calculated
based on your current location. It is not affected by the watch’s point (port)
setting. This means that Fishing Time Screen information can be used for
both saltwater and fresh water fishing.
Keep in mind that the Tide Graph Screen shows information about the
currently selected point (port), while Fishing Time Screen information is
based on your current location.
EN-41
Interpreting Fishing Time Screen Contents
Fish Marks (Projected Probability of Fishing Success
Indicators)
The number of fish marks on the Fishing Time screen indicates the projected
probability of fishing success. Anywhere from zero to four white fish marks
are displayed, and more white fish marks indicate that better success can be
expected. Note however, that this in no way specifically guarantees your
fishing success.
The fish mark indicator display is based on the current Moon age and Moon
position (hour angle). Fishing timing is said to be best when the Moon age is
new Moon or full Moon, and second best during the Moon’s first quarter and
last quarter. For the Moon hour angle, 00:00 and 12:00 is said to be optimal,
while 06:00 and 18:00 is said to be second best. The correlation of these
factors results in the fish mark indications shown below.
Hour Angle
00:00/12:00 Hour
Hour Angle
06:00/18:00 Hour
Other
New Moon/ Full
Moon
*
First Quarter/
Last Quarter
Other
* Including Moon ages 26.9 to 28.6, and 12.1 to 13.8.
Note
Hour angle is one of the coordinates used to give the direction of a celestial
body (planet, moon, etc.) point on the celestial sphere. The hour angle
directly overhead is 00:00, westward is 06:00, directly downwards is 12:00,
and eastward is 18:00.
EN-42
Current Date’s Optimum Predicted Fishing Time Period
The Fishing time Screen shows two orange time periods centered on hour
angles 00:00 and 12:00, and two blue time periods centered on hour angles
06:00 and 18:00. Each region indicates periods during which optimum fishing
can be expected.
The orange region indicates the best fishing period as predicted by the watch,
while the blue region indicates the next best fishing period. The part of a
period in the current day that is already passed is indicated by a lighter color,
while the darker color indicates the part of the period that has not yet passed.
Times indicated by the periods can be read using values around the periphery
of the watch face. The 12 o’clock position is noon, while 6 o’clock is midnight.
A
Time period centered on a Moon hour angle of 18:00 (Time of 18:00 hour
angle = 08:50AM)
B
Time period centered on a Moon hour angle of 12:00 (Time of 12:00 hour
angle = 02:10AM)
C
Time period centered on a Moon hour angle of 00:00 (Time of 00:00 hour
angle = 02:00PM)
D
Time period centered on a Moon hour angle of 06:00 (Time of 06:00 hour
angle = 08:05PM)
EN-43
Current Moon Hour Angle and Moon Age Indications
The location of the Moon indicator on the Fishing Time screen shows the
current hour angle of the Moon, while the shape of the indicator shows the
current Moon age. In the screen shown above, for example, the current Moon
hour angle is 22:00 (12 o’clock position = hour angle 00:00, 6 o’clock position
= hour angle 12:00), while the Moon age is 21.3 to 23.1.
The table below shows how Moon age is indicated by the Fishing Time screen
indicator.
Moon
phase
Moon age
Indicator
New
Moon
0.0 - 0.9
28.7 - 29.5
1.0 - 2.7
2.8 - 4.6
4.7 - 6.4
First
Quarter
6.5 - 8.3
8.4 - 10.1
10.2 - 12.0
12.1 - 13.8
Moon
phase
Moon age
Indicator
Full
Moon
13.9 - 15.7
15.8 - 17.5
17.6 - 19.4
19.5 - 21.2
Last
Quarter
21.3 - 23.1
23.2 - 24.9
25.0 - 26.8
26.9 - 28.6
EN-44
Using My Graph
My Graph shows the status of your activities for the current day.
Under initial default settings, both color and monochrome screens show
how many calories you have burned from the start (00:00) of the current
day.
A color display shows what types of activities you have performed on the
current day (A Running, B Cycling, C Walking, D Riding, E Resting) as
a concentric circle graph. Up to four of the five items (A through E) can be
displayed at the same time. Values at the bottom of the screen show the
cumulative times spent engaged in each type of activity.
For information about configuring display item settings, see “To specify
activity types that appear on the Activity Graph screen”.
You can hide the current time and cumulative activity times by tapping the
touch screen of the color display. Tap the touch screen again to show the
times.
Before Using My Graph
My Graph cannot be displayed under the watch’s initial default configuration.
To display it, you need to change the “Save daily activity records” setting to
“ON”. For more accurate burned calorie calculation, you need to input the
following information: height, weight, wrist where you wear the watch. After
reading “Common Outdoor Function Settings”, configure the following
settings: “Save daily activity records”, “Height”, “Weight”, “Wrist where you
wear the watch”.
EN-45
To specify the type of values shown in the center of the My
Graph screen
1.
Swipe the touch screen from right to left. On the
“Settings” Screen that appears, tap D. This displays the
setting menu.
2.
Scroll the setting menu upwards and downwards. When
“Centered value / My Graph” is displayed, tap it. This
displays a list of value types.
3.
Scroll the list upwards and downwards. When the type
of value you want shown in the center of the My Graph
Screen is displayed, tap it.
Important!
The measurement and calculation method used to determine calories
burned, number of steps, and other numeric values depends on the app
being used. Because of this, there may be some variation between values.
For example, the number of calories shown on My Graph will not necessarily
match the number of calories burned on another app’s display.
The activity type and activity time displayed by My Graph are based on
movements detected by the watch’s sensors. Because of this, certain
movements may result in misinterpretation of your activity, resulting in the
wrong activity type and/or activity time being displayed.
EN-46
To specify activity types that appear on the Activity Graph
screen
1.
Swipe the touch screen from right to left. On the
“Settings” Screen that appears, tap D. This displays the
setting menu.
2.
Scroll the setting menu upwards and downwards. When
“Activity Specific Properties” is displayed, tap it. This
displays a list of activity types.
3.
Tap the check boxes next to the activity types you want
to show on the activity graph screen to select ( ) them.
You can have up to four activity types selected ( ) at one time.
EN-47
Using the Activity App
The Activity app shows cumulative elapsed time from when one of the outdoor
activities listed below starts until it stops, a track of the route followed on a
map, and a list of data (activity time, distance traveled, etc.)
Trekking Paddle
Fishing Snow
Cycling
Activity App Screen
Screen Before Start of Measurement
The text below the “START” (or “BEGIN”) button shows the activity type. You
can change the activity type by swiping the touch screen left or right.
Swipe the touch screen from bottom to top. You can use the menu that
appears to perform the operations below.
Use this menu item: To do this:
Download Map Download maps ahead of time while you have
net access when you want to use maps where
there is no net access.
After tapping this menu item, perform the
procedure from step 2 under “Download Map”.
Using this procedure to download a map
automatically changes the “Map Type” setting
to “Mapbox”.
EN-48
Use this menu item: To do this:
History & Export
→ Activity History
Display an activity history (activity end dates
and times). You can tap an item in the history to
display its measurement result screen and/or
map screen.
History & Export
→ History Auto Save
Enable “History Auto Save”, which will cause
the operations below to be performed
whenever you stop a logging operation with the
Activity app. This means you can view history
data on the phone.
Auto registration of the activity type and date/
time data to Google Calendar
Auto save of traveled route data (KML file) to
Google Drive
The exported KML file is stored on Google
Drive in a folder named “CASIO-WSD”.
For details about the required procedure, see
Enabling History Auto Save”.
History & Export
→ View History on
Phone (Android only)
Display a calendar (Google Calendar or
another similar app) on the phone. To view the
route you traveled with Google Earth or another
app, tap the desired data on the Calendar.
For details about the required procedure, see
Viewing History Data on a Phone”.
Target altitude Specify the trekking target altitude.
Point Navigation This setting can be used to have the direction
and distance to a destination displayed on the
activity map. For details, see “Using Point
Navigation”.
MOMENT SETTER Configure MOMENT SETTER notification
settings to get useful information delivered
when you need it during an activity. For details,
see “Using the MOMENT SETTER App”.
Tapping “START” or “BEGIN” starts speed and distance traveled
measurement of the activity and switches to the measurement in progress
screen.
EN-49
Measurement in Progress Screens
Swiping the screen left or right while measurement is in progress will switch
between a measurement data screen, map screen, “STOP” screen, etc. The
screens that can be displayed depend on the activity type.
Basic Activity App Operations
To do this: Perform this operation:
Start measurement
(excluding Snow)
Select the type of activity whose data you want
to measure and then tap “START”.
Start a Snow
measurement operation
(while “Auto Record” is
“ON”)
Select the type of activity whose data you want
to measure and then tap “BEGIN”.
Measurement will start automatically when
the watch detects the start of a Snow run.
Start a Snow
measurement operation
(while “Auto Record” is
“OFF”)
1. Select the type of activity whose data you
want to measure and then tap “BEGIN”.
2. To start measurement, press the MAP
button.
Stop a measurement
operation
After the activity whose data is being measured
is finished, tap “STOP” (or “END”).
Input fishing results
during Fishing
measurement
While a Fishing data measurement operation is
in progress, display the fishing result screen
and then press the MAP button or tap .
EN-50
Enabling History Auto Save
Note
“History Auto Save” settings are applied to both the Activity app and Extend
Mode app. Because of this, you do not need to perform the procedure below
if you have already enabled History Auto Save with the Extend Mode app.
1.
Display the Activity app “START” screen or “BEGIN”
screen.
2.
Swipe the touch screen from bottom to top. On the menu
that appears, tap the following in sequence: “History &
Export”, “History Auto Save”.
3.
On the Select Account screen that appears, select the
Google account you want to use.
4.
In response to the confirmation message that appears,
tap “Enable”.
At this point, a message may appear asking you to grant access to your
Google Calendar and/or Google Drive. If this happens, scroll
downwards as you read the message, and then tap to allow
access.
Check to confirm that “ON” is displayed for “History Auto Save”.
While “History Auto Save” is enabled, history data will be uploaded
automatically whenever a logging operation performed with the Activity
app or Extend Mode app is stopped.
EN-51
Viewing History Data on a Phone
Important!
Note that your phone needs to have “Google Calendar”, “Google Drive”,
and “Google Earth” installed in order to perform this procedure.
1.
On the phone, start up Google Calendar.
2.
On Google Calendar, tap the history data whose details
you want to view.
On the detailed information screen that appears, tap the link of the KML
file stored on Google Drive.
3.
Use Google Earth to open the KML file.
Android phone:
1.
Tap the KML file link.
2.
On the app selection screen that appears, tap Google Earth.
This starts up Google Earth and shows the route you traveled on a
map.
iPhone:
1.
Tap the KML file link.
This will display the following message: “Unsupported File Format.”
2.
In the upper right corner of the screen tap the more options (...) icon.
On the screen that appears, tap “Open In”.
3.
On the dialog box that appears, tap “Google Earth”.
This starts up Google Earth and shows the route you traveled on a
map.
EN-52
Note
If the watch is paired with an Android phone, you can use watch menu
operations to start up the phone’s Google Calendar.
Using the Activity app:
1. Display the Activity app “START” screen or “BEGIN” screen.
2. Swipe the touch screen from bottom to top. On the menu that
appears, tap the following in sequence: “History & Export”, “View
History on Phone”.
Using the Extend Mode app:
1. On the app menu, tap “Extend Mode”.
2. Tap the following in sequence: “Settings”, View History on Phone.
Data Displayed During Measurement Operations
Note the points below concerning the data displayed while a measurement
operation is in progress.
For information about procedures to calibrate the barometric pressure and
altitude values displayed by the Activity app to make them more accurate,
read “Common Outdoor Function Settings” and then refer to the following
items: “Barometric Pressure Calibration”, “Altitude Calibration”, and
Correct Altitude Using Location”.
Since speed and distance traveled are measured using the watch’s or your
smartphone’s GPS function, location measurement error may result in
measured value error.
Speed and distance are calculated at regular intervals, so there may be
some lag before values are displayed.
Hyphens (-) are displayed in place of the speed and distance readings when
the watch is unable to acquire location information (GPS).
EN-53
Using the MOMENT SETTER App
For example, you can use the MOMENT SETTER app to receive notifications
like the ones shown below.
During an Activity app Trekking measurement operation, perform a vibration
notification and display the remaining altitude when there are 200 m remaining
to an altitude of 2000 m.
Every day, perform vibration notification and display the sunrise time one
hour before sunrise.
Operation involves simple selection of the notification to be received from a
menu.
As is evident in the above example, there are two types of MOMENT SETTER
notifications: those received during the measurement operation of an Activity
app Trekking, Fishing, or another activity, and those that are not related to an
activity measurement operation.
EN-54
MOMENT SETTER App Main Menu
Starting up the MOMENT SETTER app first displays a Main Menu.
Setting items included in the Main Menu are shown in the table below.
Tapping this item: Displays this menu:
Recent Menu of up to three notifications that were last
turned on. This item appears when one or more
MOMENT SETTER notifications were turned on.
Climbing, trekking
*1
,
Fishing
*1
, Cycling
*1
,
Paddle
*1
, Snow
*1
Notification menu corresponding to each activity
type (see “Using the Activity App”). The alerts of
each menu can be received only while there is a
measurement operation in progress for the activity
with the same name as the item name.
Extras Displays a notification menu that is not associated
with any activity type. The alerts on this menu can
be received even when there is no Activity app
measurement operation in progress.
Settings Setting menu. See “Common Outdoor Function
Settings”.
*1 The menu that appears when one of these items is tapped is the same
menu that is displayed when MOMENT SETTER is accessed from the
Activity app.
EN-55
Example MOMENT SETTER Operation
This section shows an example operation for configuring notification settings
for “Climbing, trekking”. This operation can be started from the MOMENT
SETTER app or Activity app.
1.
Start up the MOMENT SETTER app and scroll the main
menu upwards and downwards. When “Climbing,
trekking” is displayed, tap it.
Alternatively, while the Activity app “Trekking” activity
is displayed, swipe the touch screen from bottom to top.
On the menu that appears, tap “MOMENT SETTER”.
2.
Scroll the displayed notification menu left and right until
the notification you want (such as, “Each 1 km of
distance traveled, display the current altitude.”) is
displayed.
At this point, the check mark at the bottom of the notification screen will
become gray. This indicates that notifications are disabled (no
notifications received).
To change initial default settings, perform steps 3 and 4. To leave initial
default settings as they are, advance to step 5.
To return from the notification menu to the previous screen (MOMENT
SETTER app main menu or Activity app “START” Screen), press the
MAP button or TOOL button.
3.
Swipe the touch screen from top to bottom to display the
criteria setting screen.
4.
Tap “Distance”. On the list that appears, tap a setting
(such as “3km”).
This applies the changes and returns to the notification menu. At this
time, notifications are enabled and the check mark at the bottom of the
display will change to (meaning that the operation in step 5 is not
required).
EN-56
5.
At the bottom of the display, tap to toggle it to .
6.
Press the power button to exit the MOMENT SETTER
app.
After performing the above operation, you need to start up the Activity
app and start a Trekking measurement operation to actually receive
notifications. See “Using the Activity App”.
Note
A notification from MOMENT SETTER is deleted automatically after a fixed
amount of time.
Since speed measurement, distance traveled measurement, and current
location detection are performed using the watch’s or your smartphone’s
GPS function, there may be some measured value error. Accuracy is
particularly poor in a ravine or canyon, among buildings, indoors, and in
other areas where signal reception is bad.
You can disable all MOMENT SETTER settings with a single operation.
After reading Common Outdoor Function Settings”, perform the operation
under “All Off”.
EN-57
Using the Extend Mode App
The Extend Mode app records multiple days of trekking and other activity
data as a continual log (location information log).
9:00AM 3:00PM 9:00AM 2:00PM 6:30AM
End
Resume
Pause
Resume
Pause
Start
Power off Power off
Logging Logging Logging
(Watch
display)
(Watch
display)
Day 1 Plan*
1
Day 2 Plan*
1
Day 3 Plan*
1
Logging:
This app continually logs your activity while you are in motion, and
automatically turns off power (displaying the current time only) while you are
at rest at a mountain cabin, etc. The Extend Mode allows recording of a
maximum of three days
*2
(three days, two nights) of track data, even if you
do not charge the battery during that time.
EN-58
*1 One day of data (current day’s log start time and pause times, next day’s
log resume time) must be input by you each morning.
*2 Maximum value based on eight hours of use and 16 hours of rest per day.
Note
While logging is paused, the bottom of the display shows the scheduled
time until watch operation and logging restarts.
This is just a brief explanation about how to use the Extend Mode app and
perform its operations. For more information, refer to the Extend Mode help
page at the website below.
https://support.casio.com/wsd/en/basic/extend_mode.html
Precautions when Using the Extend Mode App
Before performing a location information logging operation with the Extend
Mode app, be sure to first download a map that covers the entire area where
you plan to be moving around while logging. For details, see “Download
Map”.
Wi-Fi and Bluetooth are automatically disabled during an Extend Mode app
logging operation. Because of this, notifications from the phone and all other
phone linking operations are disabled.
While logging with Extend Mode, displaying a screen other than the Extend
Mode screen (another app screen or a watch face) will increase power
consumption. If another screen is displayed, tap “Extend Mode” on the app
menu as soon as possible to return to the Extend Mode screen.
None of the items below can be used while Extend Mode app logging
operation is being performed.
Location Memory, Point Navigation, all activity apps
MOMENT SETTER notifications
Location information logging stops automatically whenever battery power
becomes very low. Logging will stop at any time after remaining battery
power drops below 3%.
EN-59
Extend Mode App Basics
To do this: Perform this operation:
Input a plan for the first
day’s activity
1. On the app menu, tap “Extend Mode”.
2. Tap “Prepare”.
3. Perform the operations below in accordance
with the displayed message.
Confirm that map of your destination has
been downloaded. If it isn’t, download it.
If the “Prepare” screen appears, input the
following times: “Start Log”, “Pause”,
“Restart Log”.
4.
On the “Prepare” screen, tap .
5. In accordance with the message that
appears, tap “Start logging now” or “Wait
until start”.
Note
If you tapped “Wait until start”, Wear OS shuts
down (powers off) and only the time is
displayed on the monochrome LCD. When
the “Start Log” time is reached, Wear OS re-
starts automatically (power on), and logging
starts.
After tapping “Wait until
start”, have the logging
start time advanced (to
start logging
immediately)
Important!
The procedure assumes that “Wait until start”
was tapped to shut down Wear OS, and that
a logging start time is in the future.
1. Long-press the power button to start up
Wear OS.
This displays the Extend Mode plan input
screen.
2. Scroll the screen downwards and then tap
.
EN-60
To do this: Perform this operation:
Switch from the
monochrome display to
the map display during a
logging operation
Press the MAP, POWER, or TOOL button. Note
that the tapping the touch panel will not switch
the display.
Advance the logging
pause time (to pause
logging immediately)
1. While a map is displayed, swipe the touch
screen from bottom to top. On the menu that
appears, tap “Pause”.
2. On the confirmation message screen that
appears, tap “Wait until restart”.
Extend the logging
pause time
1. In response to the message that appears
when the pause time you input on the “Plan”
screen is reached, tap “Extend 1 hour”.
This displays a message letting you know
that the pause time was extended by one
hour.
Input a plan for the
second and subsequent
day’s activities
1. When the “Restart Log” time that was
specified on the previous day is reached,
Wear OS automatically starts up and the
“Plan” screen appears.
2. On the “Plan” screen, input the following
times: “Pause”, “Restart Log”.
3.
Tap .
End logging 1. While a map is displayed, perform the
operation below.
Swipe the touch screen from bottom to
top. On the menu that appears, tap “Stop
(Quit)”.
EN-61
Viewing History Data
You can use the watch screen to view history data recorded with the Extend
Mode app.
Enabling “History Auto Save” will cause the operations below to be performed
whenever you stop a logging operation with the Extend Mode app. This
means you can view history data on the phone.
Auto registration of the log operation date/time to Google Calendar
Auto save of traveled route data (KML file) to Google Drive
The exported KML file will be stored on your Google Drive in a folder named
CASIO-WSD.
Perform the procedures below while there is no logging operation being
performed by the Extend Mode app.
To do this: Perform this operation:
View history data on the
watch
1. On the app menu, tap “Extend Mode”.
2. Tap the following in sequence: “Settings”,
“History”.
3. Select the history data you want to display.
Enable “History Auto
Save”
Note
“History Auto Save” settings are applied to
both the Activity app and Extend Mode app.
Because of this, you do not need to perform
the procedure below if you have already
enabled History Auto Save with the Activity
app.
1. On the app menu, tap “Extend Mode”.
2. Tap the following in sequence: “Settings”,
“History Auto Save”.
3. Perform the procedure from step 3 under
Enabling History Auto Save”.
View history data on a
phone
See “Viewing History Data on a Phone”.
EN-62
Note
History data logged with the Extend Mode can be viewed and exported
using the Location Memory app.
Using the Multi Timepiece App
The Multi Timepiece app provides access to the Multi Timepiece Mode, which
makes it possible to display the current time and particular information
(battery level, or barometric pressure/altitude, etc.) only on the monochrome
LCD. Use the Multi Timepiece Mode to minimize the information that appears
on the watch display and save power while sleeping, while in a location where
smart device use is prohibited, etc.
Important!
In Multi Timepiece Mode, apps, location information, Wi-Fi, and
smartphone linking (notification reception, etc.) are all disabled.
While the watch is in Multi Timepiece Mode, you will not be able to change
any settings related to the current time and date (time zone auto switching,
smartphone time and date sync, including summer time adjustment, etc.)
To update the time setting, every couple of days you should exit Multi
Timepiece Mode and establish a connection with a smartphone.
EN-63
Display Styles
There are two display styles in the Multi Timepiece Mode. You can select the
display style each time you enter the Multi Timepiece Mode.
Outdoor Style................... Current time, barometric pressure, altitude,
compass
Daily Style........................ Current time, day of the week, day, battery level,
step count
*
Daily StyleOutdoor Style
* Either the battery level (default) or step count can be displayed. The battery
operating time while the step count is displayed is approximately one-fourth
that provided when the battery level is displayed.
EN-64
Multi Timepiece Mode Operations
To do this: Perform this operation:
Switch the watch to
Multi Timepiece
Mode
1. On the app menu, tap “Multi Timepiece”.
This displays the “Multi Timepiece” screen.
2. Tap “Settings” and then configure the settings
below as required.
Battery Level/
Step Count
While Daily Style is selected,
this setting switches the value
at the bottom of the display
between the battery level and
the step count.
Monochrome
Display
Selects the Multi Timepiece
mode display style.
Bright: Dark characters on a
light background.
Dark: Light characters on a
dark background.
Backlight
Color
Specifies the color of the
backlight that illuminates the
display when the power button
is short-pressed in the Multi
Timepiece mode.
3. Tap “Outdoor Style” or “Daily Style”.
4. Read the explanation that appears, and then tap
“Start”.
This shuts down Wear OS by Google, enters
Multi Timepiece Mode, and displays the
current time on a monochrome screen.
Illuminate the display
in Multi Timepiece
Mode
Press and immediately release the power button.
This will illuminate the display for about two
seconds.
EN-65
To do this: Perform this operation:
Show or hide the
compass (Outdoor
Style only)
Short-press the TOOL button. Each press toggles
the compass between show and hide.
Note
If “CALI” appears on the screen when you try to
use the compass, it means that you need to
perform magnetization correction. Remove the
watch from your wrist, and rotate it on various
different axes until “CALI” disappears from the
display.
Correct altitude and
barometric pressure
values (Outdoor
Style only)
Important!
Use the operation below to input altitude values
based on elevation values from other sources,
and/or barometric pressure values measured
using an accurate barometer. For details about
this operation and why it is necessary, see the
explanation under “Altitude Calibration” and
Barometric Pressure Calibration”.
1. Hold down the MAP button for about two
seconds until the “ALTI” (altitude) value in the
lower display starts to flash.
This indicates the altitude calibration mode.
2. Use the MAP button and TOOL button to change
the value as desired.
3. Hold down the MAP button for about two
seconds until the “BARO” (barometer) value in
the upper display starts to flash.
This enters the barometric pressure
calibration mode.
4. Use the MAP button and TOOL button to change
the value as desired.
5. Hold down the MAP button for two seconds.
This exits the calibration mode.
Exit Multi Timepiece
Mode and restore
normal function
Hold down the power button for about two seconds.
This starts up Wear OS by Google and returns to
normal function.
EN-66
Common Outdoor Function Settings
CASIO apps and CASIO watch faces share the same outdoor functions such
as Compass, Altimeter, etc. This section explains settings that are common
to all CASIO apps and watch faces.
Basic Operations for Configuring Common Settings
Use the setting menu to configure common settings. The required operation
to display the setting menu depends on what screen is displayed, but
operations are the same in all cases once the menu is displayed. You can
use the steps below to configure settings.
1.
Display the setting menu.
From a CASIO watch face:
1.
Touch and hold the center of the touch screen for about two seconds.
2.
Tap D that appears in the lower part of the watch face. This displays
the setting menu.
From the TOOL app or Activity app:
1.
Swipe the touch screen from right to left several times.
2.
When the “Settings” Screen is displayed, tap D. This displays the
setting menu.
From the MOMENT SETTER app:
1.
Swipe the touch screen from bottom to top.
2.
Tap “Settings”. This displays the setting menu.
From the Location Memory app or Extend Mode app:
1.
While a map is displayed, swipe the touch screen from bottom to top.
2.
On the menu that appears, tap “DSettings”. This displays the setting
menu.
2.
Scroll the setting menu upwards and downwards. When
the setting item you want to configure is displayed, tap
it.
Some items toggle between settings when tapped, while others display
another screen for configuring settings. For an explanation about each
item and its operation, see “Setting Item List”.
EN-67
Setting Item List
The setting items displayed on the setting menu (see “Basic Operations for
Configuring Common Settings”) are shown below. After displaying the setting
menu, perform the operation required for the item whose setting you want to
change.
Note
The letters to the right of each setting item indicate the screen from which
the setting item can be displayed. For example, the letters “WF” to the right
of a setting item means that the setting item can be displayed from a watch
face (WF) screen.
WF: Watch face MS: MOMENT SETTER app
TL: TOOL app LM: Location Memory app
AC: Activity app EX: Extend Mode app
TP: Multi Timepiece app
Compass Calibration (WF)
Operation
Tap this setting item and then move the watch around as instructed by the
Compass magnetic calibration message and animation that appears on the
display. A message will appear to let you know when magnetic calibration is
complete, and then the screen that was displayed before you started
calibration (watch face) will reappear.
Description
This function calibrates Compass so it indicates direction correctly.
If Compass Calibration is dimmed (and will not respond when tapped) it
means that Compass accuracy is sufficient and that correction is not required.
Compass Magnetic Declination Calibration (WF/TL)
Operation
Each tap of this setting item toggles between “ON” and “OFF”. The Compass
indicates true north when on, and magnetic north when off.
Description
This function corrects magnetic north and true north error.
EN-68
Altitude Calibration (WF/TL/AC/EX)
Operation
1.
If “Correct Altitude Using Location” is on, turn it off.
2.
Tap “Altitude Calibration”.
3.
On the altitude input screen that appears, input the elevation at your
current location (which you obtained from local indications).
Tap the digit of the value that you want to change, and then use and
to change it.
To reset a manually input altitude calibration value, tap C.
Important!
Tapping C to reset the calibration value causes the watch to display altitude
values that are simply calculated based on International Standard
Atmosphere (ISA) definitions. Because of this, there will be large error
between displayed values and actual altitude. Following reset, it is
recommended that you re-input a locally indicated altitude value.
Changing the “Correct Altitude Using Location” setting to “ON” will cancel
any Altitude Calibration value you input manually.
Description
You can lessen error in the altitude readings displayed by the watch by
manually inputting accurate local altitude and elevation values. You can find
out the elevation at your current location from signs, maps, on the Internet,
etc. While mountain climbing, it is highly recommended that you make a habit
of regularly comparing altitude readings produced by the watch with locally
available elevation indications, and of performing this procedure as required.
EN-69
Correct Altitude Using Location (WF/TL/AC/EX)
Operation
Each tap of this setting item toggles between “ON” and “OFF”.
Description
Select “ON” for this setting to perform auto altitude calibration based on the
watch’s or your smartphone’s location information (GPS). “OFF” must be
selected for this setting to perform altitude calibration manually using Altitude
Calibration”.
Important!
When “ON” is selected for the “Correct Altitude Using Location” setting, the
correction operation is performed only when GPS reception is extremely
good. It is not performed in valleys, among buildings, or in any other location
where reception is poor. Since GPS information generally includes some
error, there may be error in relation to actual altitudes indicated locally. If
you want more accurate altitude readings, turning off this item and
performing the “Altitude Calibration” operation by manually inputting locally
indicated altitude values is recommended.
Barometric Pressure Calibration (WF/TL/AC)
Operation
Tapping this setting item displays a barometric pressure input screen. Input
the current barometric pressure as measured by another accurate barometer.
Tap the digit of the value that you want to change, and then use and
to change it.
To reset a manual calibration and display barometric pressure readings
based on pressure sensor measurements, tap C.
Description
Though the pressure sensor built into the watch is adjusted at the factory and
normally does not require calibration, you can perform the calibration
operation above if you notice that readings are very different from those from
other sources. To calibrate manually, use this item to input the current
barometric pressure as measured by another accurate barometer.
EN-70
Centered value / My Graph (TL)
Operation
Tap this setting item and then scroll the list that appears upwards and
downwards. When the type of value you want shown in the center of the My
Graph Screen is displayed, tap it.
Description
This setting changes the type of value displayed in the center of the My Graph
Screen.
Home city (WF)
Operation
Tap this setting item and then scroll the list that appears upwards and
downwards. When the name of the city you want to specify as your Home city
is displayed, tap it.
Description
This setting specifies the Home city displayed on watch faces (World Time,
Traveler).
Styles (WF)
Operation
Tap this setting item, and then tap “Daily Style” or “Outdoor Style” from the
available options that appear. If you select “Daily Style”, another selection
screen will appear. Select “Battery level” or “Steps”.
Description
The display styles are the same as those in the Multi Timepiece Mode. See
Display Styles”.
Edit Color (WF)
Operation
Tap this setting item, and then on the list that appears tap the color you want
to use.
Description
This setting specifies the face color of a watch face (Authentic, Multi,
Location, Traveler, etc).
EN-71
Monochrome Display (WF/TL/AC/TP/EX)
Operation
Each tap of this setting item toggles the face background between “Dark” and
“Bright”.
Description
You can select how the watch’s monochrome LCD displays data. This setting
is applied to all of the displays below.
“2 Layers” watch face monochrome display
TOOL app monochrome display
Activity app monochrome display
Extend Mode app monochrome display
Multi Timepiece Mode monochrome display
Point Navigation (TL/AC)
Operation
Each tap of this setting item toggles between “ON” and “OFF”.
Description
When the setting of this item is “ON”, an icon indicating the direction to your
destination is displayed on the compass color display during navigation with
Point Navigation.
GPS Time Calibration (WF)
Operation
1.
Move to an outdoor area where the sky is visible.
2.
Perform the required operation on a CASIO watch face to display the
setting menu, and then tap “GPS Time Calibration”.
3.
Carefully read the message that appears on the display and then tap
“Correct”.
4.
Wait until GPS reception is complete.
Description
The watch normally adjusts its current time setting by syncing with a
smartphone. Should the smartphone battery go dead, if you lose your
smartphone, or if syncing is not possible for some other reason, you need to
perform the above operation each time you want to adjust the watch’s time
setting. Each time you do, the watch will temporarily adjust its time setting
based on GPS information.
It is recommended that you perform this procedure in a location where GPS
reception conditions are good and where the sky is visible. See “Appropriate
and Inappropriate Signal Reception Location”.
EN-72
Port setting (TL)
Operation
Tap this setting item and then scroll the list that appears upwards and
downwards. When the name of the point (port name or name of a city near
the ocean) you want is displayed, tap it.
Description
This setting specifies the point (port) whose tide information is displayed by
the “Tide Graph” of the TOOL app.
Re-calculation with Current Location (TL)
Operation
Tap this setting item to start acquisition of positioning information for your
current location. After positioning information acquisition is successful, the
TOOL screen will reappear, which will show re-calculated data.
Description
Perform this operation when “DEMO” is displayed on the TOOL app screen
or when the message “Displayed result is based on location info from 000
minutes ago.” appears. It re-calculates data displayed by the TOOL app
based on current location information acquired by the watch or your
smartphone GPS function.
EN-73
Save Daily Location Info (WF/MS/LM)
Operation
After tapping this setting, you then need to select “Every 6 minutes”, “Every
1 minute”, or “OFF”.
Important!
When you tap this setting item to toggle from “OFF” to “ON”, you will also
need to tap “Every 6 minutes” or “Every 1 minute” on the confirmation dialog
box that appears.
Description
This item is for configuring a setting related to the Location Memory app.
Selecting “ON” for this item enables maintenance of a daily location history,
even when there is no Activity app measurement operation.
Important!
Note that once internal storage becomes full, the oldest location history
information is deleted automatically to make room for new information when
it is recorded.
Save daily activity records (WF/TL/MS)
Operation
Each tap of this setting item toggles between “ON” and “OFF” (initial default
setting).
Important!
When you tap this setting item to toggle from “OFF” to “ON”, you will also
need to tap “I agree.” on the confirmation dialog box that appears.
Description
This item is for configuring a setting related to watch faces (Authentic, Multi),
the TOOL app (My Graph), and the MOMENT SETTER app.
Selecting “ON” for this item, allows the watch to record information (such as
displayed workout time and calories burned) about your activities. If you want
to use this function, make sure that its setting is “ON”.
EN-74
Height (TL/MS)
Operation
Tap this setting item and then use the screen that appears to input your height.
Tap the digit of the value that you want to change, and then use and
to change it.
Description
The value you input for this item is used as basic information when calculating
data displayed on the TOOL app’s “My Graph”.
Weight (TL/MS)
Operation
Tap this setting item and then use the screen that appears to input your
weight.
Tap the digit of the value that you want to change, and then use and
to change it.
Description
The value you input for this item is used as basic information when calculating
data displayed on the TOOL app’s “My Graph”.
Units (WF/TL/AC/MS)
Operation
Each tap of this setting item toggles between “Metric” and “Imperial”.
Description
Use this setting to switch between metric units (meters, kilograms, hPa, etc.)
and Imperial units (feet, pounds, inHg, etc.) for values displayed by CASIO
watch faces and apps.
Energy Unit (WF/TL/MS/AC)
Operation
Each tap of this setting item toggles between “Cal” (kilogram calories or large
calories, default setting) and “kJ” (kilojoules).
Description
The setting you specify here is used for the calories burned value displayed
on watch faces (Authentic, Multi), and by the TOOL app (My Graph),
MOMENT SETTER and the Activity app.
EN-75
Wrist where you wear the watch (TL/MS)
Operation
Each tap of this setting item toggles between “Right” and “Left”.
Description
The value you input for this item is used as basic information when calculating
data displayed on the TOOL app’s “My Graph”.
Target altitude (AC)
Operation
Tap this setting item and then use the screen that appears to specify a target
altitude.
Tap the digit of the value that you want to change, and then use and
to change it.
Description
Use this item to input a target altitude before starting an Activity app Trekking
activity.
Route Colors (AC)
Operation
From the Activity app, perform the required operation to display the setting
menu and then tap “Route Colors”. This displays a screen showing the
meanings of the route track colors.
Description
Route tracks are drawn on Activity app maps using multiple colors. This item
shows the meaning of each color, and is not used for configuring particular
settings.
EN-76
Auto Record (AC)
Operation
1.
Use the Activity app to display the Snow “BEGIN” screen, and then tap
“BEGIN”.
2.
Swipe the touch screen from right to left as many times as necessary to
display the “Settings” Screen. Next, tap D.
3.
On the setting menu that appears, swipe upwards and downwards until
“Auto Record” is displayed, and then tap it.
Each tap toggles between “ON” and “OFF”.
Important!
The “Auto Record” setting can be modified only on the setting menu you
display using steps 1 and 2 above.
Description
This setting is related to the Activity app “Snow”. When the setting of this item
is “ON”, the watch will start an activity measurement operation automatically
when operation by you is detected. When “OFF”, you need to start
measurement operations manually. The initial default setting is “OFF”.
EN-77
Map Type (AC/MS/LM)
Operation
Each tap of this setting item toggles between “Google Maps” and “Mapbox”.
Description
This setting lets you select either Google Maps or Mapbox as the map type
displayed by the Activity app and Location Memory app.
Important!
Maps displayed while “Mapbox” is selected use geographic information
from OpenStreetMap. OpenStreetMap geographic information can be
freely edited by anyone, which means that information displayed on a map
may not be correct.
Immediately following execution of a “Download Map” operation, the watch
will automatically switch to “Mapbox”.
Map Skin (AC/MS/LM)
Operation
Tap this setting item, and then use the list that appears to tap the name of the
map skin you want to use.
Description
This item is for selecting the map skin displayed by the Activity app and the
Location Memory app. You can select geographic view, satellite view, or
another view to suit your location or purpose.
EN-78
Download Map (AC/MS/LM/EX)
Operation
1.
Tap “Download Map”.
This displays a list of map skin names.
2.
Scroll the list upwards and downwards. When the skin name you want is
displayed, tap it.
This displays a map with your current location in the center.
3.
Scroll the map so the location that you want to be in the center of the map
you download is in the center of the watch screen.
You can scroll the map after using the TOOL (-) button to reduce the
size of the map and increase the display area. The area in circle in the
center of the screen at this time shows the maximum downloadable
area.
4.
Use the MAP button (+) and TOOL button (-) to zoom the map so the area
you want to download fills the screen.
The area that is displayed at this time is the approximate area that will
be downloaded.
5.
Tap “Fix”.
This may cause a message prompting you to use Wi-Fi to appear.
This starts map downloading, and show the progress on the display. To
cancel downloading, tap ×.
The downloaded map will appear on the display after download is
complete.
Important!
Except when you want to cancel, do not perform any watch operation until map
downloading is complete. Performing an operation may stop the download.
Map data is heavy, so use of a Wi-Fi connection is recommended.
Zoom levels are limited while a downloaded map is displayed. The smaller
the area of the map you display in step 4 of this procedure, the greater the
detail that will be shown when you enlarge the map. In step 4, specifying
the smallest map area you might possibly need is recommended.
Tapping “Fix” in step 5 may cause a message prompting Wi-Fi connection
to appear. If you are in a location where Wi-Fi is available, tapping “Wi-Fi”
to switch communication over to Wi-Fi is recommended.
The watch can have up to five sets of Mapbox map data (map area and skin
type) in memory at a time. If you attempt to download more data while there
are already five sets of data in memory, a message will appear prompting
you to delete existing downloaded map data. Delete map data you no longer
need and try downloading the new data again.
EN-79
Description
This item is for configuring settings related to the Activity app and the Location
Memory app. It is for downloading a map to watch memory when “Mapbox”
is selected for “Map Type”. If you want to use the map in an area where a
network connection is not available, use this item beforehand in an area
where a network connection is available to download the desired map.
Downloaded Map (AC/MS/LM/EX)
Operation
Tapping this setting displays the map you downloaded.
To display another downloaded map, swipe the touch screen from right to
left.
To delete the currently displayed map, swipe the touch screen from bottom
to top and then tap “Delete This Map”.
Description
You can use the procedure under “Download Map” to view and delete maps
saved in watch memory.
Route Tracking(Activity) (AC/LM)
Operation
Each tap of this setting item toggles between “Accuracy Priority” and “Battery
Priority”.
Description
This item is for configuring a setting related to Activity app. While “Accuracy
Priority” is selected, the GPS positioning operation and refresh operation are
performed more frequently, and the route tracked on the map is more
accurate. While “Battery Priority” is selected, the accuracy of the route tracked
on the map is reduced somewhat, but battery power is saved.
Except when you want to perform long-term Trekking or Fishing
measurement operations, use “Accuracy Priority” for better speed and
distance calculation accuracy, and more frequent display refreshing.
Important!
Note that with Activity app Cycling, Paddle, and Snow measurement
operations, GPS positioning is executed at relatively short intervals even
when “Battery Priority” is selected for this setting. Because of this, battery
power savings are less in this case.
EN-80
All Off (MS)
Operation
1.
Tap this item and a confirmation dialog box will appear asking if you want
to disable all MOMENT SETTER notifications.
2.
Tap “Turn off.” to disable notifications or “Cancel” to leave notifications
enabled.
Description
Removing all check marks from the MOMENT SETTER app menu disables
all notifications. Note that once you perform this operation, there is no single
batch operation to re-enable notifications. You will need to use the MOMENT
SETTER app menu to individually re-enable each notification you want.
Route Display (LM)
For information about this item, see “Enabling Route Tracking on the Map
(Route Display)”.
Revisit (LM)
For information about this item, see Changing the “Revisit” Mark Notification
Setting”.
EN-81
Troubleshooting
Refer to this section whenever you are experiencing problems with watch
operation.
If you don’t find the solution to your problem here, visit the website below.
https://support.casio.com/en/support/faq.php?cid=019
Restoring Watch Operation
If you find yourself unable to obtain proper operation from the watch for some
reason, restart it and then try performing the operation again. For information
about restarting the watch, visit the website below.
https://support.google.com/wearos/
If the watch will not restart...
Perform the procedure below to force it to shut down. After the watch is forced
to shut down, it will restart automatically.
1.
Hold down the power button until the display goes blank.
Wait for a while until the watch restarts automatically.
Error Code and Error Message List
If an error code or error message appears on your watch, look it up in the table
below and take the required action.
Error Code
Error Message
Required Action
1001, 1009
Normal charging is not
possible for some
reason. If this
message keeps
appearing, request
servicing.
Remove the charger cable from the watch, turn
off the watch, and then try charging again. Use
only the AC adaptor and charger cable that
comes with the watch for charging.
If this message/error code keeps appearing, it
could mean that the chargeable battery has
deteriorated. Request servicing by your original
retailer or an authorized CASIO service center.
1003
Too cold to charge.
Charge the watch in an area where the ambient
temperature is between 10°C and 35°C (50°F
and 95°F).
1004, 1007
Too hot to charge.
EN-82
Error Code
Error Message
Required Action
1021
Data acquisition from
the sensor may have
failed. Use the Settings
screen to perform a
System Restart
operation.
Data acquisition from one of the following
sensors may have failed for some reason:
pressure sensor, accelerometer, gyro sensor,
magnetic sensor.
Restart the watch by performing the following
steps:
Swipe the watch face from top to bottom.
> Tap D. > Tap “System”. > Tap “Restart”.
If this message/error code keeps appearing
after restart, request servicing by your original
retailer or an authorized CASIO service center.
9000
Some problem
occurred with the watch.
Power will turn off
shortly.
To restart the watch, first charge it for at least
one hour. Next, hold down the power button for
about 12 seconds until the display color
changes.
9001, 9002, 9003
Some problem
occurred with the watch.
Power will turn off
shortly.
Take your watch to an authorized CASIO
service center or to your original retailer for
inspection and repair.
9010
Watch temperature is
high. Power will turn off
to protect it.
Remove the watch from your wrist and leave it
in a location that is not exposed to direct
sunlight, where the temperature is between
10°C and 30°C (50°F and 86°F) to allow the
watch to cool down. You will be able to turn the
watch on again after it reaches a lower
temperature.
EN-83
Important!
Note the precautions in this section whenever using this watch.
Precautions During Use
Display Information Accuracy
Tide Graph Precautions
For Japan area oceans, tide times and level changes are predictively
calculated using harmonic constant data obtained from Bibliography 742
Tidal Harmonic Constants Tables, Japanese Coast (February 1992)
published by the Hydrographic Department of the Japan Coast Guard, and
from the List of Tidal Stations (2015) published by the Japan Meteorological
Agency. For other area oceans, tide times and level changes are predictively
calculated using harmonic constant data obtained from NOAA, NOAA CO-
OPS, and the NOAA Tides & Currents website, and the U.S. DEPARTMENT
OF COMMERCE / COAST AND GEODETIC SURVEY January 1942 TH-1.
Actual tidal phenomena fluctuate in accordance with weather, the season,
and various other factors, and may give rise to irregularities not in accordance
with calculated values. Certain conditions may result in some deviation from
actual tides. Because of this, the information produced by the Tide Graph
function of this app and watch should be treated as approximate reference
information only. Never use it for navigation or any other decisions about tide
that may put safety at risk.
Sunrise/Sunset Precautions
Sunrise and sunset calculations are performed using the following azimuths:
North: 0 degrees, East: 90 degrees, South: 180 degrees, West: 270 degrees.
Calculation results include error of multiple seconds, and error becomes
greater at higher latitudes. Calculations assume a level horizon, and local
topography is not taken into consideration.
EN-84
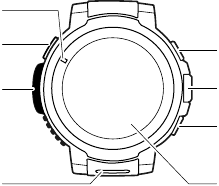
Moon Age Precautions
Moon ages displayed by this watch are based on the calculation described
below.
(1) Elongation is calculated using solar and lunar coordinates produced by
functional calculus.
(2) Moon age is calculated based on the correlation between the elongation
and average moon age.
Though the lunar period averages 29.53 days, it actually fluctuates by as
much as ±1 day, so this calculation produces an error of up to ±1 day.
Water Resistance
This watch is water resistant up to five atmospheres, which means it can be
worn while working around water and while swimming. However, note the
information below.
Even if a watch is water resistant, note the usage precautions described
below.
Avoid using this watch while windsurfing, skin diving, or scuba diving.
Do not operate the buttons while your watch is submersed in water or
wet.
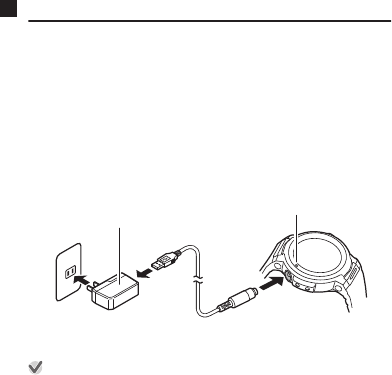
Do not charge the watch while it is in water or wet.
Avoid wearing your watch while in the bath.
Do not wear your watch while in a heated swimming pool, sauna, or any
other high temperature/high humidity environment.
Do not wear this watch while washing your hands or face, or while
performing any other task that includes the use of soap or detergent.
The touch screen does not work while the watch is submerged in water.
After using the watch where it is submerged in seawater or fresh water, or
where it is soiled by sand or mud, rinse it with clean water as described
below and then thoroughly dry it.
1.
Fill a bucket or other container with tap water or other clean water.
2.
Place the watch in the water and leave it there for about 10 minutes.
3.
Gently move the watch back and forth in the water to remove any salt,
dirt, mud, sand, etc.
If the touch screen is dirty, do not rub it without first washing it clean.
After washing the watch, use a clean, dry, soft cloth to wipe away any
remaining water. Next, leave the watch in a well-ventilated, shaded
location to dry thoroughly.
To maintain water resistance, have the gaskets of your watch replaced
periodically (about once every two or three years).
Be sure to leave battery replacement up to an authorized CASIO service
center or your original retailer. Unauthorized battery replacement may
cause problems with the waterproof performance of the watch.
EN-85
The inside surface of the watch glass may fog when the watch is exposed
to a sudden drop in temperature. No problem is indicated if the fogging
clears up relatively quickly. Sudden and extreme temperature changes
(such as coming into an air conditioned room in the summer and standing
close to an air conditioner outlet, or leaving a heated room in the winter and
allowing your watch to come into contact with snow) can cause it to take
longer for glass fogging to clear up. If glass fogging does not clear up or if
you notice moisture inside of the glass, immediately stop using your watch
and take it to an authorized CASIO service center or to your original retailer.
Do not charge the watch if the watch or charger cable is wet. Wipe off all
moisture and make sure the watch and charger cable are dry before
charging.
Using GPS
You watch can use radio signals from Global Positioning System satellites
to determine your current location and the current time anywhere on the
globe. The process for determining your current location is called
“positioning”.
Appropriate and Inappropriate Signal Reception Location
A good location for signal reception is outdoors where the sky is visible and
not blocked by buildings, trees, or other objects.
You may experience GPS signal reception problems in the areas described
below.
Where the view of the sky above is narrow
Near trees or buildings
Near a train station, airport, or other congested area, or where there is a
large amount of vehicular traffic
Near railway aerial wires, high-voltage lines, TV towers, etc.
GPS signal reception is not possible in the areas described below.
Where the sky is not visible
Underground, in a tunnel, underwater
Indoors (Reception may be possible near a window.)
Near wireless communication equipment or other devices that generate
electromagnetism.
GPS satellites are in constant motion, so your location, the time of day, or
other factors may cause a delay in the positioning operation or may even
make positioning impossible.
EN-86
Using GPS Outside Your Country
Some countries or geographic areas put legal restrictions on the use of GPS,
on the collection and logging of location information, etc. Your watch has built-
in GPS functionality, so before embarking on international travel to a country
or area outside of the country where you purchased your watch, you should
check with the embassy of the countries you plan to visit, your travel agency,
or some other reliable source of information to find out if there are any
prohibitions or restrictions on bringing in devices with GPS functionality, or
on the logging of location information, etc.
Long Periods of Non-use
If you allow the watch to remain discharged and unused for a long period, it
will take a long time to acquire GPS signals and perform positioning
immediately after you charge the watch and start using it again.
GPS Function Precautions
Whenever you are in any area where radio wave reception is prohibited or
restricted, perform the operation below to turn off the “Location” setting.
1.
While the watch face is displayed, swipe the touch screen from top to
bottom and then tap D.
2.
Scroll downwards and tap “Connectivity” and then “Location”.
3.
On the screen that appears, disable “Location”.
Map data may include information that is incorrect. Also, all countries and
geographic areas may not be provided in the map data.
Some location and address names may not display correctly due to
applicable laws and restrictions in certain countries and geographic areas.
The location information provided by the GPS function of this watch is
intended for reference purposes only and locations shown may not be
accessible or difficult to access. Also, map information may show mountain,
jungles, deserts, and other dangerous or lawless locations. Before going to
an unknown location, be sure to check on the latest information available
about laws and safety.
EN-87
Using this watch in the vicinity of a mobile phone or other device that uses
1.5 GHz band radio waves may make signal reception impossible.
Depending on reception conditions, GPS positioning information may
include error up to several hundred meters.
Location information is not acquired while flying on an aircraft or otherwise
moving at very high speed.
Never use the GPS function of this watch for surveying or any other
measuring that requires high accuracy.
Never use the GPS function of this watch for navigation of boats, aircraft,
motor vehicles, individuals, etc.
Location measurements are performed using satellites that are operated
and managed by the United States (GPS), Russia (GLONASS), and Japan
(QZSS). Because of this, there is always the possibility that access to its
information may be disabled at the discretion of these countries.
Wi-Fi connectivity
Note that when using a Wi-Fi connection you need to be aware of the watch’s
battery level and your surrounding environment. A low battery or extreme cold
can cause Wi-Fi operation to shut down automatically to protect the watch’s
system.
EN-88
MIL-STD-810G
This watch has been tested for the items described below in accordance with
the MIL-STD-810G standard established by the U.S. Department of Defense.
Shock resistance is based on the assumption of normal daily use. Throwing
the watch, or subjecting it to excessive dropping or other extreme shock
can cause it to break.
Be sure to read the information in this manual under “Precautions During
Use” and “User Maintenance” in order to ensure proper use of this watch.
Failure to use the watch in accordance with this information creates the risk
of overheating, fire, electric shock, personal injury, and accident.
The functions of this watch have been confirmed under test environments,
but no guarantees are made concerning operation under all environments
where it may be used. Also, no guarantees are made concerning the ability
of the watch to withstand damage or malfunction.
Shock Tested in accordance with Method 516.7
Procedure IV.
Vibration Tested in accordance with Method 514.7
Procedure I.
Humidity Tested in accordance with Method 507.6
Procedure II.
Low Pressure
Transport
Tested in accordance with Method 500.6
Procedure I.
Low Pressure
Operation
Tested in accordance with Method 500.6
Procedure II.
High Temperature
Transport
Tested in accordance with Method 501.6
Procedure I.
Low Temperature
Transport
Tested in accordance with Method 502.6
Procedure I.
Temperature Shock Tested in accordance with Method 503.6
Procedure I-C.
Ice Accretion Tested in accordance with Method 521.4
Procedure I.
Protective stickers
Be sure to remove all protective stickers and/or paper tags that may be
affixed to your watch (including its back cover) and/or its band when you
purchase it. Using the watch without removing protective stickers and/or
paper tags may result in the build-up of dirt between the watch/band and
the sticker/paper tag, which creates the risk of rust and skin rash.
EN-89
Charging
The watch and AC adaptor may become warm to the touch during charging.
This is normal and does not indicate malfunction.
Do not charge the watch while its charge level is high enough for watch
operation. Waiting until the charge level is low until you charge will help to
extend battery life. Disconnecting the charger cable from the watch after it
reaches a full charge is recommended. Any of the following can hasten
battery deterioration and should be avoided.
Frequent charging while the battery is fully charged or near fully charged
Continuing to charge over a long period (multiple days)
Connecting and disconnecting the charger cable multiple times during a
single day even though the battery is fully charged
Do not charge the watch in a location where large amounts of moisture,
dust, or fine metal particles are present, in a location subjected to vibration,
or near a hard line telephone, a TV, a radio, etc.
The charger cable of this watch is magnetic. Contact with sand containing
iron particles can make it unusable for charging. Should the charger
terminal or cable become soiled with mud or sand, thoroughly wipe off all
foreign matter before charging.
In an area where it is extremely cold or hot, you may not be able to charge
the watch or the watch may not charge completely. Charge the watch in an
area where the ambient temperature is between 10°C and 35°C (50°F and
95°F).
EN-90
Band
Tightening the band too tightly can cause you to sweat and make it difficult
for air to pass under the band, which can lead to skin irritation. Do not fasten
the band too tightly. There should be enough room between the band and
your wrist so you can insert your finger.
Deterioration, rust, and other conditions can cause the band to break or
come off of your watch, which in turn can cause band pins to fly out of
position or to fall out. This creates the risk of your watch falling from your
wrist and becoming lost, and also creates the risk of personal injury. Always
take good care of your band and keep it clean.
Immediately stop using a band if you ever notice any of the following: loss
of band flexibility, band cracks, band discoloration, band looseness, band
connecting pin flying or falling out, or any other abnormality. Take your
watch to an authorized CASIO service center or to your original retailer for
inspection and repair (for which you will be charged) or to have the band
replaced (for which you will be charged).
Temperature
Never leave your watch on the dashboard of a car, near a heater, or in any
other location that is subject to very high temperatures. Do not leave your
watch where it will be exposed to very low temperatures. Doing so can
cause malfunction.
Leaving your watch in an area hotter than +60°C (140°F) for long periods
can lead to problems with its display panel. The display panel may become
difficult to read at temperatures lower than 0°C (32°F) and greater than
+40°C (104°F). Watch operation that is stopped due to high temperatures
will not resume until watch cools sufficiently. Wait for a while to allow the
watch to cool.
Use in Cold Environments
Under cold conditions, the operating time provided by a battery is shorter
than normal, even if the battery is fully charged.
Extreme cold can cause Wi-Fi operation to shut down automatically to
protect the watch’s system.
EN-91
Magnetism
Some watch functions may not operate normally in a location where
magnetism is present. Very strong magnetism (from medical equipment,
etc.) should be avoided because it can cause malfunction of your watch
and damage to electronic components.
Chemicals
Do not allow your watch to come into contact with thinner, gasoline,
solvents, oils, or fats, or with any cleaners, adhesives, paints, medicines,
or cosmetics that contain such ingredients. Doing so can cause
discoloration of or damage to the resin case, resin band and other parts.
Storage
If you do not plan to use your watch for a long time, thoroughly wipe it free
of all dirt, sweat, and moisture, and store it in a cool, dry place.
Disconnect the charger cable from the AC adaptor and unplug the AC
adaptor from the power outlet when not charging. Store them in a safe place
for later use. The charger cable is magnetic, so keep it away from magnetic
cards, precision equipment, and analog watches.
Resin Components
Allowing your watch to remain in contact with other items or storing it
together with other items for long periods while it is wet can cause color on
resin components to transfer to the other items, or the color of the other
items to transfer to the resin components of your watch. Be sure to dry off
your watch thoroughly before storing it and make sure it is not in contact
with other items.
Leaving your watch where it is exposed to direct sunlight (ultraviolet rays)
for long periods or failure to clean dirt from your watch for long periods can
cause it to become discolored.
Friction caused by certain conditions (strong external force, sustained
rubbing, impact, etc.) can cause discoloration of painted components.
If there are printed figures on the band, strong rubbing of the printed area
can cause discoloration.
Daily use and long-term storage of your watch can lead to deterioration,
breaking, or bending of resin components. The extent of such damage
depends on usage conditions and storage conditions.
EN-92
Watch Sensors
A watch sensor is a precision instrument. Never try to take it apart. Never
try to insert any objects into the openings of a sensor, and take care to
ensure that dirt, dust, or other foreign matter does not get into it. After using
your watch where it has been immersed in saltwater, rinse it thoroughly with
fresh water.
Metal Components
Failure to clean dirt from metal components can lead to formation of rust,
even if components are stainless steel or plated. If metal components
exposed to sweat or water, wipe thoroughly with a soft, absorbent cloth and
then place the watch in a well-ventilated location to dry.
Use a soft toothbrush or similar tool to scrub the metal with a weak solution
of water and a mild neutral detergent, or with soapy water. Next, rinse with
water to remove all remaining detergent and then wipe dry with a soft
absorbent cloth. When washing the band, wrap the watch case with kitchen
plastic wrap so it does not come into contact with the detergent or soap.
Display Panel
Display figures may be difficult to read when viewed from an angle.
The display panel of this watch uses high-precision technology that
provides a pixel yield in excess of 99.99%. This means that some very small
number of pixels may not light or may remain lit at all times. This is due to
the characteristics of the display panel, and does not indicate malfunction.
EN-93
User Maintenance
Caring for Your Watch
Remember that you wear your watch next to your skin, just like a piece of
clothing. To ensure your watch performs at the level for which it is designed,
keep it clean by frequently wiping with a soft cloth to keep your watch and
band free of dirt, sweat, water and other foreign matter.
Whenever your watch is exposed to sea water or mud, rinse it off with clean
fresh water.
For a resin band, wash with water and then wipe dry with a soft cloth. Note
that sometimes a smudge like pattern may appear on the surface of a resin
band. This will not have any effect on your skin or clothing. Wipe with a cloth
to remove the smudge pattern.
To clean the metal parts on a resin band, use a soft toothbrush or similar
tool to scrub the band with a weak solution of water and a mild neutral
detergent, or with soapy water. Next, rinse with water to remove all
remaining detergent and then wipe dry with a soft absorbent cloth. When
washing the band, wrap the watch case with kitchen plastic wrap so it does
not come into contact with the detergent or soap.
Dangers of Poor Watch Care
Rust
Though the metal steel used for your watch is highly rust-resistant, rust can
form if your watch is not cleaned after it becomes dirty.
Dirt on your watch can make it impossible for oxygen to come into contact
with the metal, which can lead to breakdown of the oxidization layer on
the metal surface and the formation of rust.
Rust can cause sharp areas on metal components and can cause band
pins to fly out of position or to fall out. If you ever notice any abnormality
immediately stop using your watch and take it to an authorized CASIO
service center or to your original retailer.
Even if the surface of the metal appears clean, sweat and rust in crevasses
can soil the sleeves of clothing, cause skin irritation, and even interfere with
watch performance.
EN-94
Premature Wear
Leaving sweat or water on a resin band or bezel, or storing your watch in
an area subject to high moisture can lead to premature wear, cuts, and
breaks.
Skin Irritation
Individuals with sensitive skin or in poor physical condition may experience
skin irritation when wearing a watch. Such individuals should keep their
leather band or resin band particularly clean. Should you ever experience
a rash or other skin irritation, immediately remove your watch and contact
a skin care professional.
Chargeable Battery Handling (Please recycle!)
The built-in lithium-ion battery includes valuable resources.
When you are ready to discard your watch, follow proper procedures in order
to recycle resources. For information about the proper procedure to follow
when discarding the watch, contact an authorized CASIO service center or
your original retailer.
Important!
Do not try to replace batteries by yourself. Request battery replacement
from an authorized CASIO service center or your original retailer.
Personal Information Protection Precautions
To protect your personal information, be sure to unpair the watch from your
smartphone before transferring ownership of the watch to another party or
before disposing of the watch. For details, visit the website below, enter “How
do I unpair from a phone?”, and then tap the [Search] button.
https://support.casio.com/en/support/faq.php?cid=019
EN-95
Main Specifications
1.2-inch dual layer display, Color organic electroluminescence (EL) (390 ×
390 pixels) + Monochrome LCD
Capacitive touch panel
Microphone
Vibration
Battery:
Type: Lithium-ion battery
Charging time:
Approximately 3 hours at room temperature (Be sure to use the special
charger cable and AC adaptor.)
Bluetooth: Bluetooth
®
4.1 (Low Energy support)
Wi-Fi: IEEE802.11b/g/n
Memory & storage: 768 MB RAM, 4 GB internal storage
Charging method: Magnetic crimped charging terminal
Buttons: MAP button, Power button, TOOL button
5-bar (50-meter) water resistant
*1
Environment performance: MIL-STD-810G (United States military standard
issued by the U.S. Department of Defense)
Sensors: GPS, Pressure sensor, Accelerometer, Gyrometer, Magnetic
sensor
EN-96
Watch:
Auto time correction:
By communication with smartphone (Time can be adjusted manually.)
By GPS information (Can be corrected manually.)
Time zones (world time function):
Supports multiple world time zones (Types depend on system time
zones.)
12/24-hour timekeeping
Full auto-calendar:
Auto switching by linking with smartphone
Summer time:
Auto switching by linking with smartphone
Watch faces:
Three favorites, more can be added.
Location Memory App:
Map screen, route screen, selectable map skin, map downloading (off-line
maps), voice memo, landmark, Revisit marks
*2
, history screen
EN-97
TOOL App:
Compass:
Measurement range: 0° to 359°
Measurement unit: 1°
Continuous measurement duration: 1 minute
North Indication hand, Magnetic declination calibration, Bearing
memory, Gradient calibration
Altimeter:
Measurement range: –700 to 10,000 m (–2,300 to 32,800 ft)
Measurement unit: 1 m (5 ft)
Measurement accuracy: within ±75 m (within ±250 ft) (When frequent
manual calibration is performed)
Shortest measurement interval: 1 minute
Altitude graph: Past 24 hours
Manual altitude calibration, Auto altitude calibration using location
information
*3
Barometer:
Measurement range: 260 to 1,100 hPa (7.6 to 32.5 inHg)
Measurement unit: 1 hPa (0.1 inHg)
Measurement accuracy: within ±3 hPa (within ±0.1 inHg)
Atmospheric pressure tendency graph: Past 24 hours
Barometric pressure measurement interval: 1 minute
Manual barometric pressure calibration
Tide and Fishing:
Tide graph: Past 12 hours + Next 12 hours
Fishing time (Calculated according to current location, and moon hour
angle and age.)
Sunrise/sunset:
Sunrise/Sunset times (Current location sunrise/sunset)
Sunrise/Sunset directions: Accuracy depends on compass
My Graph
*4
:
Daily activity pattern: Running, bicycle, walking, vehicle, stopped
Calories burned, Steps, Altitude (Highest altitude achieved that day),
Workout time
EN-98
Activity App:
Trekking, Fishing, Cycling, Paddle, Snow
MOMENT SETTER App:
Trekking, Fishing, Cycling, Paddle, Snow notifications
Screen brightness setting: Auto, 5 levels
Watch battery level indicator: Integer value, 0 to 100%
Charger (AC adaptor):
INPUT: AC 100 V to 240 V 50 Hz/60 Hz
OUTPUT: 5.0 V
Charger cable:
Length: Approximately 0.75 m (2.46 ft)
Type: AC adaptor USB Type A
Operating time on full charge
*1
:
Normal use: More than one day
Multi-Timepiece Mode: Approximately one month
*5
Operating temperature: –10 to 40 (14 to 104)
Crystal: Mineral glass (dirt resistant coating)
Approx. Size (Body H × W × D): 60.5 × 53.8 × 14.9 mm (2.4” × 2.1” × 0.6”)
Approx. Weight (including band): 83 g (2.9 oz)
Included accessories: Charger (AC adaptor), Special charger cable
EN-99
About MIL-STD-810G (United States military standard issued by the U.S.
Department of Defense):
Description:
1. Shock
2. Vibration
3. Humidity
4. Low Pressure Transport
5. Low Pressure Operation
6. High Temperature Transport
7. Low Temperature Transport
8. Temperature Shock
9. Ice Accretion
Procedure: MIL-STD-810G, w/change1
1: Method 516.7 Procedure
2: Method 514.7 Procedure
3: Method 507.6 Procedure
4: Method 500.6 Procedure
5: Method 500.6 Procedure
6: Method 501.6 Procedure
7: Method 502.6 Procedure
8: Method 503.6 Procedure-C
9: Method 521.4 Procedure
Attention:
The functions of this watch have been confirmed under test
environments, but no guarantees are made concerning operation under
all environments where it may be used. Also, no guarantees are made
concerning the ability of the watch to withstand damage or malfunction.
Phones and tablets that work with Wear OS by Google
Wear OS by Google works with phones running Android 4.4+ (excluding
Go edition) or iOS 10+
*6*7
. Supported features may vary between platforms
and countries.
Visit g.co/wearcheck on your Android phone or iPhone
®
to see if it’s
compatible.
EN-100
*1 CASIO test conditions
*2 In order to be able to use these functions your Android phone must have
the CASIO MOMENT SETTER+ app installed, and there must be a
connection between the phone and watch. These functions are not
supported in the case of iOS.
*3 GPS altitude information is used, so the indicated altitude may not exactly
match the actual above sea level elevation or altitude.
*4 Default: OFF
*5 Displaying the step count reduces the battery operating time.
*6 Limited functionality when connected to iOS device.
*7 Recommended. However, a WSD-F30 watch that is already paired with
a smartphone running iOS 9.3+ can also be used.
EN-101
Supplementary Information
Open Source Information
CASIO uses GPL, LGPL and other source code that comes under an open
source license in this product. CASIO discloses the source code in
accordance with each open source license. For source codes and details
about each open source license, visit the CASIO website. Source code is
provided “as-is” without any guarantees. However, this does not affect
warranty conditions by CASIO concerning product defects (including defects
in the source code).
Copyrights
The Bluetooth
®
word mark and logos are registered trademarks owned by
Bluetooth SIG, Inc. and any use of such marks by CASIO COMPUTER CO.,
LTD. is under license. Other trademarks and trade names are those of their
respective owners.
Wi-Fi is a registered trademark of Wi-Fi Alliance.
Google, Android, Wear OS by Google, Google Play and other related marks
and logos are trademarks of Google LLC.
iPhone is a trademark or registered trademark of Apple Inc. registered in
the United States and other countries.
App Store is a service mark of Apple Inc., registered in the U.S. and other
countries.
Other company, product and service names used in this manual also may
be trademarks or registered trademarks of others.
Regulatory Information
Your watch is a device that supports electronic way of display. To display
regulatory information, perform the steps below.
1.
While the watch face is displayed, swipe the touch
screen from top to bottom and then tap D.
2.
Scroll the screen downwards. Tap “System” and then
“Regulatory information” in sequence.
EN-102
This device complies with part 15 of FCC Rules and Industry Canada’s
licence-exempt RSSs. Operation is subject to the following two
conditions: (1) this device may not cause harmful interference, and (2) this
device must accept any interference received, including interference that
may cause undesired operation.
FCC CAUTION
Changes or modifications not expressly approved by the party
responsible for compliance could void the user’s authority to operate the
equipment.
Note
This equipment has been tested and found to comply with the limits for a
Class B digital device, pursuant to part 15 of the FCC Rules. These limits
are designed to provide reasonable protection against harmful
interference in a residential installation. This equipment generates, uses
and can radiate radio frequency energy and, if not installed and used in
accordance with the instructions, may cause harmful interference to radio
communications. However, there is no guarantee that interference will not
occur in a particular installation. If this equipment does cause harmful
interference to radio or television reception, which can be determined by
turning the equipment off and on, the user is encouraged to try to correct
the interference by one or more of the following measures:
Reorient or relocate the receiving antenna.
Increase the separation between the equipment and receiver.
Connect the equipment into an outlet on a circuit different from that
to which the receiver is connected.
Consult the dealer or an experienced radio/TV technician for help.
This transmitter must not be co-located or operated in conjunction with
any other antenna or transmitter.
EN-103
The available scientific evidence does not show that any health problems
are associated with using low power wireless devices.
There is no proof, however, that these low power wireless devices are
absolutely safe. Low power Wireless devices emit low levels of radio
frequency energy (RF) in the microwave range while being used. Whereas
high levels of RF can produce health effects (by heating tissue), exposure
of low-level RF that does not produce heating effects causes no known
adverse health effects. Many studies of low-level RF exposures have not
found any biological effects. Some studies have suggested that some
biological effects might occur, but such findings have not been confirmed
by additional research. The WSD-F21 has been tested and found to comply
with FCC/IC radiation exposure limits set forth for an uncontrolled
environment and meets the FCC radio frequency (RF) Exposure Guidelines
and RSS-102 of the IC radio frequency (RF) Exposure rules.
This product is subject to the Export Administration Regulations (EAR) of
the United States, and so it cannot be exported to or brought into countries
that fall under U.S. Embargoes and Other Special Controls.
Frequency band and maximum output power
WSD-F30
IEEE802.11b/g/n:2.4GHz band19dBm
Bluetooth(2.4GHz)10.5dBm
Product Quality Information
CASIO collects information about watch usage in a way that keeps users
anonymous. This information is securely stored on CASIO servers and is not
accessible by third-parties. It is used to improve product quality and
functionality.
EN-104
CASIO COMPUTER CO., LTD.
6-2, Hon-machi 1-chome
Shibuya-ku, Tokyo 151-8543, Japan
S05_MA1907-C
38


Need help? Post your question in this forum.

Forumrules


Report abuse

Libble takes abuse of its services very seriously. We're committed to dealing with such abuse according to the laws in your country of residence. When you submit a report, we'll investigate it and take the appropriate action. We'll get back to you only if we require additional details or have more information to share.

Product:

For example, Anti-Semitic content, racist content, or material that could result in a violent physical act.

For example, a credit card number, a personal identification number, or an unlisted home address. Note that email addresses and full names are not considered private information.

Forumrules

To achieve meaningful questions, we apply the following rules:

Register

Register getting emails for Casio WSD-F30 at:


You will receive an email to register for one or both of the options.


Get your user manual by e-mail

Enter your email address to receive the manual of Casio WSD-F30 in the language / languages: English as an attachment in your email.

The manual is 2,76 mb in size.


You will receive the manual in your email within minutes. If you have not received an email, then probably have entered the wrong email address or your mailbox is too full. In addition, it may be that your ISP may have a maximum size for emails to receive.

Others manual(s) of Casio WSD-F30

Casio WSD-F30 User Manual - German - 105 pages


The manual is sent by email. Check your email

If you have not received an email with the manual within fifteen minutes, it may be that you have a entered a wrong email address or that your ISP has set a maximum size to receive email that is smaller than the size of the manual.

The email address you have provided is not correct.

Please check the email address and correct it.

Your question is posted on this page

Would you like to receive an email when new answers and questions are posted? Please enter your email address.


Info