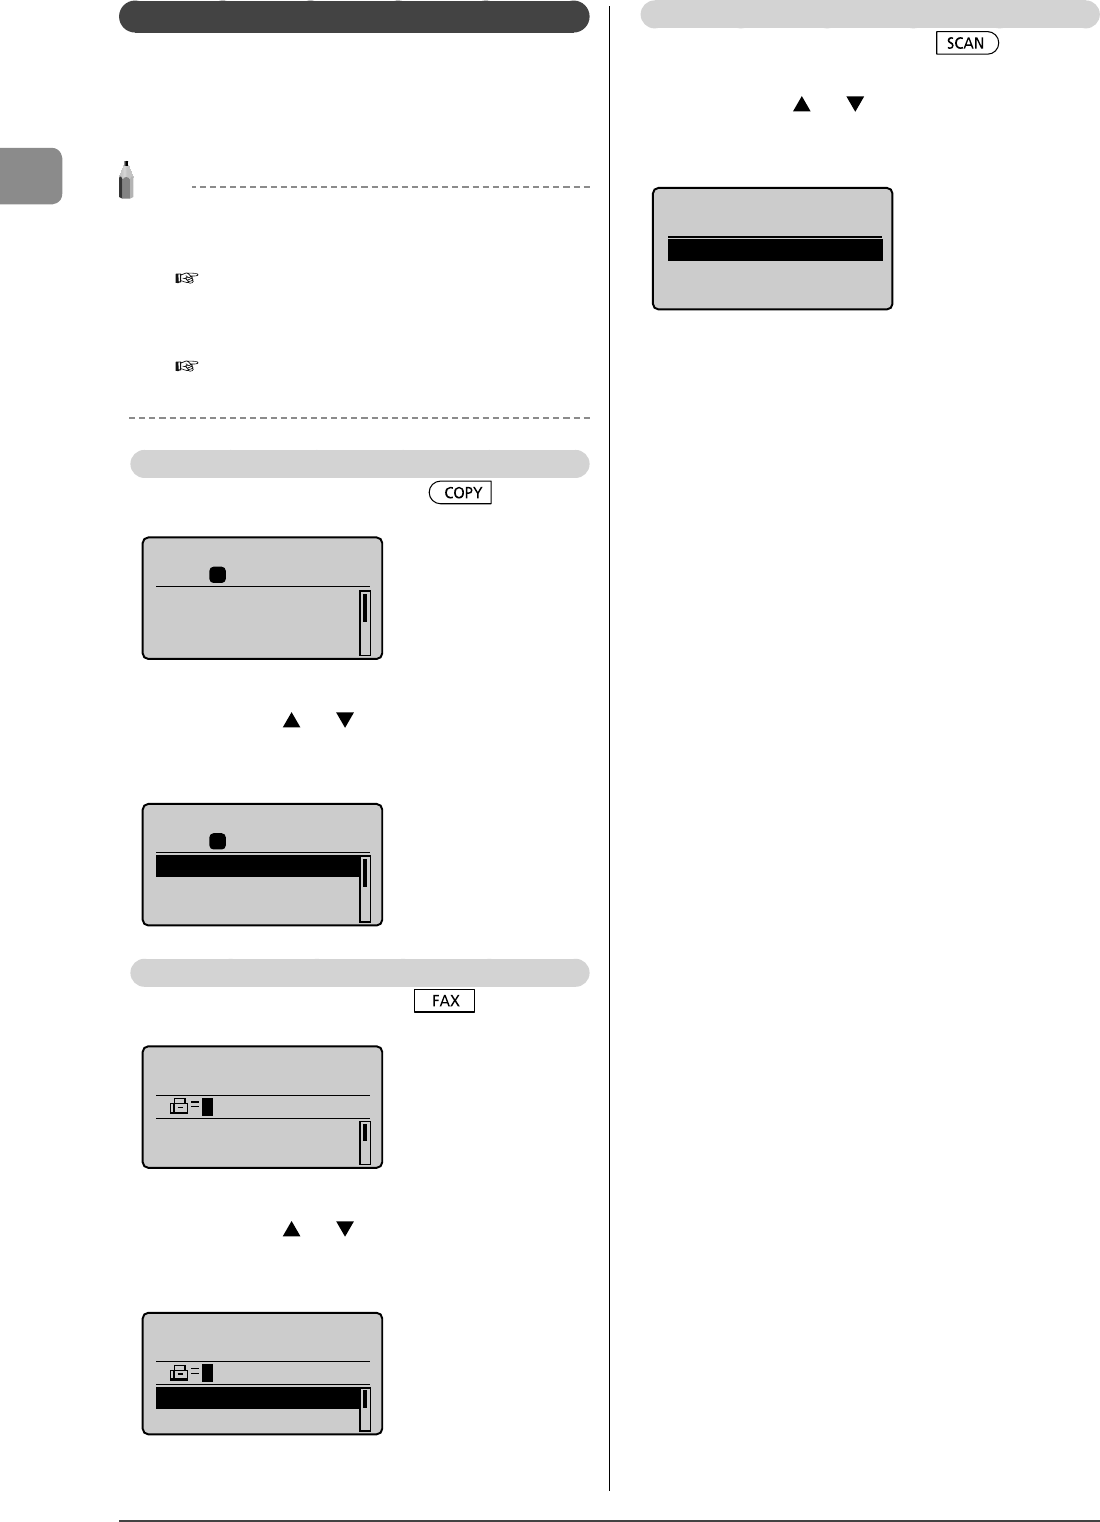
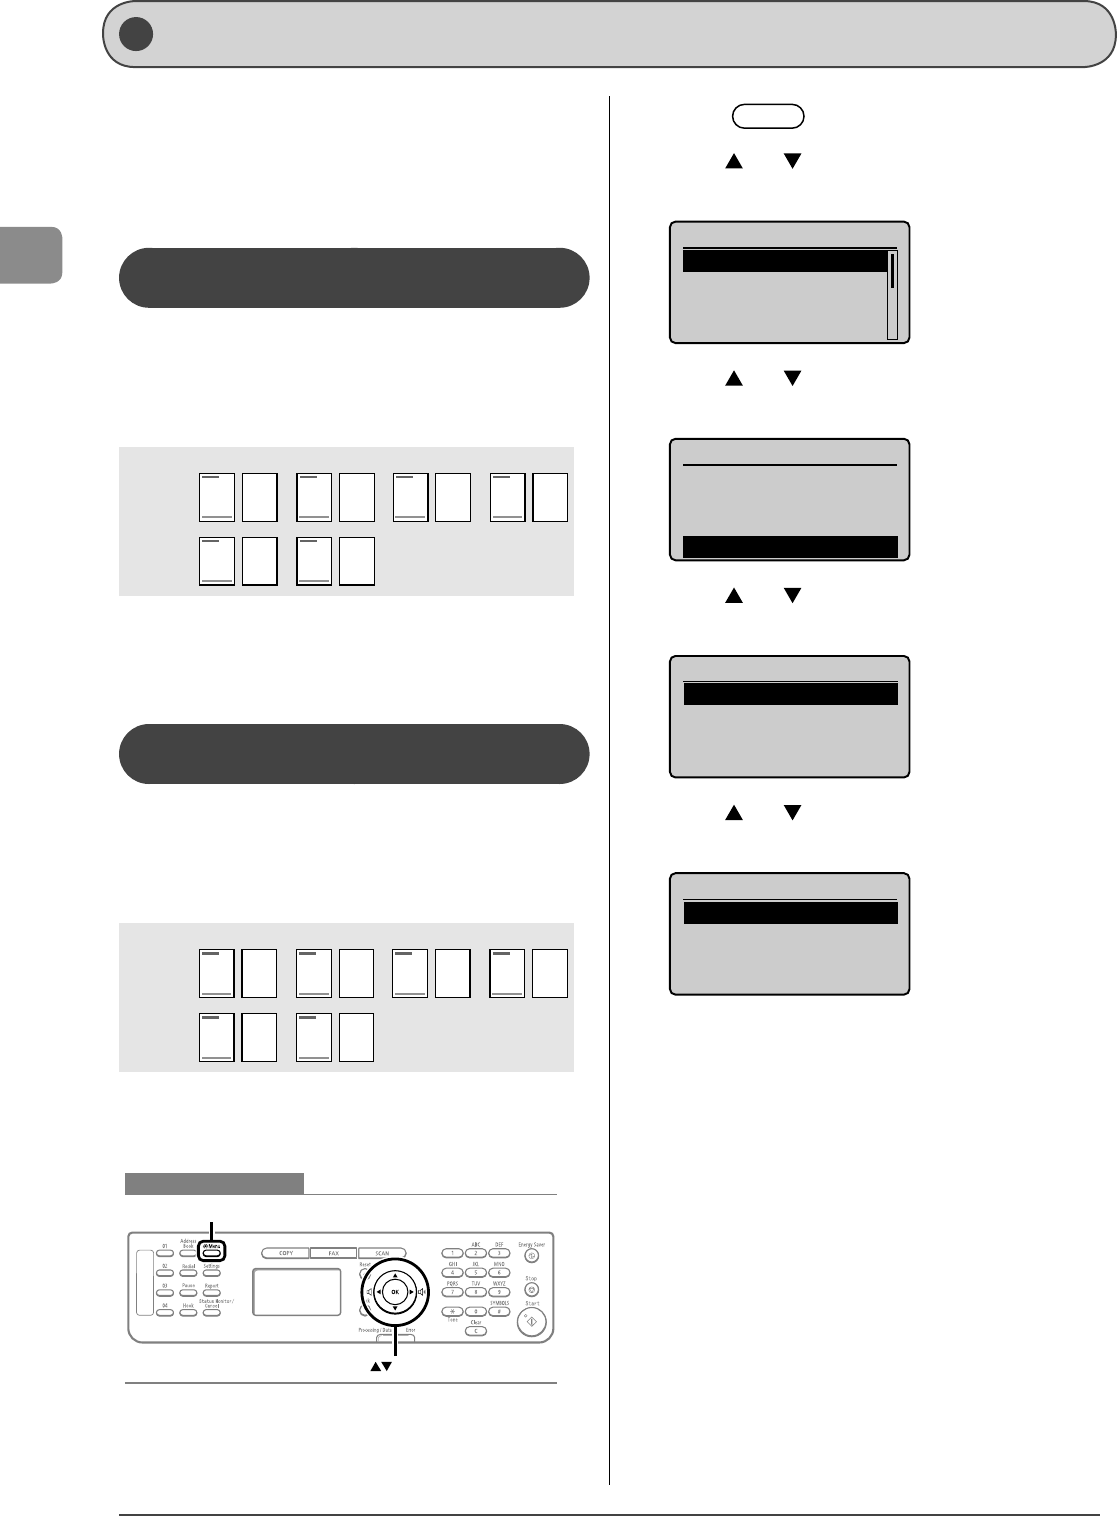
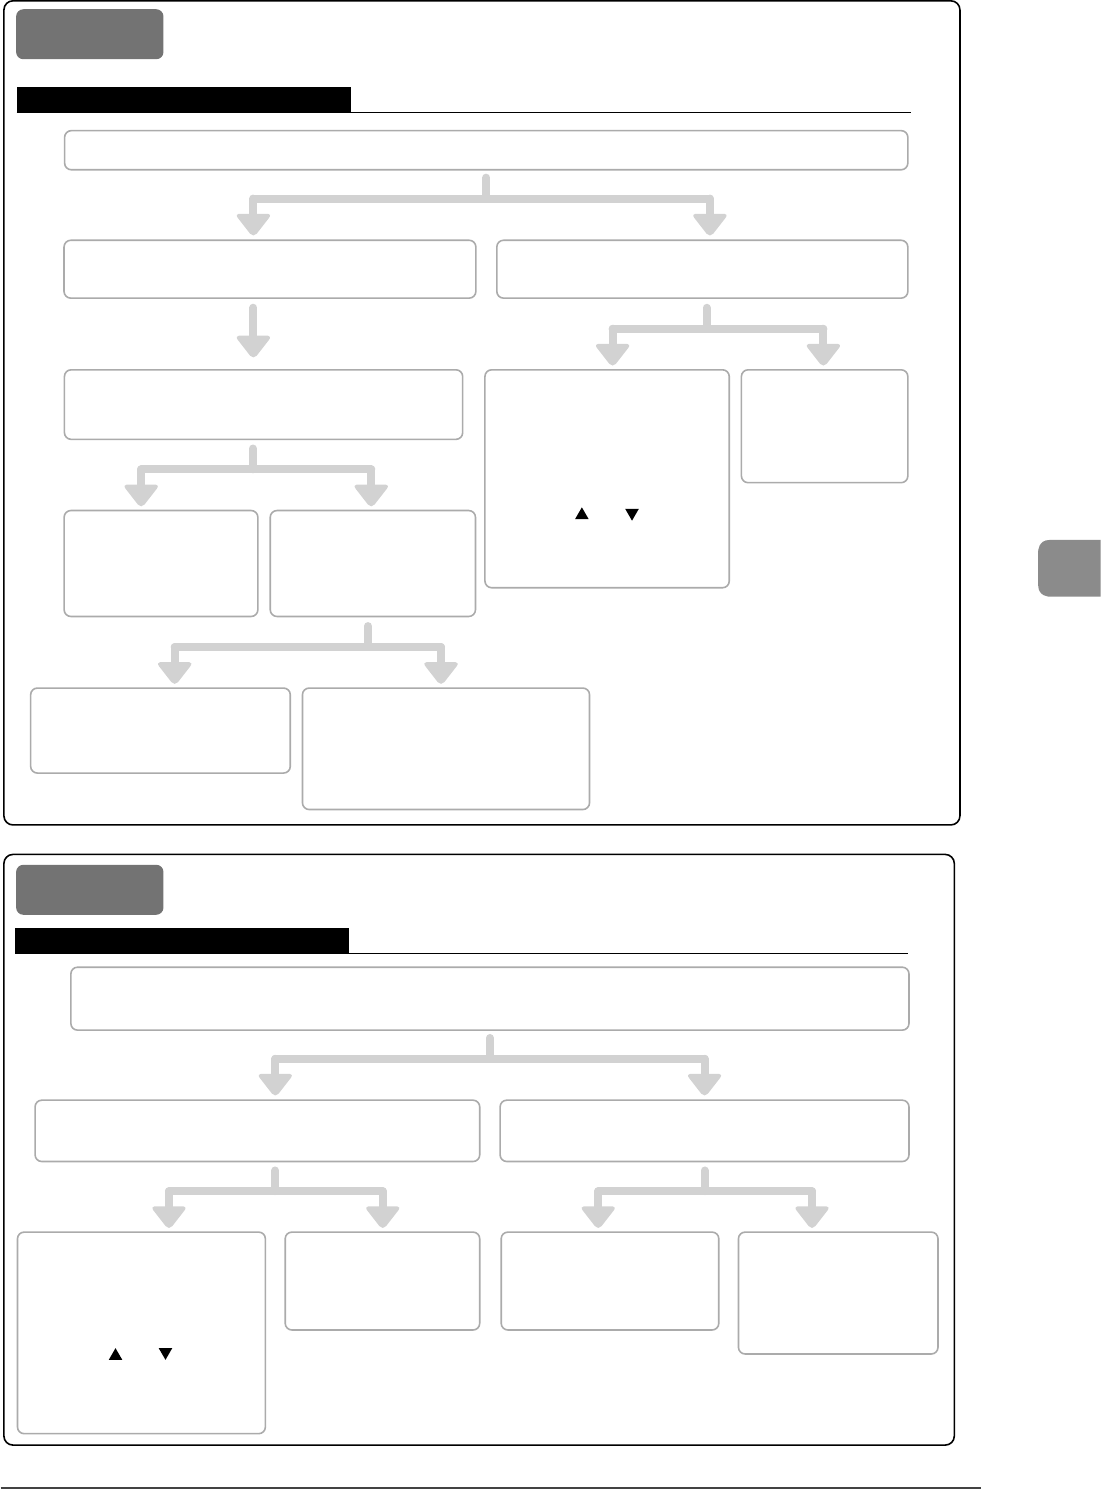
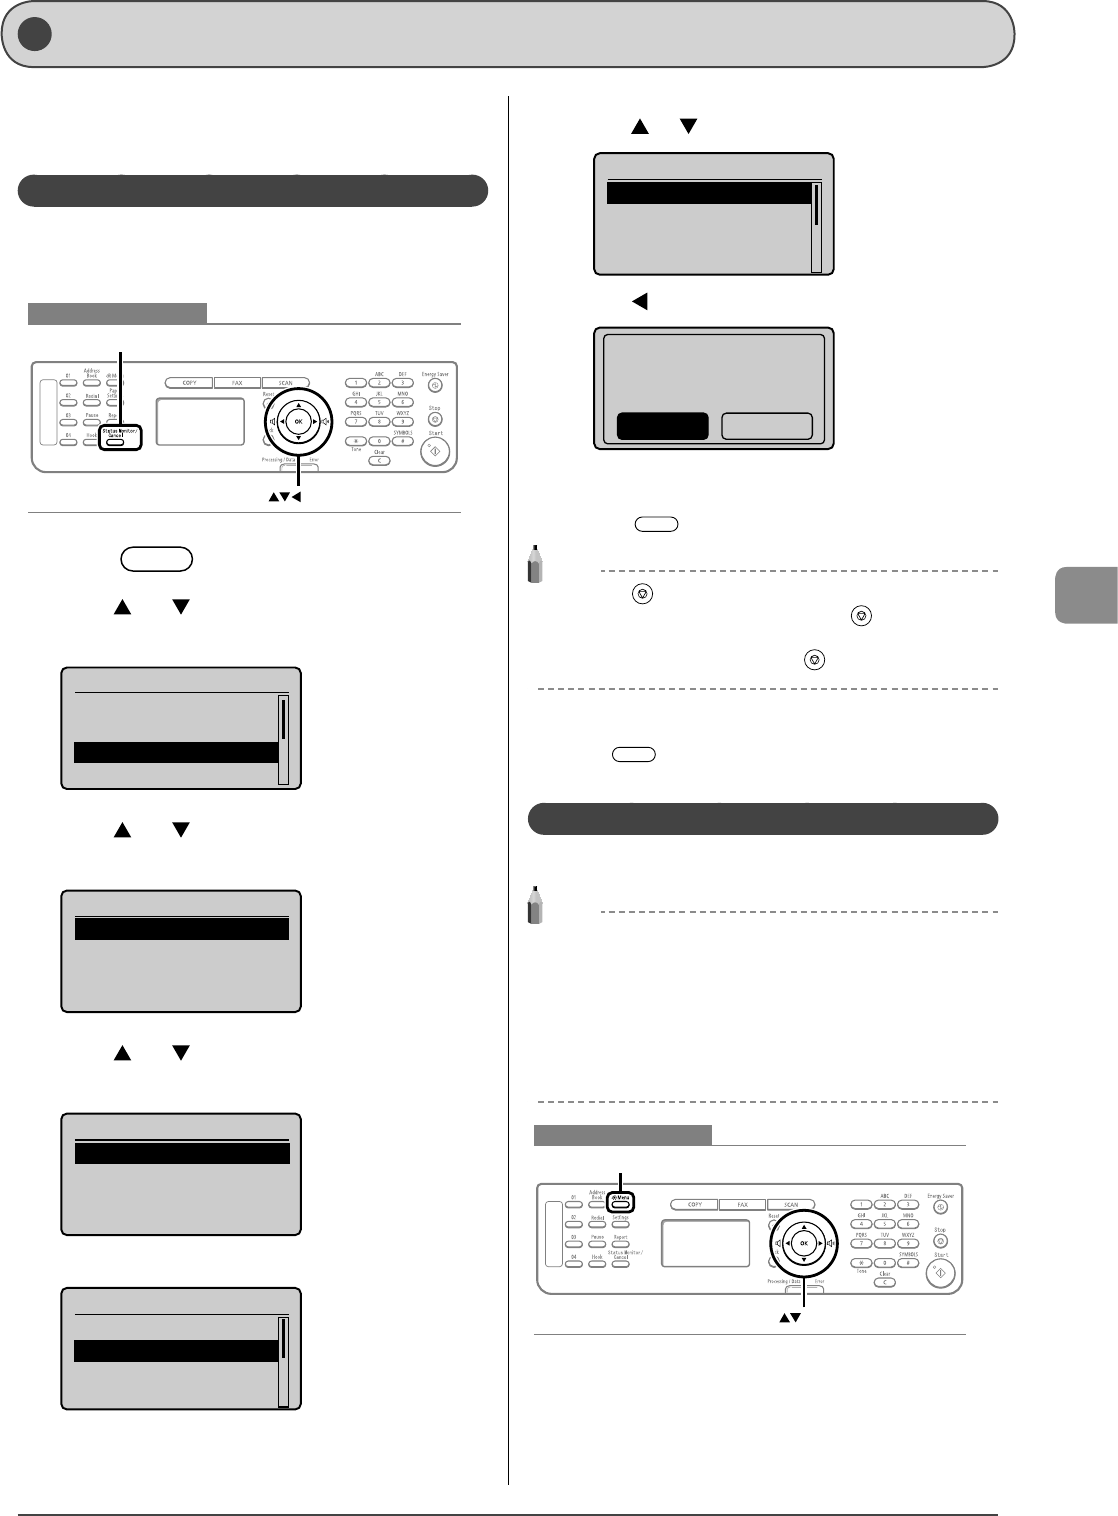
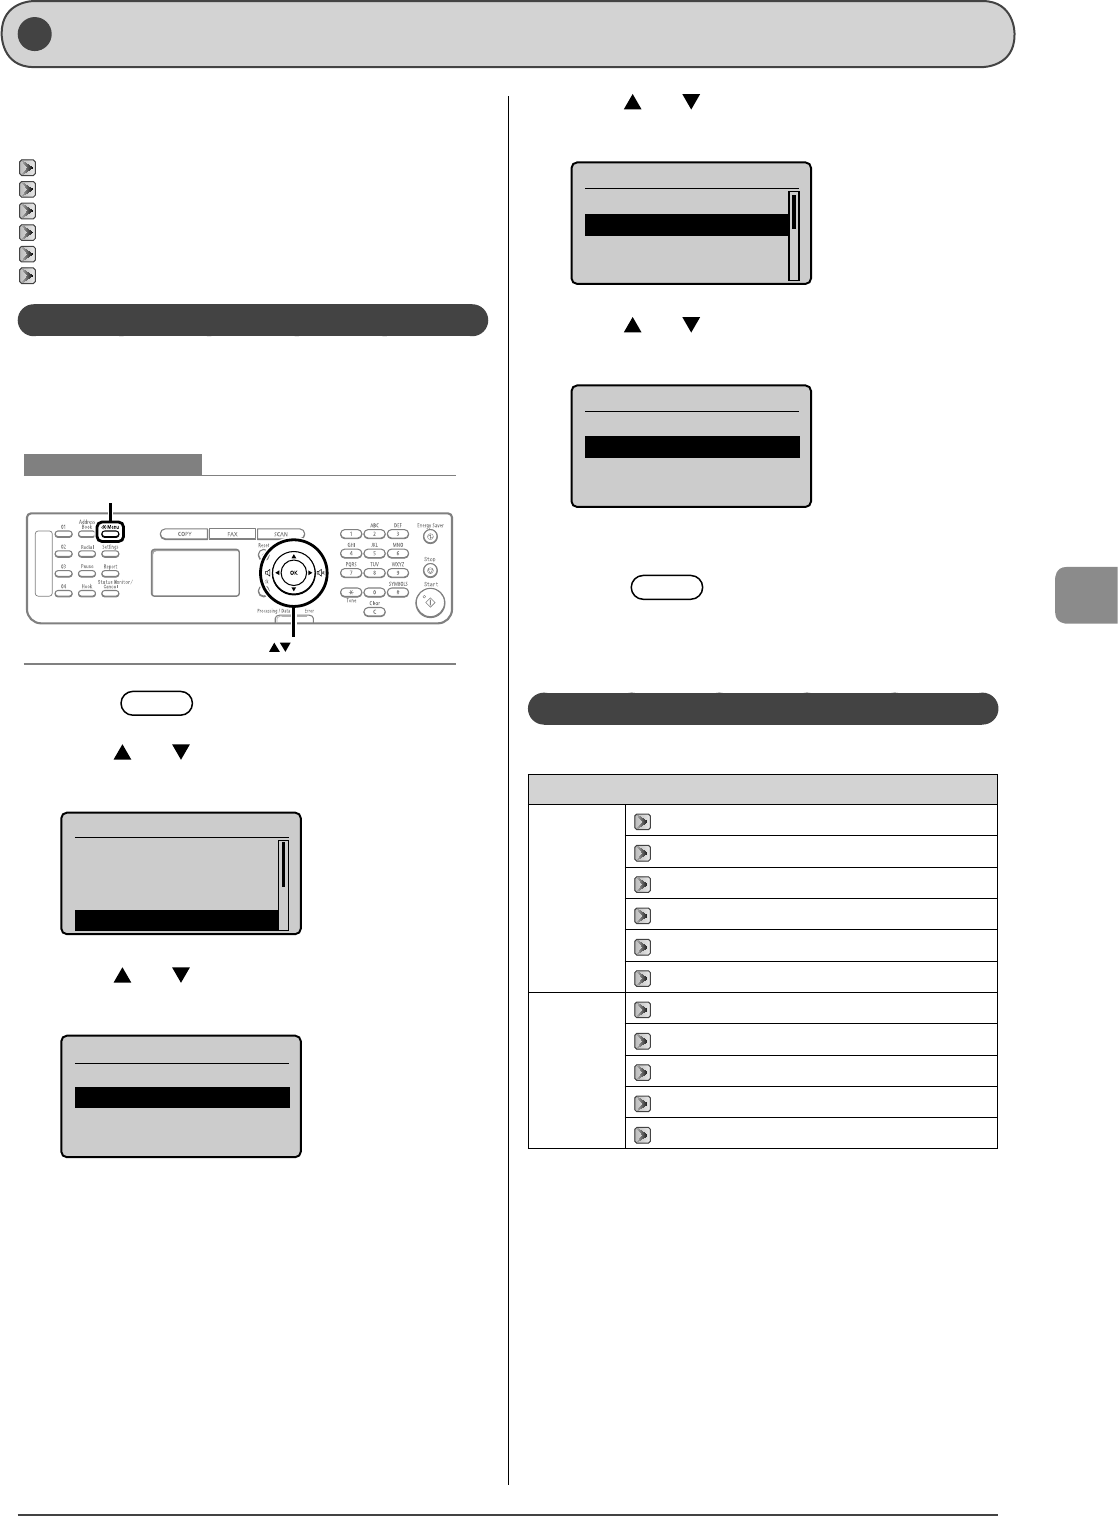
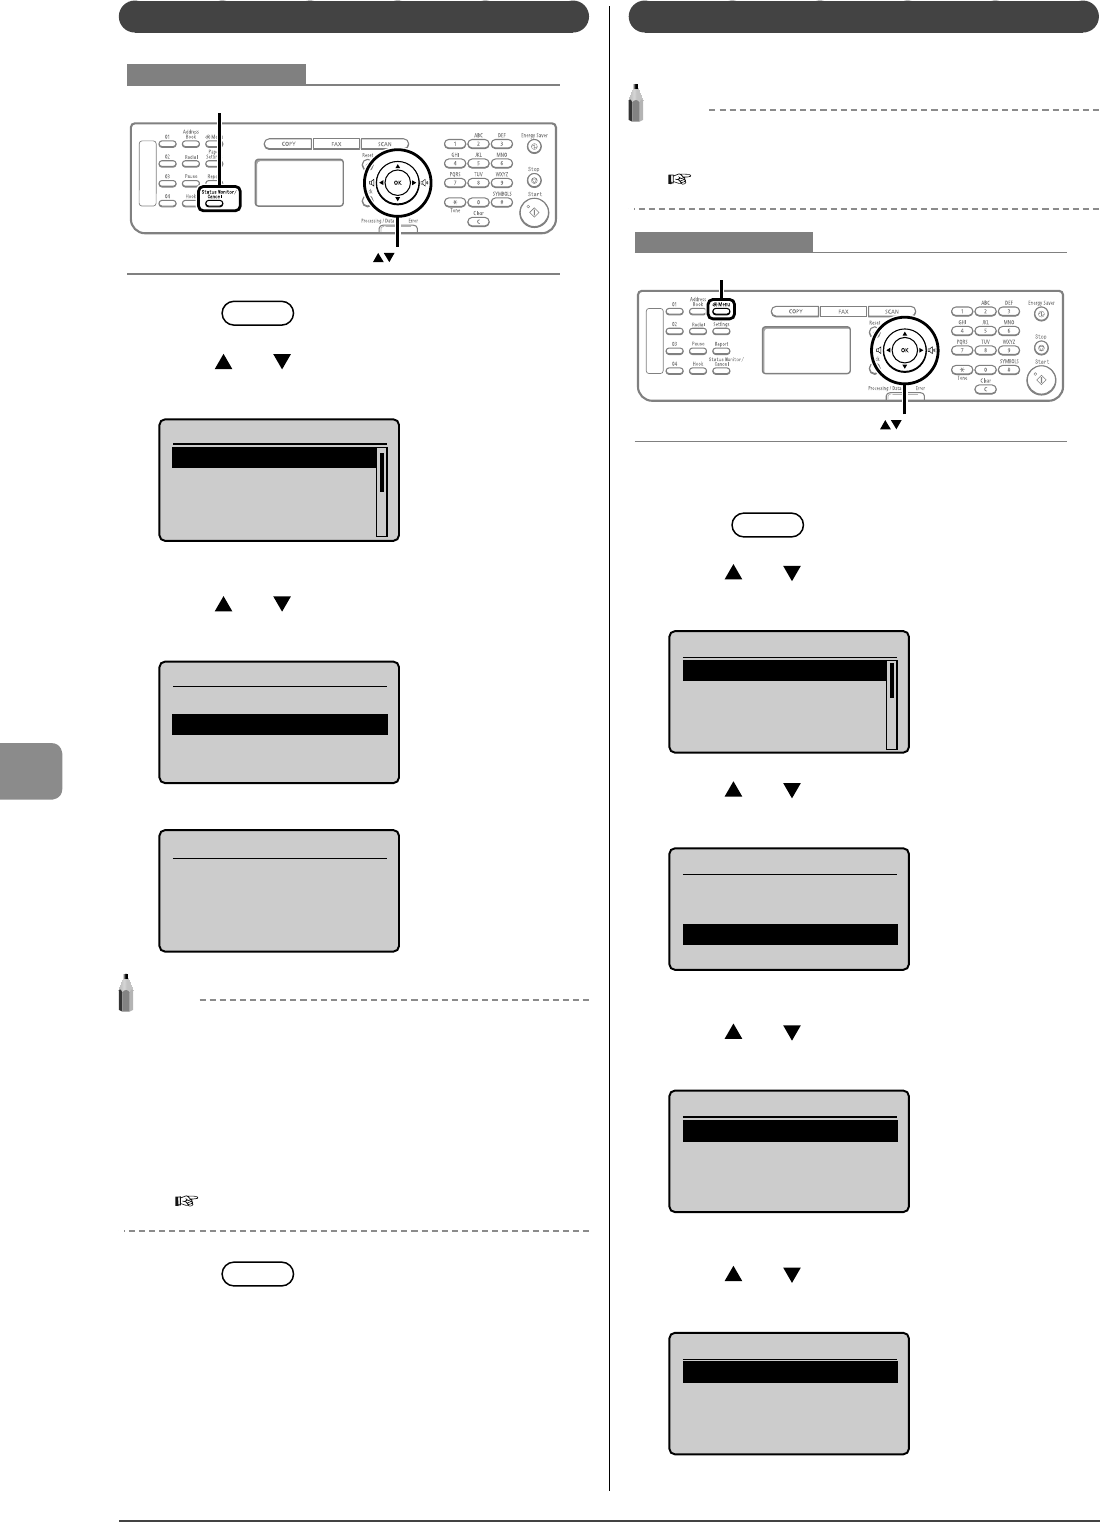
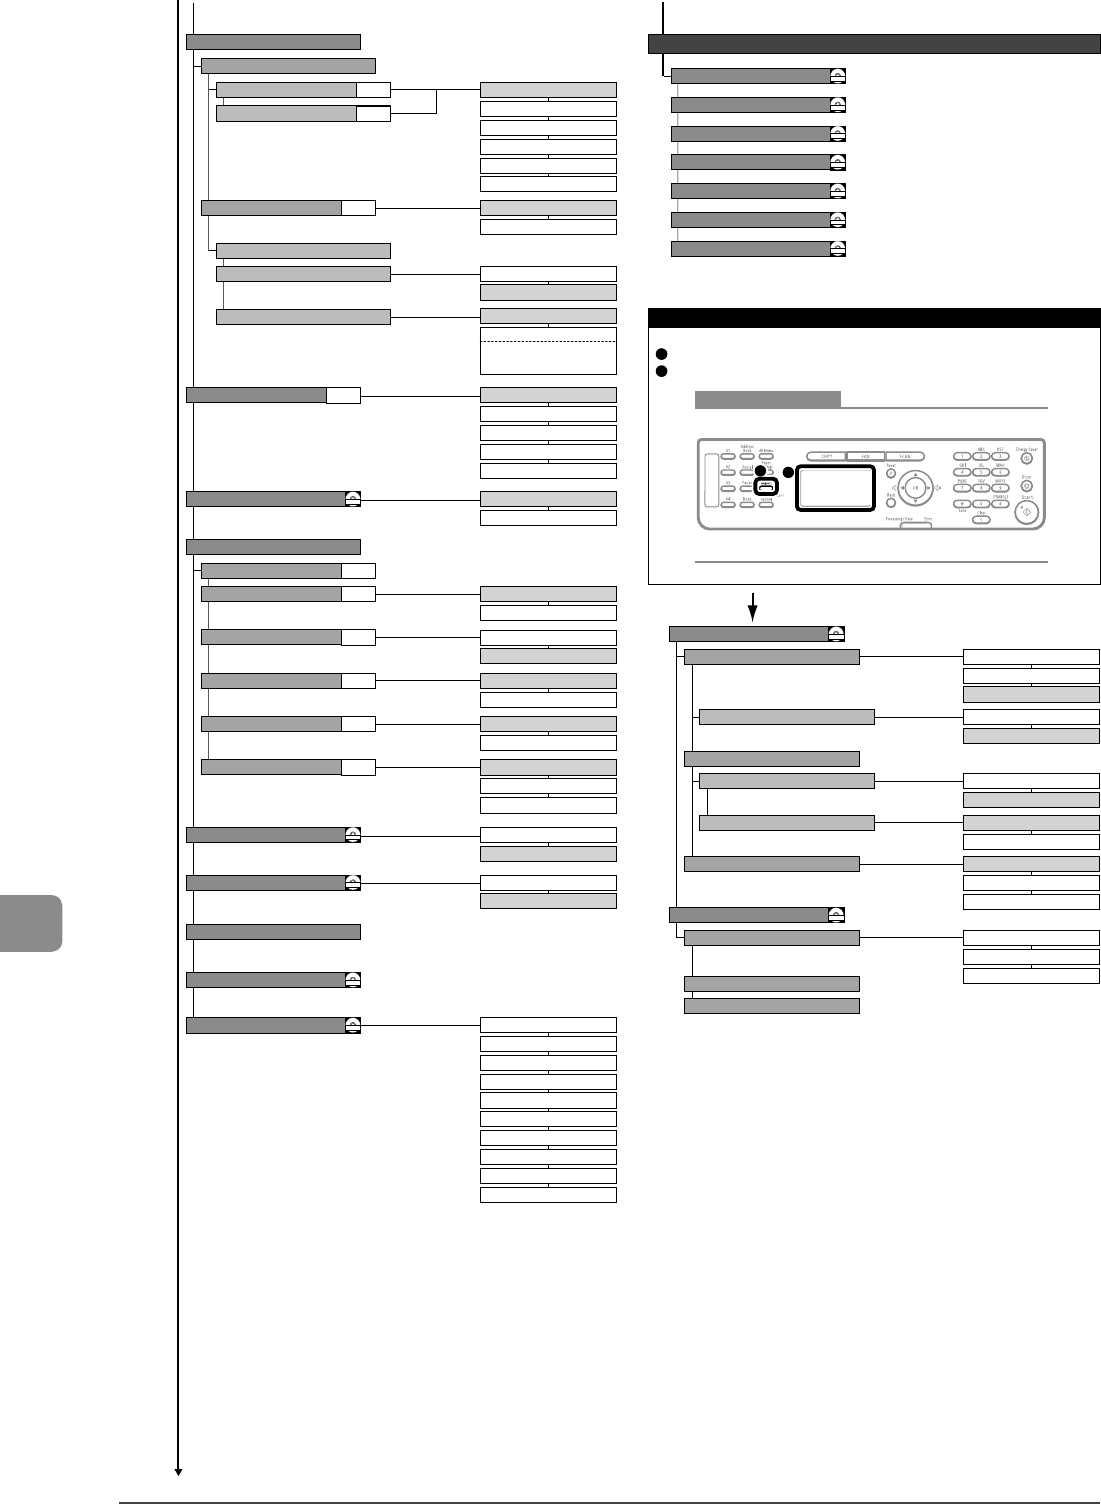
When the copy mode screen is displayed, you can select
items by pressing [
] or [].
The currently selected item will be highlighted with a black
background, and pressing [OK] will advance to the next
screen.
Copy: Press Start
100% LTR
Density: 0
Original Type: Text
...
2-Sided: Off
1
+
-
01
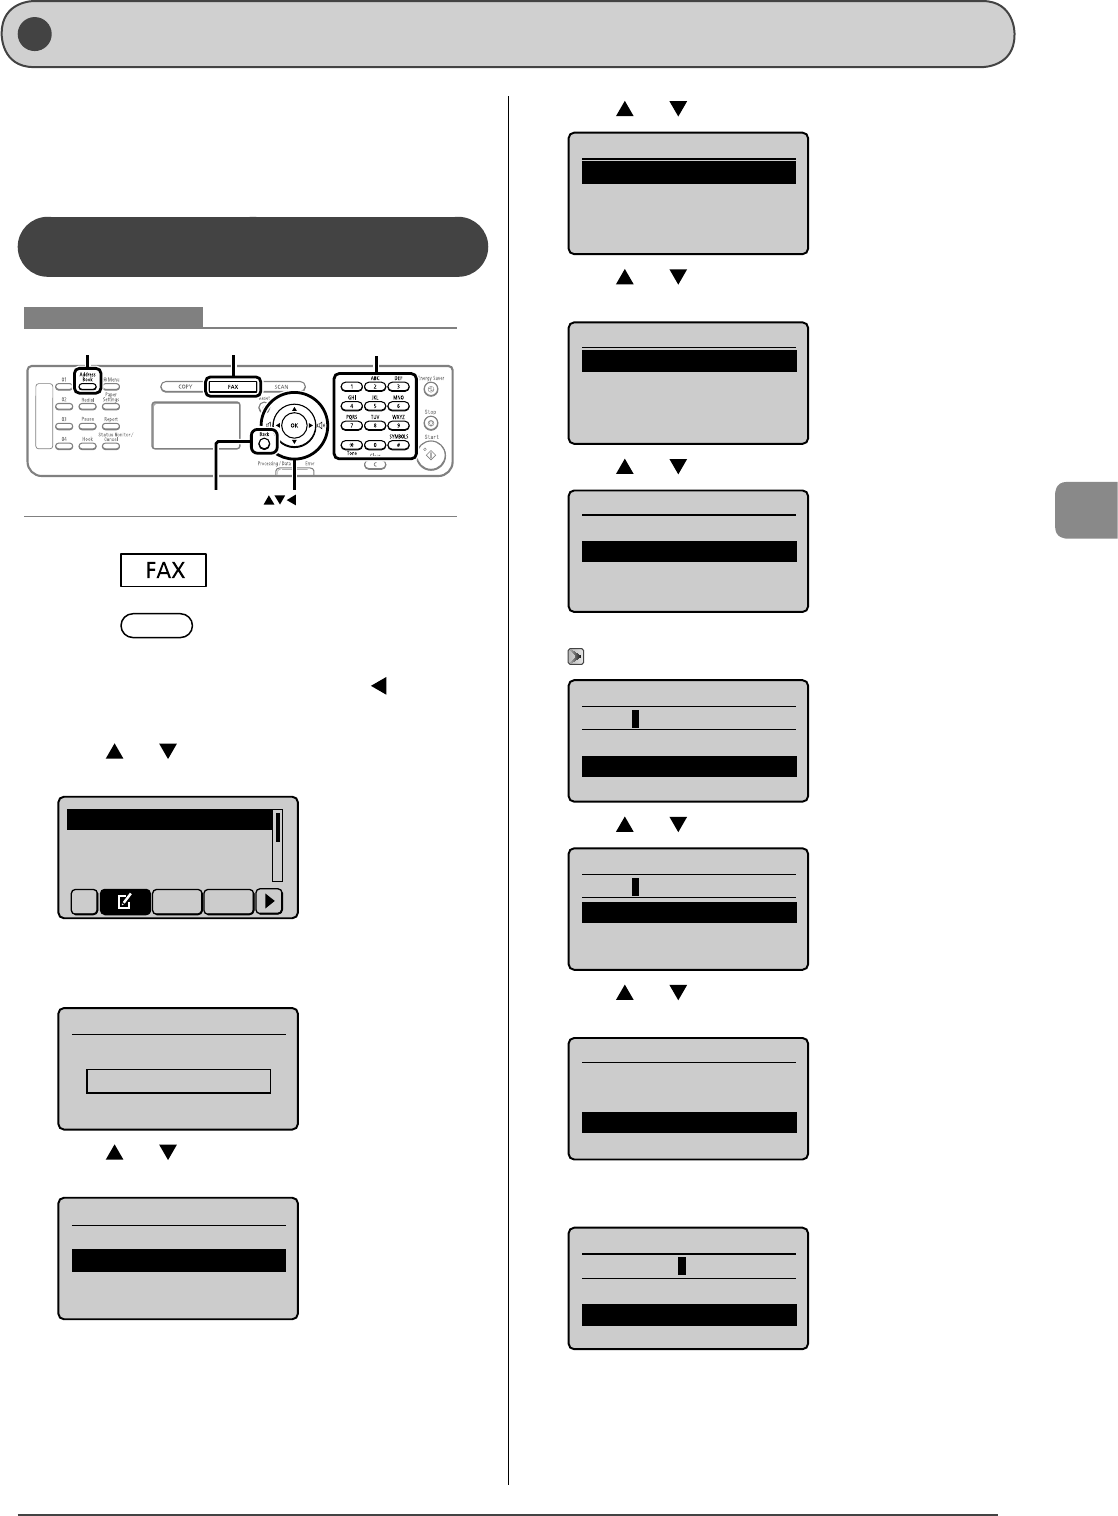
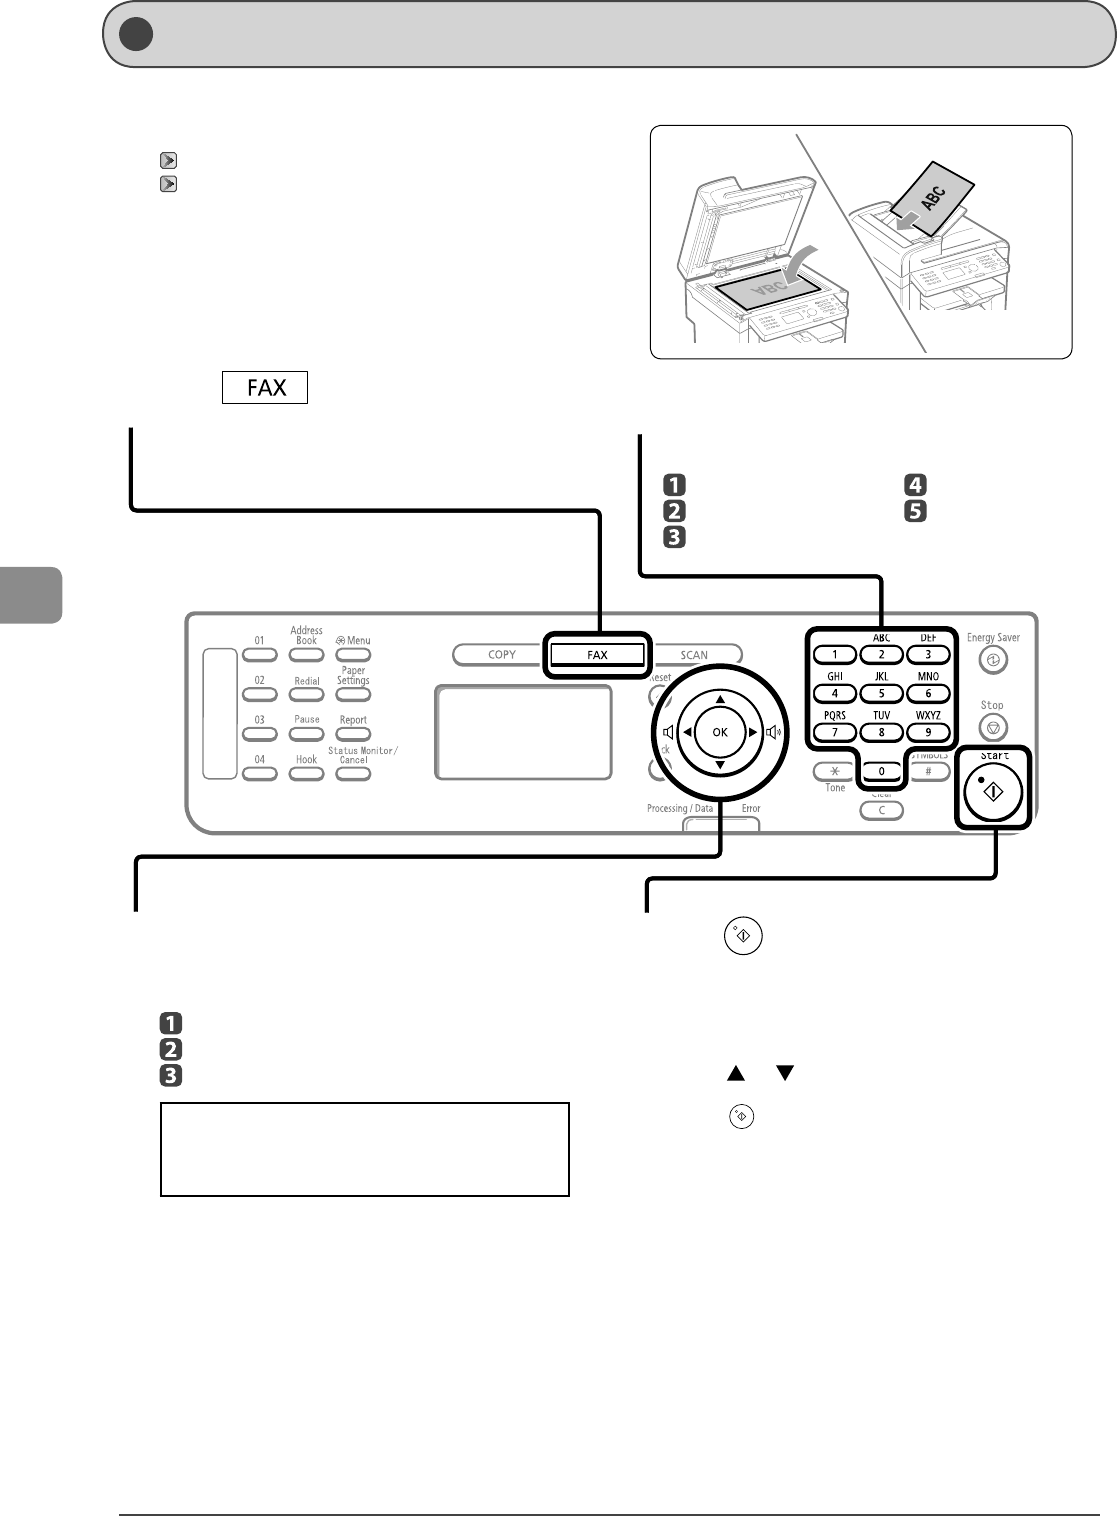
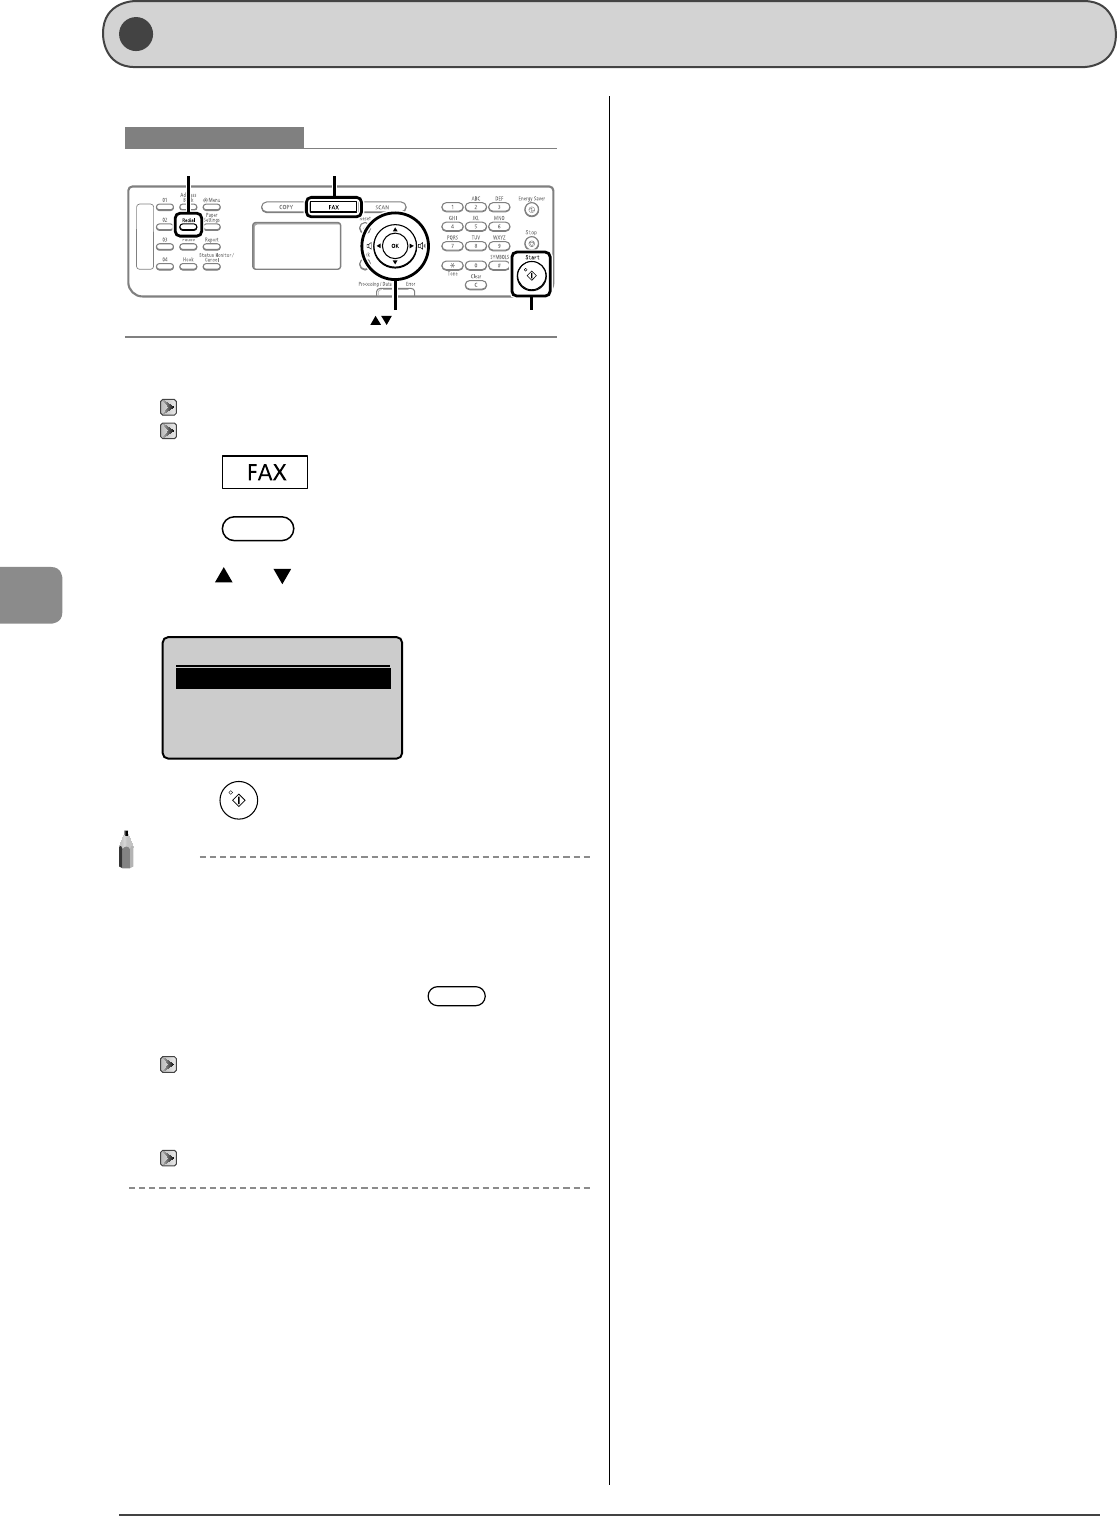
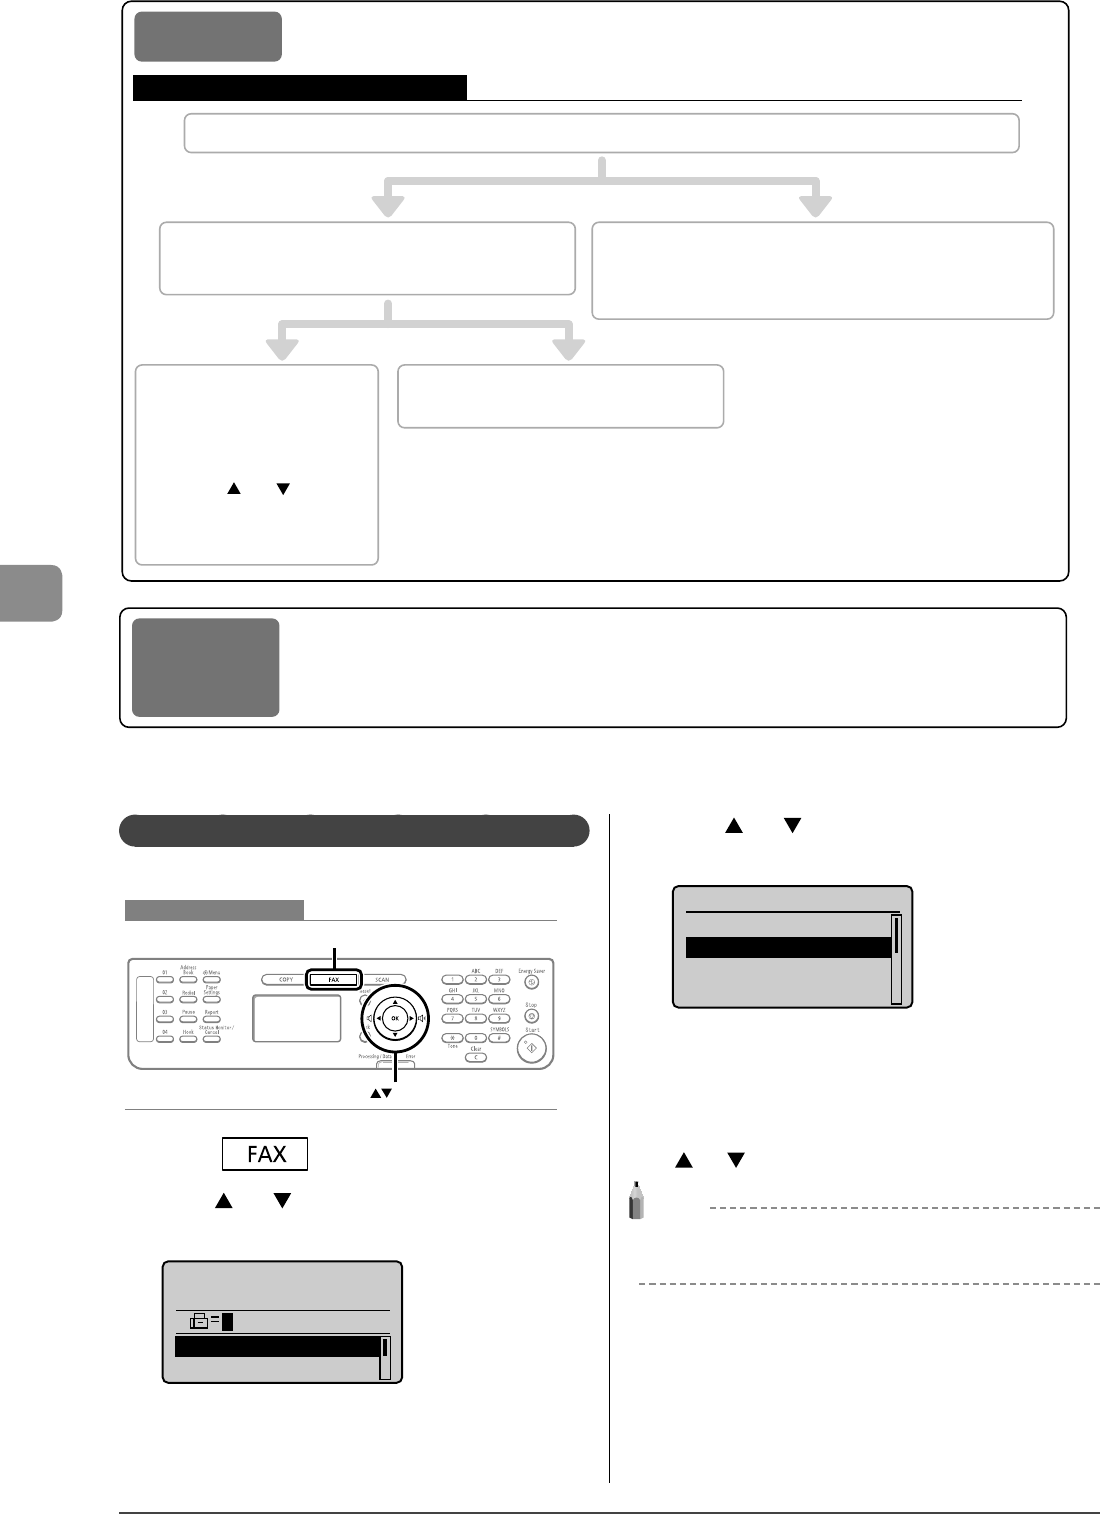
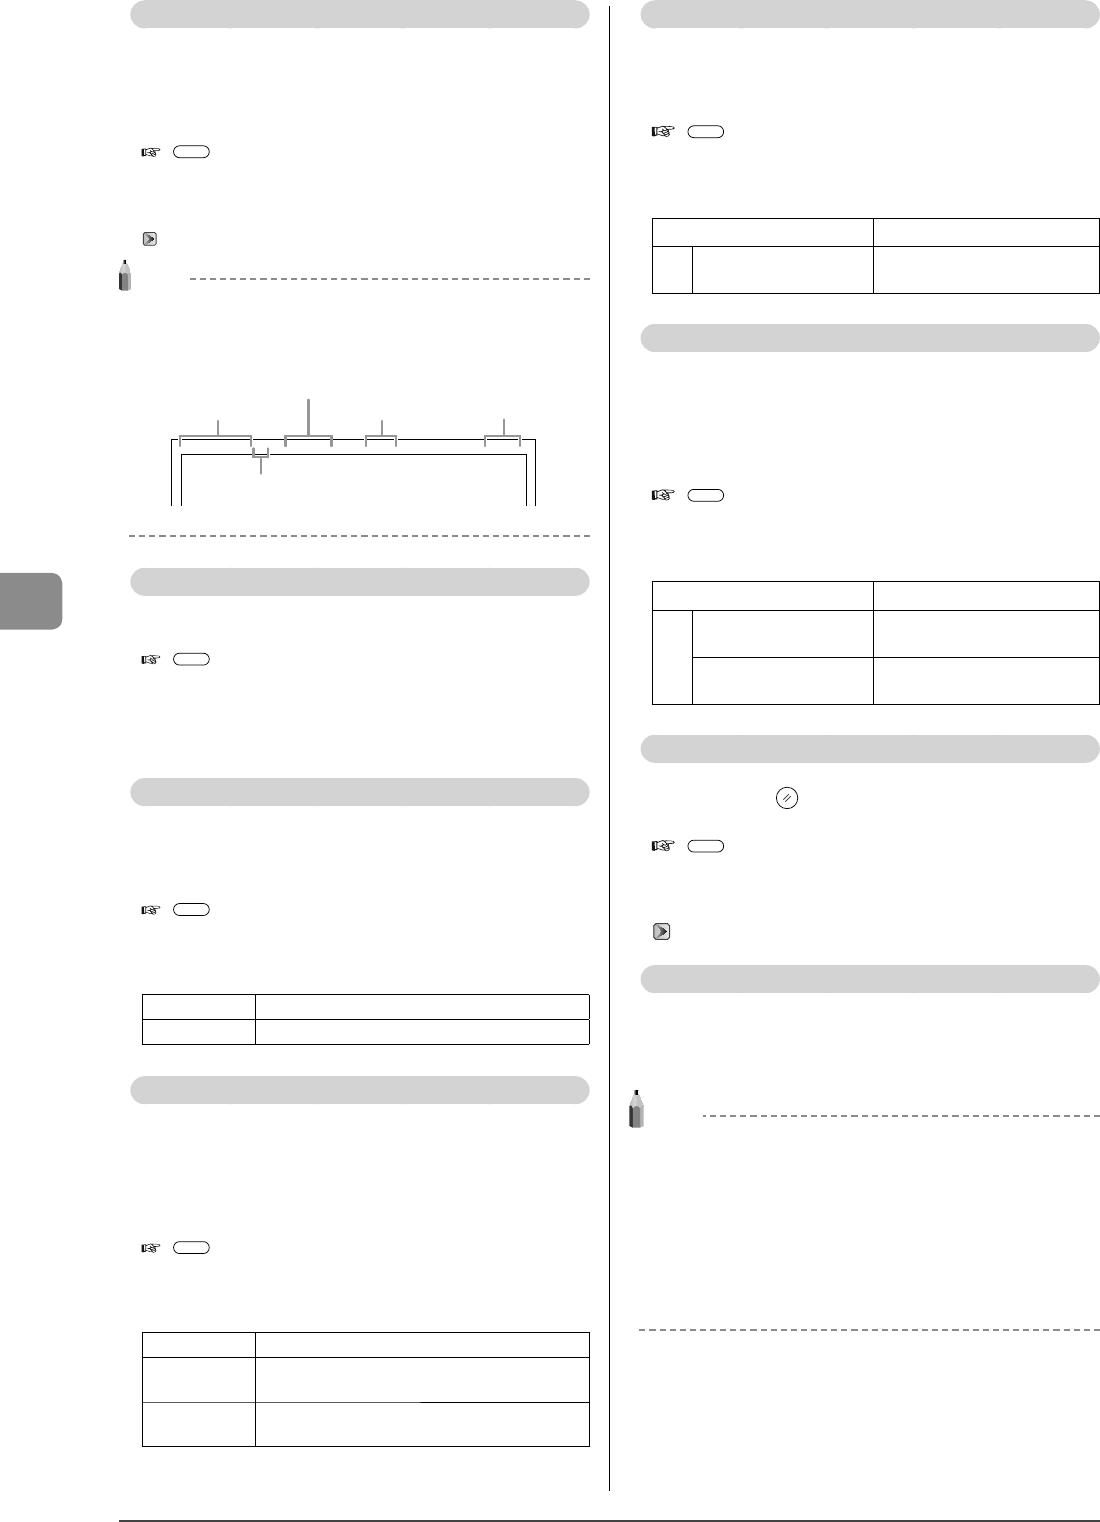
Fax Mode
When using the fax function, press [] to switch to
the standby display.
Specify destination.
01/01/2011 12:52AM
RX Mode: Auto
Resolution: 200 x 1
...
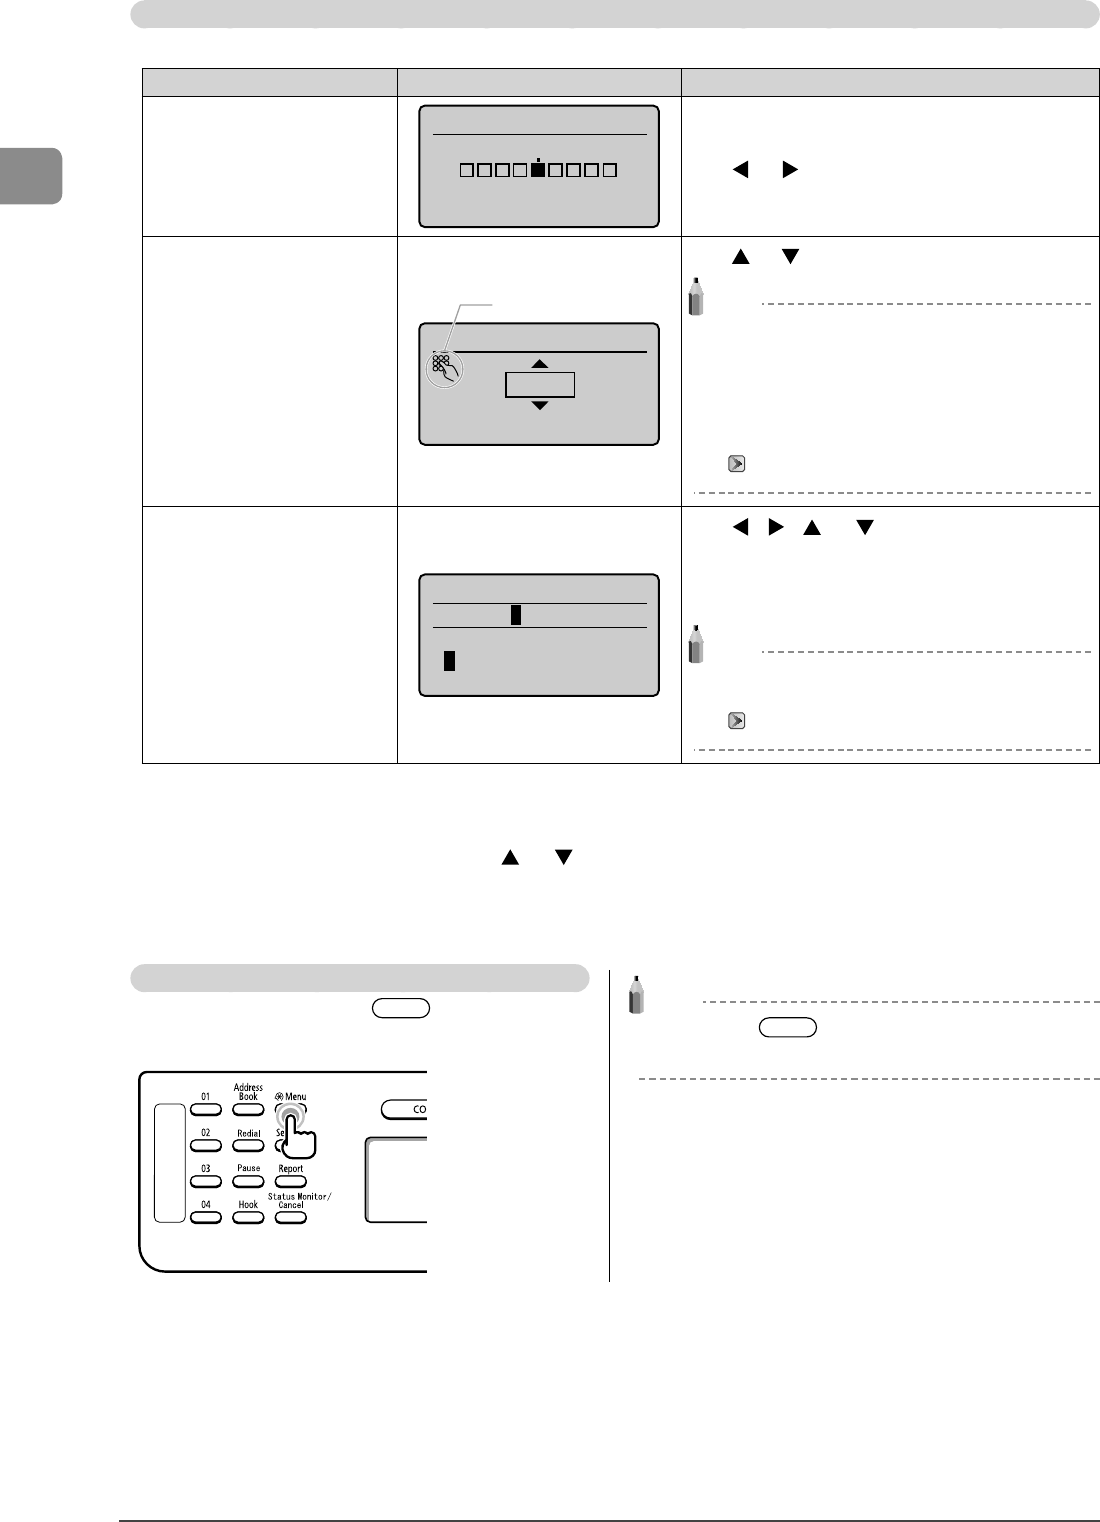
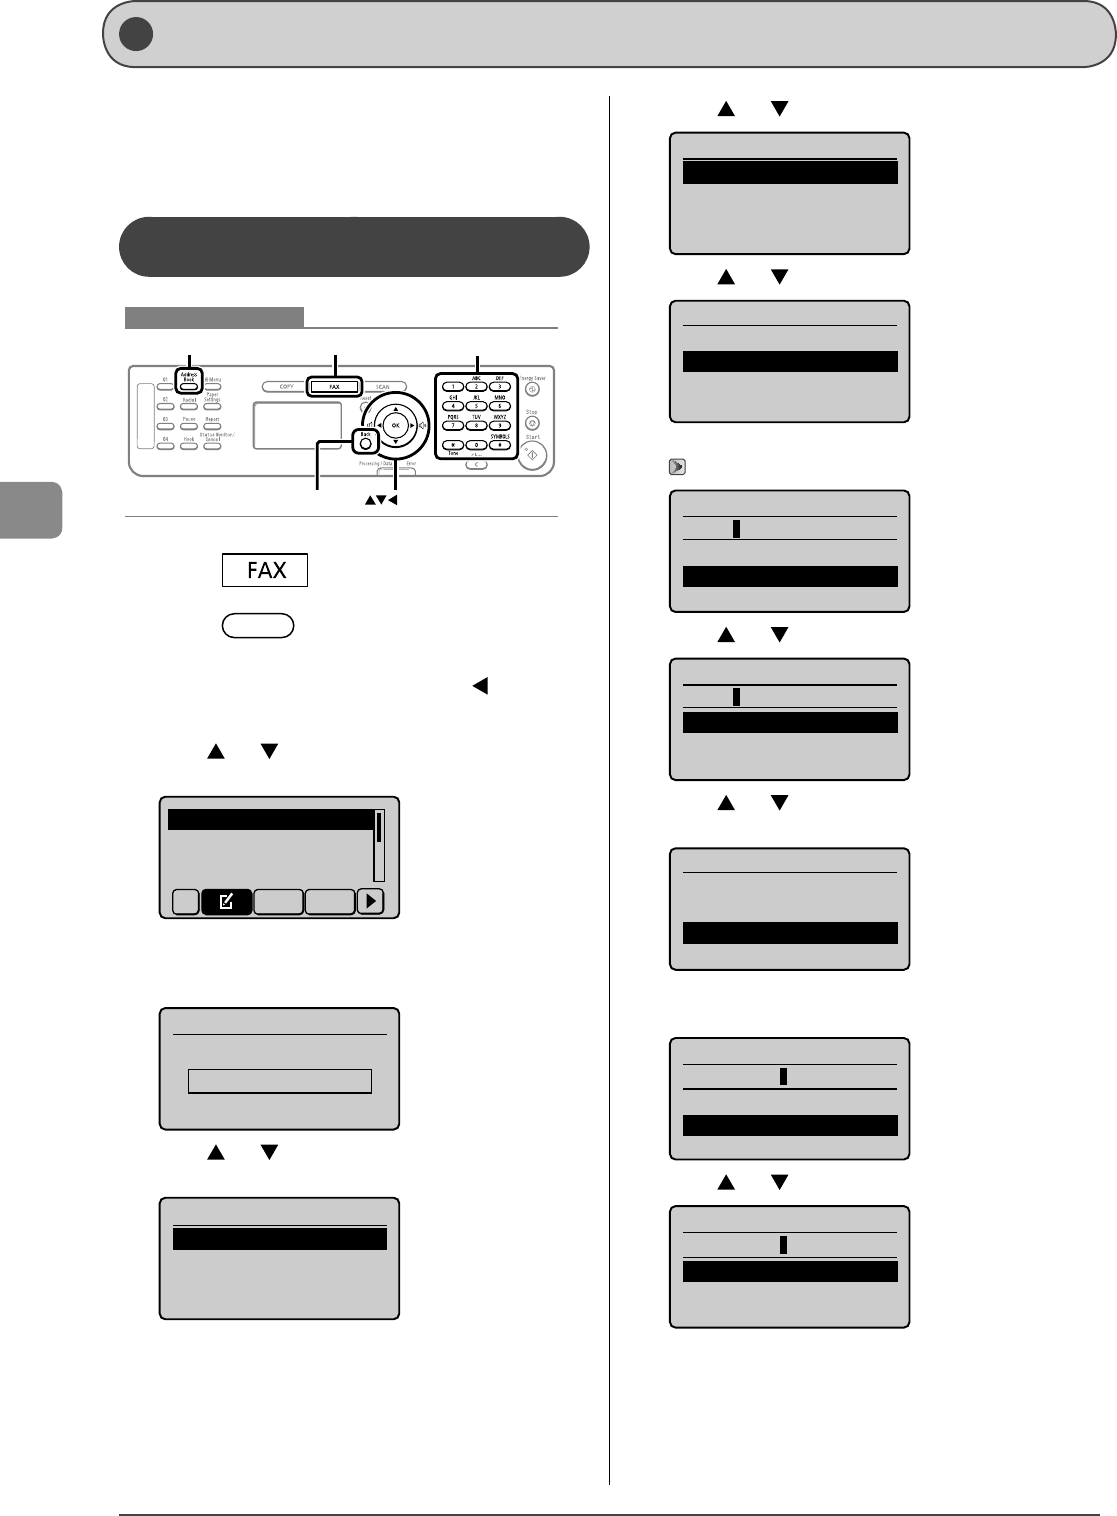
When the fax mode screen is displayed, you can select
items by pressing [
] or [].
The currently selected item will be highlighted with a black
background, and pressing [OK] will advance to the next
screen.
Specify destination.
01/01/2011 12:52AM
RX Mode: Auto
Resolution: 200 x 1
...
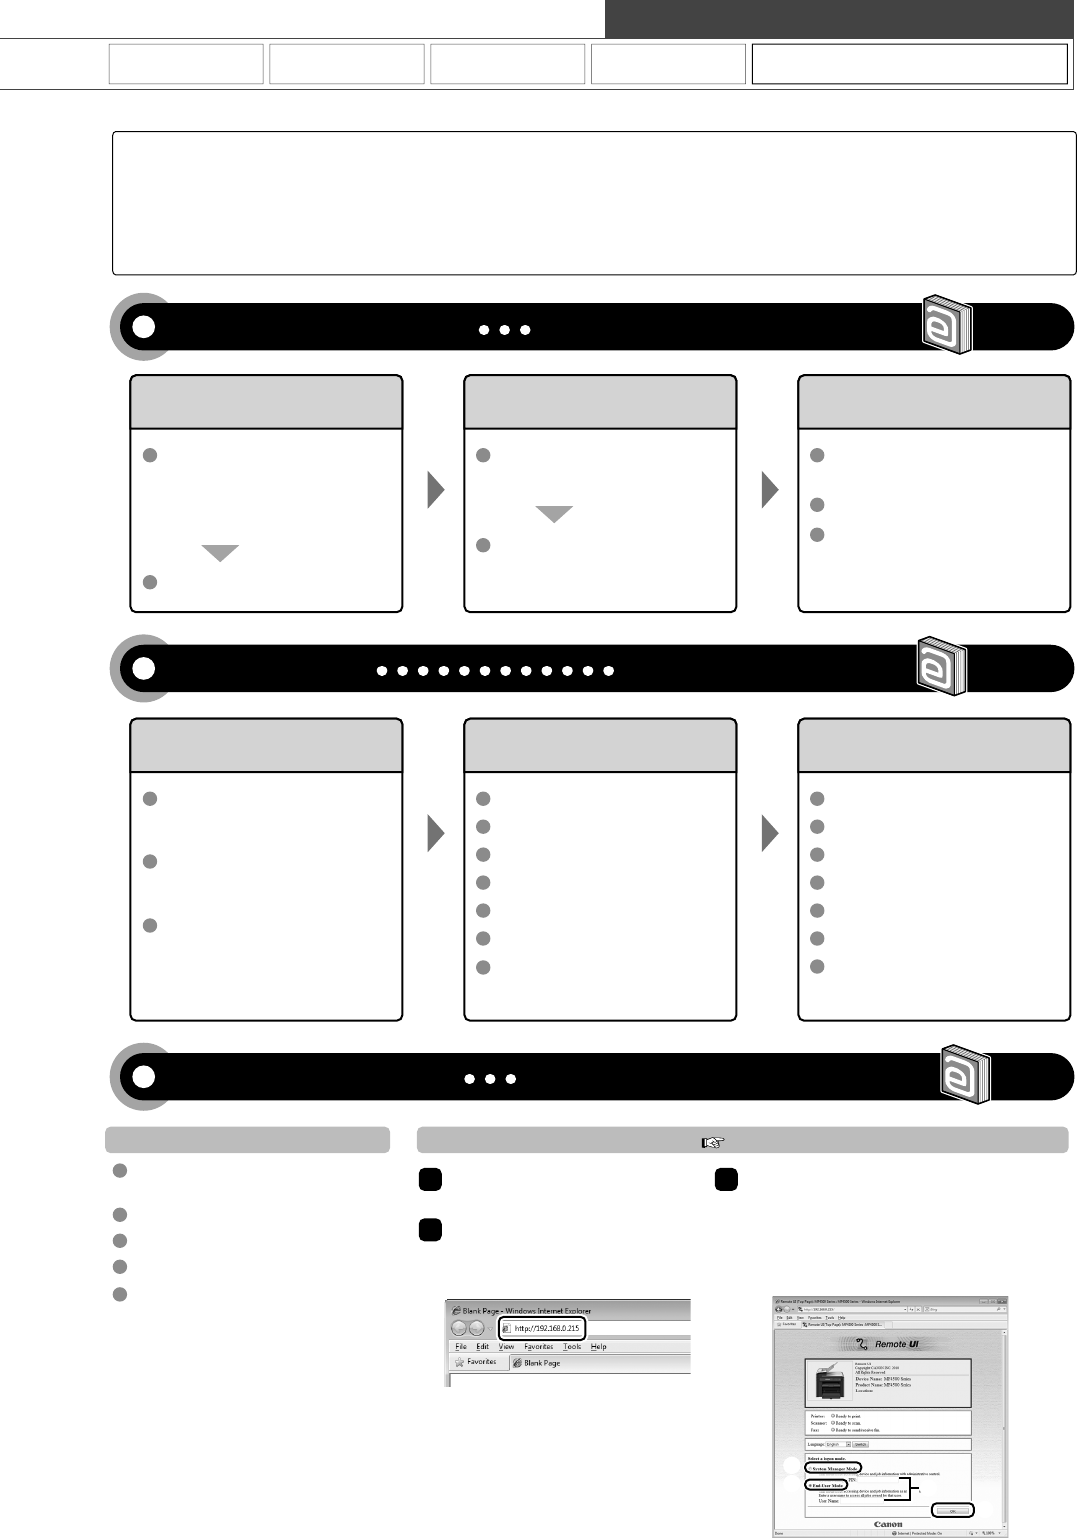
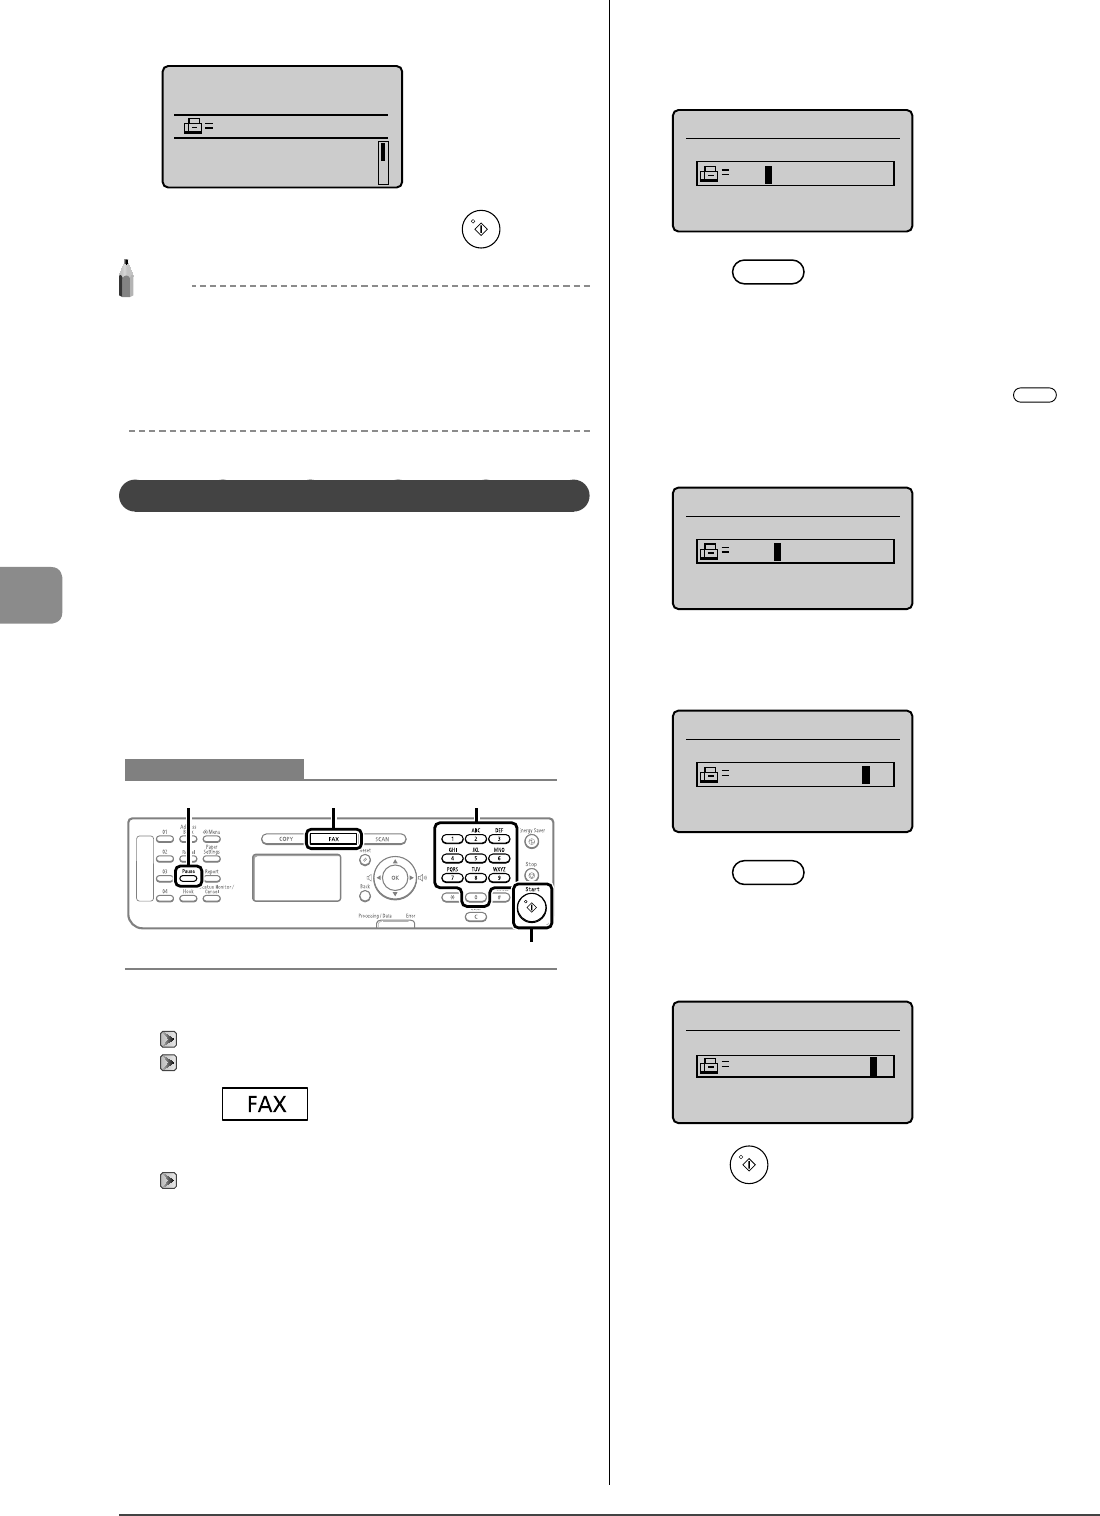
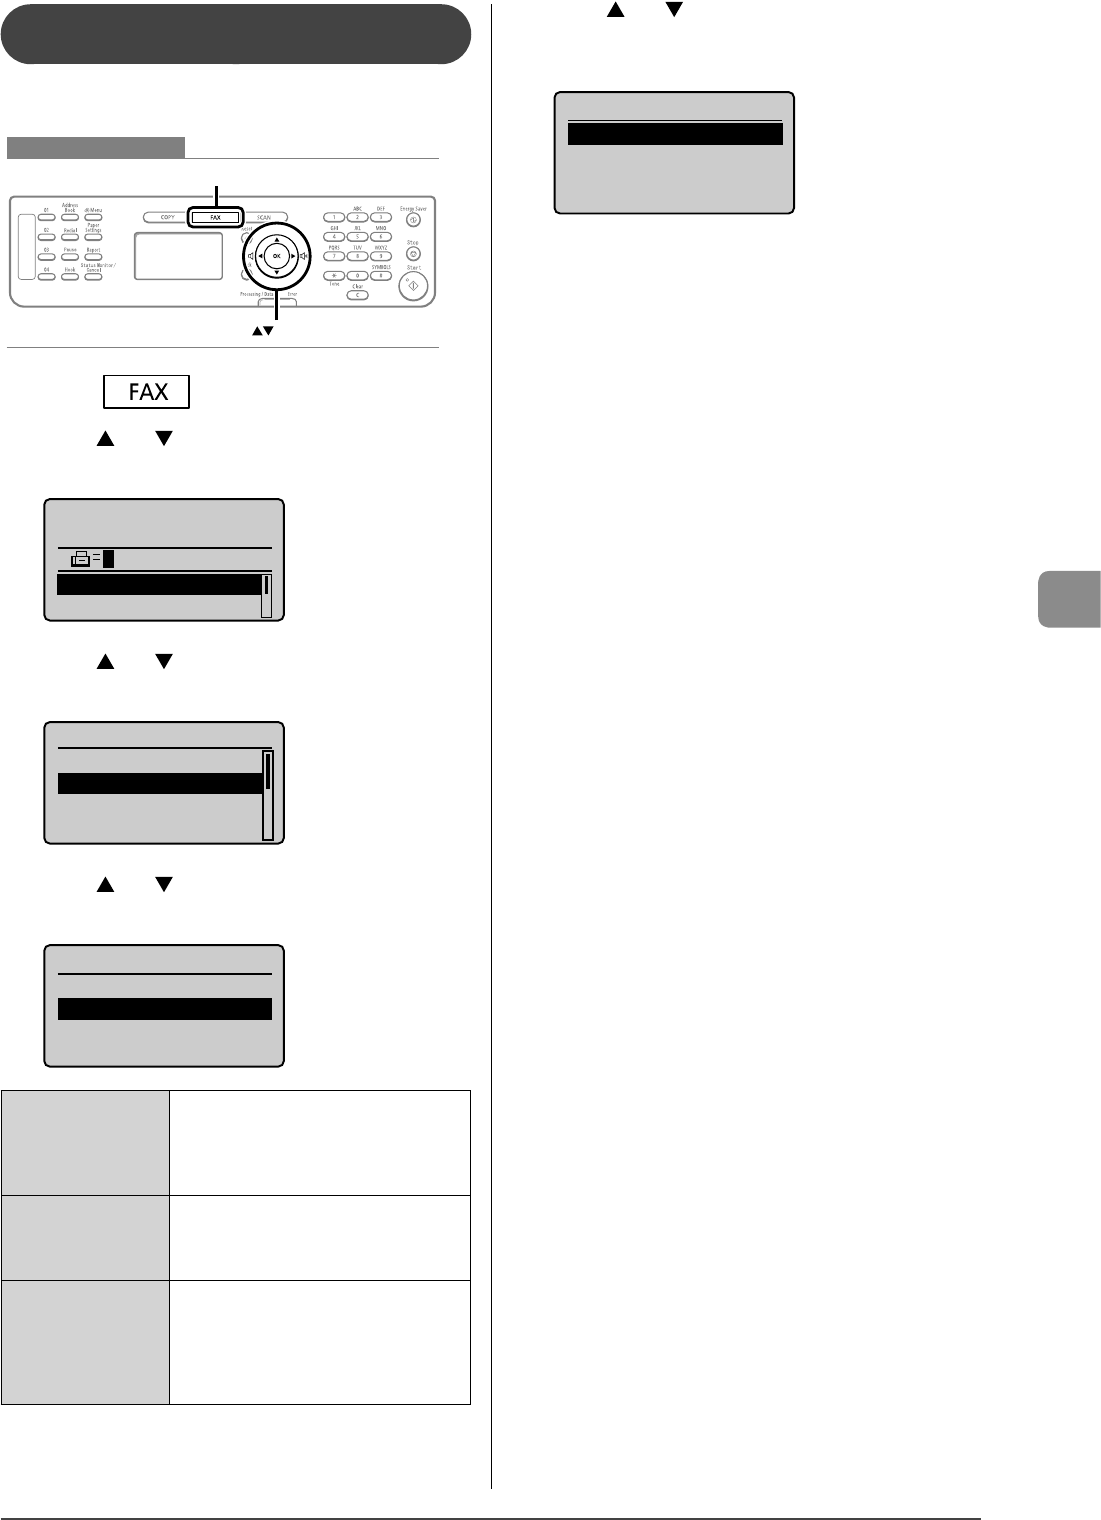
Scan Mode
When using the scan function, press [] to switch
to the standby display.
When the scan mode screen is displayed, you can select
items by pressing [
] or [].
The currently selected item will be highlighted with a black
background, and pressing [OK] will advance to the next
screen.
Select the scan type.
Computer
Remote Scanner
1-7
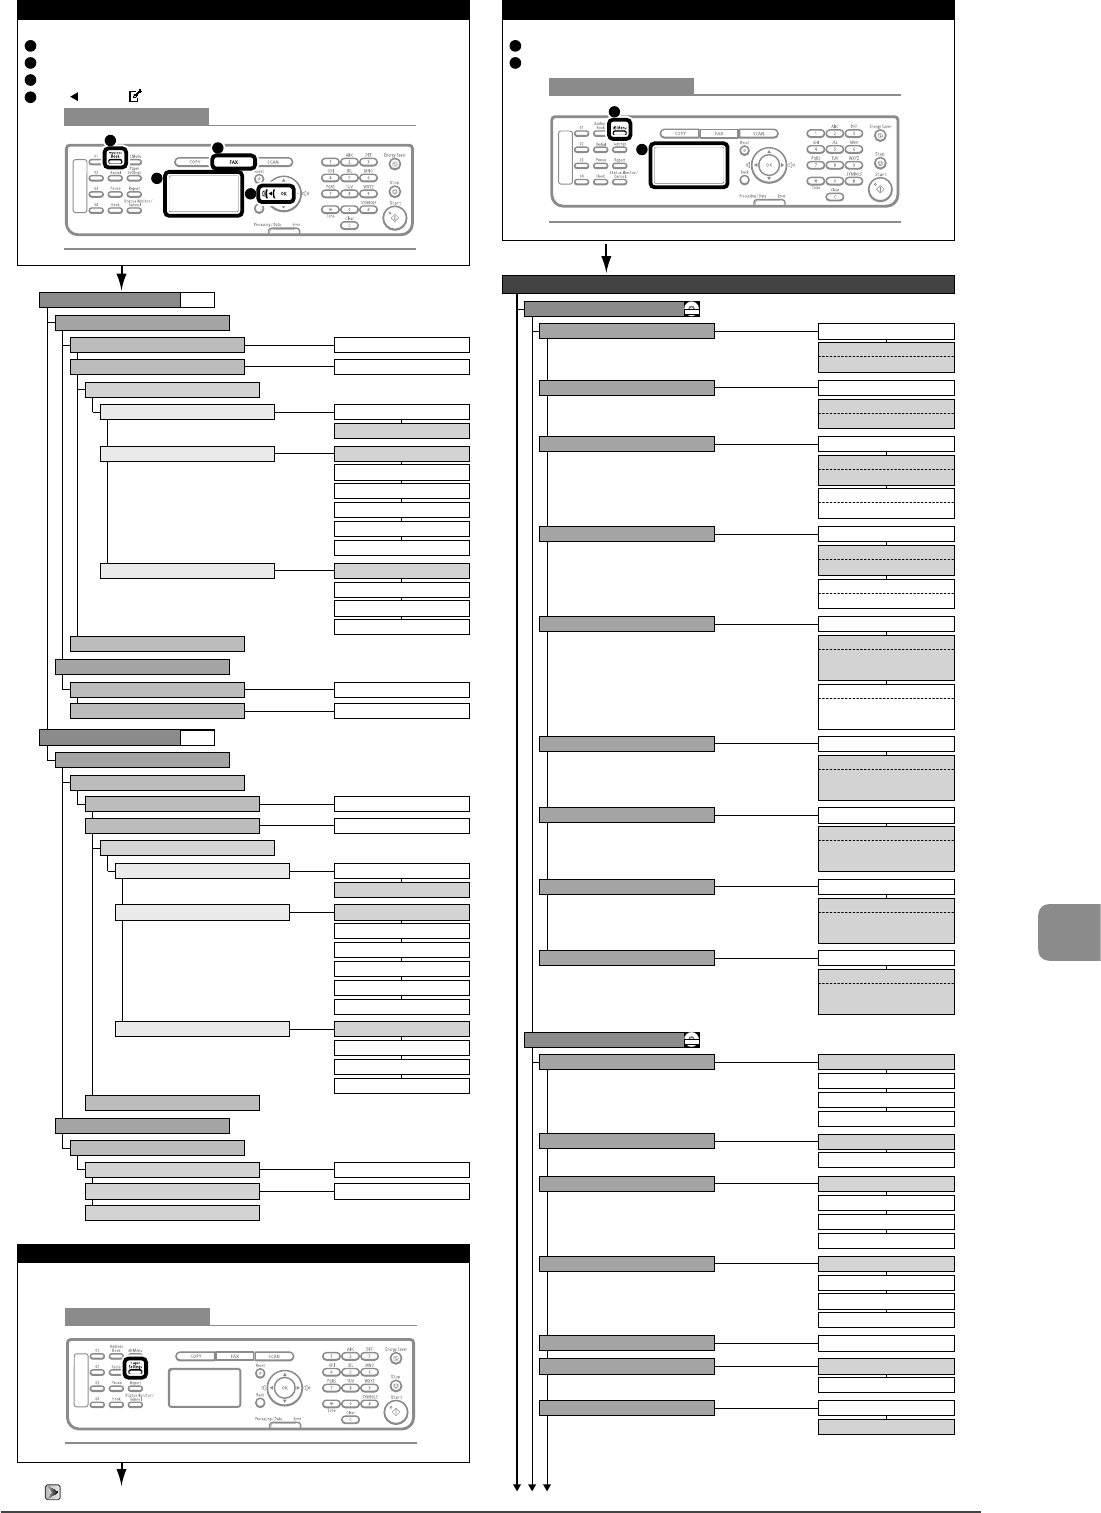
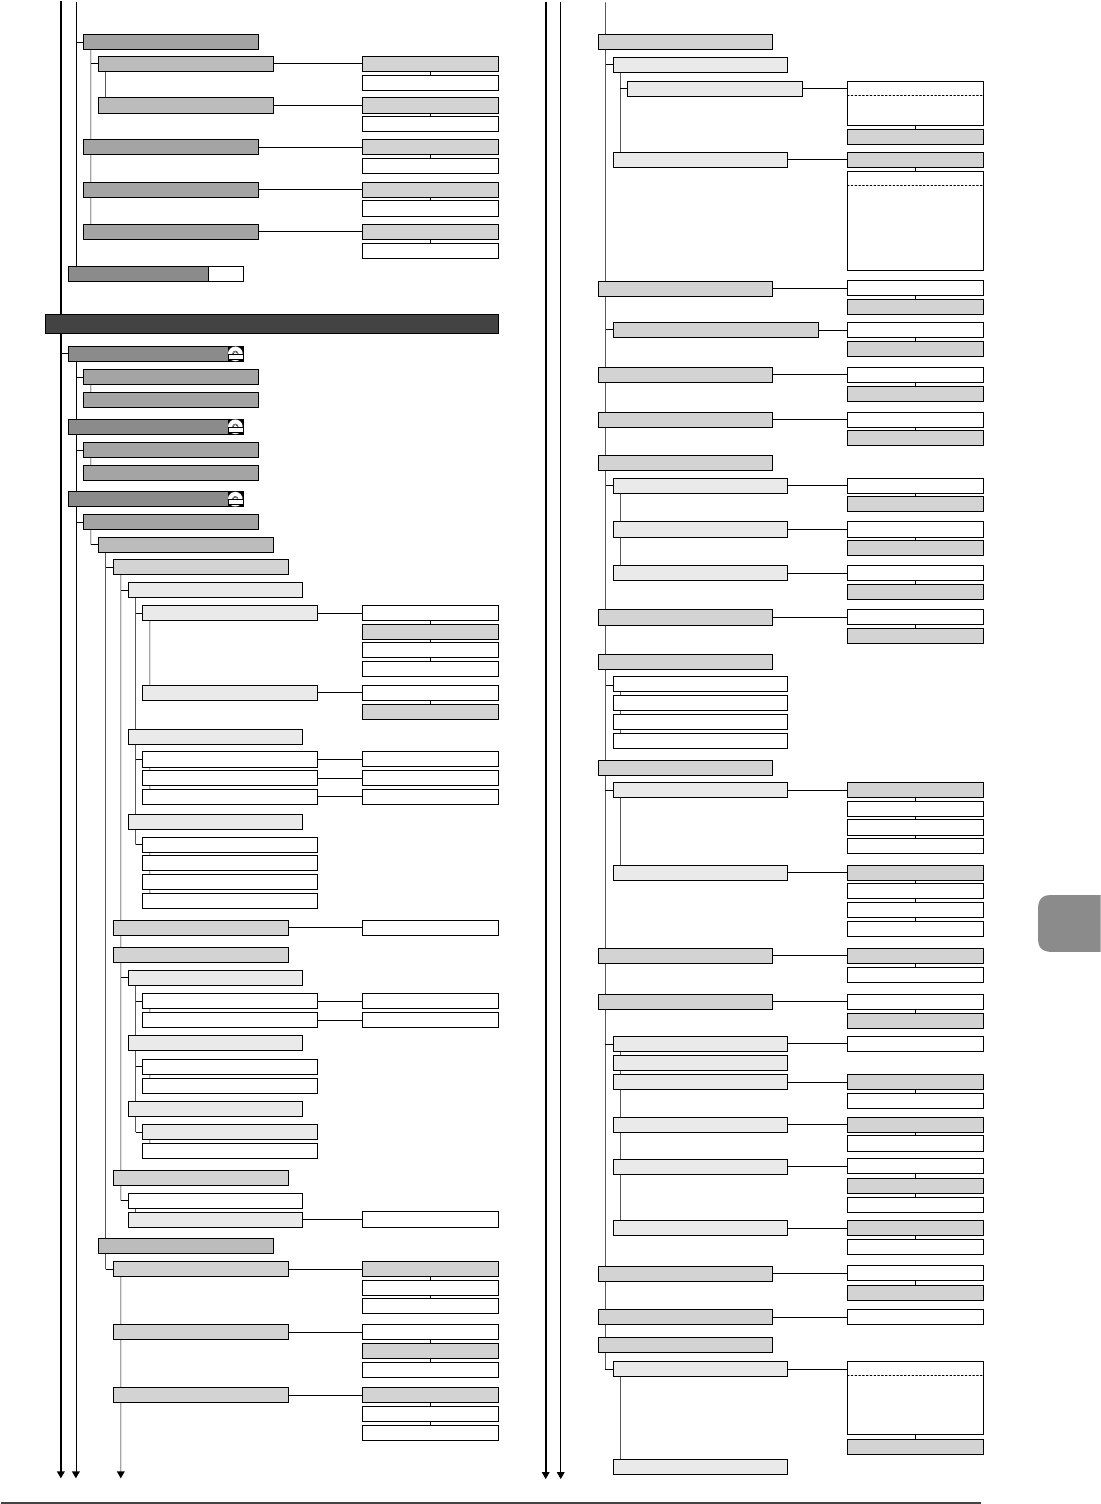
Before Using the Machine
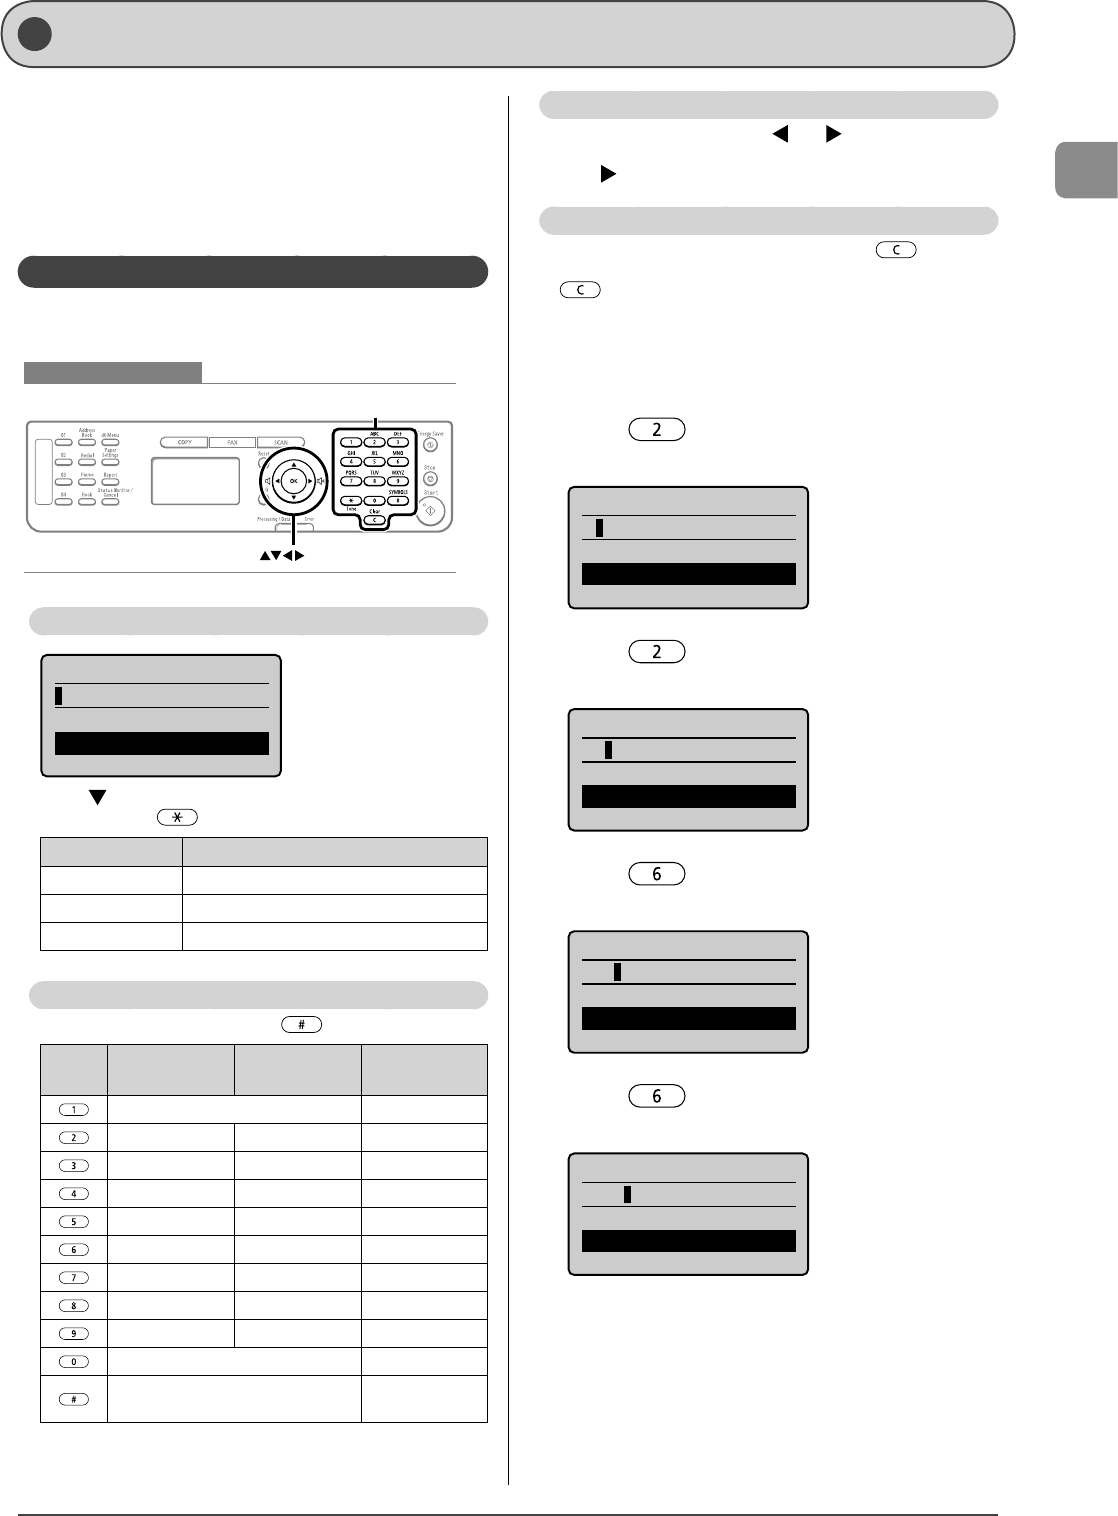
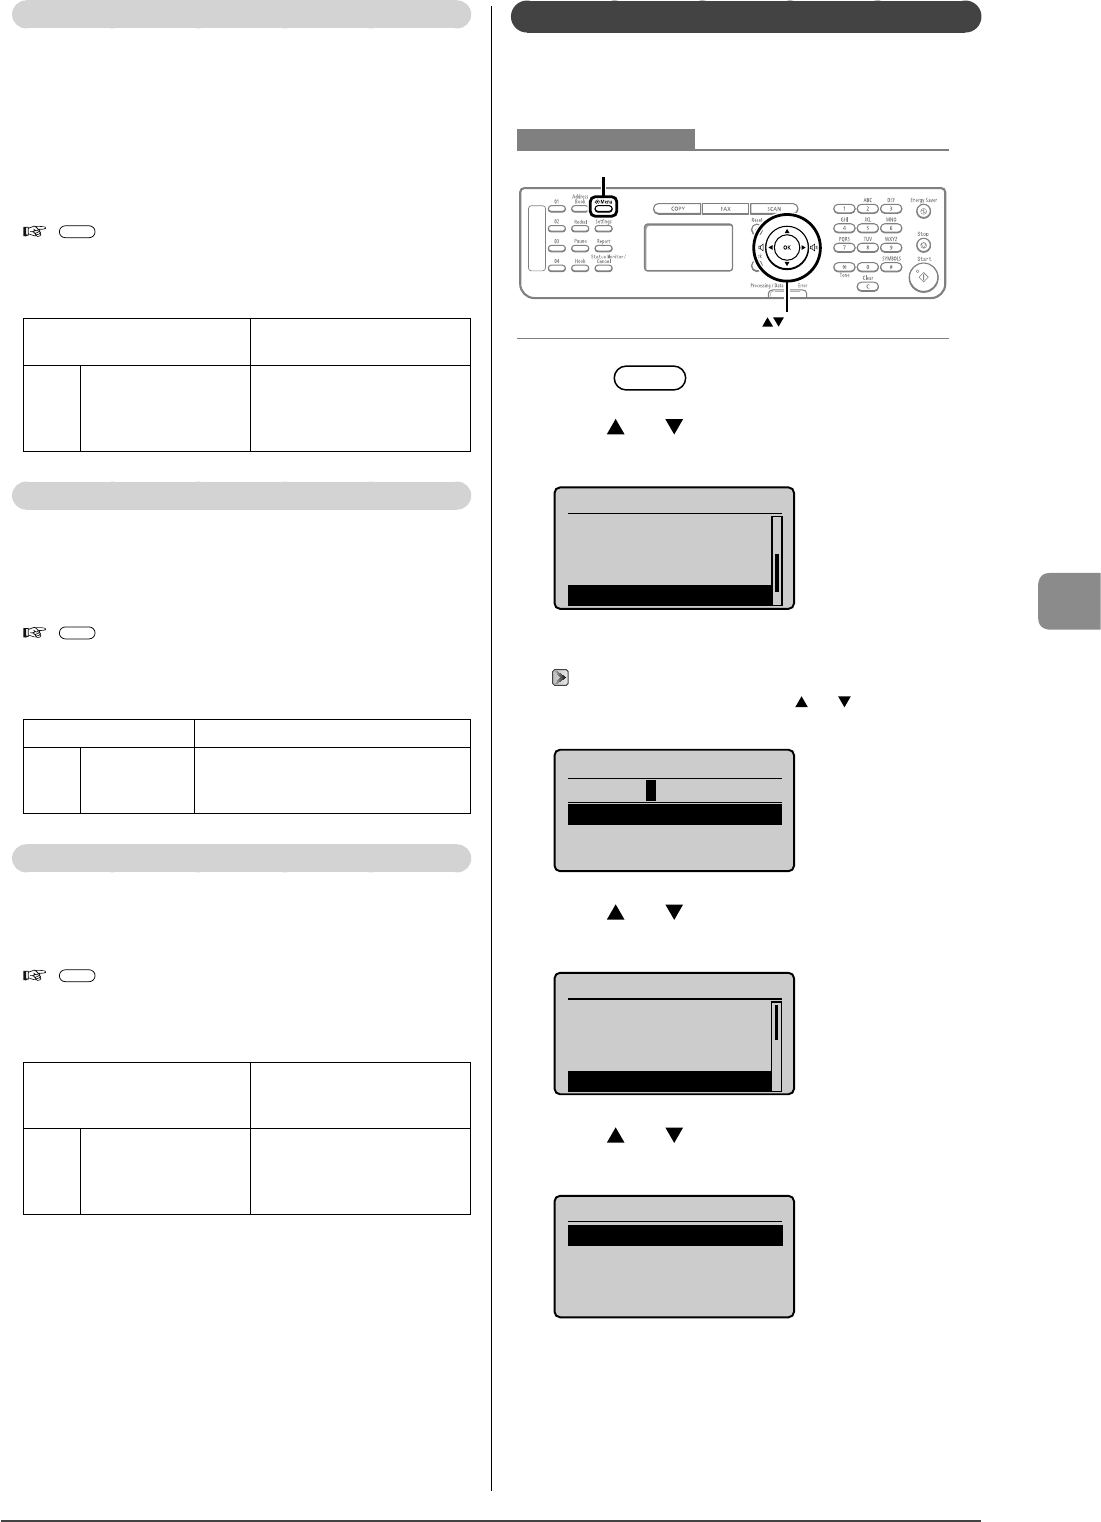
This section describes how to navigate the menu and specify
values on the menu screen.
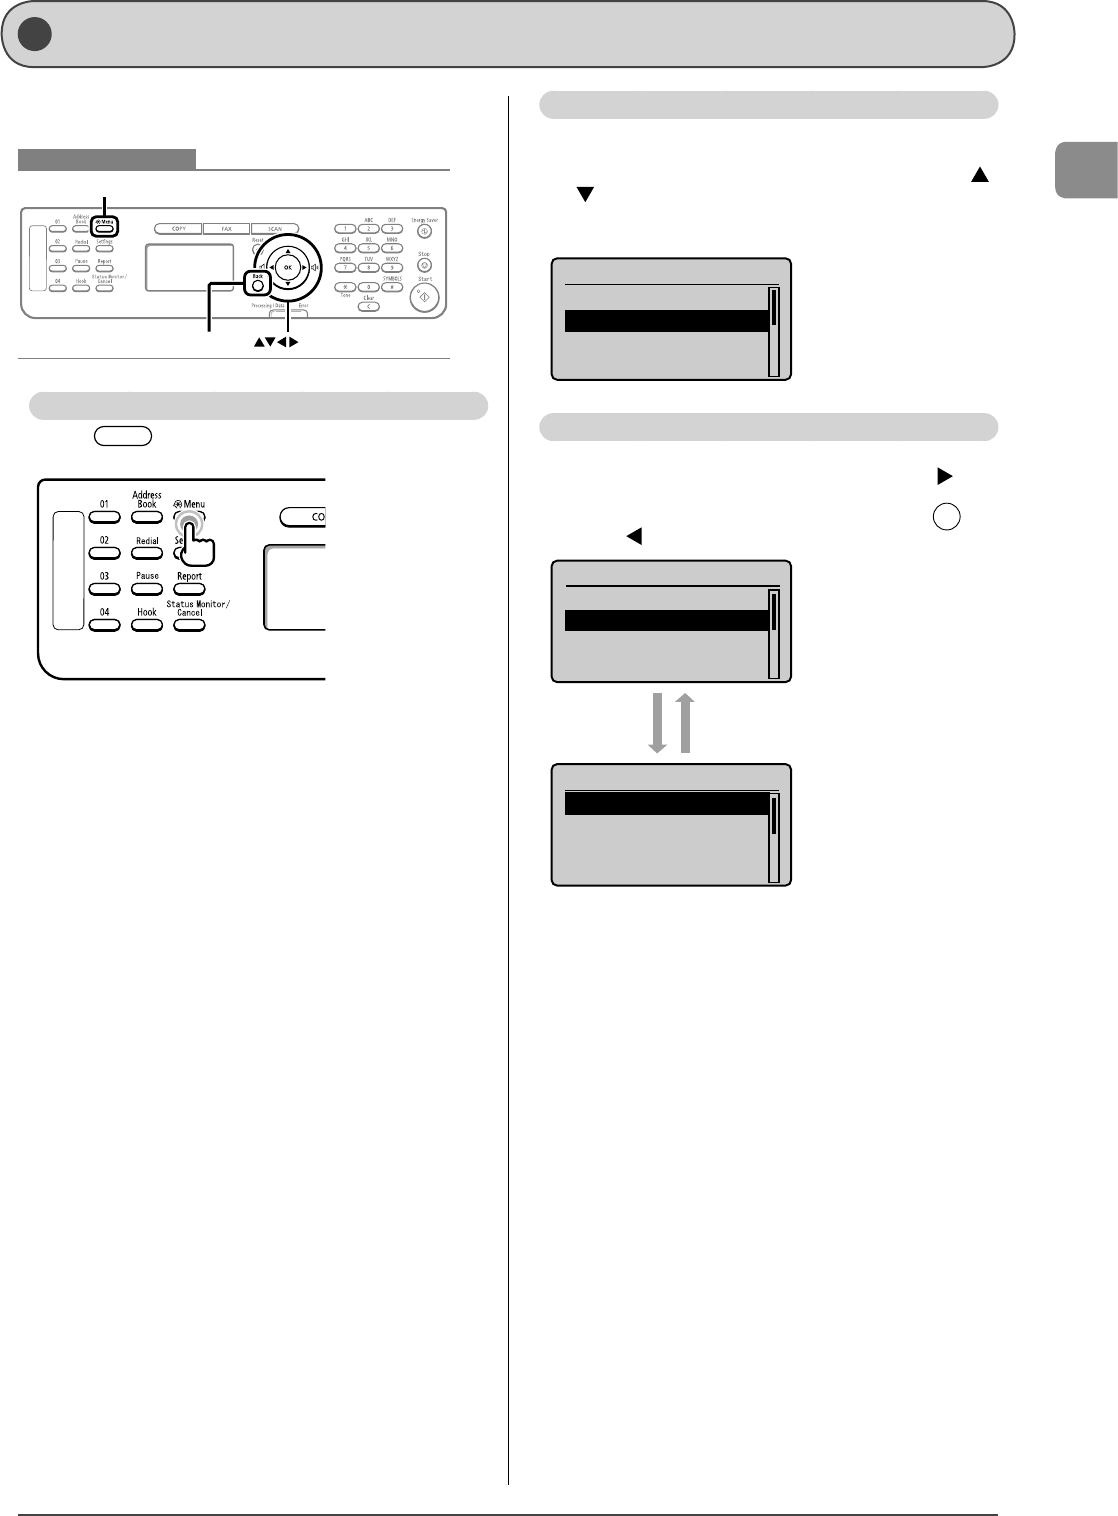
Keys to be used for this operation
Menu
OKBack
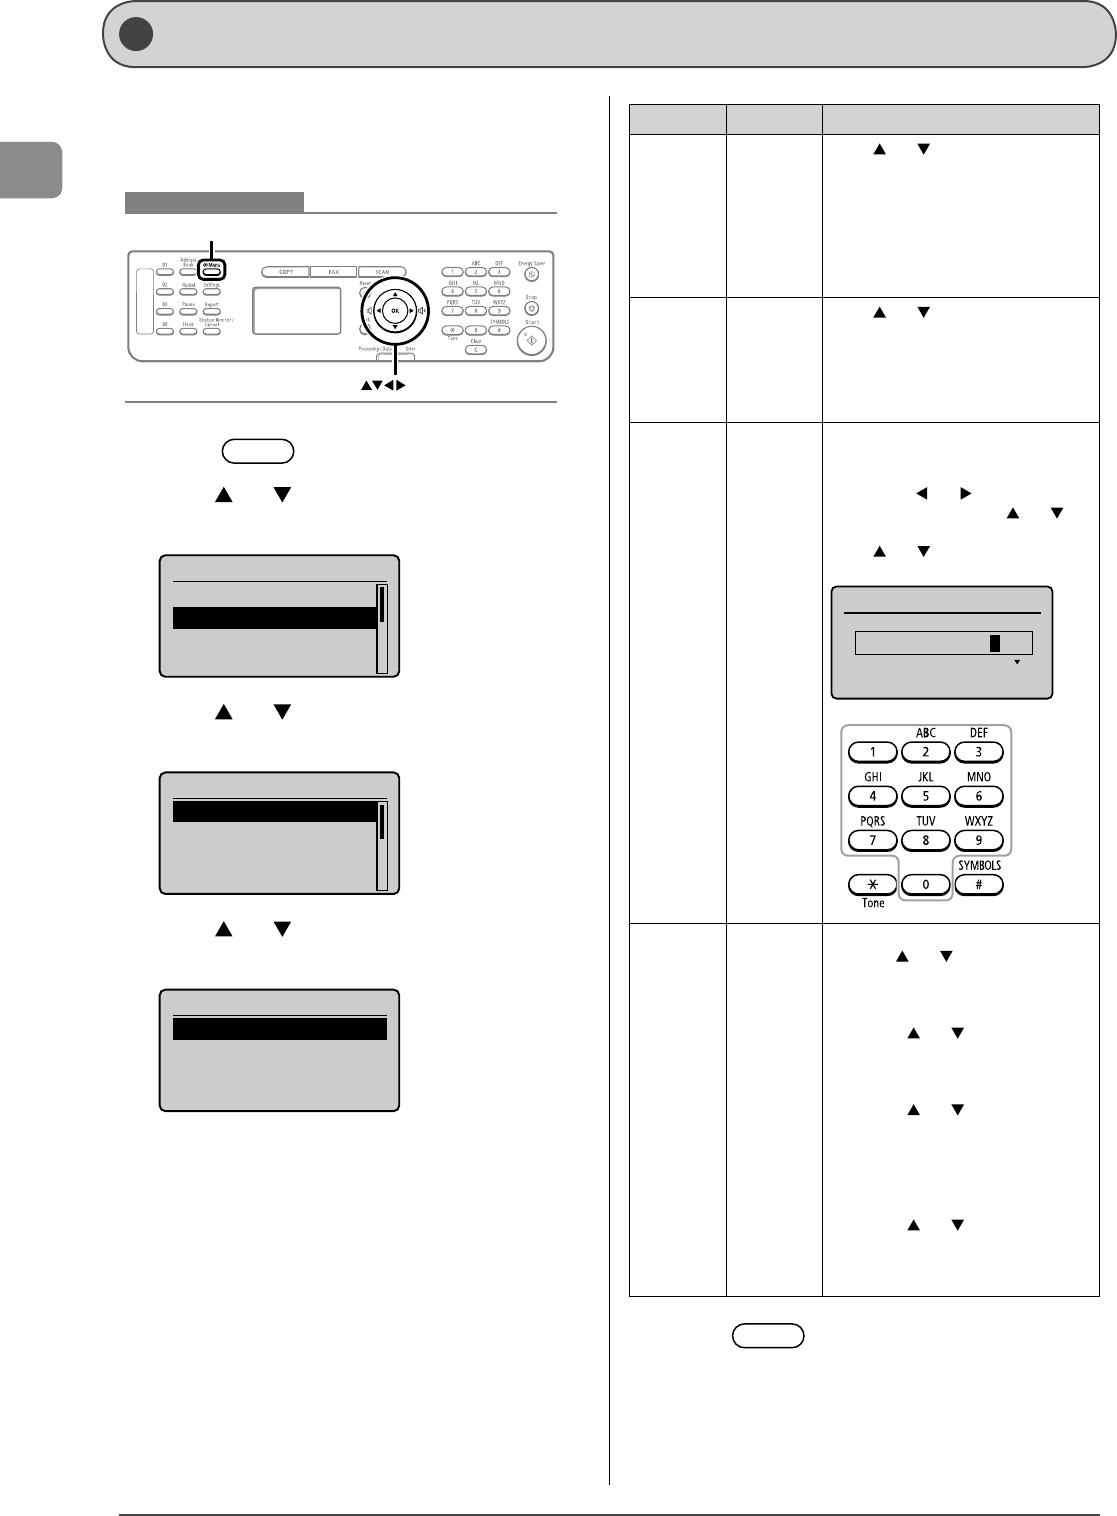
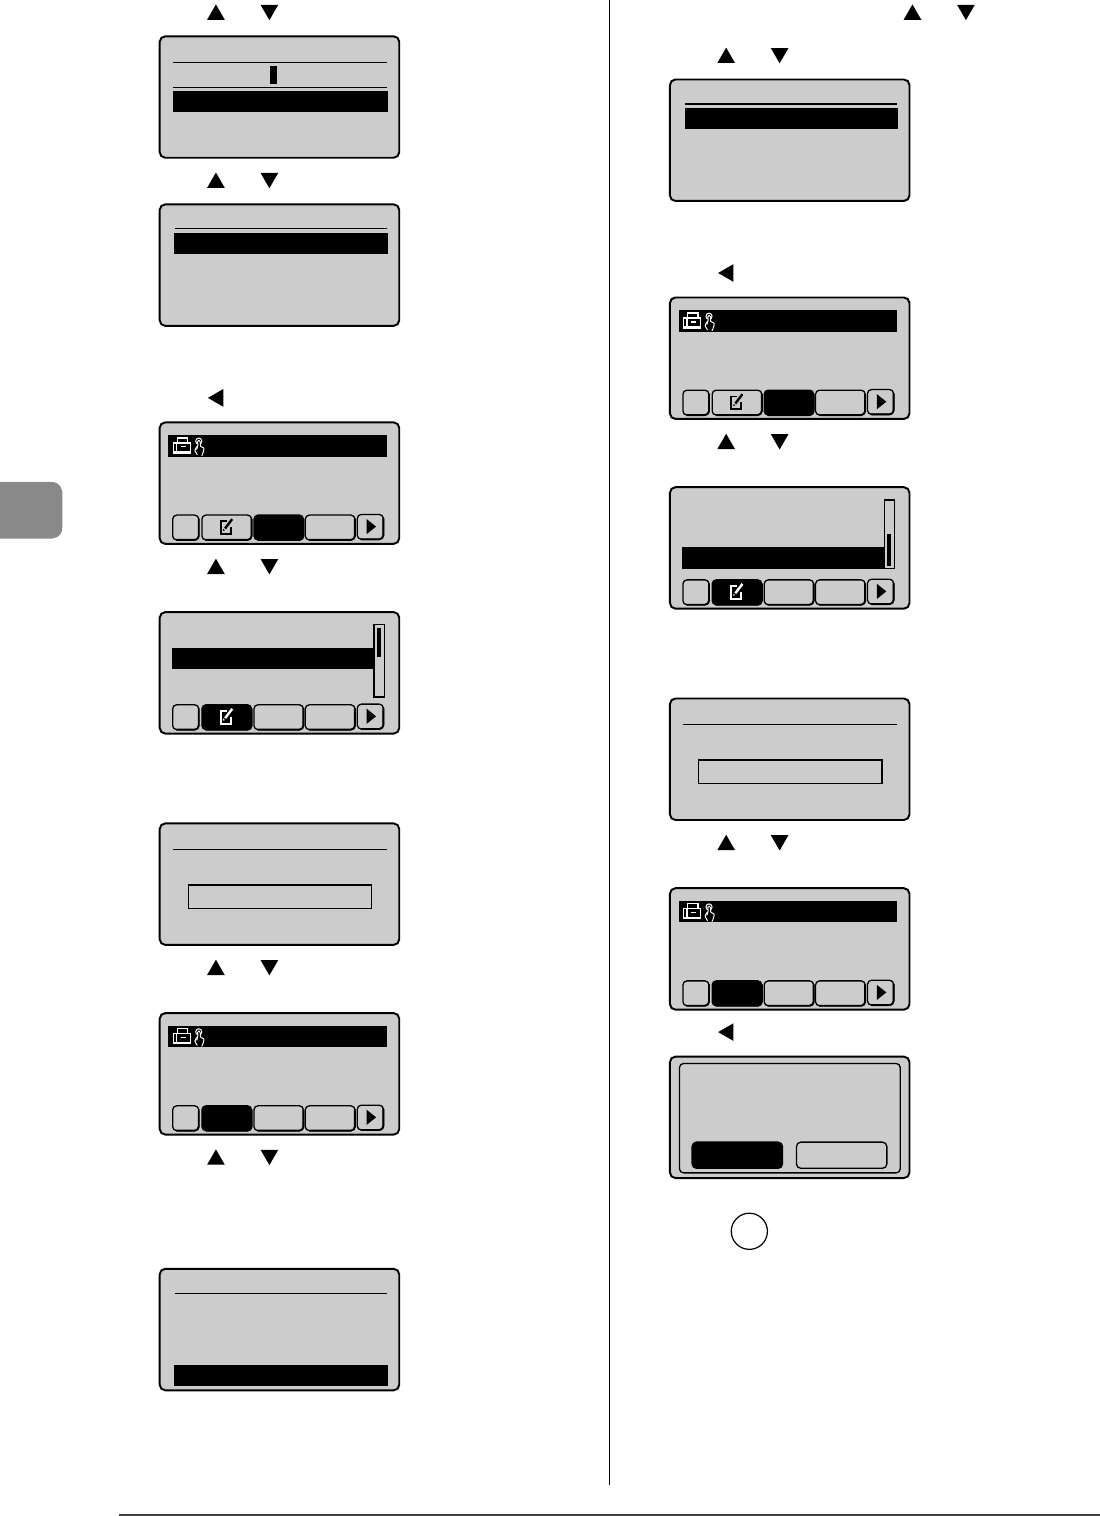
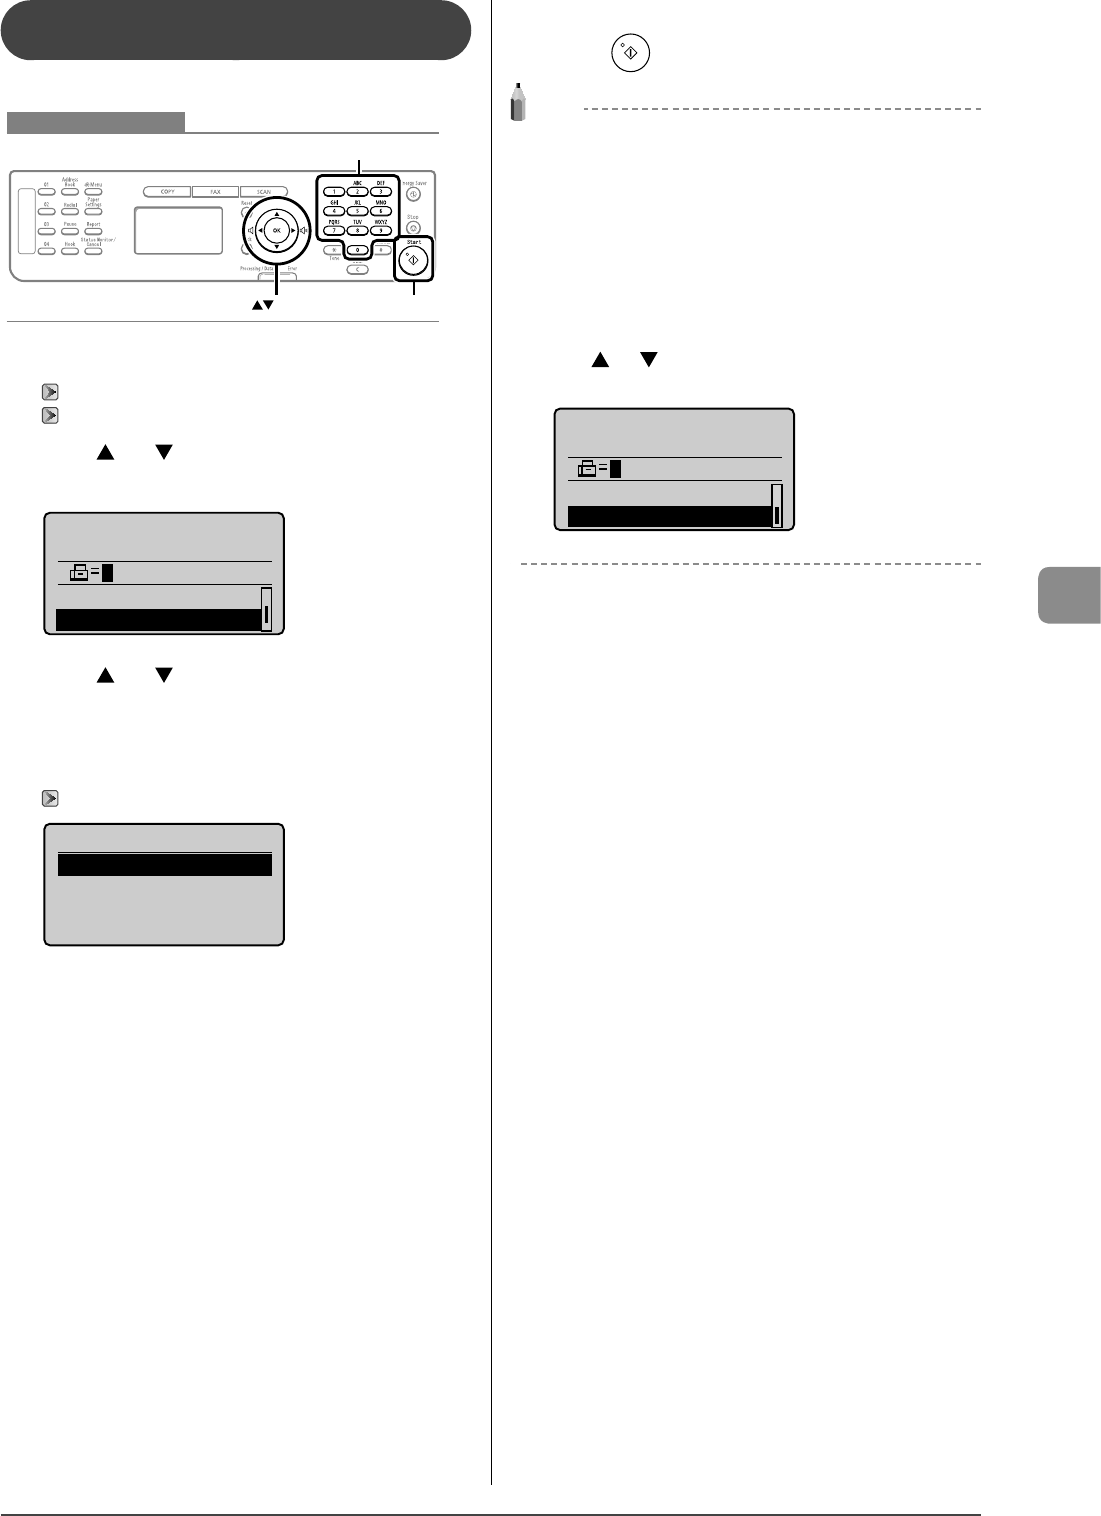
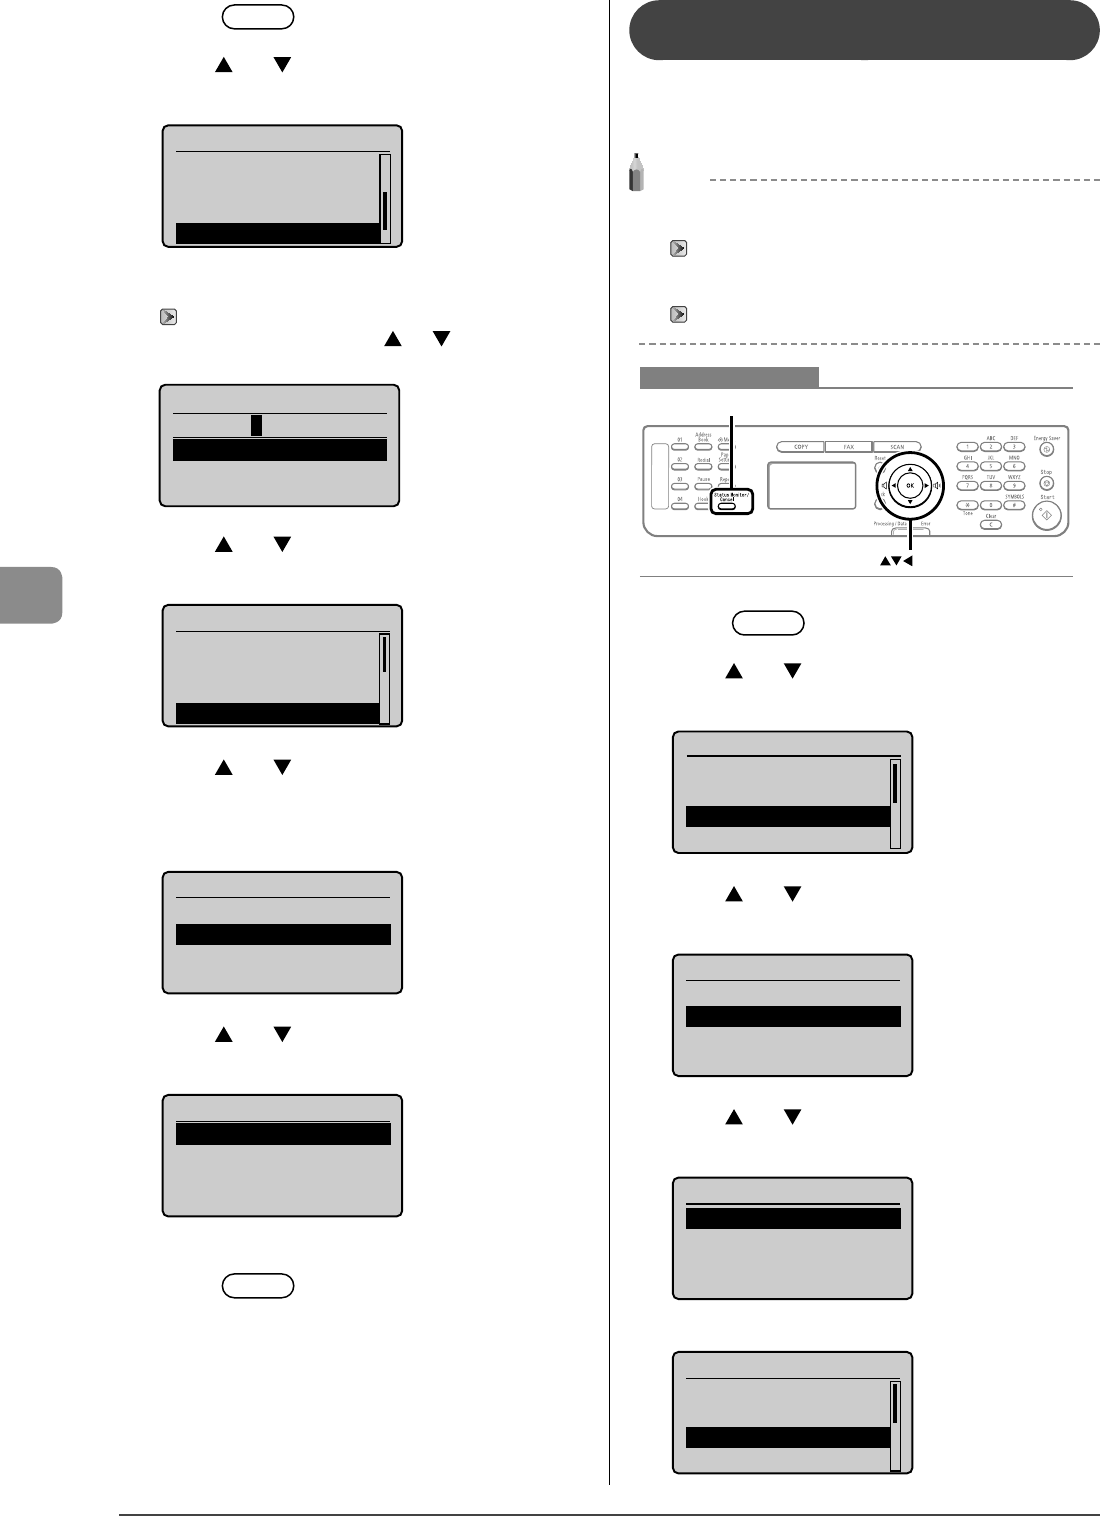
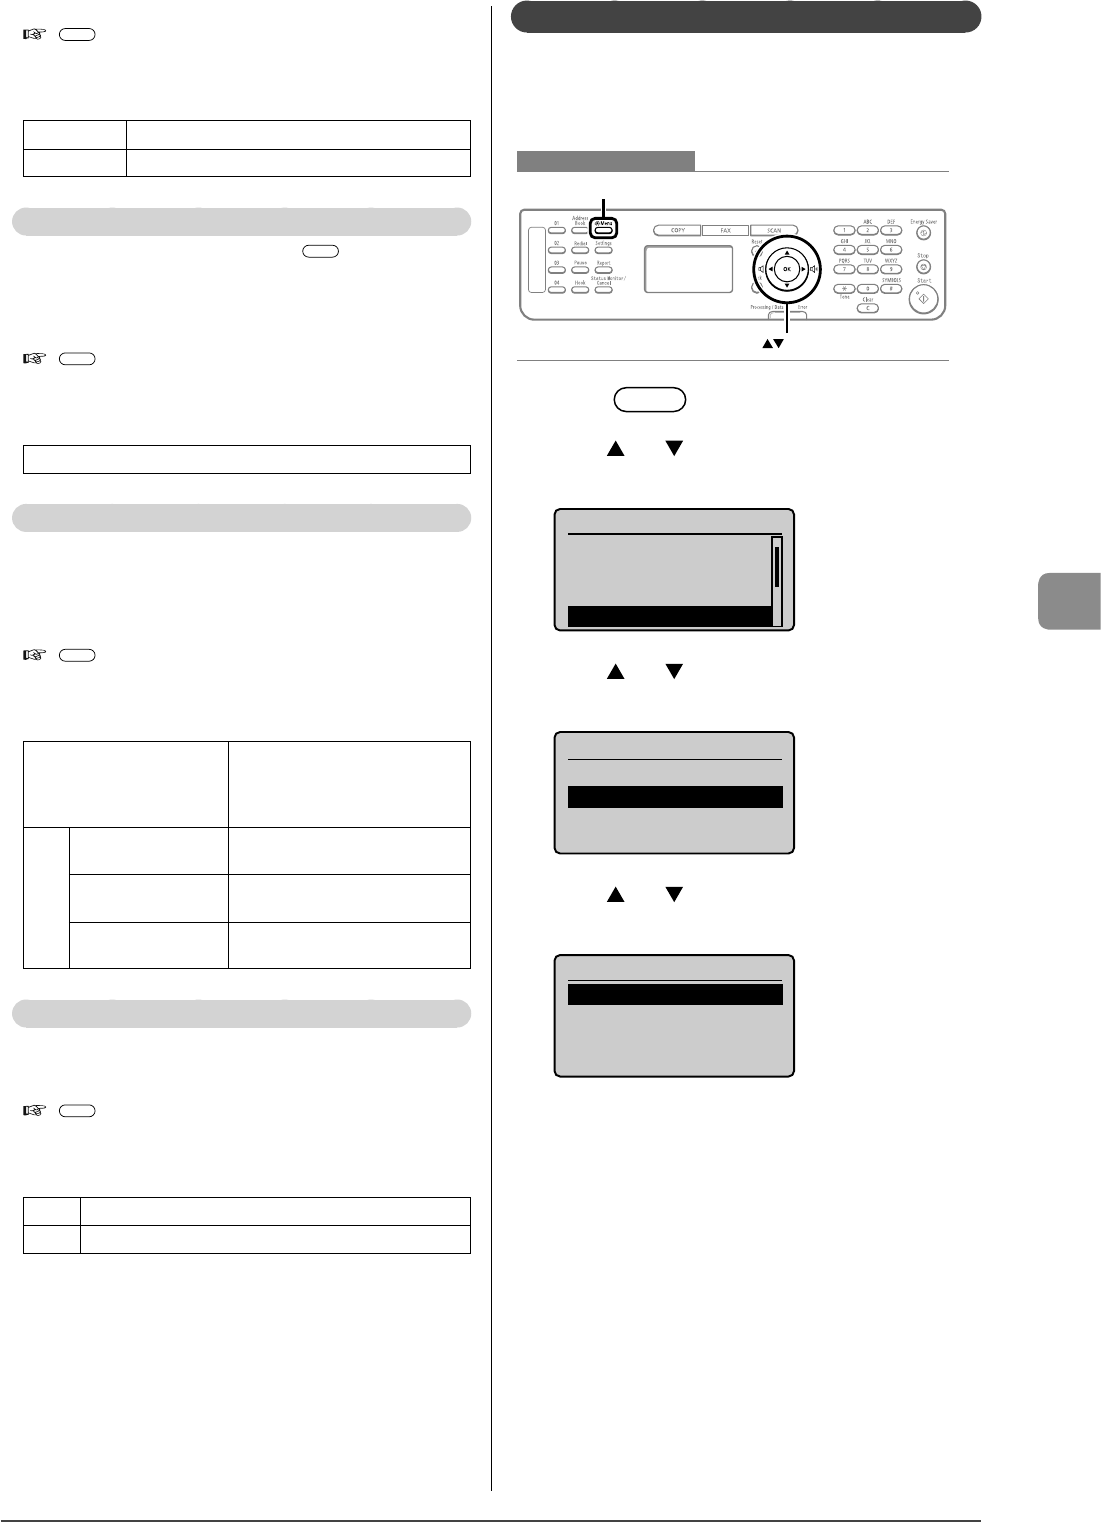
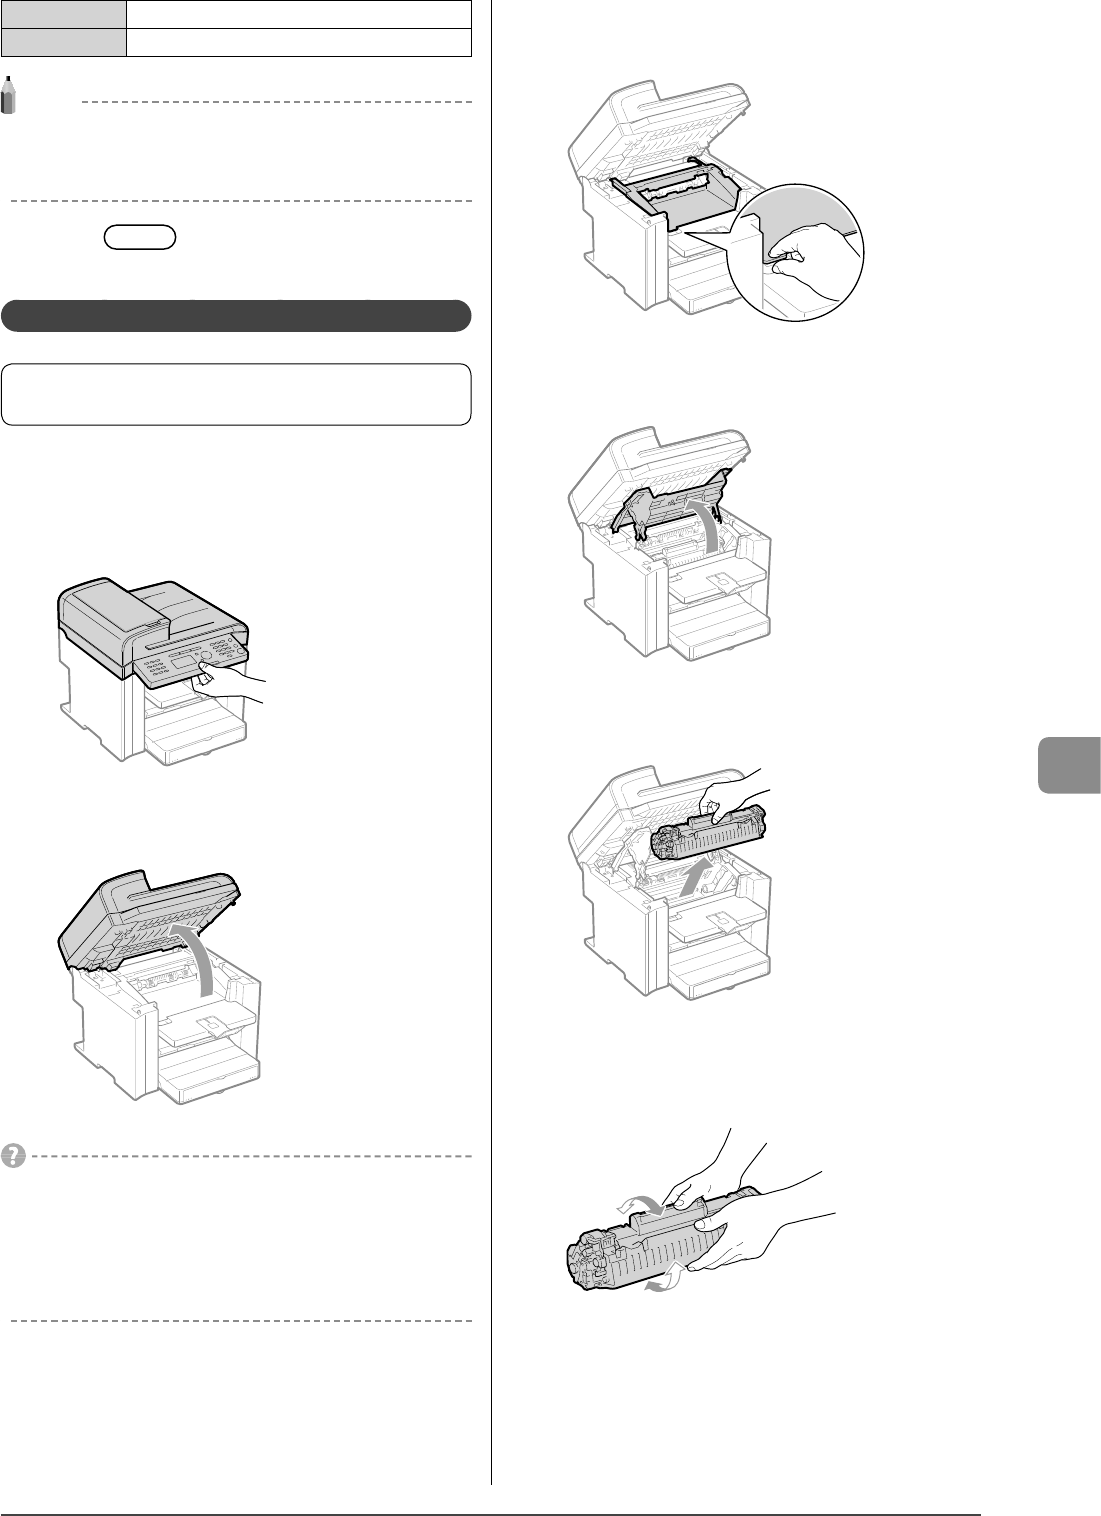
Entering the Menu Screen
Press [] (Menu) to enter the menu screen.
Scrolling Through Menu Items
The scrollbar at the right side of the screen indicates that
more items are available.
To select an item that is not shown on the screen, press [
]
or [
] to scroll through menu items.
The currently selected item is highlighted with a black
background.
Menu
Preferences
Timer Settings
Copy Settings
Fax TX Settings
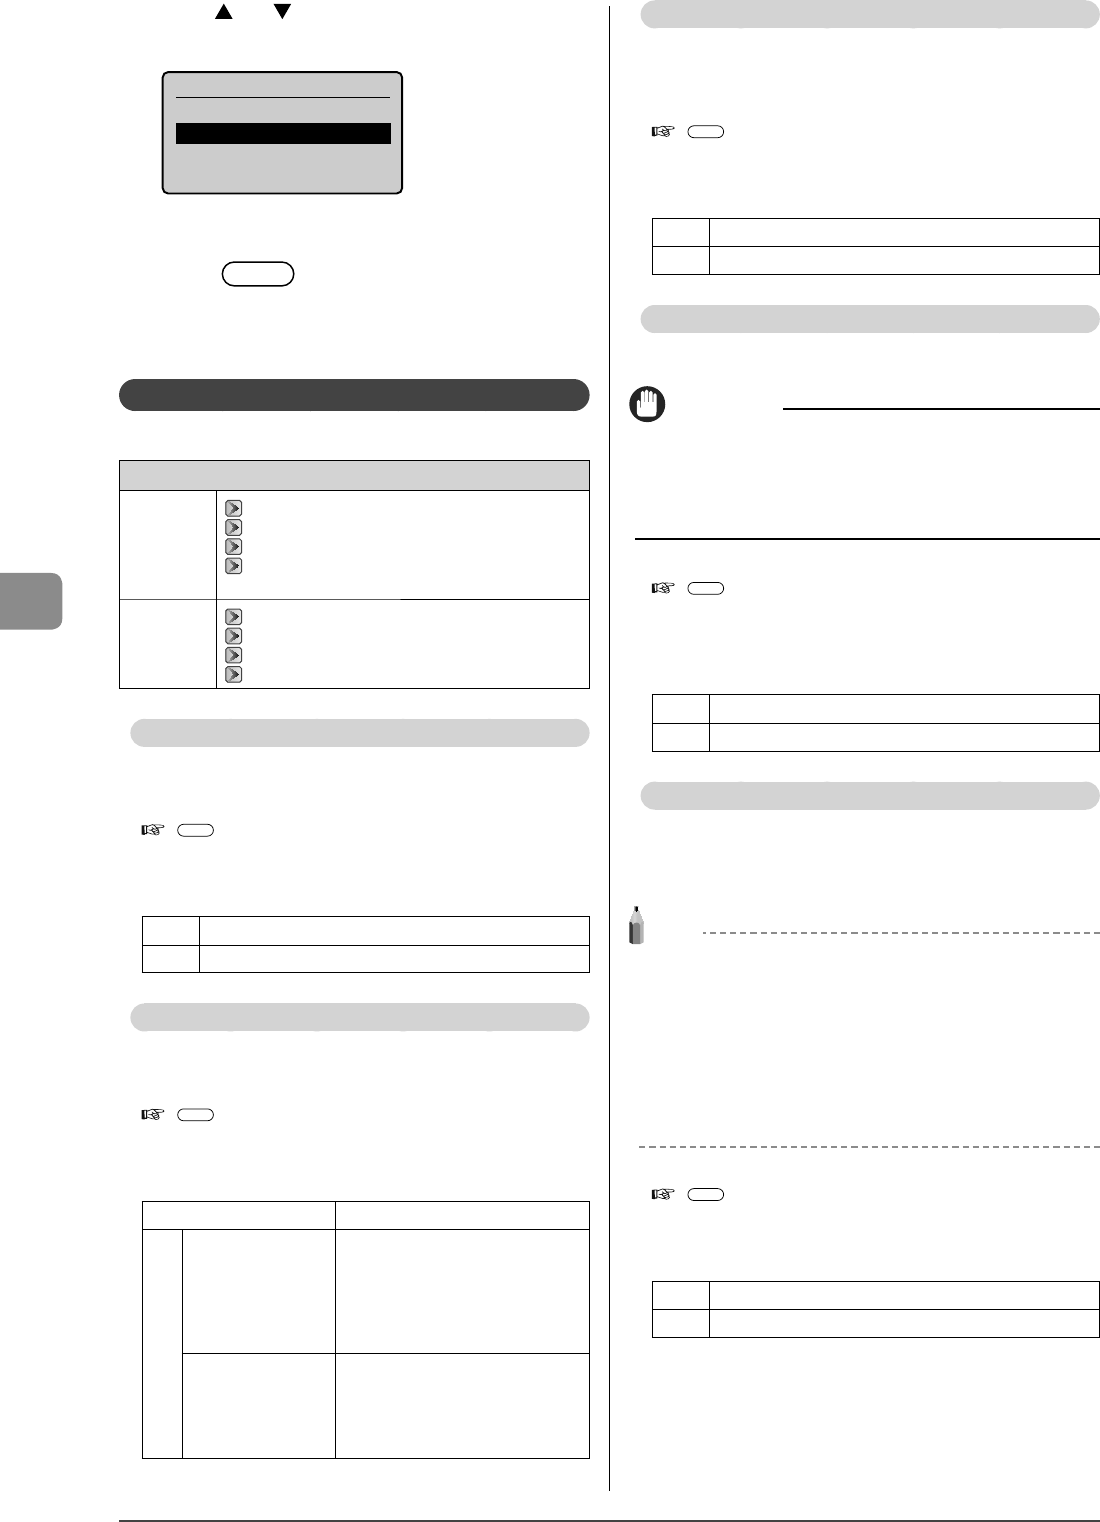
Selecting a Menu Item
Press [OK] to select a highlighted menu.
If there are submenus available, you can also press [
] to
select the item and proceed to the next screen.
You can return to the previous screen by pressing [
]
(Back) or [
].
Menu
Preferences
Timer Settings
Copy Settings
Fax TX Settings
Timer Settings
Time & Date Settings
Sleep Timer
Auto Reset Timer
Screen After Auto R
...
[Back] or [Ż][OK] or [Ź]
Navigating the Menu
1-8
Before Using the Machine
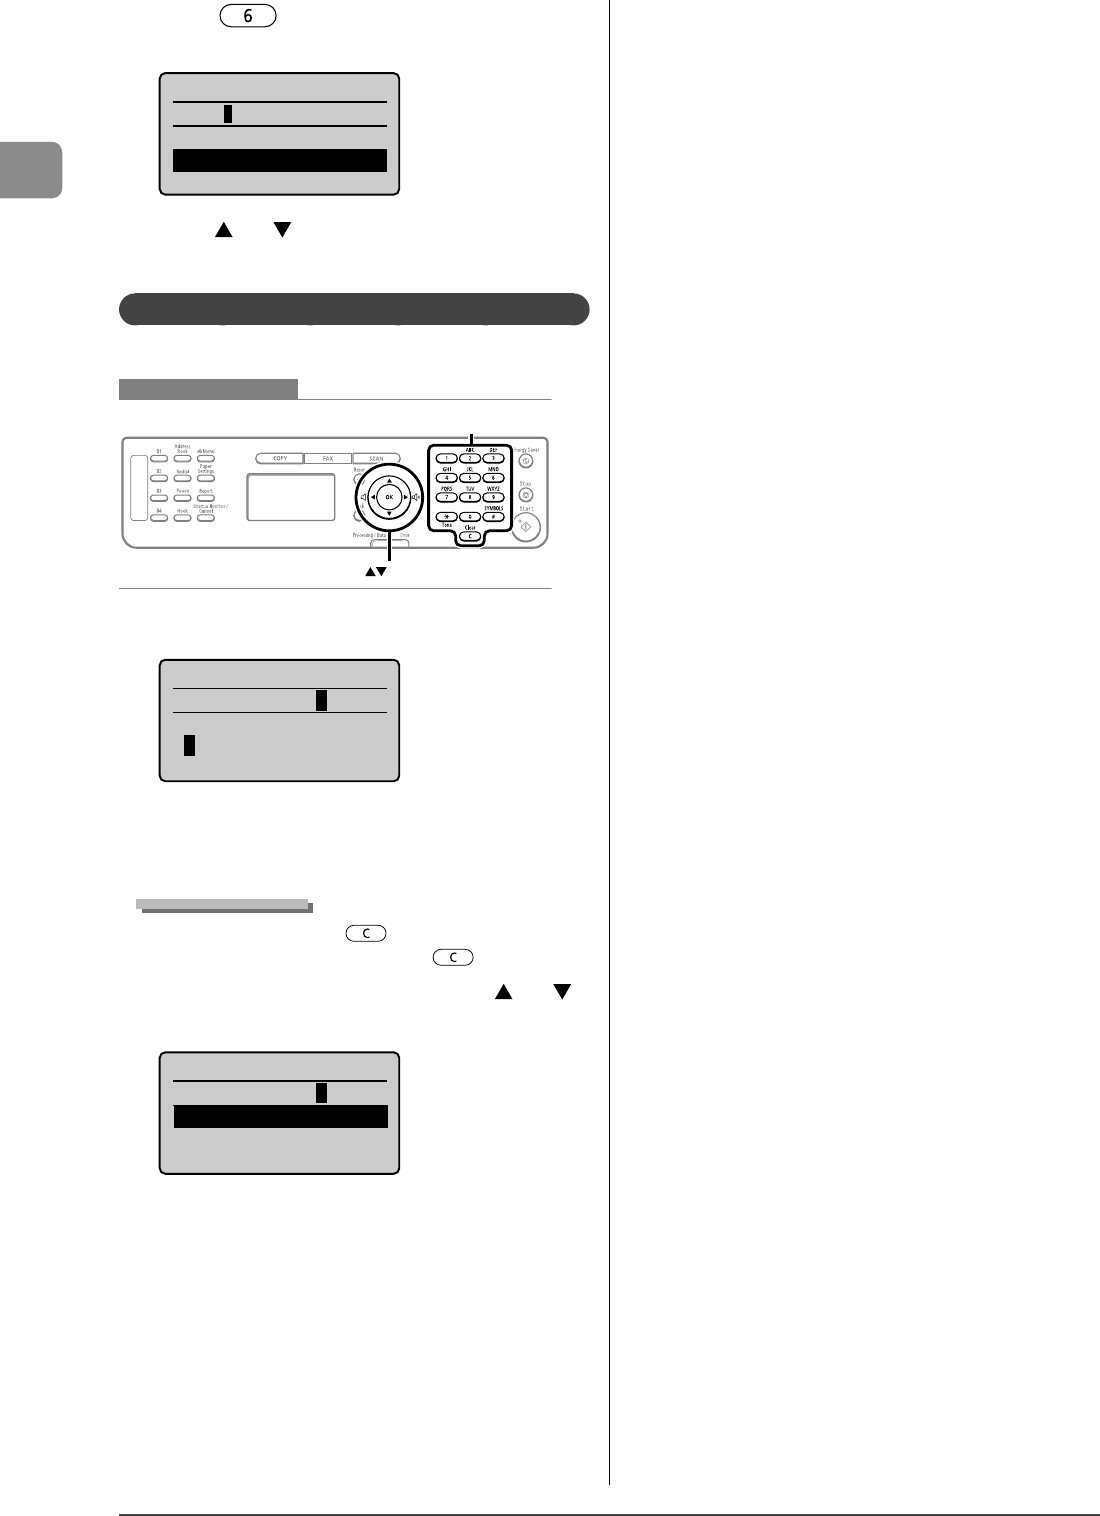
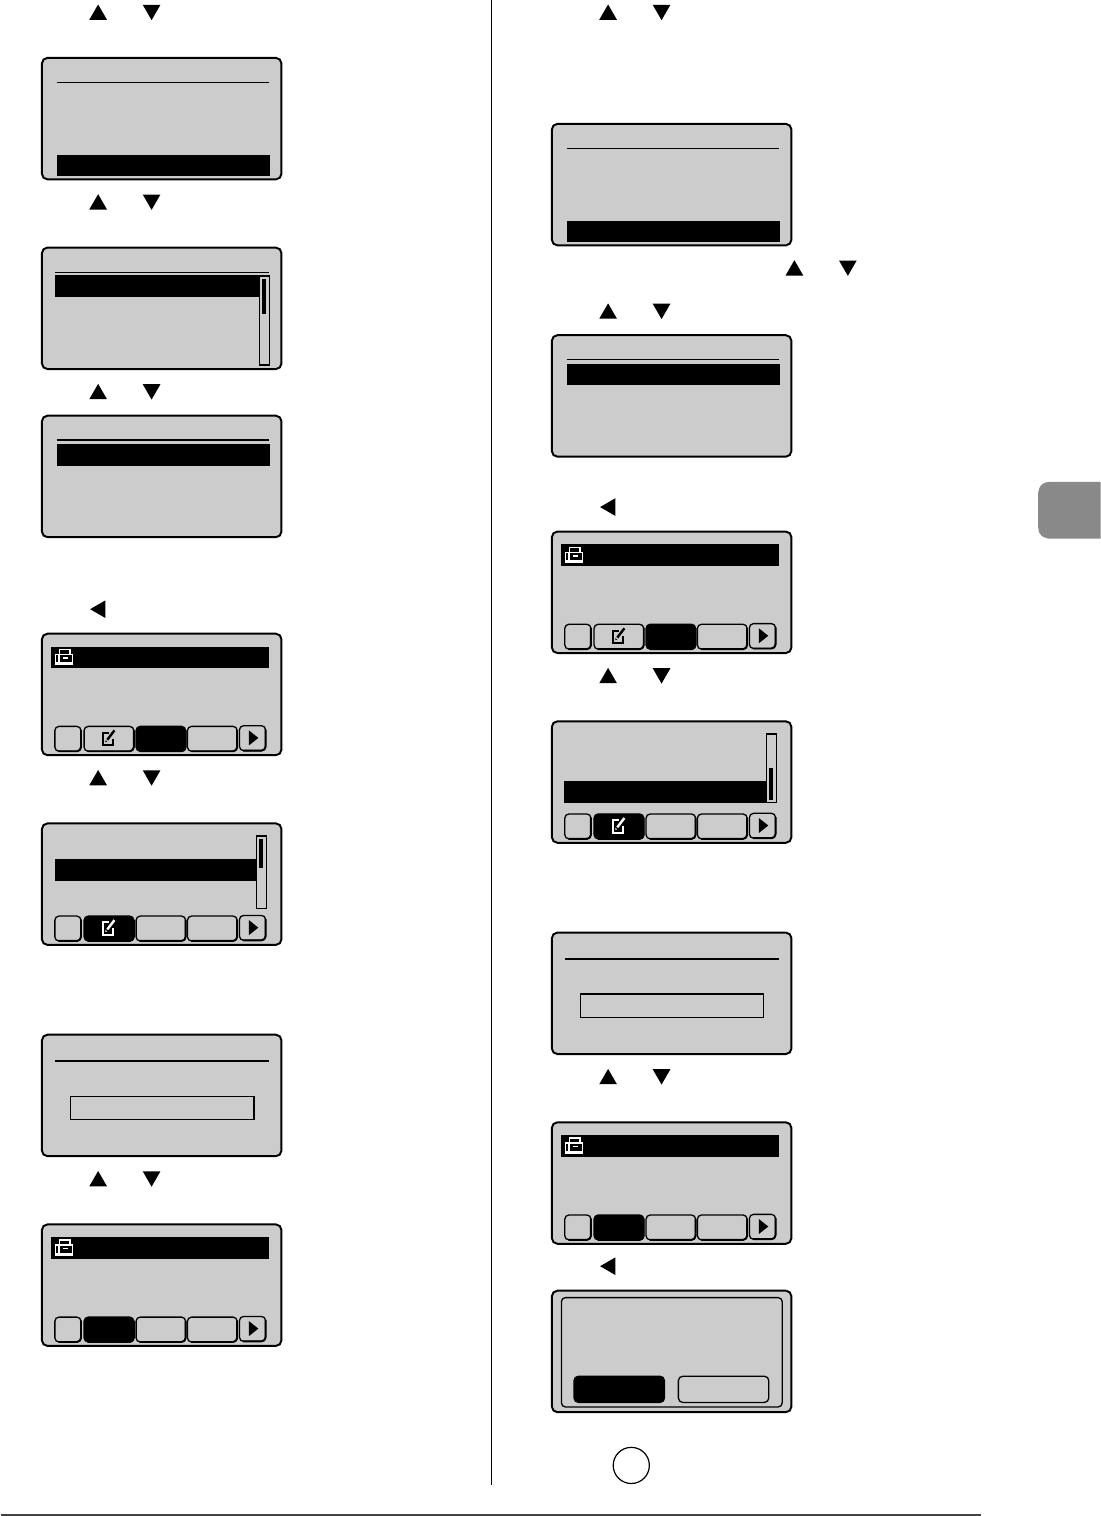
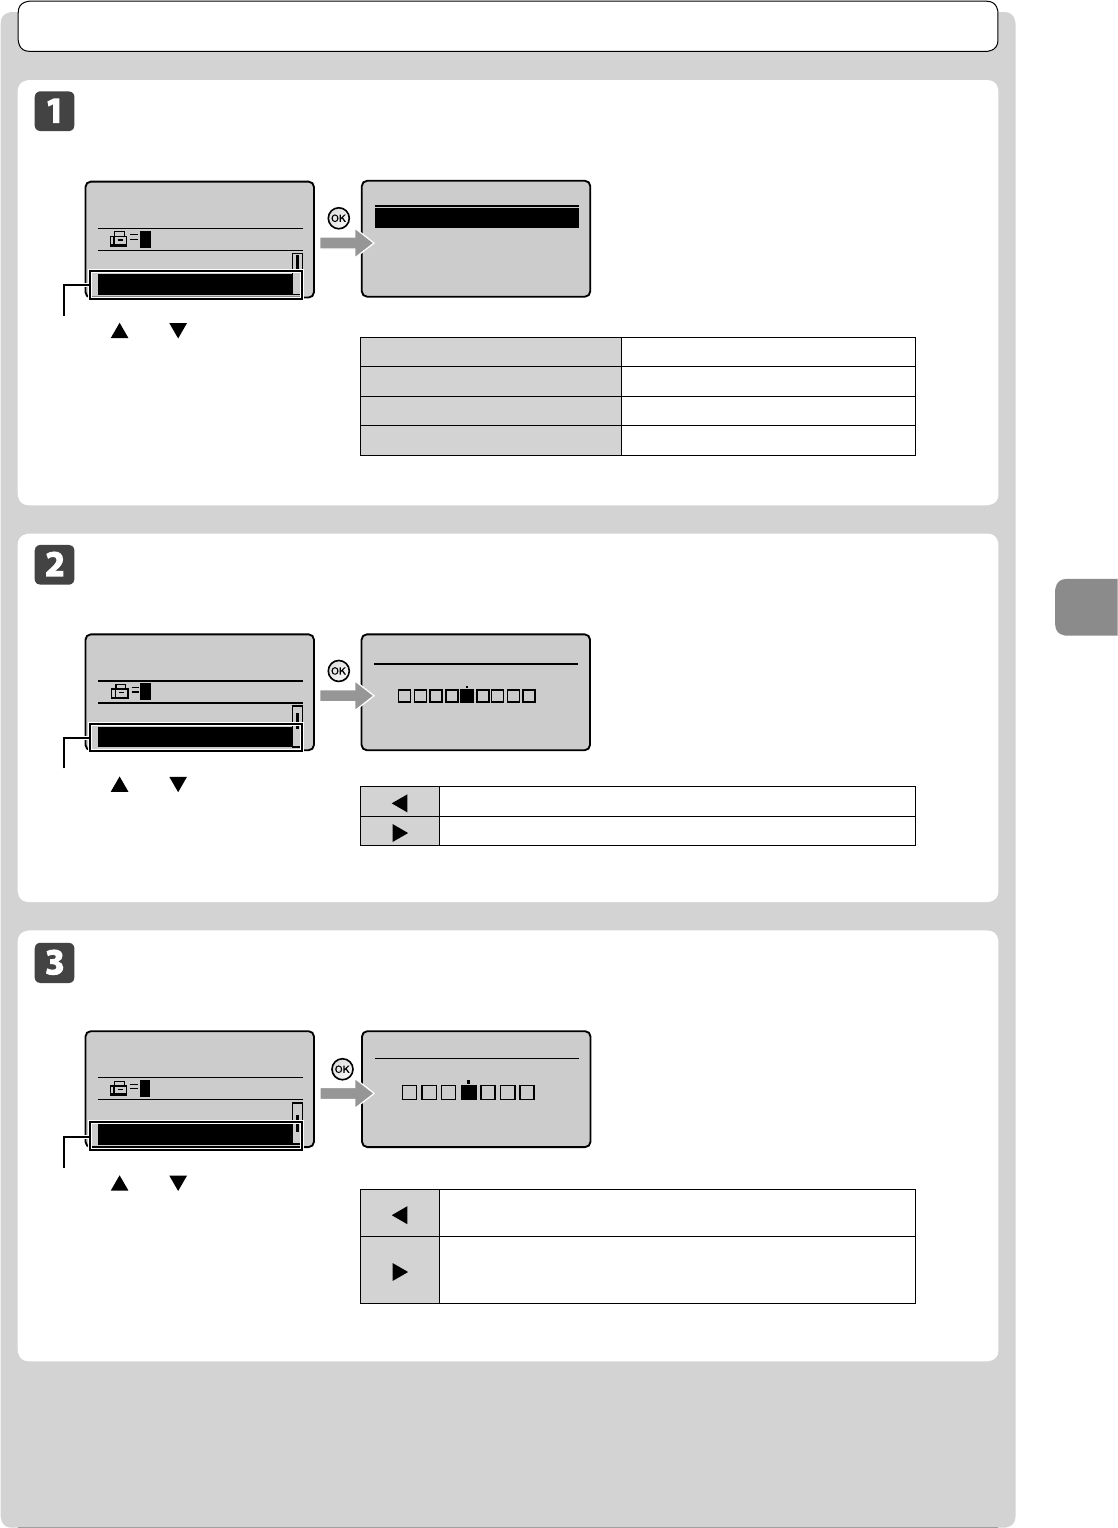
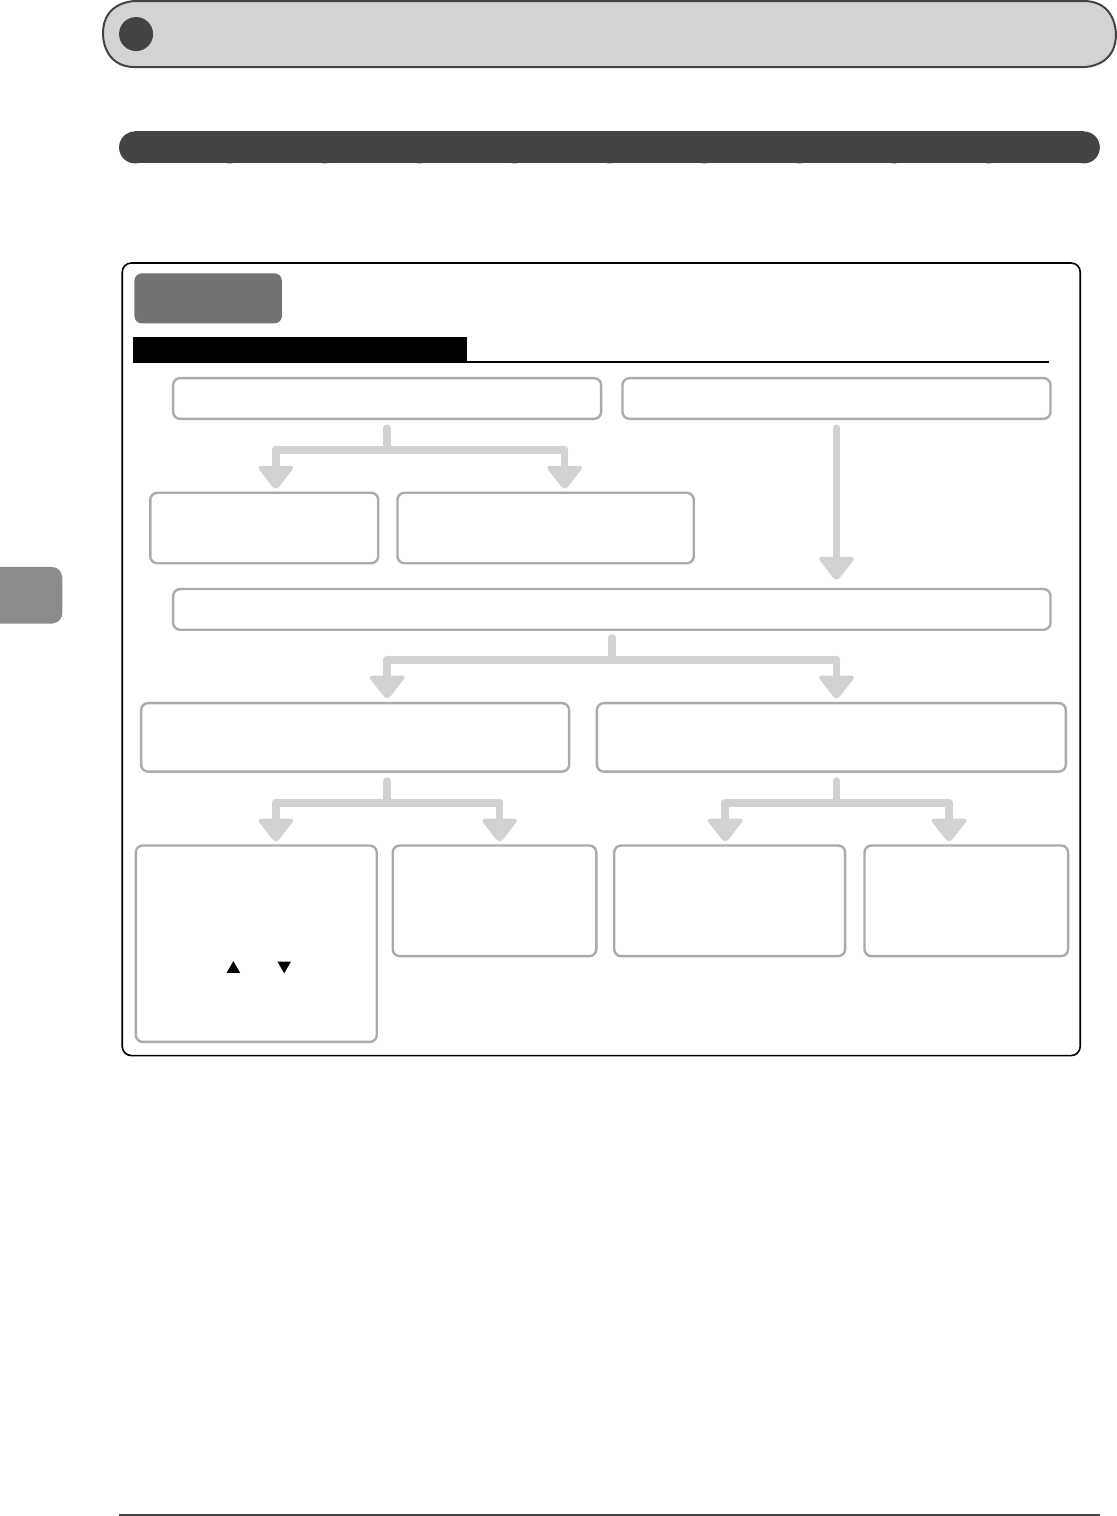
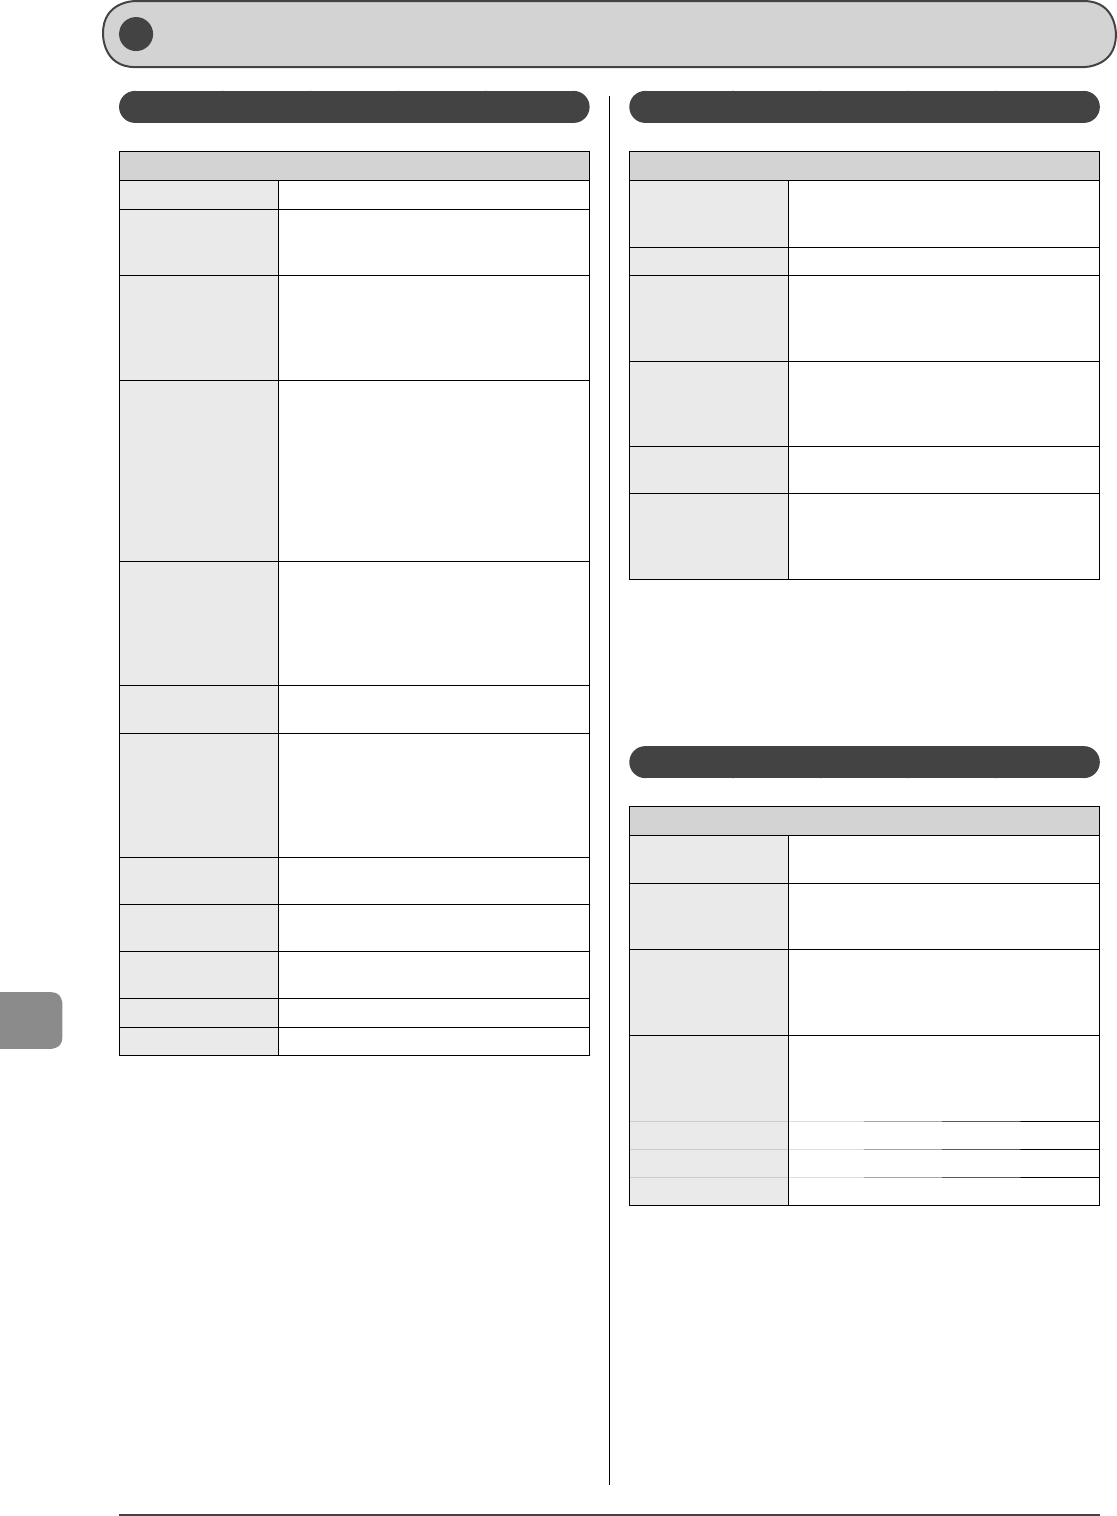
Specifying values using the navigation keys
Specifying values
SituationScreen exampleProcedure
When moving through the bars to
adjust levels such as density
Correct Density
- +
Press [] or [] to adjust the level.
When selecting a value to set a
timer
Auto Reset Timer
2 minutes
(0=Off, 1-9)
Numeric key icon
Press [] or [] to specify the value.
NOTE
Available values
You can specify any value shown in the parentheses at
the bottom of the screen.
When the numeric key icon is displayed on the
screen
You can also enter values with the numeric keys.
“Text Input Method” (→P.1-9)
When entering a series of numbers
or letters such as PIN
System Manager PIN
*******
<Apply>
1 2 3 4 5 6 7 8 9 0
<BS>
Press [], [], [], or [] to select a number or
character, and then press [OK] to enter the number or
character.
To clear a number or character, select <BS>, and then press
[OK].
NOTE
You can also use the numeric keys
You can also enter values with the numeric keys.
“Text Input Method” (→P.1-9)
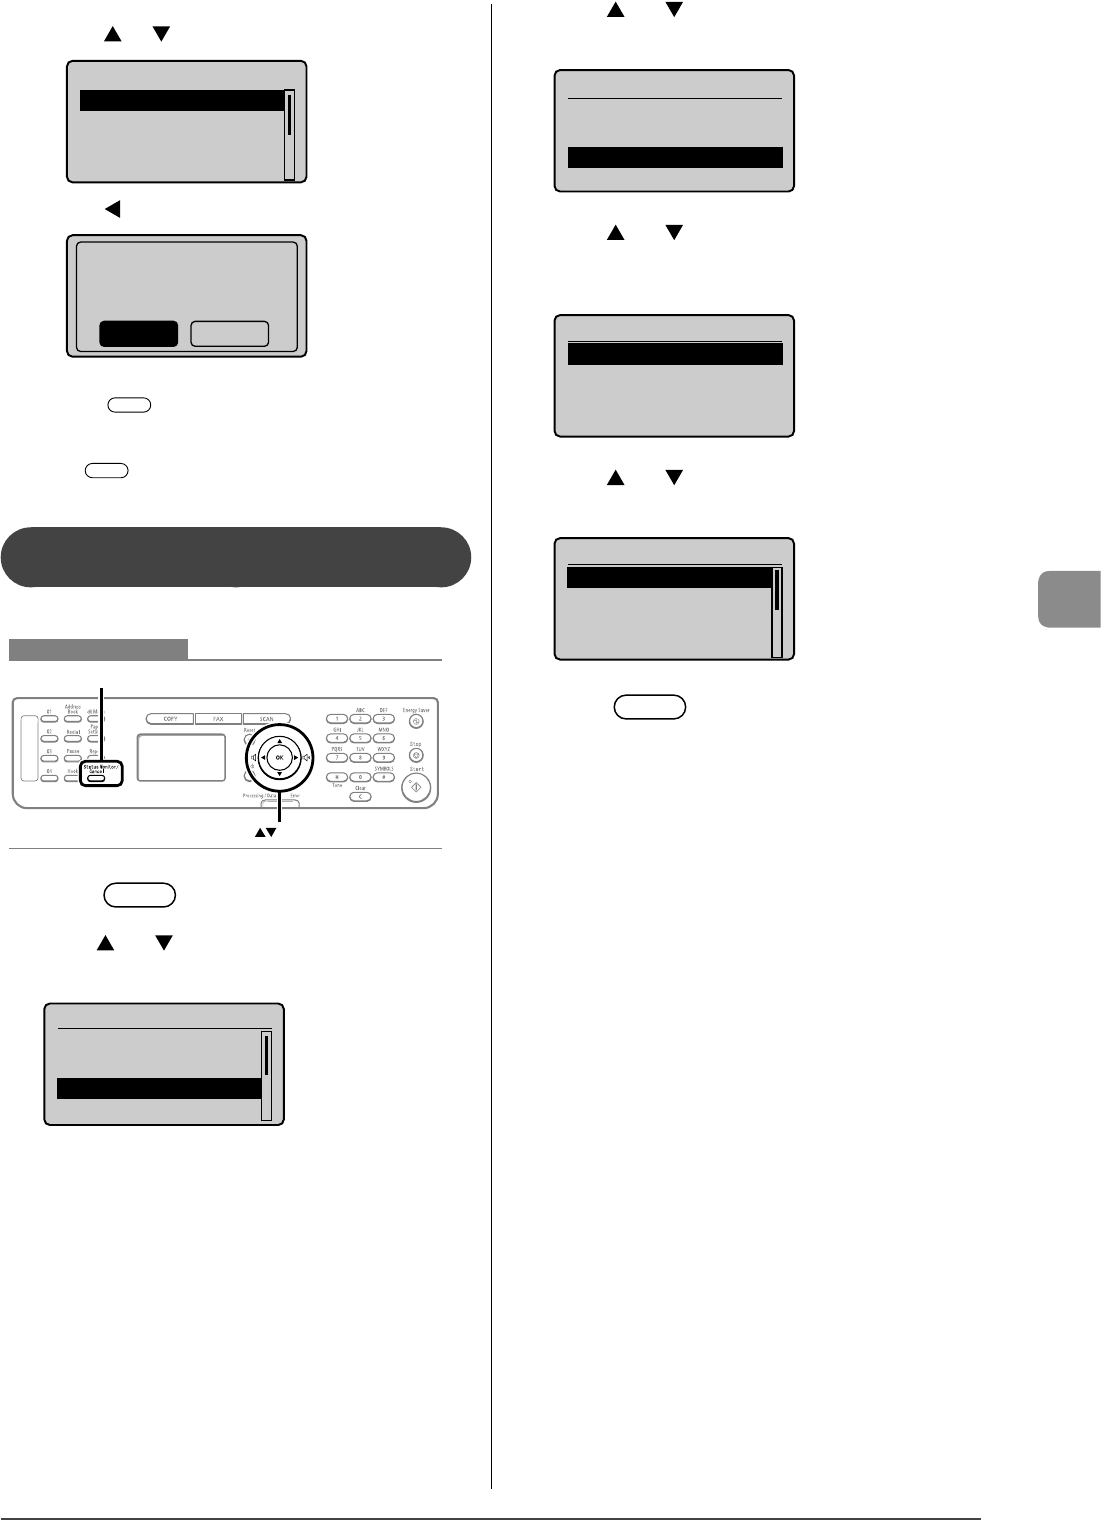
Confirming the input
To confirm the input:
• Press [OK].
• When <Apply> appears on the display, press [
] or [] to select <Apply>, and then press [OK].
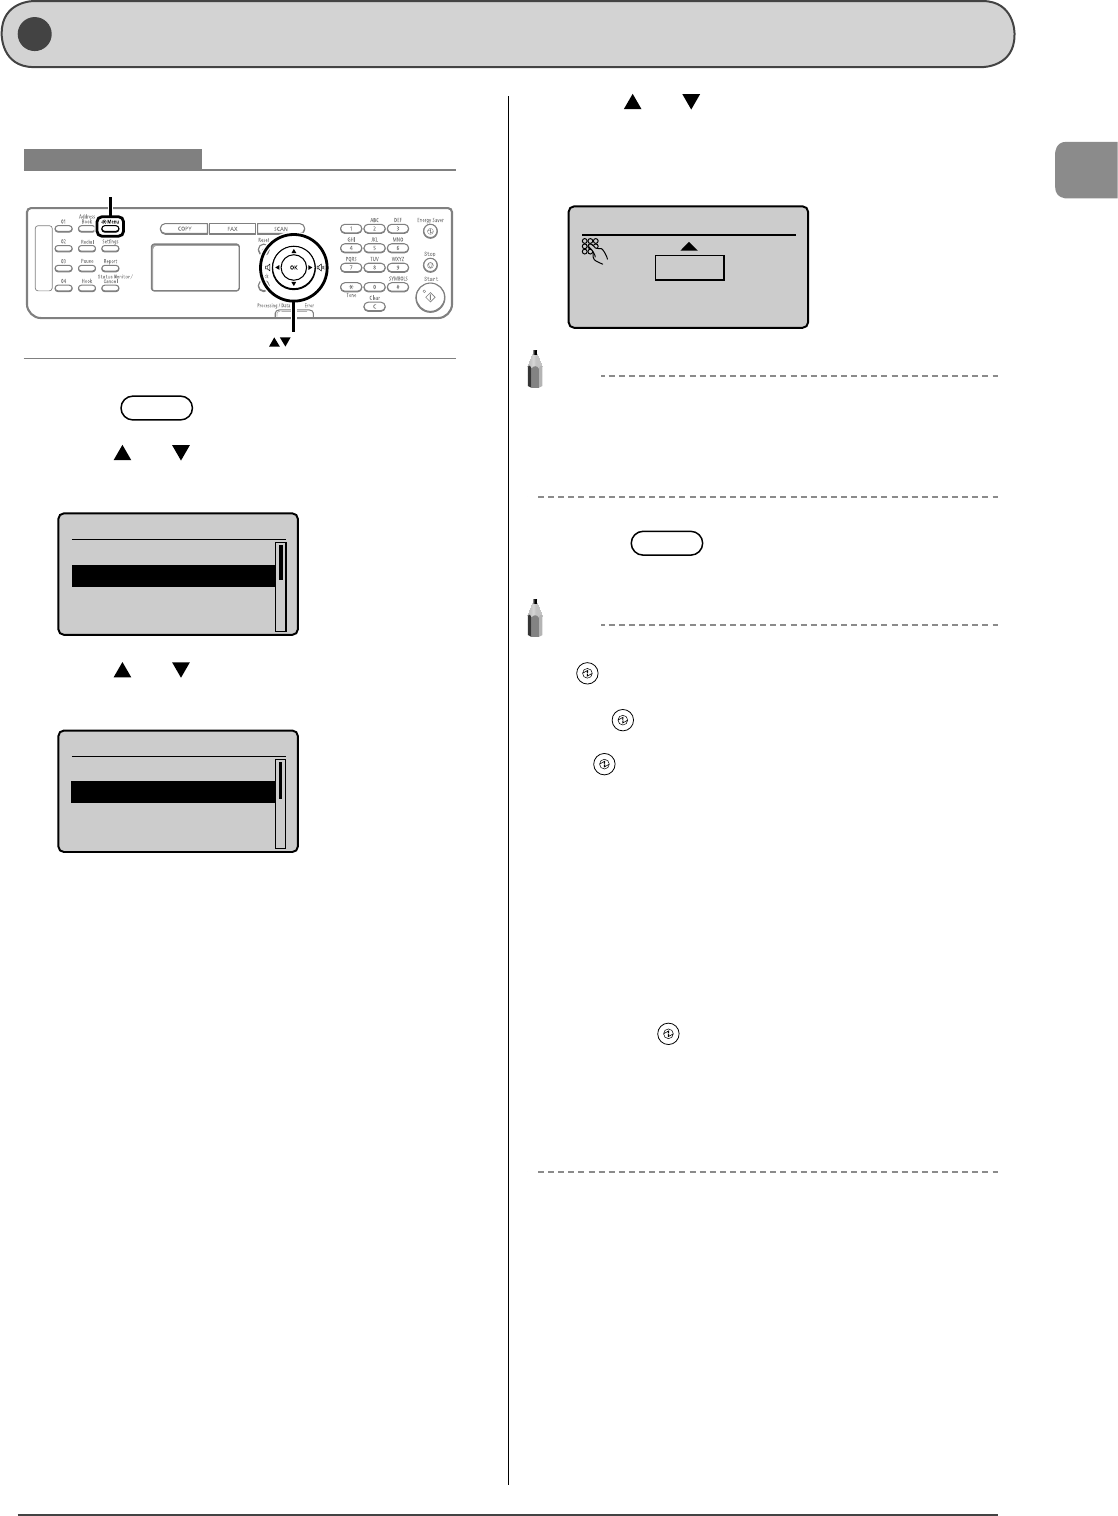
Returning to the Default Screen
From the menu screen, press [] (Menu) to exit the
menu screen and return to the default screen.
NOTE
If you press [] (Menu) before you press [OK]
The specified settings will not be saved.
1-9
Before Using the Machine
Text Input Method
When entering the followings, see “Entering IP Address
(MF4570dn Only).”
• IP address
• Subnet mask
• Gateway address
• DNS server address
Entering Text Except for IP Address
Enter information (text, symbols, and numbers) into the
machine using the following keys.
Keys to be used for this operation
OK
Tone, Numeric keys,
SYMBOLS, Clear
Changing the Entry Mode
Register Unit Name
<Apply>
Entry Mode: A
Press [] to select <Entry Mode>, and then press [OK]. You
can also press [
] (Tone) to change the entry mode.
Entry modeAvailable text
<A>Alphabet (capital letters) and symbols
<a>Alphabet (small letters) and symbols
<12>Numbers
Entering Text, Symbols, and Numbers
Enter with the numeric keys or [] (Symbols)
Keys
used
Entry mode:
<A>
Entry mode:
<a>
Entry mode:
<12>
@ . - _ /1
ABCabc2
DEFdef3
GHIghi4
JKLjkl5
MNOmno6
PQRSpqrs7
TUVtuv8
WXYZwxyz9
(Not available)0
- . * # ! ” , ; : ^ ` _ = / | ’ ?
$ @ % & + \ ( ) [ ] { } < >
(Not available)
Moving the Cursor (Entering a Space)
Move the cursor by pressing [] or [].
To enter a space, move the cursor to the end of the text and
press [
].
Deleting text, symbols, or numbers
To delete text, numbers, or symbols, press [] (Clear).
To delete all text, numbers, or symbols, press and hold
[
] (Clear).
Example: Enter <CANON>.
1Ensure that the input mode is <A>.
2 Press [] until the letter “C” appears on the
display.
Register Unit Name
C
<Apply>
Entry Mode: A
3 Press [] until the letter “A” appears on the
display.
Register Unit Name
CA
<Apply>
Entry Mode: A
4 Press [] until the letter “N” appears on the
display.
Register Unit Name
CAN
<Apply>
Entry Mode: A
5 Press [] until the letter “O” appears on the
display.
Register Unit Name
CANO
<Apply>
Entry Mode: A
1-10
Before Using the Machine
6 Press [] until the letter “N” appears on the
display.
Register Unit Name
CANON
<Apply>
Entry Mode: A
7 Press [] or [] to select <Apply>, and then
press [OK].
Entering IP Address (MF4570dn Only)
Enter numbers using the following keys.
Keys to be used for this operation
OK
Numeric keys, Clear
1Use the numeric keys to enter numbers.
IP Address
192.168.000.080
<Apply>
1 2 3 4 5 6 7 8 9 0
<BS>
* Enter numbers by three digits.
To specify “192.168.0.80,” enter “192.168.000.080.”
(If the number is less than three digits, add “0” before the
number.)
Deleting numbers
To delete a number, press [] (Clear).
To delete all numbers, press and hold [
] (Clear).
2When you are finished entering, press [] or []
to select <Apply>, and then press [OK].
IP Address
192.168.000.080
<Apply>
1 2 3 4 5 6 7 8 9 0
<BS>
1-11
Before Using the Machine
Setting the Sleep Timer
The entry is applied. The machine returns to sleep mode
automatically when it is idle for a specified length of time.
Keys to be used for this operation
Menu
OK
1 Press [] (Menu).
2 Press [] or [] to select <Timer Settings>, and
then press [OK].
Menu
Preferences
Timer Settings
Copy Settings
Fax TX Settings
3 Press [] or [] to select <Sleep Timer>, and
then press [OK].
Timer Settings
Time & Date Settings
Sleep Timer
Auto Reset Timer
Screen After Auto R
...
4 Press [ ] or [] to specify the time, and then
press [OK].
You can also enter values using the numeric keys.
* We recommend that you use this option in the default setting.
Sleep Timer
10 minutes
(10-240)
NOTE
Specifying the auto sleep timer
You may specify the auto sleep timer between <10> minutes and
<240> minutes, in one minute interval. The default value for this
setting is <10> minutes.
5 Press [] (Menu) to close the menu
screen.
NOTE
When entering sleep mode
[] (Energy Saver) will be lit green.
To enter sleep mode manually
Press [] (Energy Saver).
* The machine does not enter the sleep mode, if you press
[] (Energy Saver) in 10 seconds after the machine resumes
from the sleep mode.
The machine will not enter sleep mode when
• the machine is in operation
• the Processing/Data indicator is lit or blinking
• a message appears on the display and the Error indicator blinks
(except when <Prepare toner cartridge.> is displayed)
• the machine is performing adjustment or cleaning
• there is a paper jam
• the handset of the external telephone is off the hook
• documents are set in the feeder
The machine will wake from sleep mode when
• you press [] (Energy Saver)
• receiving a fax or phone call
• the external telephone is off the hook
• a print job from a computer begins
• documents are set in the feeder
• the machine is connected to a computer via a USB cable
1-12
Before Using the Machine
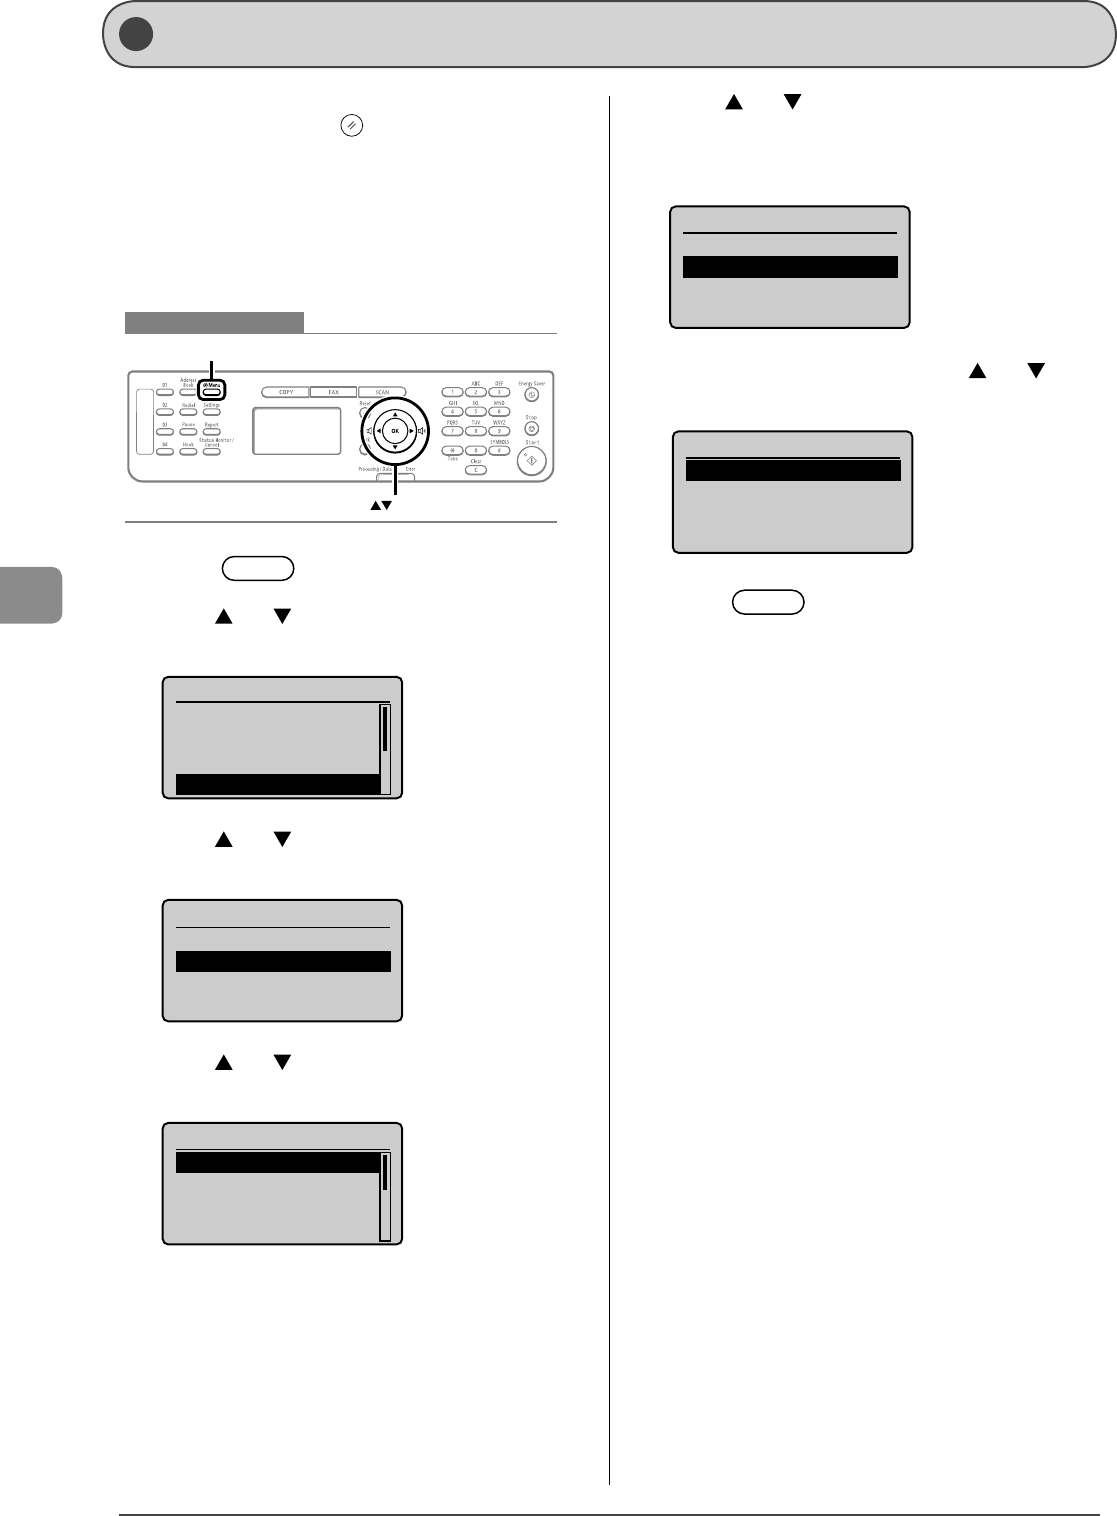
Setting the Current Date and Time
Specify a display format for the date and time and set the
current date and time.
The specified date and time are used for some fax functions
and reports.
Keys to be used for this operation
Menu
OK
1 Press [] (Menu).
2 Press [] or [] to select <Timer Settings>, and
then press [OK].
Menu
Preferences
Timer Settings
Copy Settings
Fax TX Settings
3 Press [] or [] to select <Time & Date Settings>,
and then press [OK].
Timer Settings
Time & Date Settings
Sleep Timer
Auto Reset Timer
Screen After Auto R
...
4 Press [] or [] to select a setting item, and then
press [OK].
Time & Date Settings
Date Display Type
12/24 Hour Clock
Current Time Settings
Daylight Savings
SettingsOverviewOperation
<Date
Display
Type>
Specifies
the display
format for
dates.
Press [
] or [] to select one of
following display formats, and then
press [OK].
You can select a display format from
the following three options.
• MM/DD/YYYY
• DD/MM YYYY
• YYYY MM/DD
<12/24
Hour
Clock>
Specifies
the display
format for
time.
Press [
] or [] to select a display
format, and then press [OK].
You can select a display format from
the following two options.
• 12 Hour (AM/PM)
• 24 Hour
<Current
Time
Settings>
Specifies
the current
time and
date.
Use the numeric keys to enter the date
and time, and then press [OK].
You can also enter the date and time
by pressing [] or [] to move the
cursor, and then pressing [] or [] to
select a number.
Press [] or [] to switch between
<AM> and <PM>.
Current Time Settings
01/01 2011 12:52 AM
<Daylight
Savings>
Specifies
the daylight
savings
time.
To use daylight savings time,
1. Press [] or [] to select <On>,
and then press [OK].
2. Specify the starting date of the
daylight savings time.
-Press [] or [] to select
<Month>, and then press [OK].
-Select the starting month, and
then press [OK].
-Press [] or [] to select <Day>,
and then press [OK].
-Select the starting week, and then
press [OK].
-Select the starting day, and then
press [OK].
-Press [] or [] to select
<Apply>, and then press [OK].
3. Repeat step 2 to specify the ending
date.
5 Press [] (Menu) to close the menu
screen.
2-1
Chapter
2
Document and Paper Handling
Document Requirements 2-2
Scanning Range 2-2
Copy 2-2
FAX 2-3
Scan 2-3
Placing Documents 2-4
Placing Documents on the Platen Glass 2-4
Loading Document in the Feeder 2-4
Paper Requirements 2-6
Paper Size 2-6
Paper Type 2-7
Printable Range 2-8
Loading Paper 2-9
In the Paper Cassette 2-9
In the Multi-Purpose Tray 2-11
Precautions when Loading Paper 2-12
Paper Loading Capacity 2-12
Paper Loading Orientation 2-13
When printing paper with a letterhead or logo
(previously printed paper) 2-13
Printing on Envelopes 2-13
Setting a Paper Size and Type 2-14
Setting a Custom Paper Size 2-14
Selecting Print Side (MF4570dn Only) 2-16
When setting this item to <Print Speed Priority>
(the default setting) 2-16
When setting this item to <Print Side Priority> 2-16
2-2
Document and Paper Handling
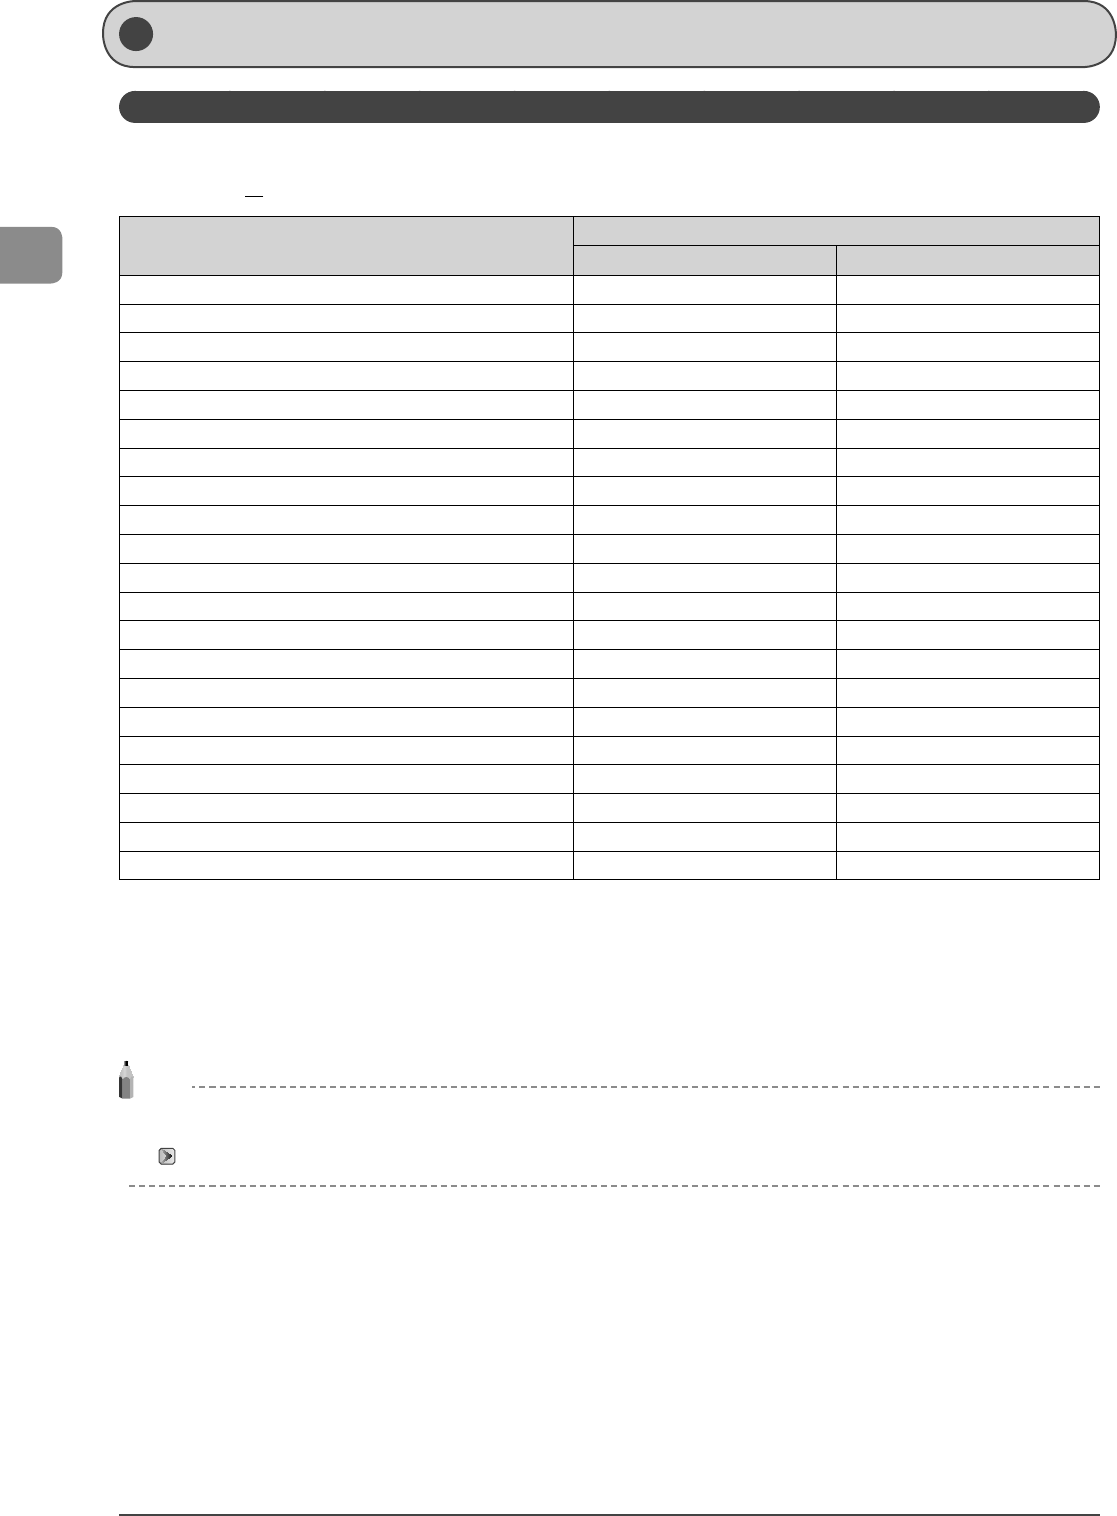
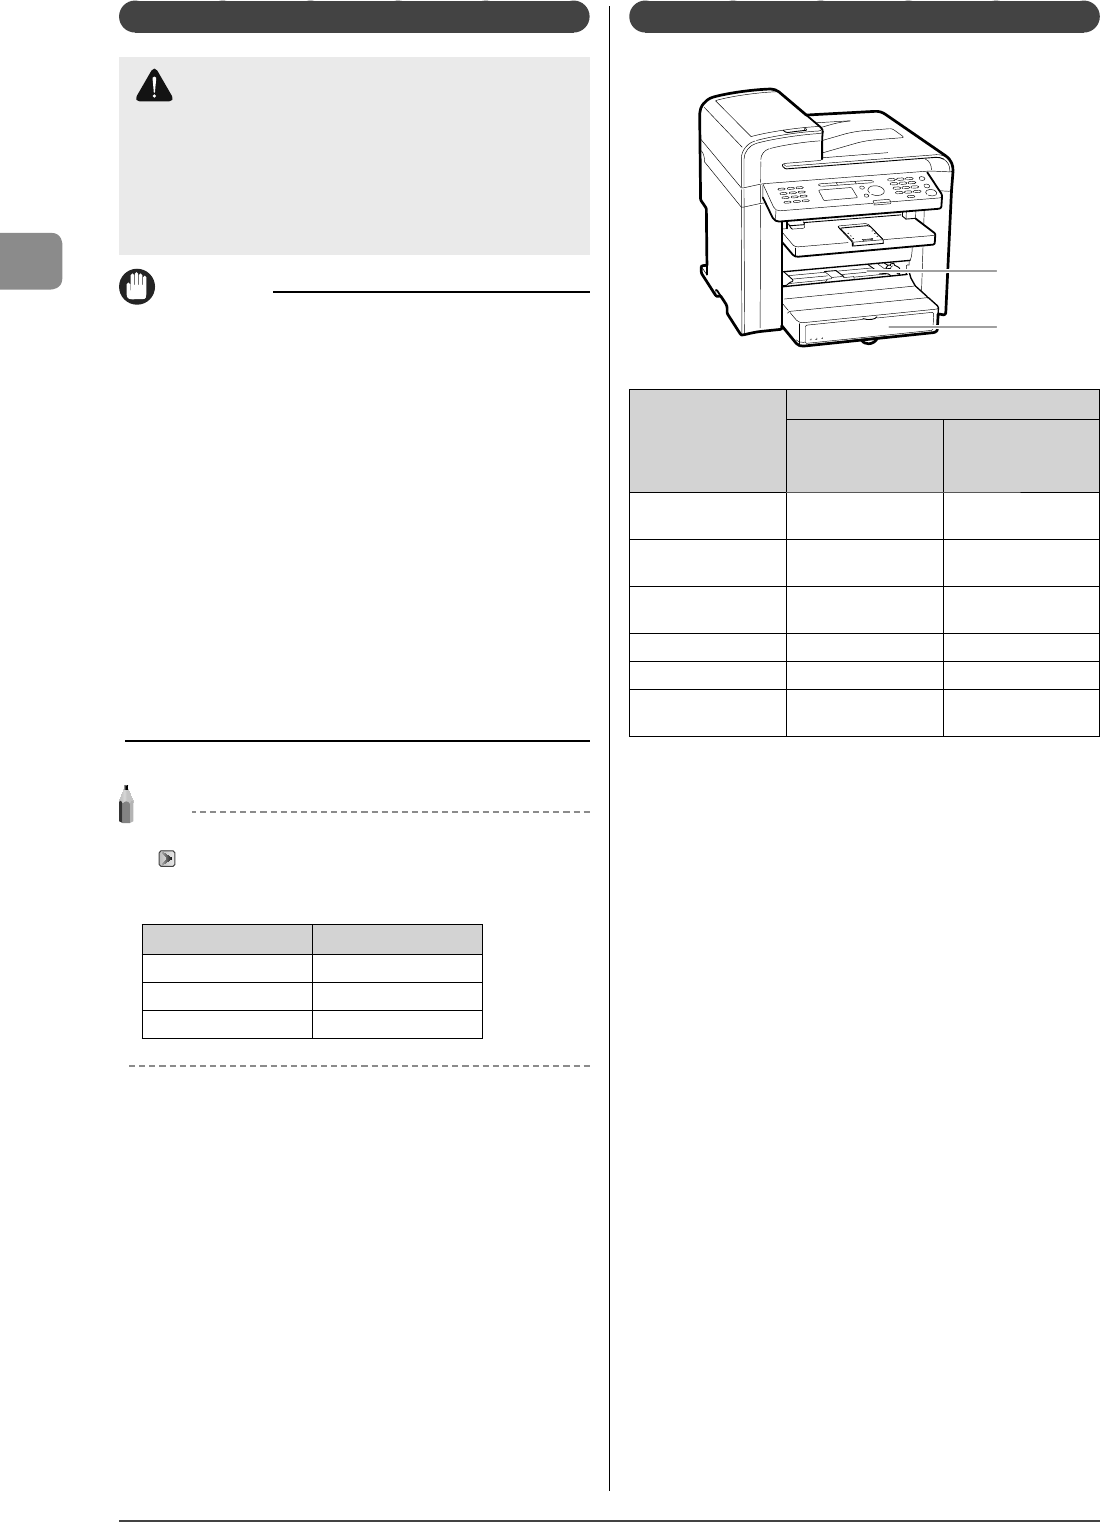
Platen glassFeeder
Document type
• Plain paper
• Heavy paper
• Photograph
• Small documents (e.g., index cards)
• Special types of paper (e.g., tracing paper, transparencies, etc.)
*1
• Booklet (Up to 3/4” (20 mm) thickness)
Plain paper
(Multi-page documents of the same size, thickness and
weight/onepage documents)
Size (W x L)Maximum 8 1/2” x 11 3/4” (215.9 mm x 297 mm)
Maximum 8 1/2” x 14” (216 mm x 356 mm)
Minimum 5 7/8” x 4 1/8” (148 mm x 105 mm)
WeightMaximum 4.4 lb (2 kg)13.3 to 27.9 lb Bond (50 to 105 g/m
2
)
Paper Capacity1 sheetMaximum 35 sheets
*2
*1
When copying transparent documents such as tracing paper or transparencies, use a piece of plain white paper to cover the document after
placing it face-down on the platen glass.
*2
21 lb Bond (80 g/m
2
) paper
IMPORTANT
When placing document
Place the document after glue, ink or correction fluid on the document is completely dry.
To prevent paper jams in the feeder
Do not use any of the following.
• Wrinkled or creased paper
• Carbon paper or carbon-backed paper
• Curled or rolled paper
• Coated paper
• Torn paper
• Onion skin or thin paper
• Documents with staples or paper clips attached
• Paper printed with a thermal transfer printer
• Transparency
Document Requirements
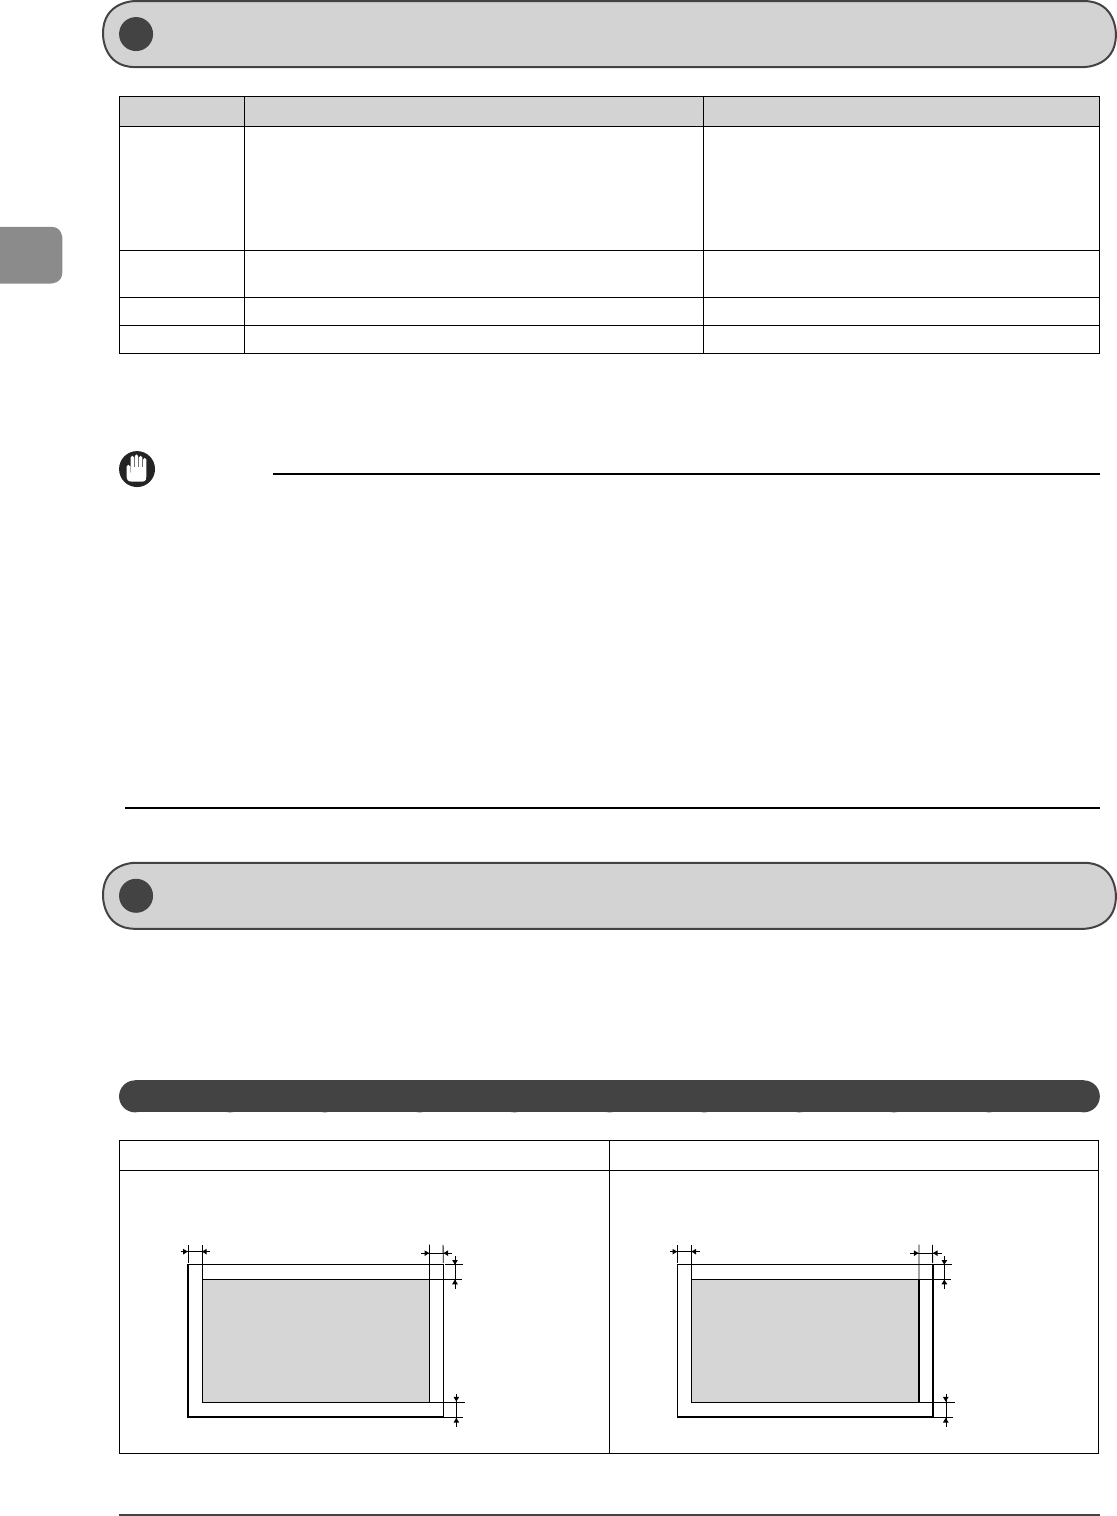
Scanning Range
Ensure your document’s text and graphics fall within the area specified in the following diagram.
* Note that the margin widths listed below are rough standards and there may be slight variations in actual use.
* The loading orientation of documents is as follows.
- Platen glass: With the document facing down
- Feeder: With the document loaded in the document feeder tray
Copy
Platen GlassFeeder
1/4 in.
(5 mm)
1/4 in.
(5 mm)
1/4 in.
(5 mm)
1/4 in.
(5 mm)
1/4 in.
(5 mm)
1/4 in.
(5 mm)
1/4 in.
(5 mm)
1/4 in.
(5 mm)
2-3
Document and Paper Handling
FAX
Platen GlassFeeder
1/8 in.
(3 mm)
1/8 in.
(3 mm)
3/64 in.
(1 mm)
3/64 in.
(1 mm)
1/8 in.
(3 mm)
1/8 in.
(3 mm)
3/64 in.
(1 mm)
3/64 in.
(1 mm)
Scan
Platen GlassFeeder
1/16 in.
(1.5 mm)
1/16 in.
(1.5 mm)
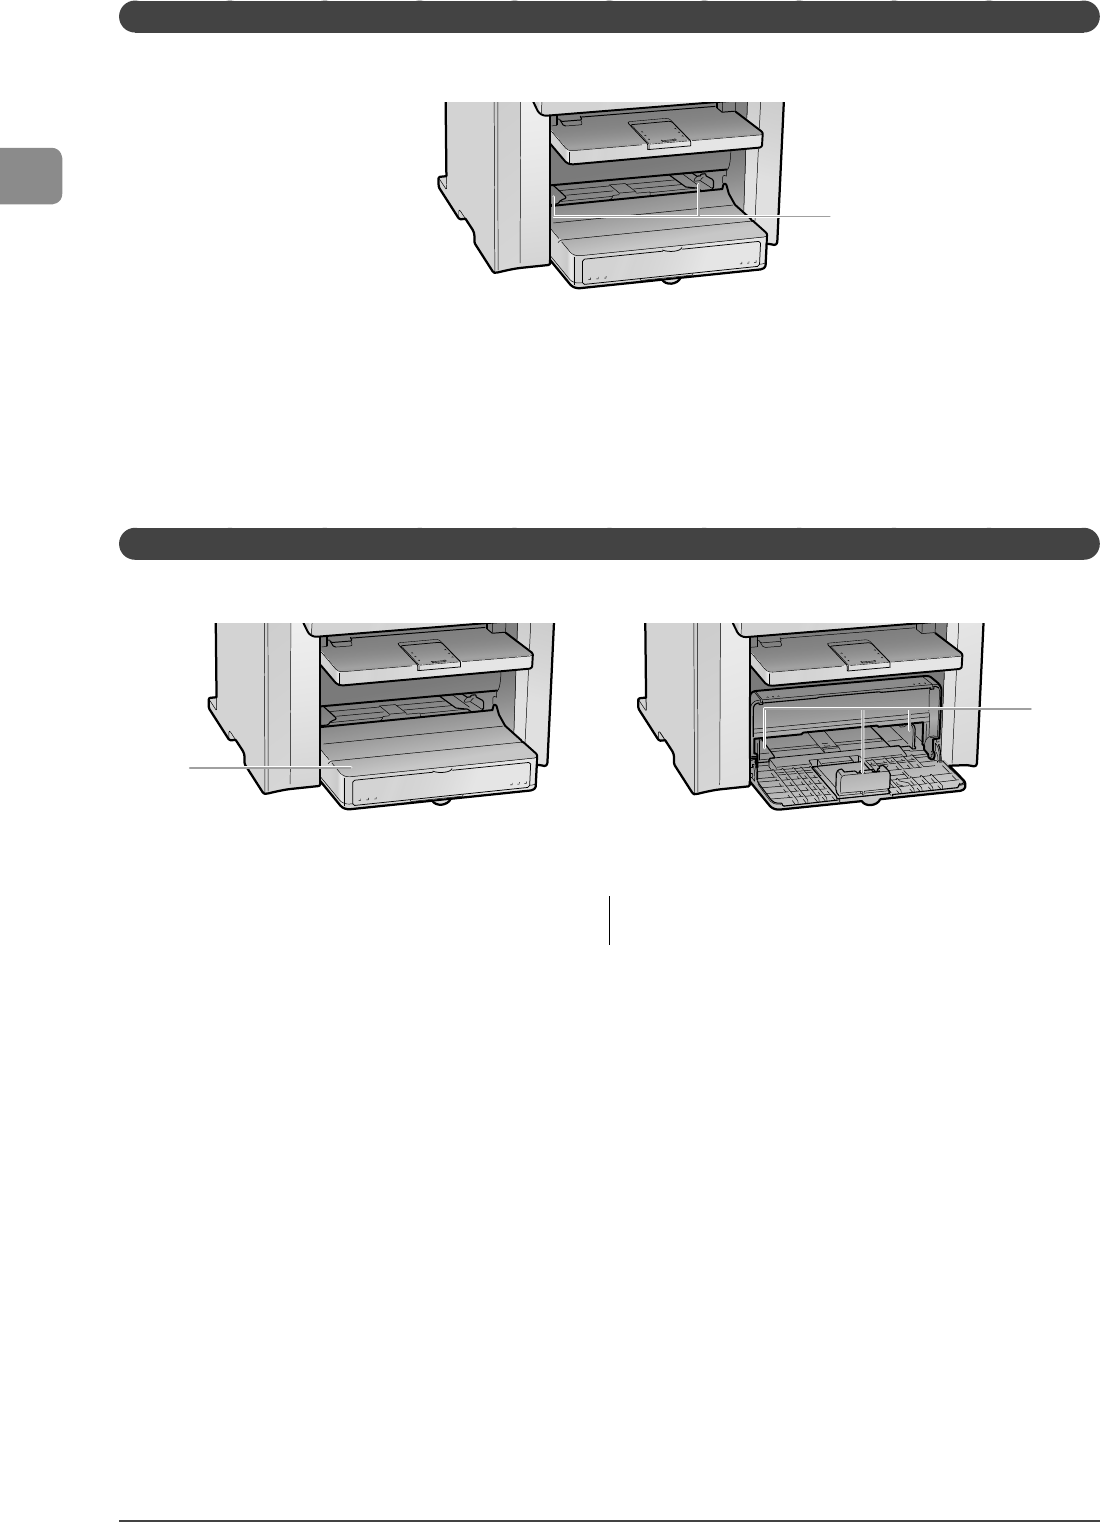
2-4
Document and Paper Handling
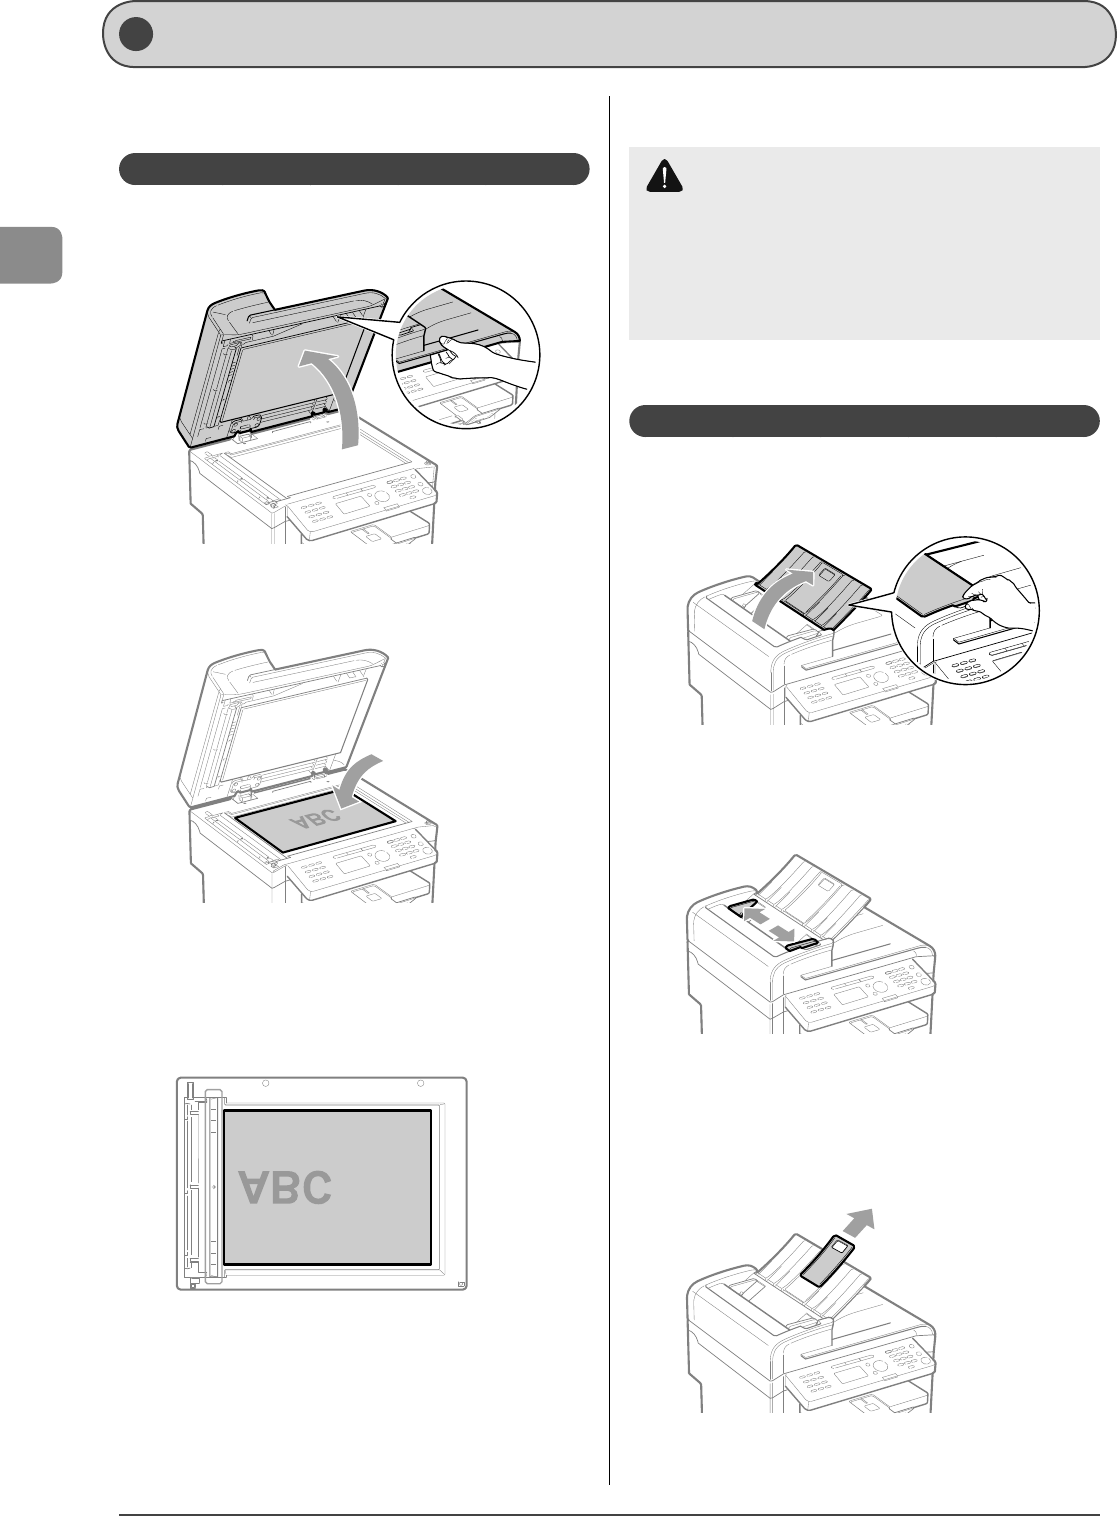
This section describes placing the documents on the platen
glass or loading them in the feeder.
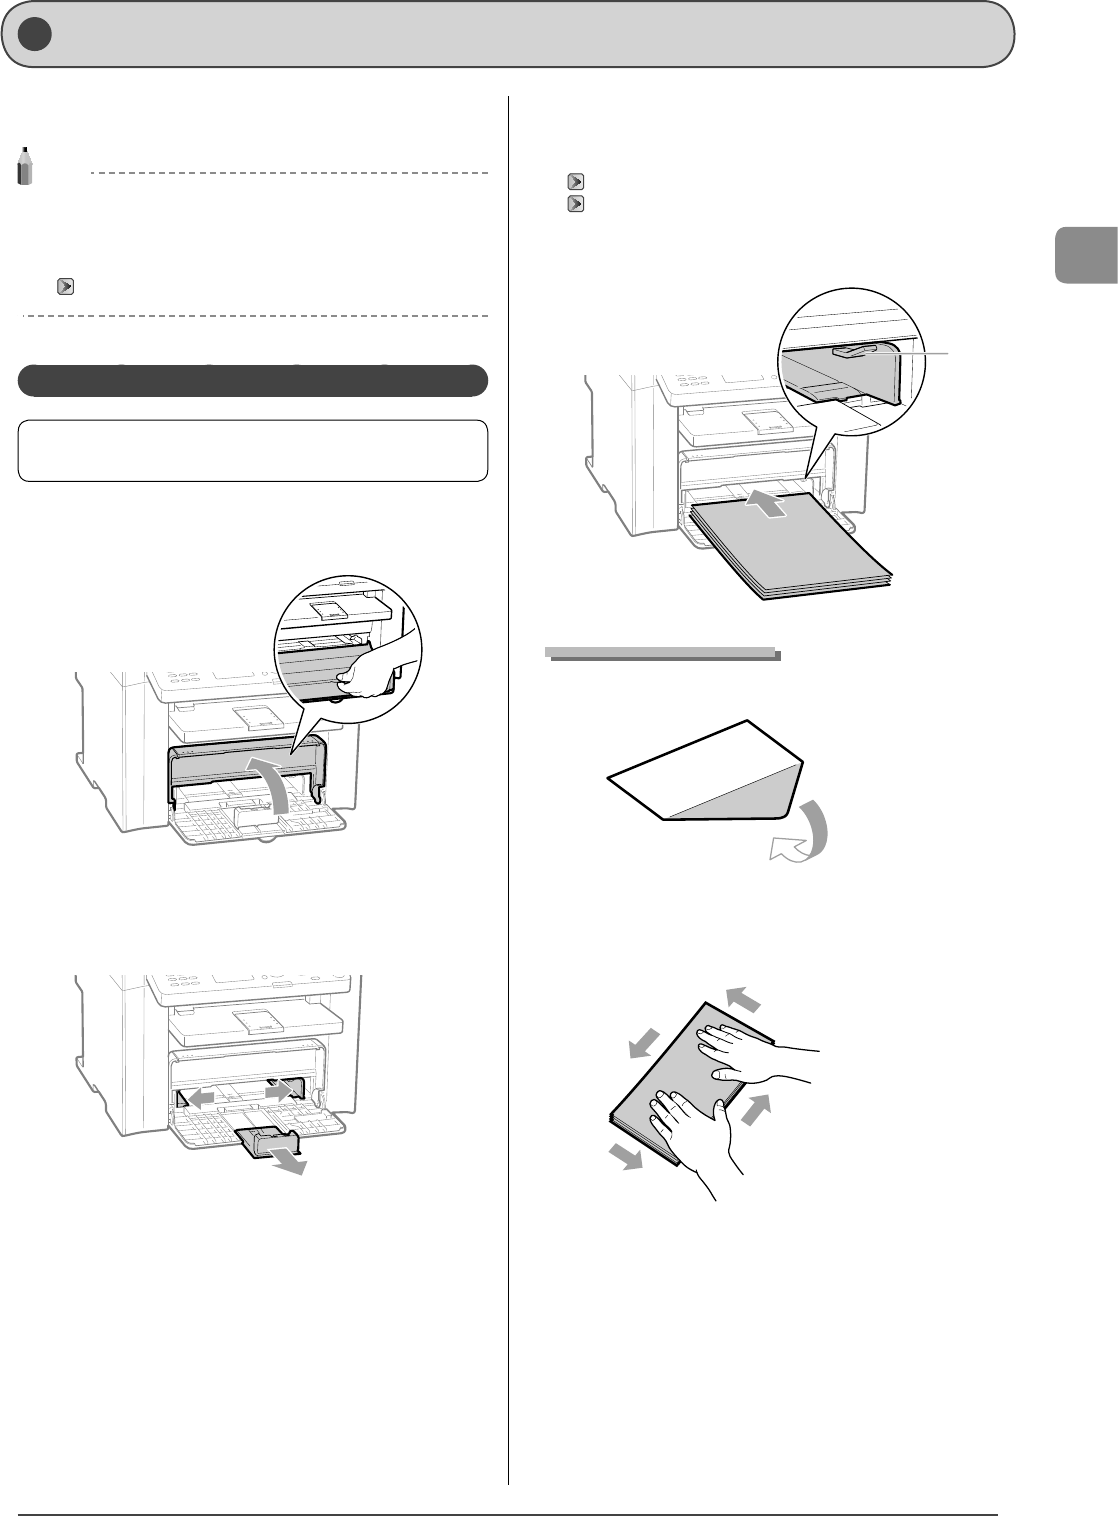
Placing Documents on the Platen Glass
1Open the feeder.
2Place a document face down.
3Align the document with the appropriate paper
size marks.
If your document does not match any of the paper size marks, align
the center of your document with the arrow mark.
A4
B4
A5
A5
B4
A4
4Close the feeder gently.
The machine is ready to scan the document.
When scanning is complete, remove the document from the
platen glass.
Loading Document in the Feeder
1Open the document feeder.
2Spread the document guides a little wider than
the document width.
3If loading large-sized documents, pull out the tray
extension.
Pull out the tray extension when the document is hanging out of
the document feeder tray.
Placing Documents
CAUTION
Precautions when closing the feeder
• Be careful not to get your fingers caught. This may
cause personal injury.
• Do not press down the feeder forcefully. This may
damage the platen glass and cause personal injury.
2-5
Document and Paper Handling
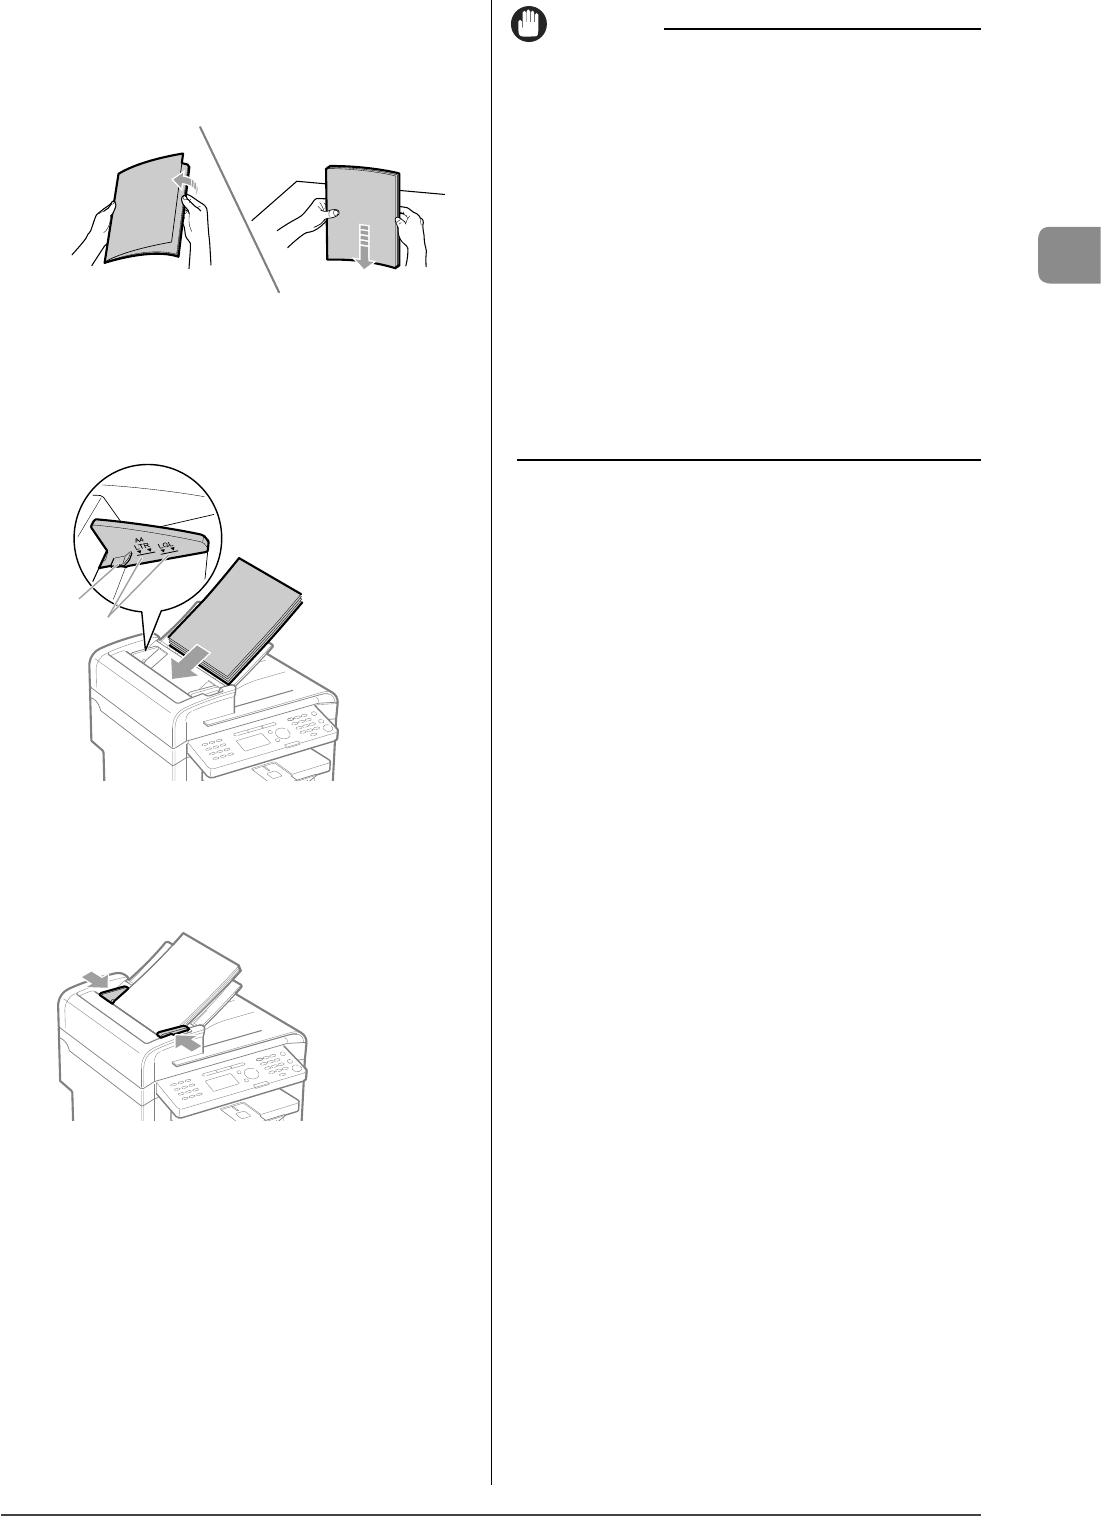
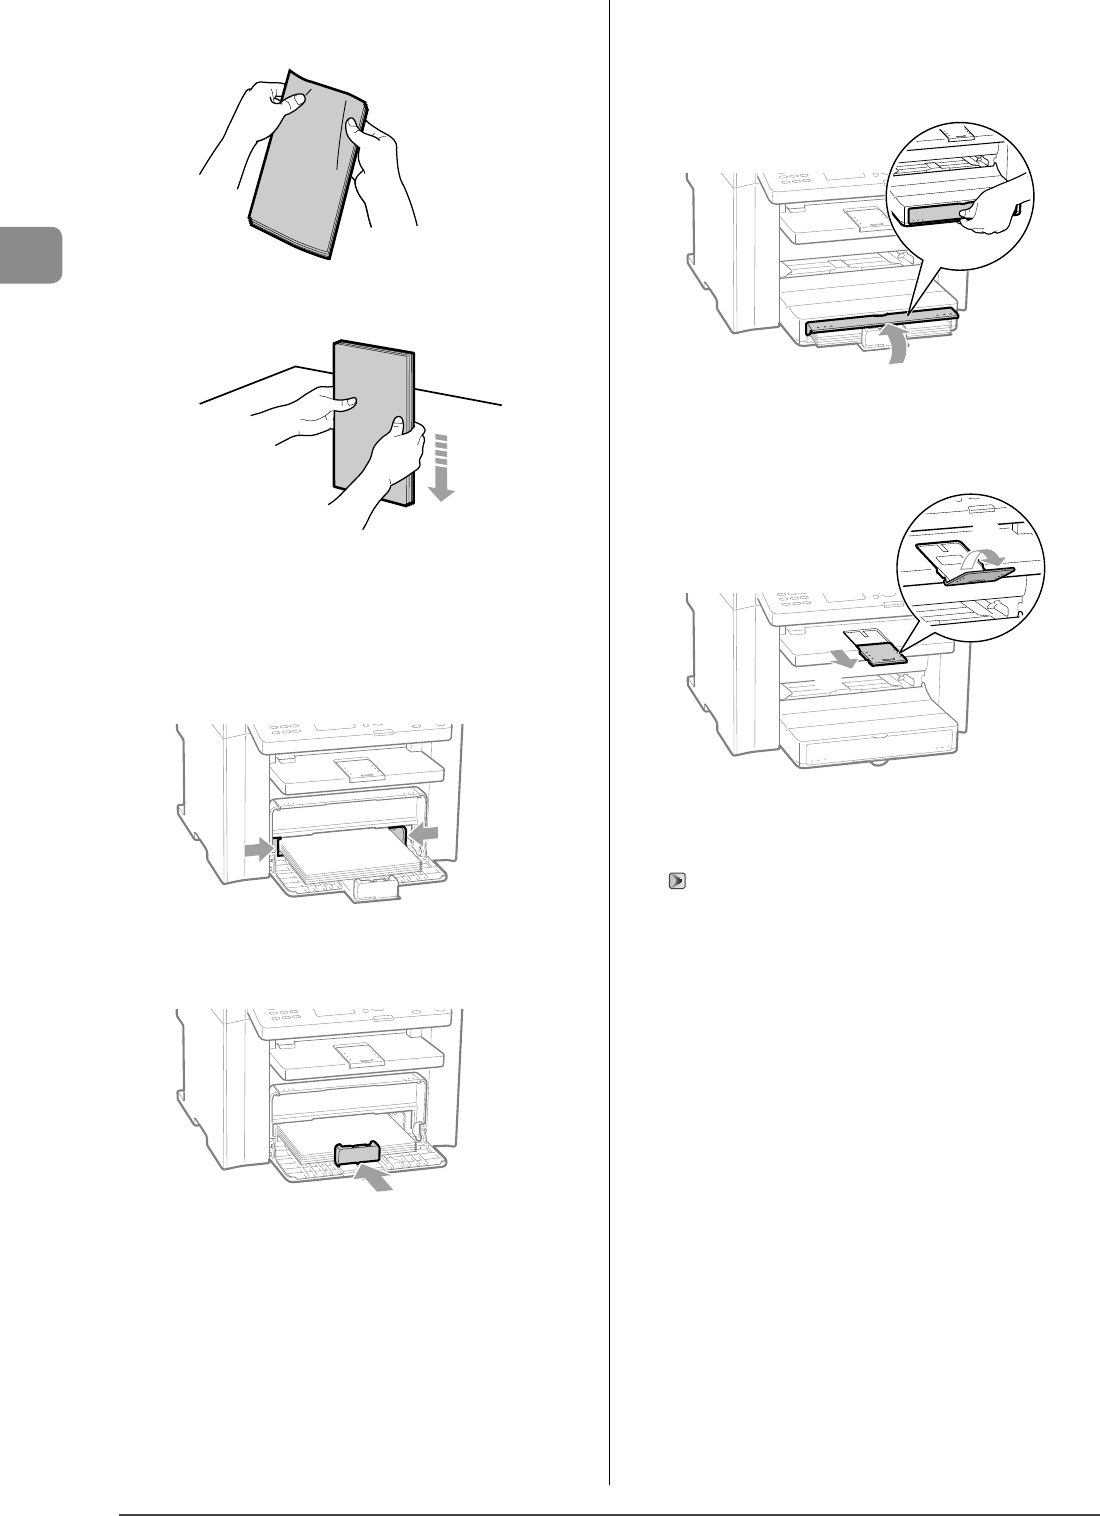
4Fan the document stack and align the edges of
the pages.
Thoroughly fan in
small batches
Align the edges on a
at surface a few times
5Neatly place the documents face up.
• Load the document under the load limit guides (A).
• Ensure that the paper stack does not exceed the load limit marks
(B).
(A)
(B)
6Align the document guides to fit the width of the
document.
The machine is ready to scan the document.
IMPORTANT
Up to 35 documents can be loaded
If more than 35 documents are loaded, paper jams may occur, or
the documents may not be scanned.
While scanning a document
Do not add or remove documents.
When scanning documents is complete
Remove the documents from the document delivery tray to avoid
paper jams.
Avoid scanning the same document more than 30 times.
When scanned repeatedly, documents can become folded or torn,
which may cause paper jams.
Be sure to align the document guides with the width of
the paper
• If the document guides are too loose or too tight, this may result
in misfeeds or paper jams.
• Printouts may be askew depending on the printing environment.
Properly load paper to reduce the symptom.
2-6
Document and Paper Handling
Paper Size
The available paper sizes are as follows.
○: Available : Not available
Paper size
Paper source
Paper cassetteMulti-purpose tray
A4 (8 1/4” x 11 3/4” (210 mm x 297 mm))
*1 *2
○○
B5 (7 1/8” x 10 1/8” (182 mm x 257 mm))
○○
A5 (5 7/8” x 8 1/4” (148 mm x 210 mm))
○○
Legal (8 1/2” x 14” (216 mm x 356 mm))
*1
○○
Letter (8 1/2” x 11” (216 mm x 279 mm))
*1 *2
○○
Statement (5 1/2” x 8 1/2” (140 mm x 216 mm))
○○
Executive (7 1/4” x 10 1/2” (184 mm x 267 mm))
○○
Officio (8 1/2” x 12 1/2” (216 mm x 318 mm))
*1
○○
B-officio (8 1/2” x 14” (216 mm x 355 mm))
*1
○○
M-officio (8 1/2” x 13 3/8” (216 mm x 341 mm))
*1
○○
Government - Letter (8” x 10 1/2” (203 mm x 267 mm))
○○
Government - Legal (8” x 13” (203 mm x 330 mm))
○○
Foolscap (8 1/2” x 13” (216 mm x 330 mm))
*1
○○
A-foolscap (8 1/8” x 13 3/8” (206 mm x 338 mm))
○○
Envelope COM10 (4 1/8” x 9 1/2” (104.7 mm x 241.3 mm))
*3
○○
Envelope Monarch (3 7/8” x 7 1/2”(98.4 mm x 190.5 mm))
*3
—
○
Envelope C5 (6 3/8” x 9” (162 mm x 229 mm))
*3
○○
Envelope B5 (6 7/8” x 9 7/8” (176 mm x 250 mm))
*3
○○
Envelope DL (4 3/8” x 8 5/8” (110 mm x 220 mm))
*3
○○
Index Card (3” x 5” (76 mm x 127 mm))—
○
Custom Paper Size
○
*4
○
*5
*1
Only in MF 4570dn, auto 2-sided print is available.
*2
Received documents, reports, or lists can be printed.
*3
Use envelopes with the flap closed.
*4
You can load paper of the following custom paper sizes.
* Width 3” to 8 1/2” (76.2 to 216 mm); Length 8 1/4” to 14” (210 to 356 mm)
*5
You can load paper of the following custom paper sizes.
* Width 3” to 8 1/2” (76.2 to 216 mm); Length 5” to 14” (127 to 356 mm)
NOTE
Default paper size
The default paper size is Letter. If you use a different paper size, change the paper size settings.
“Setting a Paper Size and Type” (→P.2-14)
Paper Requirements
2-7
Document and Paper Handling
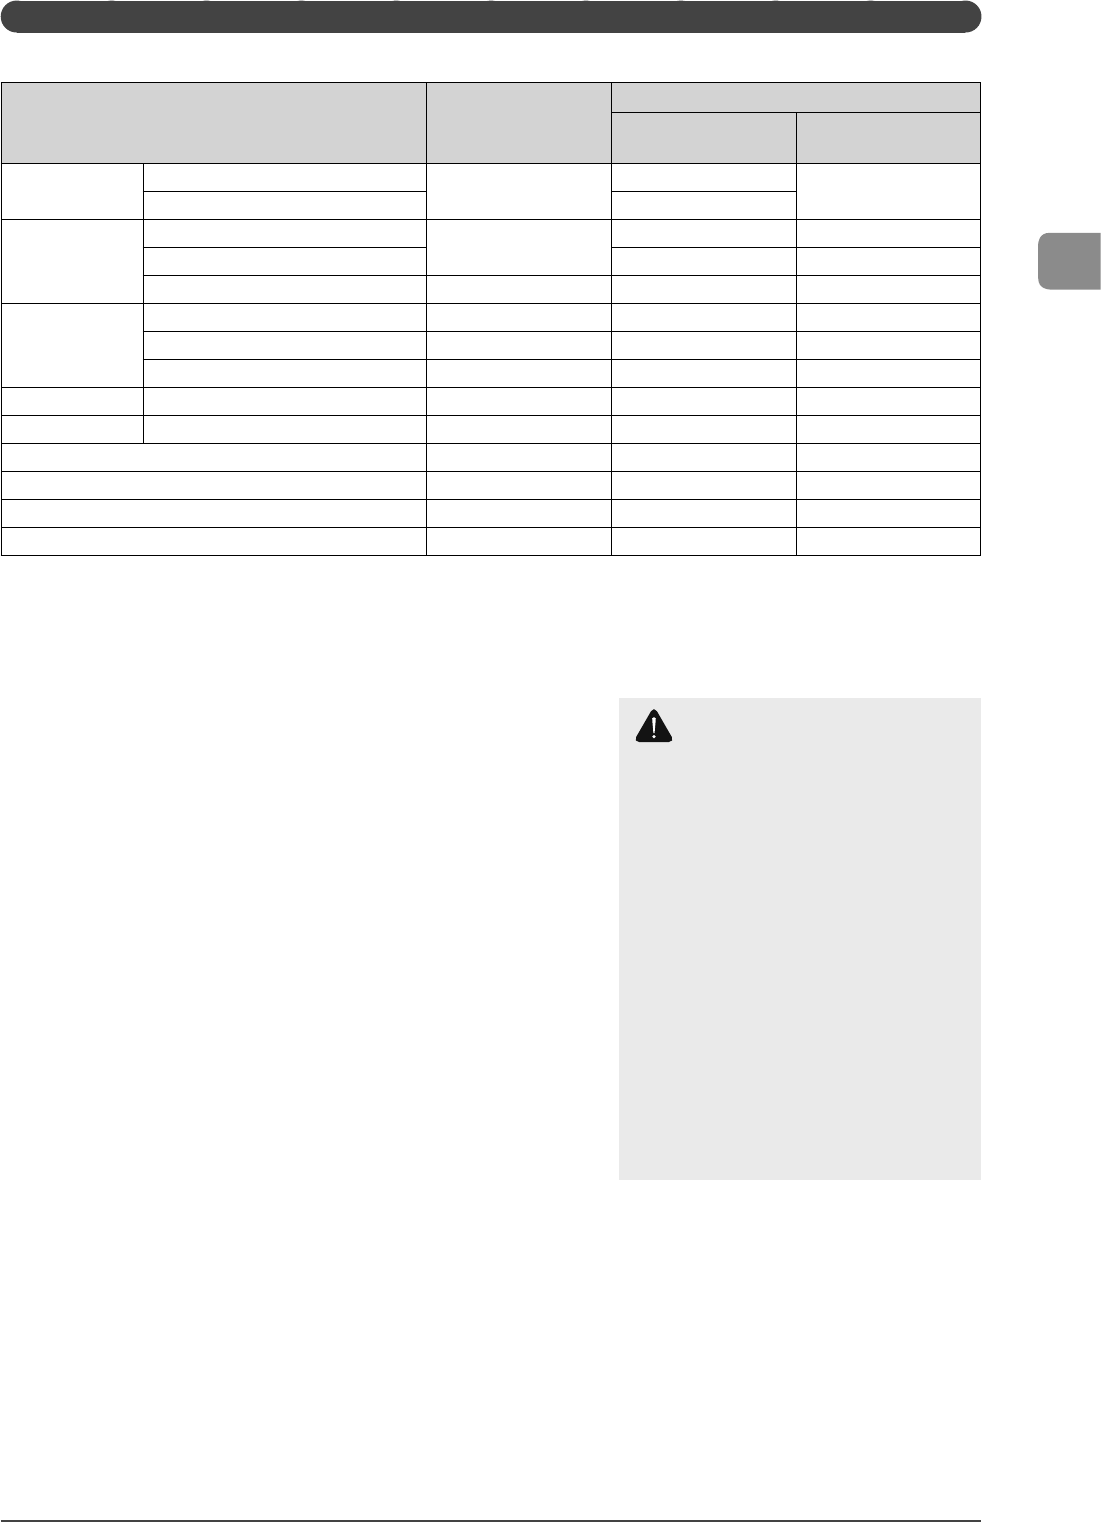
Paper Type
The available paper types are as follows.
Paper TypePrinter Driver Setting
Paper Source
Paper Capacity
(Paper Cassette)
Paper Capacity
(Multi-purpose Tray)
Plain paper
*1
16 to 21 lb Bond (60 to 80 g/m²)
[Plain Paper]
[Plain Paper L]
*2
250 sheets
1 sheet
21 to 24 lb Bond (80 to 90 g/m²)170 sheets
Heavy paper
24 to 28 lb Bond (90 to 105 g/m²)
[Heavy Paper 1]
170 sheets1 sheet
28 to 32 lb Bond (105 to 120 g/m²)100 sheets1 sheet
45 to 60 lb Cover (120 to 163 g/m²)[Heavy Paper 2]100 sheets1 sheet
Rough paper
16 to 24 lb Bond (60 to 90 g/m²)[Rough Paper 1]100 sheets1 sheet
24 to 32 lb Bond (90 to 120 g/m²)[Rough Paper 2]100 sheets1 sheet
45 to 60 lb Bond (120 to 163 g/m²)[Rough Paper 3]100 sheets1 sheet
Recycled paper
*1
16 to 21 lb Bond (60 to 80 g/m²)[Recycled Paper]250 sheets1 sheet
Color paper
*1
16 to 21 lb Bond (60 to 80 g/m²)[Color Paper]250 sheets1 sheet
Transparency
*3
[Transparency]50 sheets1 sheet
Label[Labels]100 sheets1 sheet
Index Card[Index Card]Not available1 sheet
Envelope
*4
[Envelope]20 envelopes1 envelope
*1
Only in MF4570dn, auto 2-sided print is available.
*2
If printed paper curls when [Plain Paper] is selected, set paper type to [Plain Paper L]. However, the toner fixation may be not as good when
[Plain Paper L] is set.
*3
Use only the transparencies designed for laser printers.
*4
You can set Envelope Monarch only in the multi-purpose tray.
To prevent paper jams, do not use the following types of paper.
• Wrinkled or creased paper
• Curled or rolled paper
• Torn paper
• Damp paper
• Very thin paper
• Paper printed with a thermal transfer printer (Do not copy on the reverse side.)
The following types of paper do not print well:
• Highly textured paper
• Very smooth paper
• Glossy paper
Make sure the paper is free from dust, lint, and oil stains.
Make sure to test paper before purchasing large quantities.
Store all paper wrapped and on a flat surface until ready
for use. Keep opened packs in their original packaging in a cool,
dry location.
Store paper at 64.4 to 75.2°F (18 to 24°C), 40 % to 60 % RH.
CAUTION
If you print on damp paper
The following problems may occur.
• Steam is emitted from the printer output
area.
• Water droplets form on the back side of
the operation panel and in the output
area.
Because moisture in the paper is evaporating
due to the heat generated when toner fixes,
this is not a malfunction. (This is likely to
occur when the room temperature is low.)
If you smell a burnt odor, however,
immediately turn OFF the machine, unplug
the power plug from the AC power outlet,
and then contact your local authorized
Canon dealer or the Canon help line.
Continued use can result in a fire or electrical
shock.
2-8
Document and Paper Handling
The shaded area indicates the approximate printable area of A4 paper. Note that the margin widths listed below are rough
standards and there may be slight variations in actual use.
1/4 in.
(5 mm)
1/4 in.
(5 mm)
1/4 in.
(5 mm)
1/4 in.
(5 mm)
Printable Range
2-9
Document and Paper Handling
This section describes how to load paper in the paper cassette
and the multi-purpose tray.
NOTE
If you use paper of a different size or type
The default paper size/type is set to <Letter> and <Plain (16 lb
Bond-24 lb Bond)> in the setting menu. If you use a different paper
size or paper type, you need to change the paper settings.
“Setting a Paper Size and Type” (→P.2-14)
In the Paper Cassette
Before loading paper in the paper cassette, see “Precautions
when Loading Paper” (→P.2-12).
1Lift the dust cover.
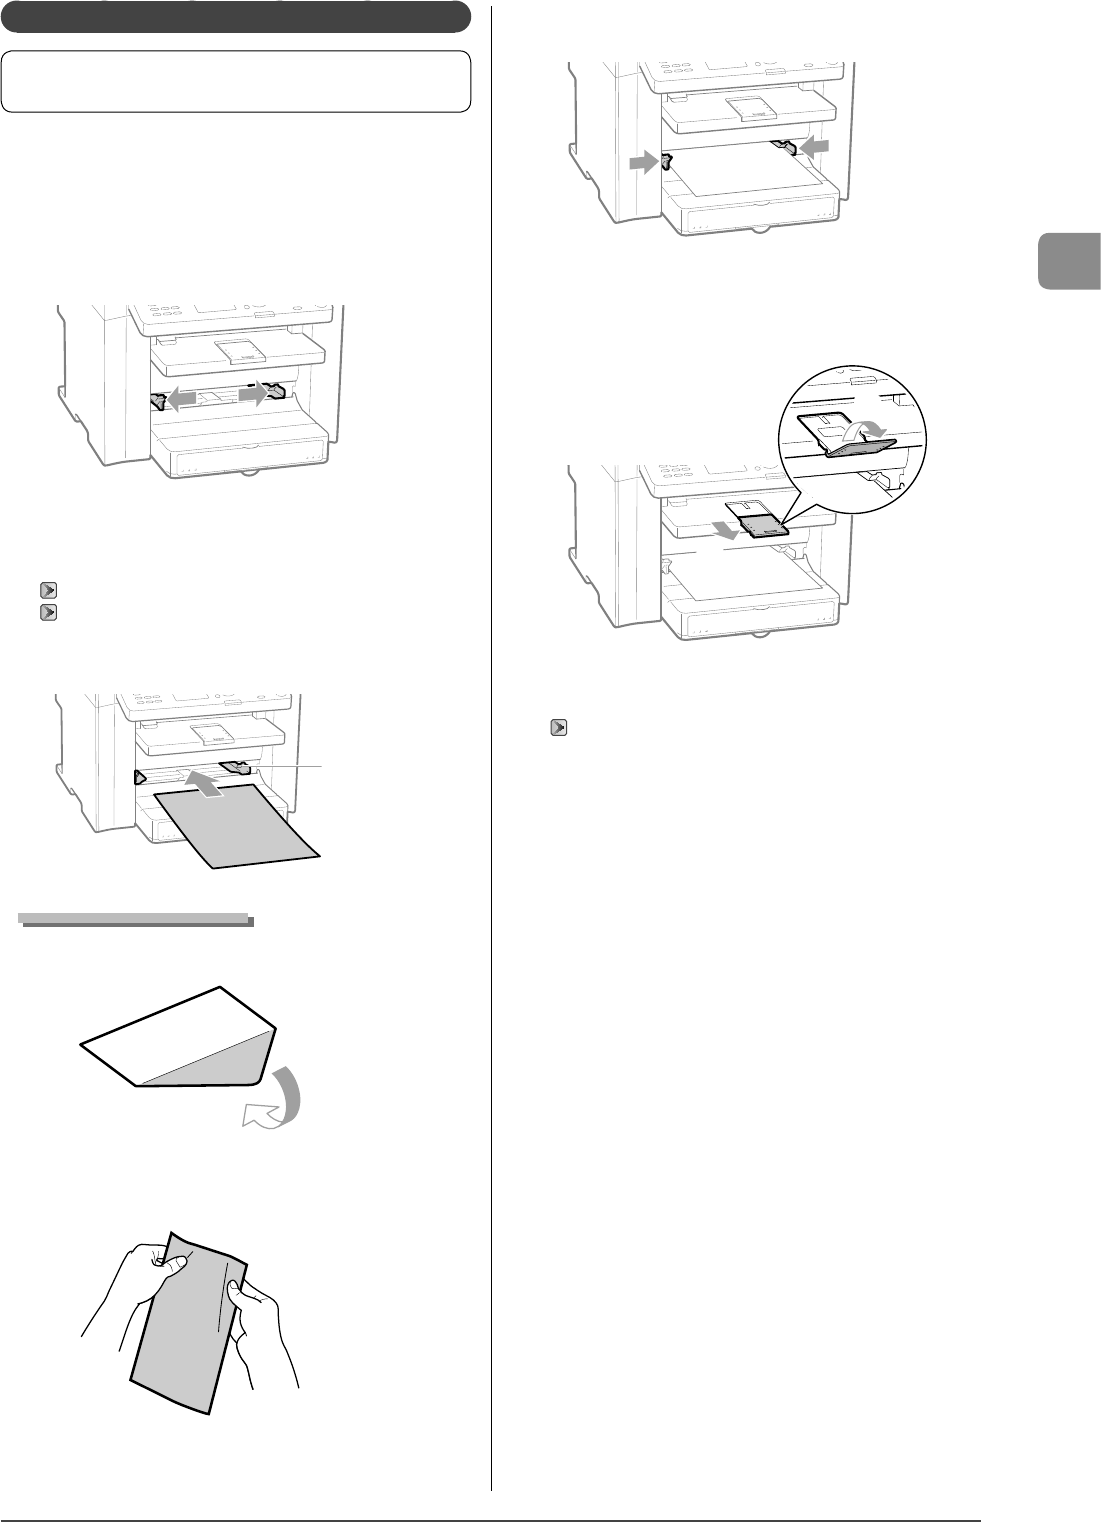
2Spread the paper guides a little wider than the
paper size.
* If you want to change the size of the paper to be loaded, be
sure to register the paper size in “Setting a Paper Size and Type”
(→P.2-14).
3Gently load the paper into the paper cassette
with the print side face up, until the edge of the
paper stack meets the back of the paper cassette.
“Paper Loading Capacity” (→P.2-12)
“Paper Loading Orientation” (→P.2-13)
Ensure that the paper stack does not exceed the load limit guides
(A).
(A)
When loading envelopes
(1) Close the envelope flap.
(2) Place the stack of envelopes on a flat surface, flatten them to
release any remaining air, and ensure that the edges are pressed
tightly.
Loading Paper
2-10
Document and Paper Handling
(3) Loosen any stiff corners of the envelopes and flatten curls as
shown in the figure.
(4) Align the edges of the envelopes on a flat surface.
(5) Gently load the envelopes into the paper cassette with the print
side face up, until the edge of the envelope stack meets the
back of the paper cassette.
4Adjust the paper guides to the width of the paper.
5Adjust the paper guide to the length of the paper.
6Close the dust cover.
When loading paper that is longer than the length of the
paper cassette
Lift the dust cover extension.
7Pull out the output tray extension, and then lift
the paper stopper.
(1)
(2)
8Specify the loaded paper size and type.
“Setting a Paper Size and Type” (→P.2-14)
2-11
Document and Paper Handling
In the Multi-Purpose Tray
Before loading paper in the multi-purpose tray, see
“Precautions when Loading Paper” (→P.2-12).
Use the multi-purpose tray when you want to copy or print on
a paper that is different from what is in the paper cassette.
You can load a single sheet of paper in the multi-purpose tray.
1Spread the paper guides a little wider than the
paper.
2Gently insert the paper into the multi-purpose
tray with the print side face up.
“Paper Loading Capacity” (→P.2-12)
“Paper Loading Orientation” (→P.2-13)
Ensure that the paper stack does not exceed the load limit guides
(A).
(A)
When loading envelopes
(1) Close the envelope flap.
(2) Loosen any stiff corners of the envelope and flatten curls as
shown in the figure.
(3) Gently insert the envelope into the multi-purpose tray with the
print side face up.
3Adjust the paper guides to the paper.
4Pull out the output tray extension, and then lift
the paper stopper.
(1)
(2)
5Specify the loaded paper size and type.
“Setting a Paper Size and Type” (→P.2-14)
2-12
Document and Paper Handling
CAUTION
Be careful when handling paper
Handle paper carefully not to cut your hands with the edges
of the paper.
Precautions when inserting the paper cassette
Be careful not to catch your fingers.
Precautions when Loading Paper
IMPORTANT
Be sure to align the paper guides with the width of the
paper.
• If the paper guides are too loose or too tight, this may result in
misfeeds or paper jams.
• Printouts may be askew depending on the printing environment.
Properly load paper to reduce the symptom.
When using paper that has been poorly cut
If you use paper that has been poorly cut, multiple sheets of paper
may be fed at once. In this case, fan the paper thoroughly, and then
align the edges of the stack properly on a hard, flat surface.
Do not exceed the load limit mark when loading paper.
Ensure that the paper stack does not exceed the line of the load
limit mark. If the paper stack exceeds the load limit mark lines, this
may result in misfeeds.
When printing on envelopes
Load envelopes with the front side (non-glued side) facing up. You
cannot print on the reverse side of envelopes.
Also, be sure to close the flap before loading envelopes.
NOTE
Detailed information about usable paper
“Paper Requirements” (→P.2-6)
Size abbreviation on the paper guides of the paper
cassette
Paper size Paper guide
Legal LGL
Letter LTR
Executive EXEC
Paper Loading Capacity
(A)
(B)
Paper type
Paper source
(A)
Multi-purpose
tray
(B)
Paper cassette
Plain paper (Ex. 21 lb
Bond (80 g/m²))
1 sheetApprox. 250 sheets
Heavy paper (Ex. 25
lb Bond (91 g/m²))
1 sheetApprox. 170 sheets
Heavy paper (Ex. 34
lb Bond (128 g/m²))
1 sheetApprox. 100 sheets
Transparency1 sheetApprox. 50 sheets
Label 1 sheet Approx. 100 sheets
Envelope 1 envelope
Approx. 20
envelopes
2-13
Document and Paper Handling
Paper Loading Orientation
NOTE
Paper loading orientation when loading in the multi-
purpose tray
Paper loading orientation for the multi-purpose tray is same as
which for the paper cassette.
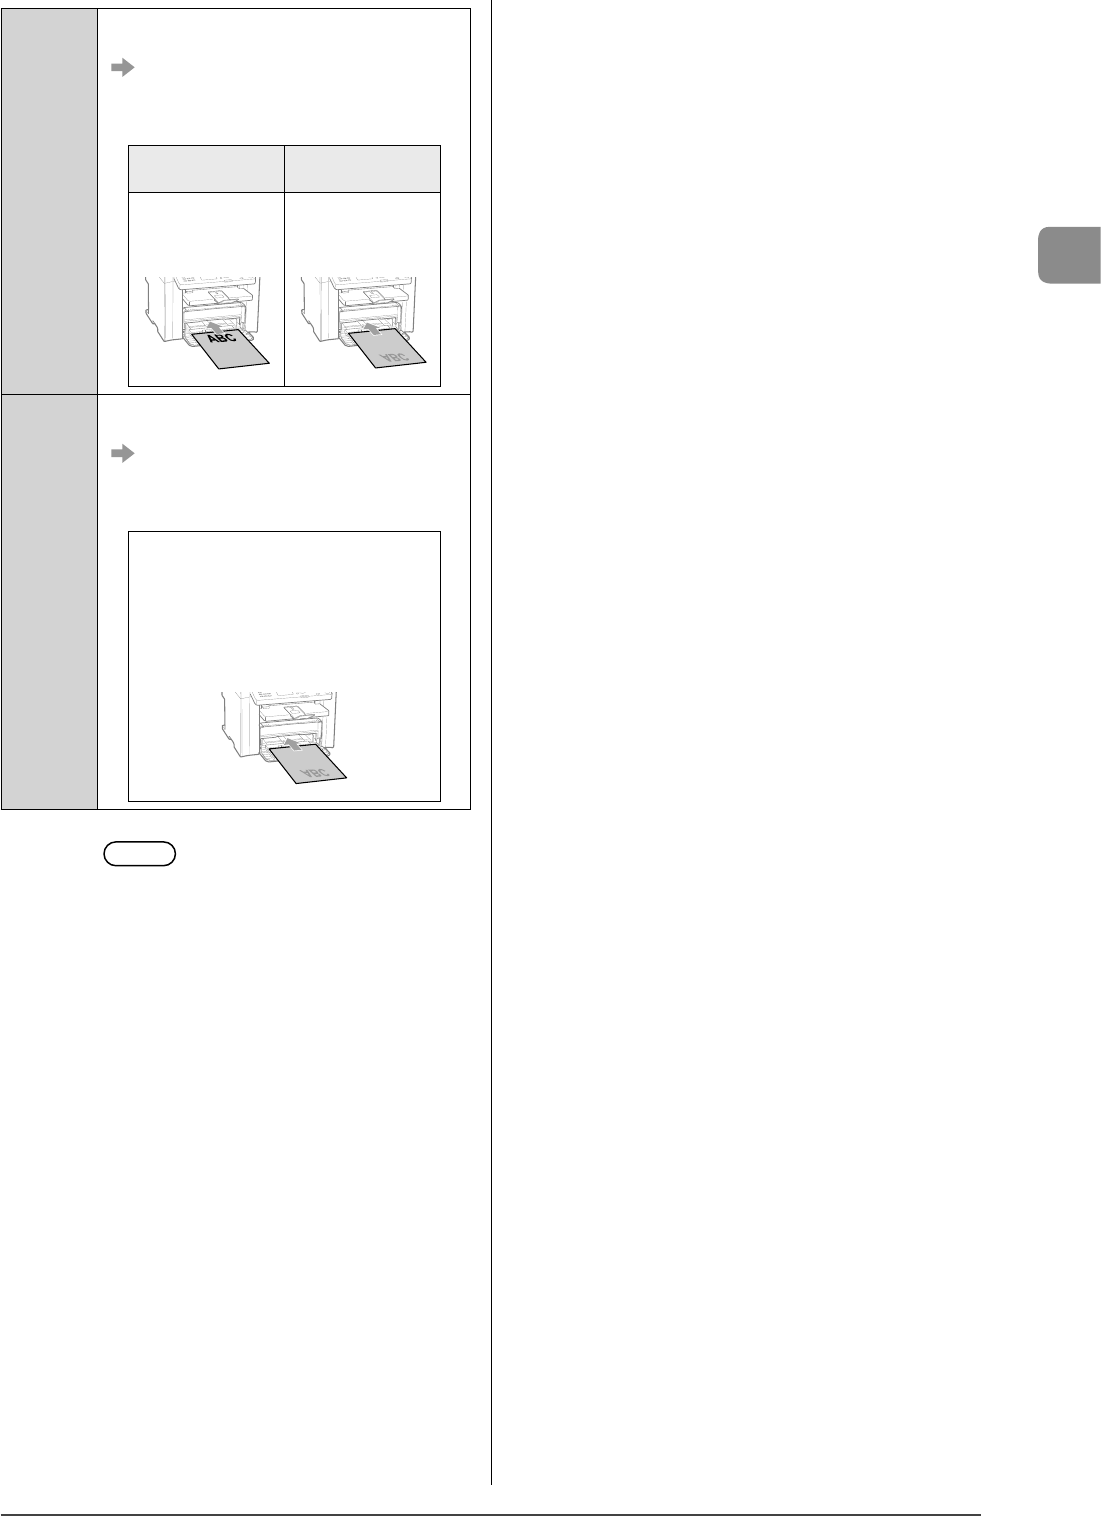
When printing paper with a letterhead or logo
(previously printed paper)
Load the paper as shown below.
(
: Feeding direction)
Portrait layoutLandscape layout
1-sided
printing
*1
(with the printed side
face up)
(with the printed side
face up)
1-sided
printing
*2
(with the printed side
face down)
(with the printed side
face down)
Automatic
2-sided
printing
*3
(with the front side
face down)
(with the front side
face down)
*1
When <Paper Feed Method Switch> is set to
<Print Speed Priority> (the default setting)
“Selecting Print Side (MF4570dn Only)” (→P.2-16)
*2
When <Paper Feed Method Switch> is set to <Print Side Priority>
“Selecting Print Side (MF4570dn Only)” (→P.2-16)
*3
MF4570dn only
Printing on Envelopes
Load envelopes with the front side (non-glued side) facing
up as follows.
(
: Feeding direction)
Envelope, No.10, DL, ISO-C5
Load the envelopes so that the flap is toward the left of the
paper cassette when they are viewed from the front.
Close the flap and
load the envelope.
Envelope ISO-B5
Load the envelopes so that the flap is toward the back of
the paper cassette when they are viewed from the front.
Close the flap and
load the envelope.
2-14
Document and Paper Handling
Whenever you change the paper size and type loaded in the
cassette or tray, follow the procedure in this section to adjust
the paper size and type settings.
IMPORTANT
If the setting is different from the size of the loaded
paper
An error message appears, or printing is not performed correctly.
Keys to be used for this operation
Paper Settings
OK
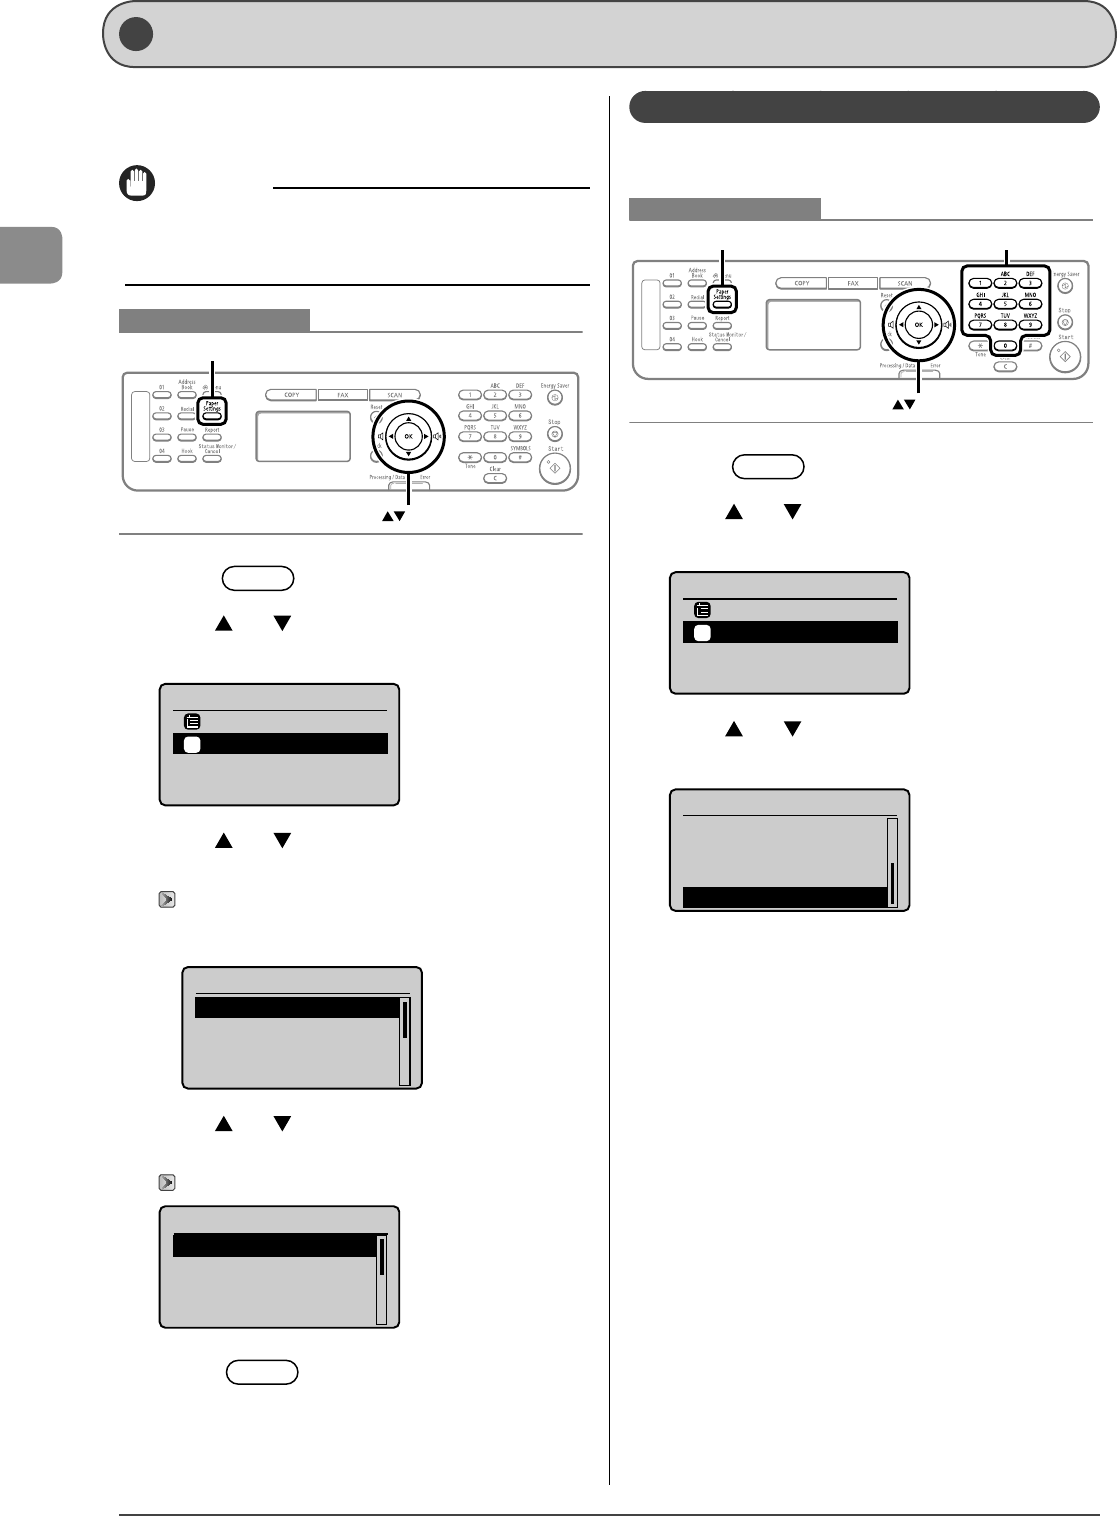
1 Press [] (Paper Settings).
2 Press [] or [] to select <MP Tray> or
<Drawer 1>, and then press [OK].
Paper Settings
MP Tray
Drawer 1
1
3 Press [] or [] to select a paper size, and then
press [OK].
“Paper Requirements” (→P.2-6)
* When registering the custom paper, see “Setting a Custom Paper
Size” (→P.2-14).
Paper Size
LTR
LGL
STMT
EXEC
4 Press [] or [] to select a paper type, and then
press [OK].
“Paper Requirements” (→P.2-6)
Paper Type
Plain (16 lb Bond-24
Plain L (16 lb Bond
...
Recycled
Color
5Press [] (Paper Settings) to close
<Paper Settings> screen.
Setting a Custom Paper Size
To use custom paper, you must specify a paper size and type.
Keys to be used for this operation
Paper Settings
OK
Numeric keys
1 Press [] (Paper Settings).
2 Press [] or [] to select <MP Tray> or
<Drawer 1>, and then press [OK].
Paper Settings
MP Tray
Drawer 1
1
3 Press [] or [] to select <Custom Size>, and
then press [OK].
Paper Size
A4
A5
B5
Custom Size
Setting a Paper Size and Type
2-15
Document and Paper Handling
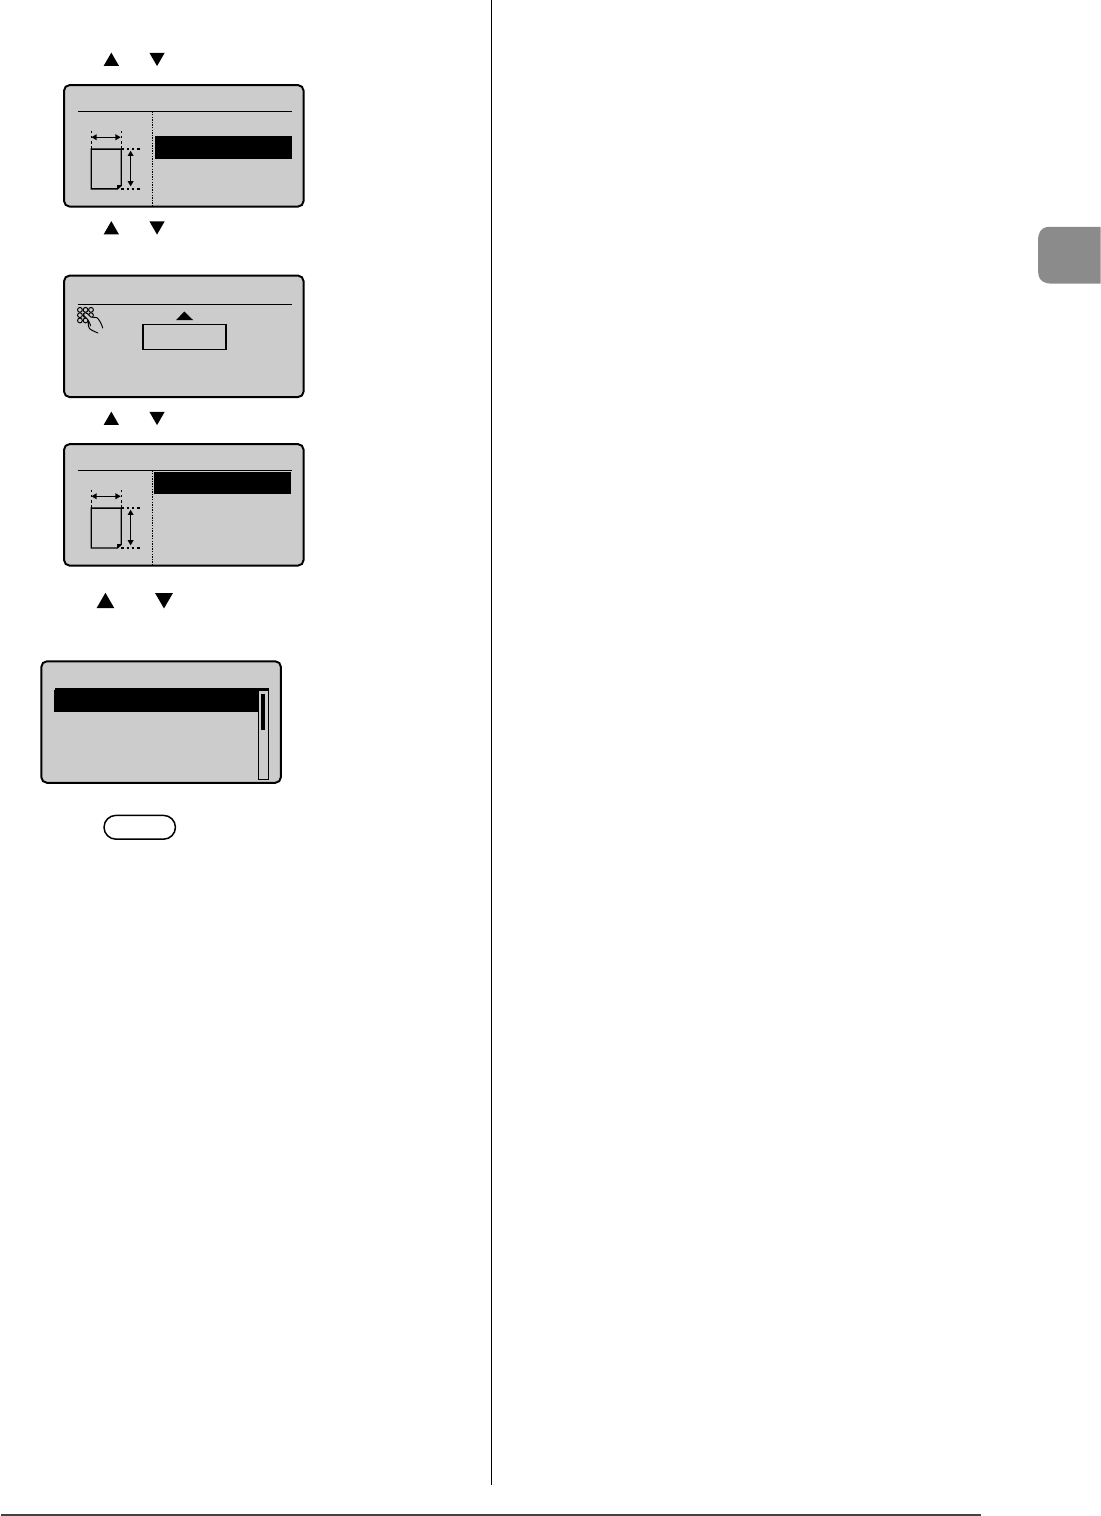
4Specifies the size of <X> direction and <Y>
direction.
(1) Press [] or [] to select the direction, and then press [OK].
Specify Size
<Apply>
X: 0"
Y: 0"
X
Y
(2) Press [] or [] to specify the size, and then press [OK].
You can also enter values using the numeric keys.
Set Length for X
3 "
(3-8_1/2)
(3) Press [] or [] to select <Apply>, and then press [OK].
Specify Size
<Apply>
X: 3"
Y: 8_1/4"
X
Y
5 Press [] or [] to select a paper type, and then
press [OK].
Paper Type
Plain (16 lb Bond-24
Plain L (16 lb Bond
...
Recycled
Color
6 Press [] (Paper Settings) to close <Paper
Settings> screen.
2-16
Document and Paper Handling
You can specify whether to match the sides to be printed for
2-sided printing and 1-sided printing.
Depending on the setting for this item, the side to be printed
changes. When using previously printed paper, read “Paper
Loading Orientation” (→P.2-13) thoroughly to load the paper in
the proper orientation.
When setting this item to <Print Speed
Priority> (the default setting)
Because the sides to be printed for 2-sided printing and
1-sided printing are different, the printing sides do not match.
* When using previously printed paper, you need to switch
the sides of loaded paper between 2-sided printing and
1-sided printing.
1234
1234
1-sided
printing
2-sided
printing
FrontBack
Specify the setting in the following cases.
• When not using previously printed paper
• When performing only 1-sided printing on previously
printed paper
When setting this item to <Print Side
Priority>
The sides to be printed for 2-sided printing and 1-sided
printing match.
* Even when using previously printed paper, you do not
need to switch the sides of loaded paper between 2-sided
printing and 1-sided printing.
1234
1234
1-sided
printing
2-sided
printing
FrontBack
Specify the setting in the following case.
• When performing 2-sided printing and 1-sided printing on
previously printed paper
Keys to be used for this operation
Menu
OK
1 Press [] (Menu).
2 Press [] or [] to select <Preferences>, and
then press [OK].
Menu
Preferences
Timer Settings
Copy Settings
Fax TX Settings
3 Press [] or [] to select <Paper Feed Method
Switch>, and then press [OK].
Preferences
Sound Volume Control
Display Settings
Toner Saver Mode
Paper Feed Method Swi
4 Press [] or [] to select a paper source, and
then press [OK].
Paper Feed Method
Multi-Purpose Tray
Drawer 1
5 Press [] or [] to select <Print Speed Priority>
or <Print Side Priority>, and then press [OK].
Multi-Purpose Tray
Print Speed Priority
Print Side Priority
Selecting Print Side (MF4570dn Only)
2-17
Document and Paper Handling
<Print
Speed
Priority>
When specifying <Print Speed Priority>, load paper
as follows.
(
: Feeding direction)
* For details on the procedure for loading paper
when printing pages of the landscape layout, see
“Paper Loading Orientation” (→P.2-13).
When performing
1-sided printing
When performing
2-sided printing
Load paper with the
printed side face up.
Load paper with the
front side (first page)
face down.
<Print Side
Priority>
When specifying <Print Side Priority>, load paper as
follows.
(
: Feeding direction)
* For details on the procedure for loading paper
when printing pages of the landscape layout, see
“Paper Loading Orientation” (→P.2-13).
The procedure for loading paper is the same
for 2-sided printing and 1-sided printing.
• When performing 1-sided printing, load
paper with the printed side face down.
• When performing 2-sided printing, load
paper with the front side (first page) face
down.
6 Press [] (Menu) to close the menu
screen.
2-18
Document and Paper Handling
3-1
Chapter
3
Copying
This category describes the copying features.
Basic Copying Method 3-2
Checking and Canceling Copy Jobs 3-3
Canceling using the Stop Key 3-3
Checking and Canceling using the Status
Monitor/Cancel Key 3-3
Copy Settings 3-4
Adjusting the Density 3-4
Selecting Image Quality (Copy) 3-4
2-Sided Copying (MF4570dn Only) 3-5
Enlarging/Reducing Copies 3-6
Multiple Documents onto One Sheet (N on 1) 3-6
Collating Copies 3-7
Emphasize the Outline of an Image (Sharpness) 3-7
Copying an ID Card 3-8
Changing the Default Values 3-9
3-2
Copying
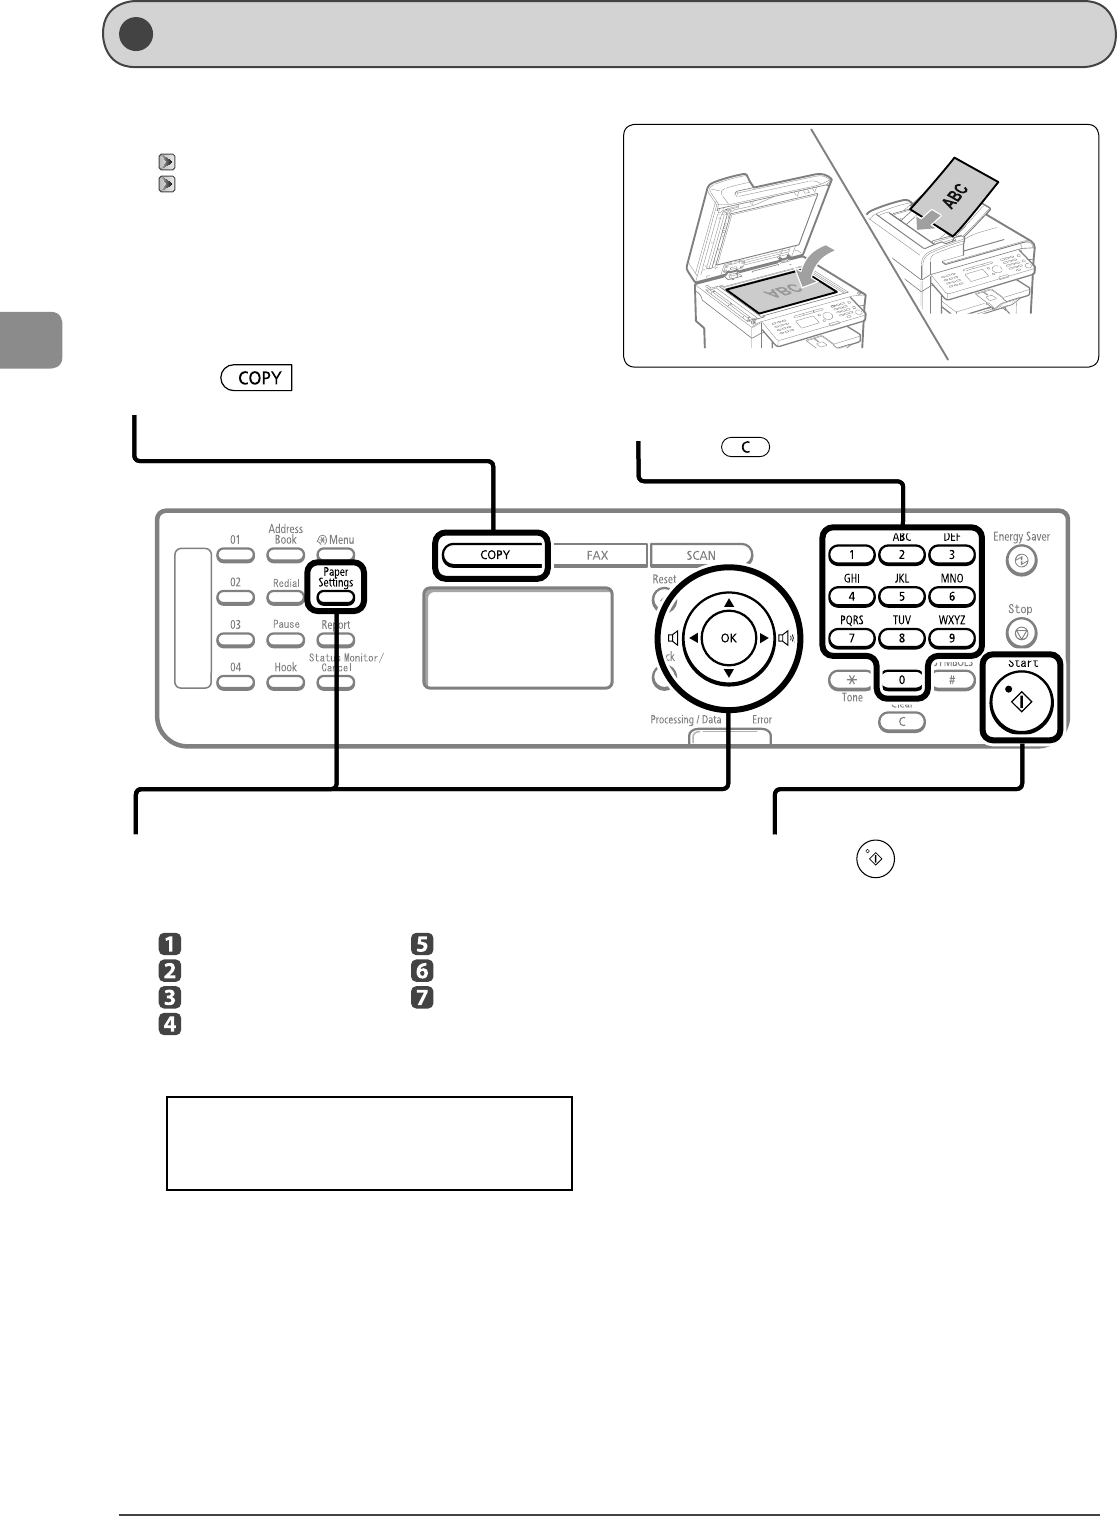
This section describes the basic procedure for copying.
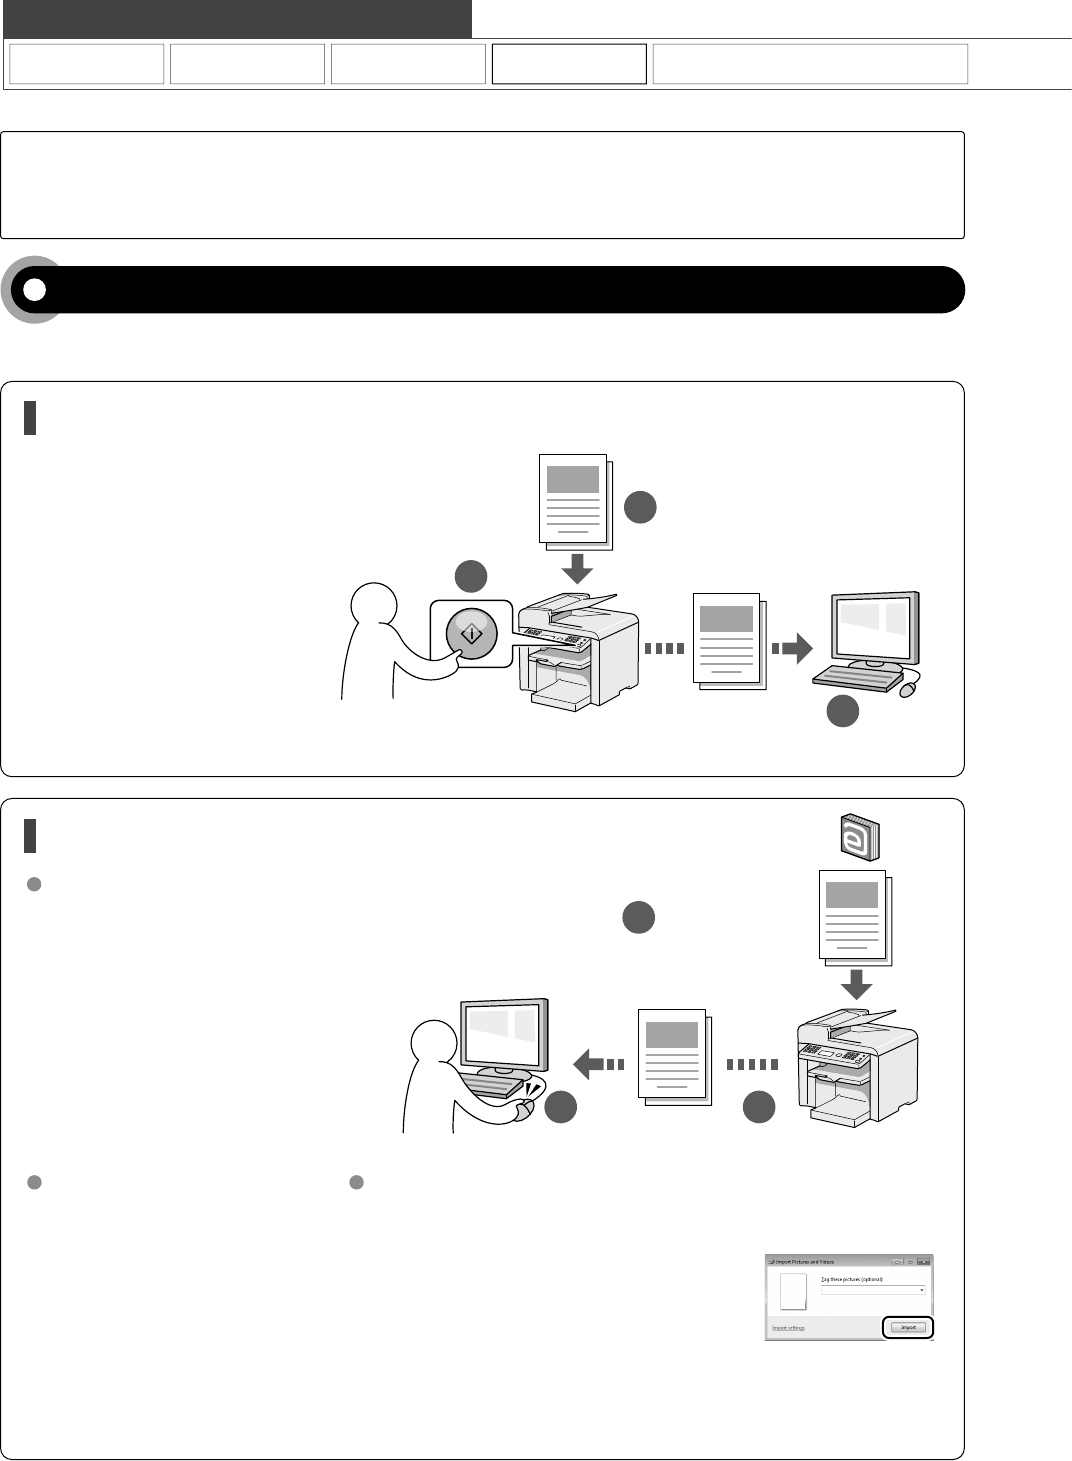
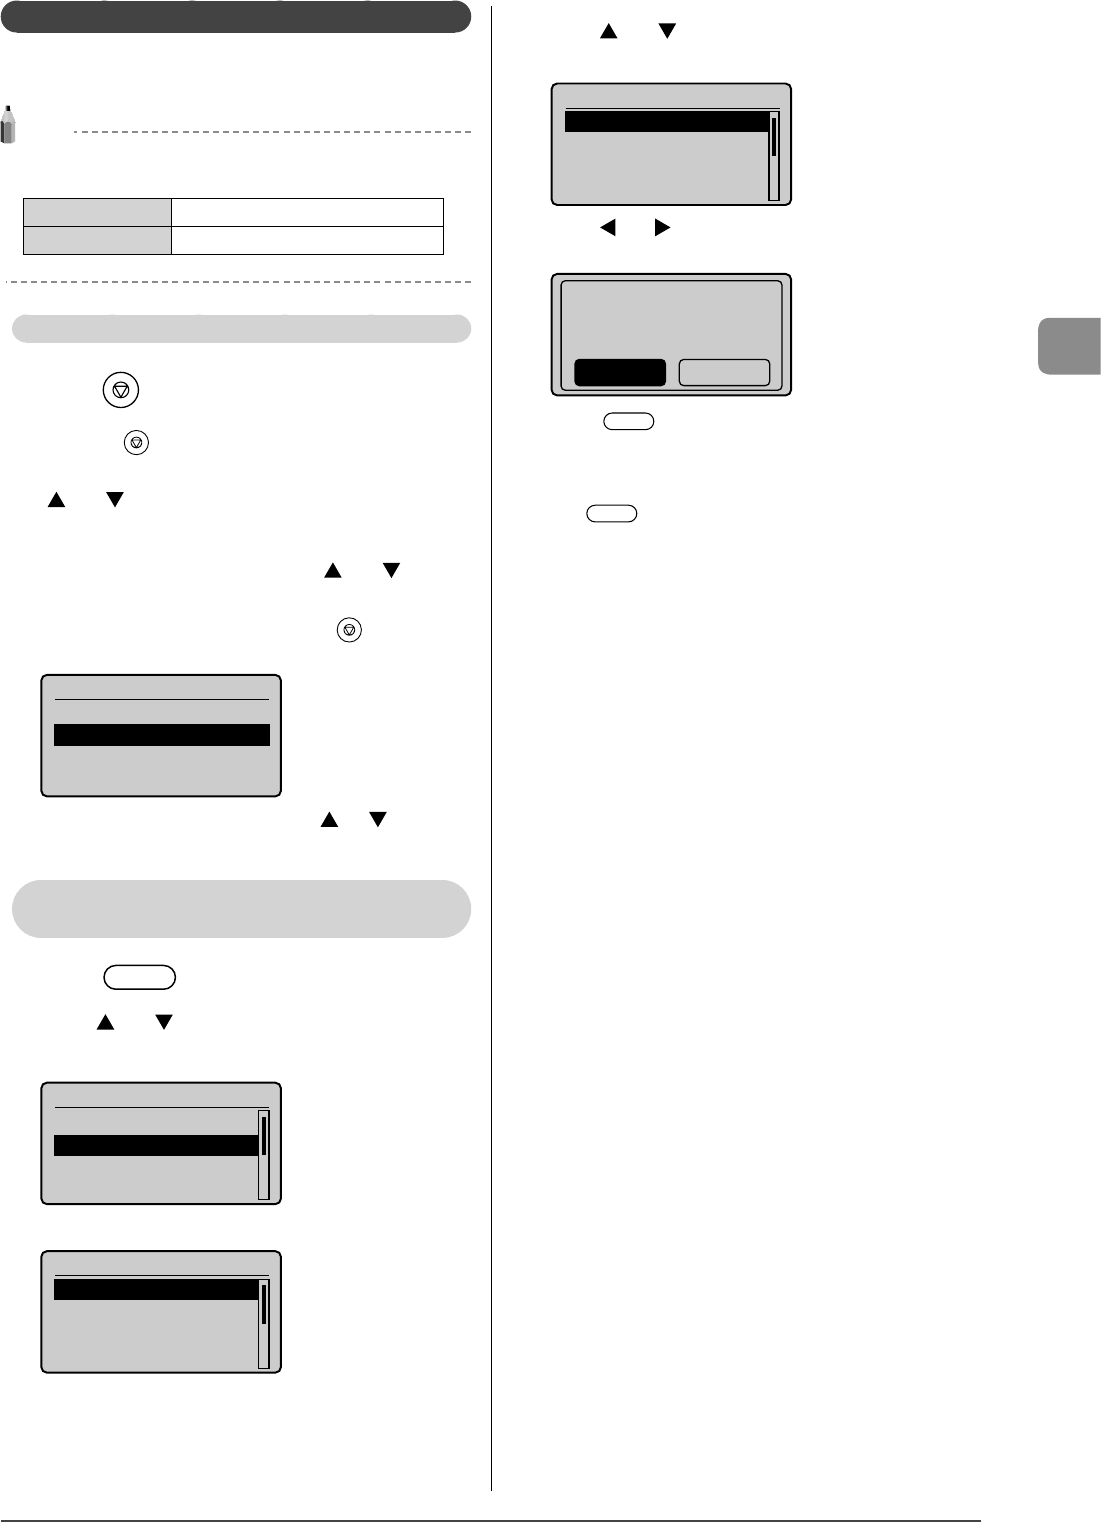
1
Place documents.
“Placing Documents” (→P.2-4)
“Document Requirements ” (→P.2-2)
* A maximum of 35 pages can be loaded into the feeder.
2
Press [].
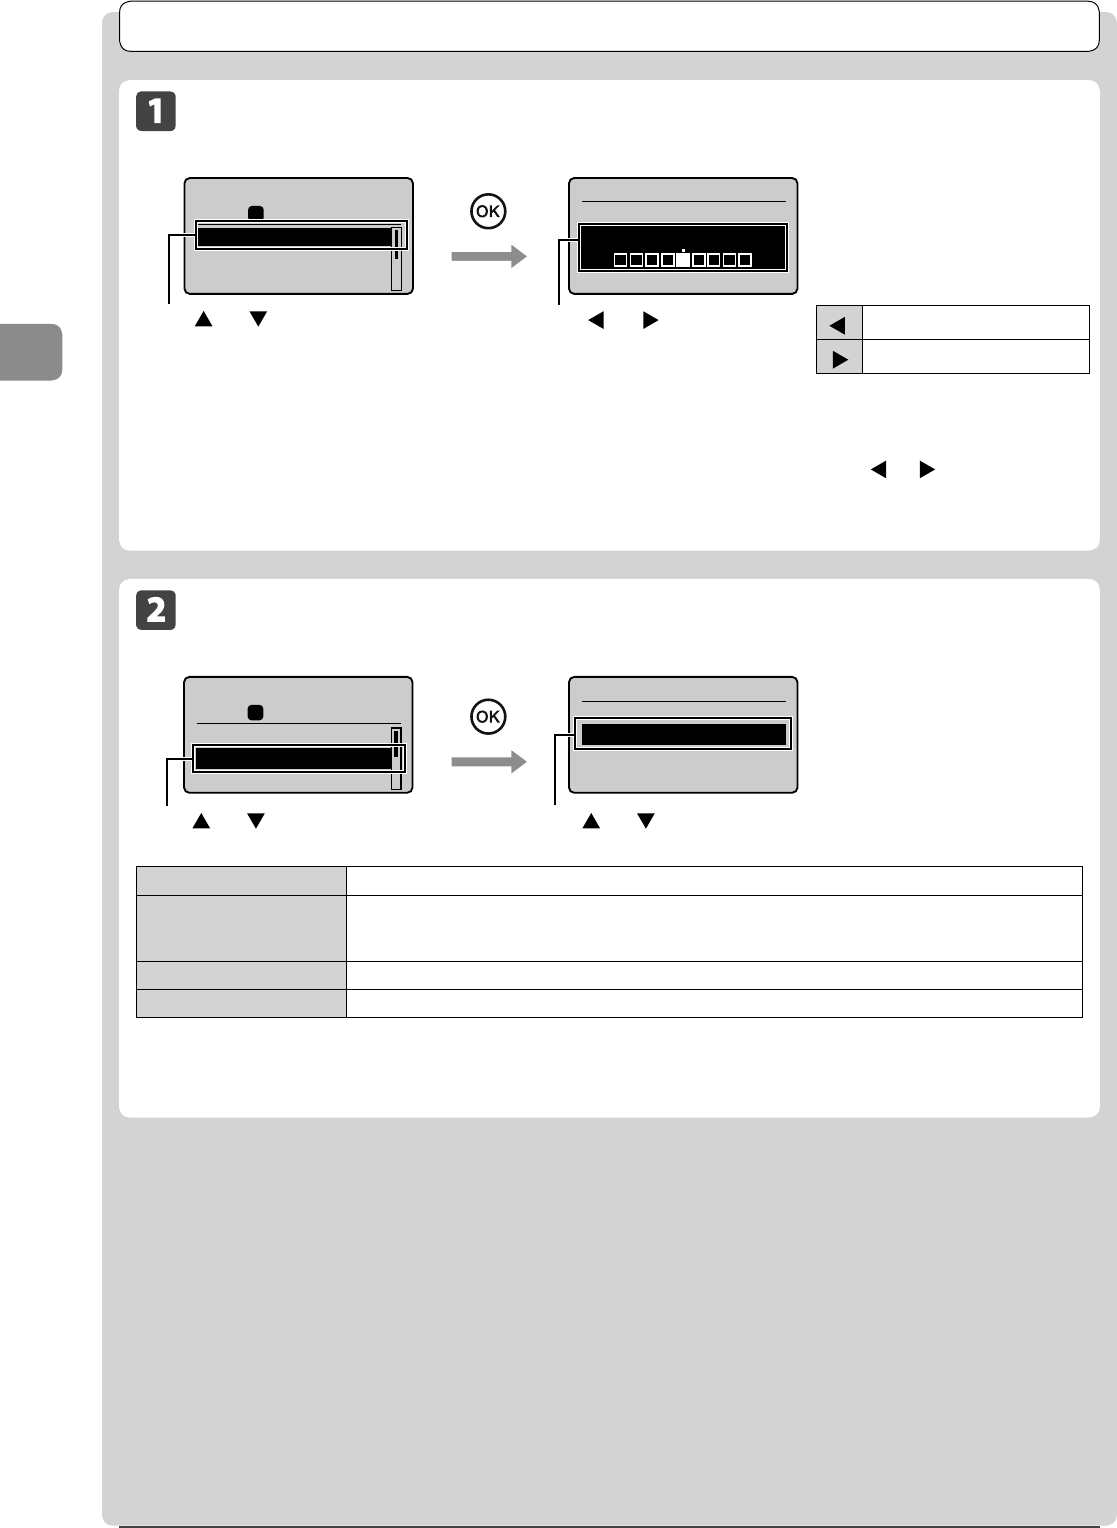
3
Specify the copy settings as needed.
You can specify up to 7 items.
(for details, see P.3-3 to P.3-6 .)
Density
Image quality
2-Sided (MF4570dn only)
Enlarged/reduced
Reduced layout
Collating
Sharpness
The settings that are specified here apply only to
copy operation which you are currently performing.
To apply the valid settings for all copy operations, see
“Changing the Default Values” (→P.3-9).
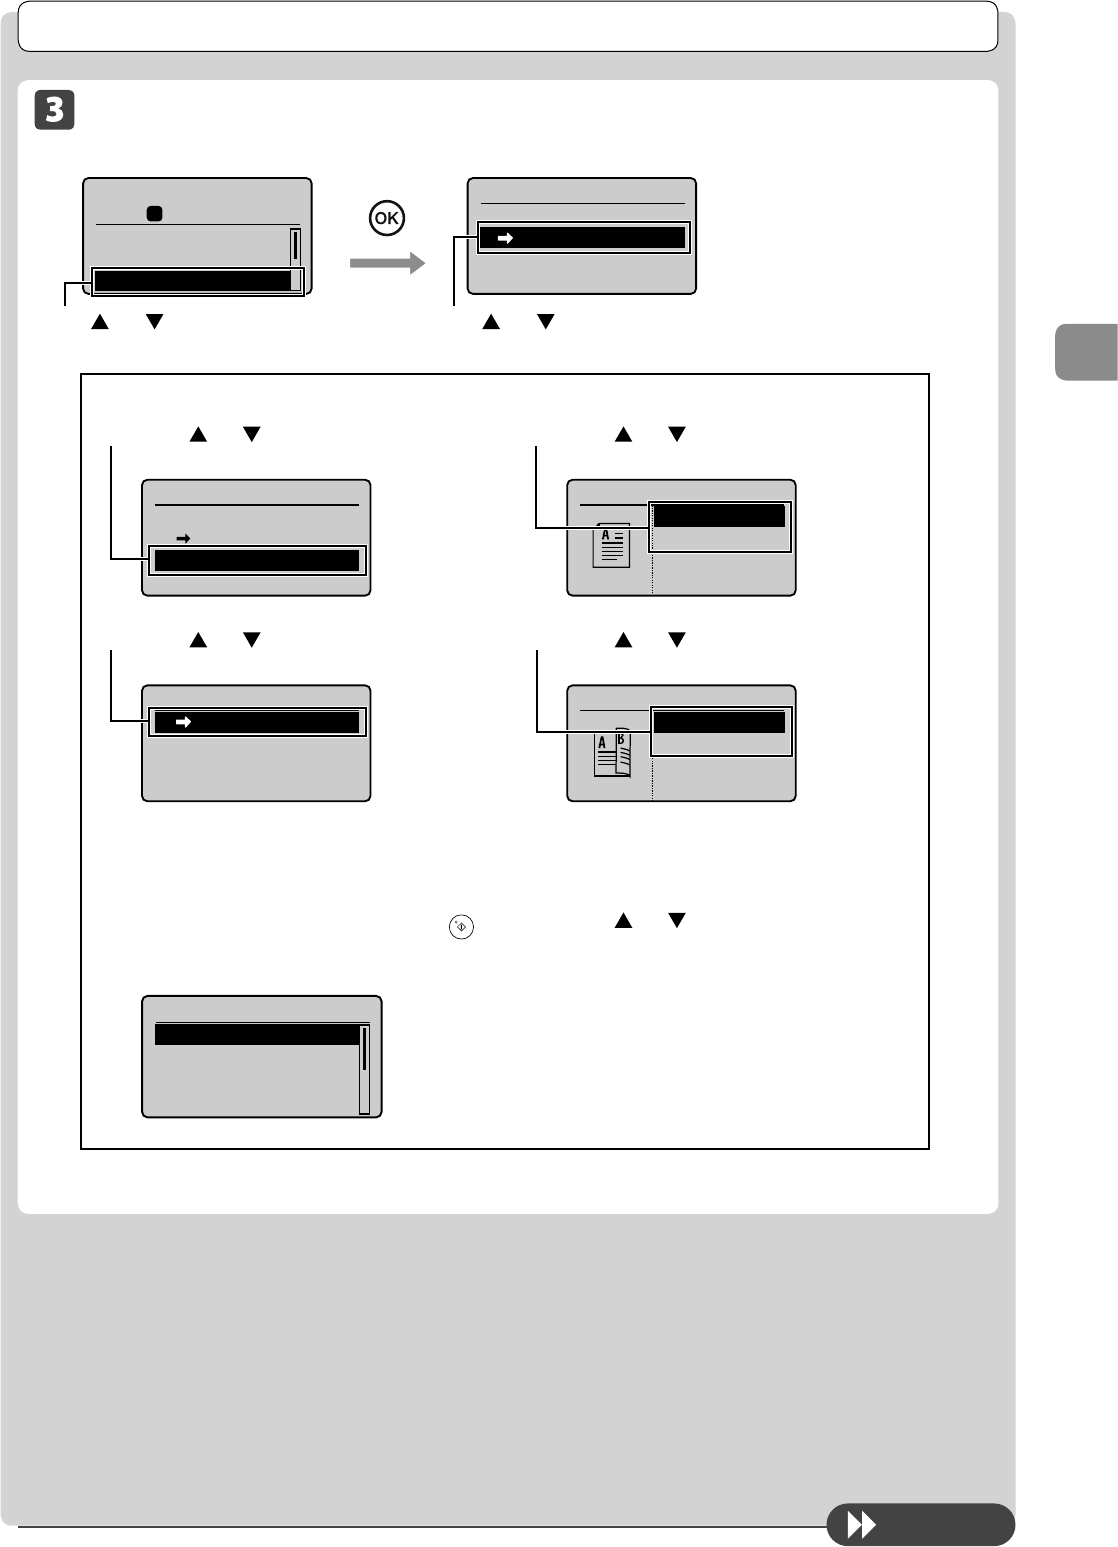
4
Use numeric keys to enter the desired copy
quantity (1 to 99).
* Press [] (Clear) to delete a number.
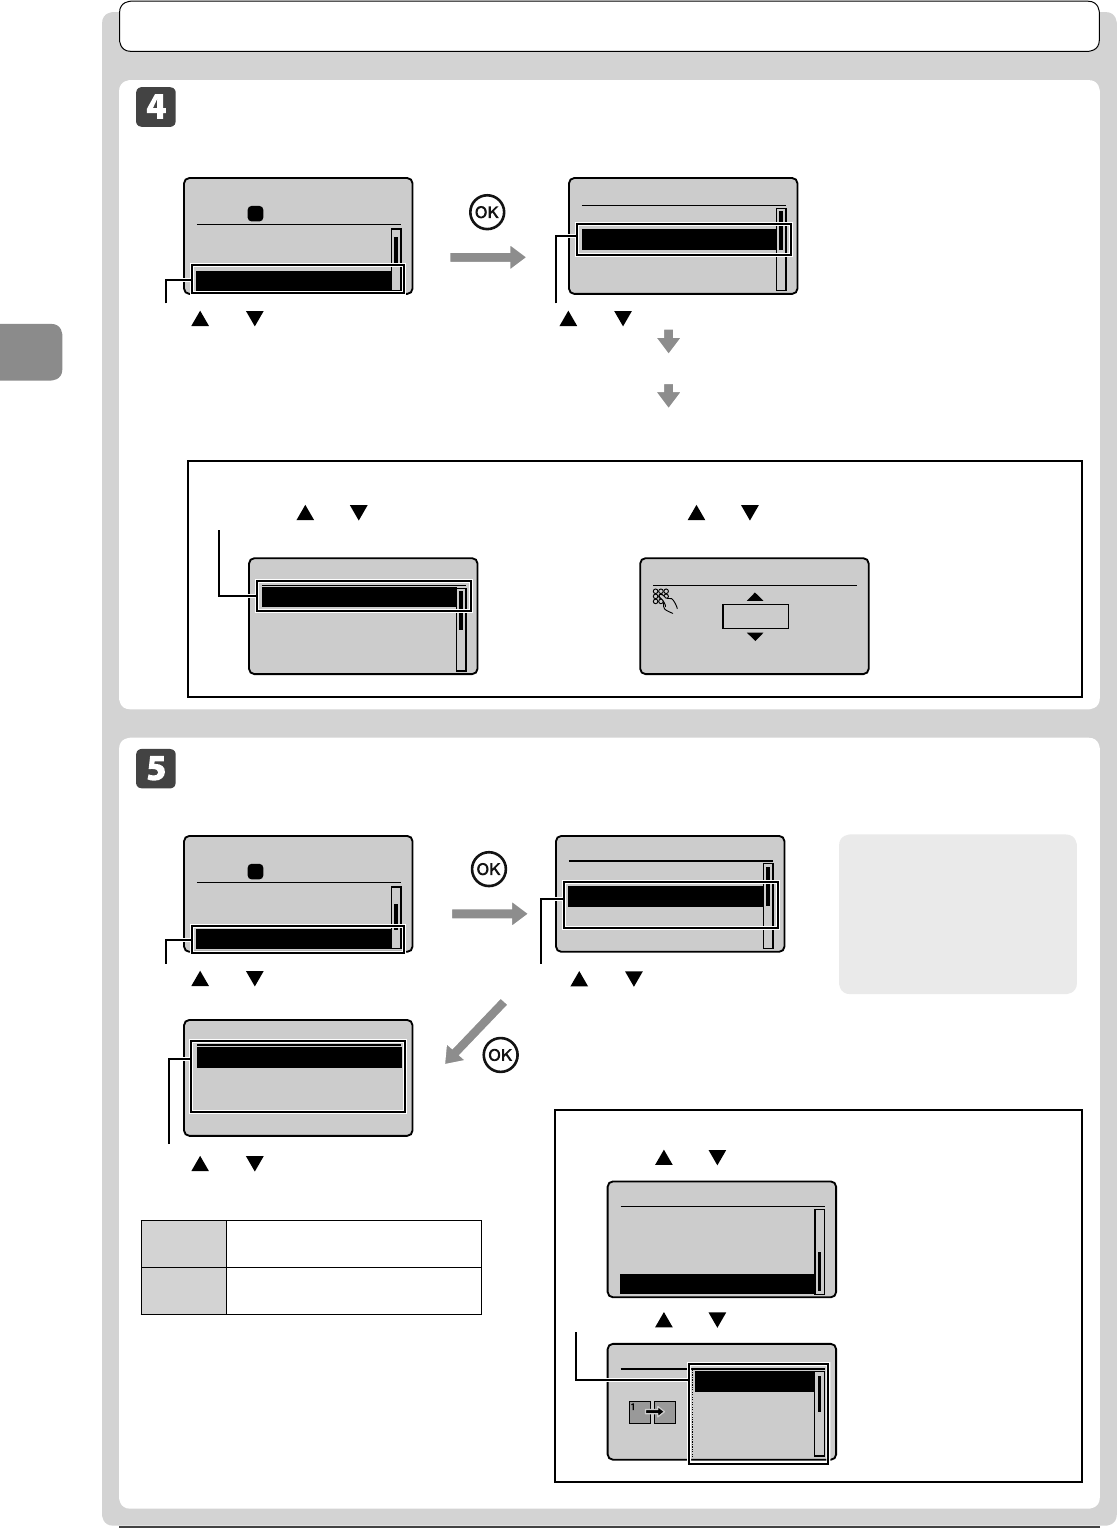
5
Press [] (Start).
Basic Copying Method
3-3
Copying
Checking and Canceling Copy Jobs
You can check detailed information about copy jobs. Also, you
can cancel copy jobs while the jobs are in process.
NOTE
If the processing/Data indicator on the operation panel
is:
Turned on/blinkingA job is being processed.
Turned offNo jobs are in the memory.
Canceling using the Stop Key
1 Press [] (Stop).
* If only one job is processing or waiting, you can stop the job by
pressing [] (Stop) twice.
2When multiple jobs are being processed, press
[] or [] to select a job to be canceled, and then
press [OK].
3When <Cancel?> appears, press [] or [] to
select <Yes>, and then press [OK].
You can cancel the print job also by pressing [] (Stop).
The copy job is canceled.
Cancel?
<No>
<Yes>
Details
* To check the job before canceling, press [] or [] to select
<Details>, and then press [OK].
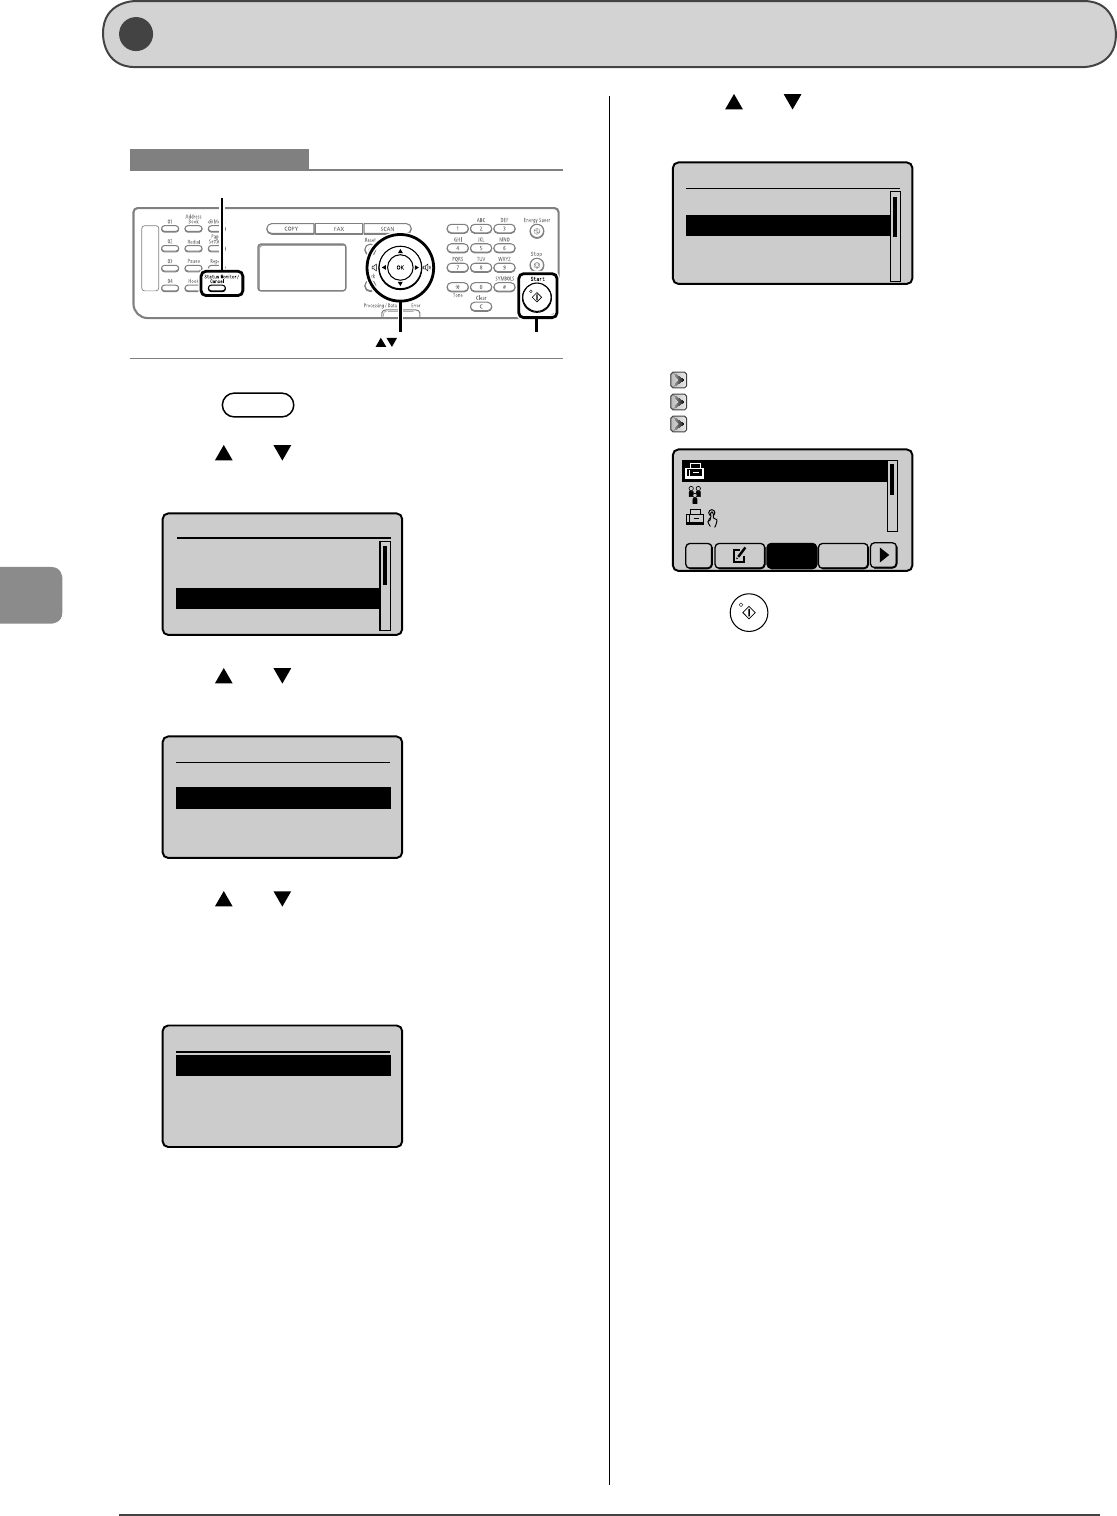
Checking and Canceling using the Status
Monitor/Cancel Key
1 Press [] (Status Monitor/Cancel).
2 Press [] or [] to select <Copy Job Status>, and
then press [OK].
Status Monitor/Cancel
Device Status
Copy Job Status
Fax Job Status/Hist
...
Print Job Status
The detailed information is displayed.
Copy Job Status
<Cancel>
Job Number: 0001
Status: Copying
Time: 01/01 12:52 AM
● For canceling
(1) Press
[] or []
to select <Cancel>, and then press
[OK].
Copy Job Status
<Cancel>
Job Number: 0001
Status: Copying
Time: 01/01 12:52 AM
(2) Press [] or [] to select <Yes>, and then press [OK].
The copy job is canceled.
Cancel?
NoYes
(3) Press [] (Status Monitor/Cancel) to close the
screen.
● For checking only
Press [
] (Status Monitor/Cancel) to close the screen.
3-4
Copying
Copy Settings
Adjusting the Density
Copy mode screen Setting screen
Copy: Press Start
100% LTR
Density: 0
Original Type: Text
...
2-Sided: Off
1
+
-
01
Density
Auto Density
Manual Density
- +
Press [] or [] to adjust the
density → [OK]
* Select <Auto Density> to copy with the density that is suitable for the
document. If other than <Text> is set as <Original Type>, <Original Type> will
be changed to <Text> when you select <Auto Density>.
* You can adjust <Manual Density> by pressing [] or [], when either of
<Auto Density> or <Manual Density> is selected.
[
]
Makes the copy density lighter.
[
]
Makes the copy density darker.
Press [] or [] to select
<Density>
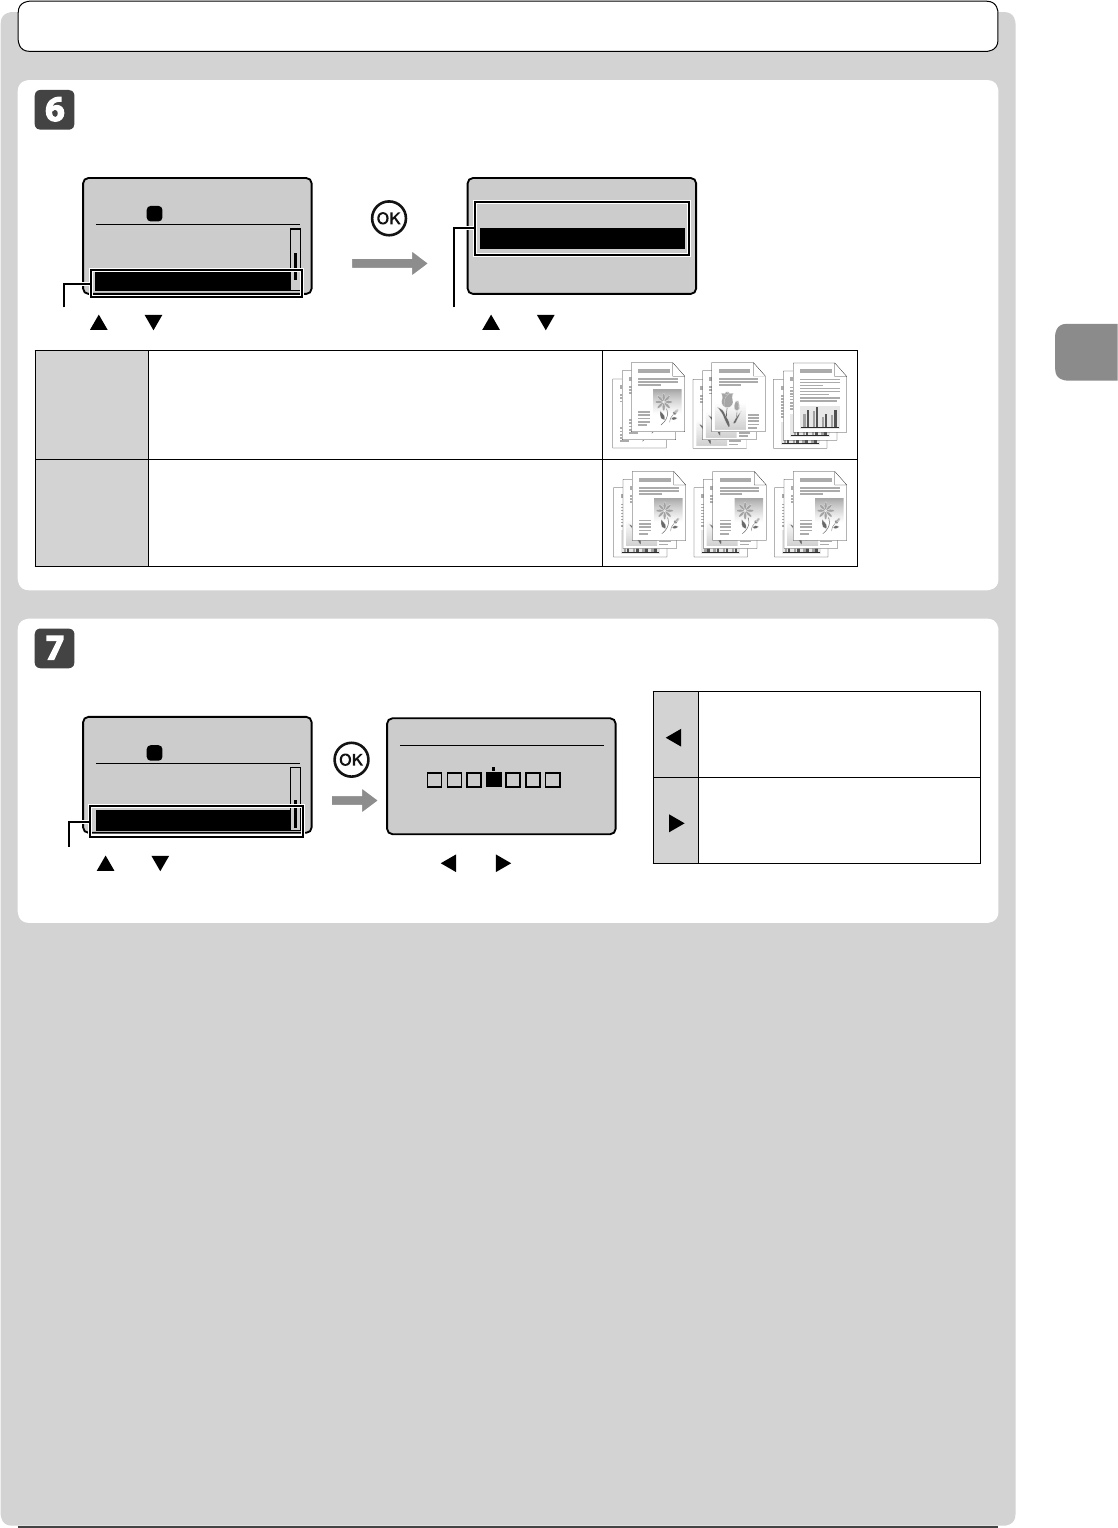
Selecting Image Quality (Copy)
Copy mode screen Setting screen
Copy: Press Start
100% LTR
Density: 0
Original Type: Text/
2-Sided: Off
1
+
-
01
Original Type
Text
Text/Photo (High Spee
Text/Photo
Photo
<Text>This setting is suitable for documents that contain text without photos or illustrations.
<Text/Photo (High Speed)>
This setting is suitable for documents that contain text and photos. This setting scans the document at a low
resolution.
This setting scans the document at a low resolution.
<Text/Photo>This setting is suitable for documents that contain text and photos.
<Photo>This setting is suitable for the documents that contain photos printed in a magazine.
Press [] or [] to select the appropriate settings
for the document → [OK]
Press [] or [] to select <Original
Type>
* If <Density> is set to <Auto Density>, <Density> will be changed to <Manual Density> when you select <Text/Photo (High Speed)>,
<Text/Photo>, <Photo>.
3-5
Copying
Copy Settings
To next page
2-Sided Copying (MF4570dn Only)
Copy mode screen Setting screen
Copy: Press Start
100% LTR
Density: 0
Original Type: Text
...
2-Sided: Off
1
+
-
01
2-Sided
Off
1 2-Sided
Format Settings
Press [
] or [] to select <1→2-Sided> → [OK]
Press [] or [] to select
<2-Sided>
If you want to specify 2-Sided copying format
(1) Press [
] or [] to select <Format Settings>
→ [OK]
2-Sided
Off
1 2-Sided
Format Settings
(2) Press [ ] or [] to select <1 → 2-Sided>
→ [OK]
Format Settings
1 2-Sided
(3) Press [ ] or [] to select the orientation of
the document → [OK]
Original Orientation
Portrait
Landscape
(4) Press [ ] or [] to select the finishing
format → [OK]
Finishing Format
Book Type
Calendar Type
If you place documents on the platen glass
(1) Place the next document, and the press [
]
(Start).
* Repeat the procedure until all documents are scanned.
Scan Next: Press Start
<Start Copying>
<Cancel>
SheetxCopy:001x01
Density: 0
+
-
(2) Press [ ] or [] to select <Start Copying>,
and then press [OK].
3-6
Copying
Copy Settings
Enlarging/Reducing Copies
Copy mode screen Setting screen
Copy: Press Start
100% LTR
Original Type: Text
...
2-Sided: Off
Copy Ratio: 100% Dir
1
01
Copy Ratio
Custom Ratio
100% Direct
400% Max
200%
Press [
] or [] to select the copy ratio → [OK]
Load paper of the output size (→P.2-9)
Register the output paper size (→P.2-14)
For the preset zoom, you can select
from the following setting values.
• 100% Direct • 50%
• 400% Max • 25% Min
• 200%
• 129% STMT → LTR
• 78% LGL → LTR
• 64% LTR → STMT
For custom ratio
(1) Press [
] or [] to select <Custom Ratio>
→ [OK]
Copy Ratio
Custom Ratio
100% Direct
400% Max
200%
(2) Press [ ] or [] to specify the ratio → [OK]
You can also enter the copy ratio using the numeric keys.
Custom Ratio
100 %
(25-400)
Press [] or [] to select <Copy
Ratio>
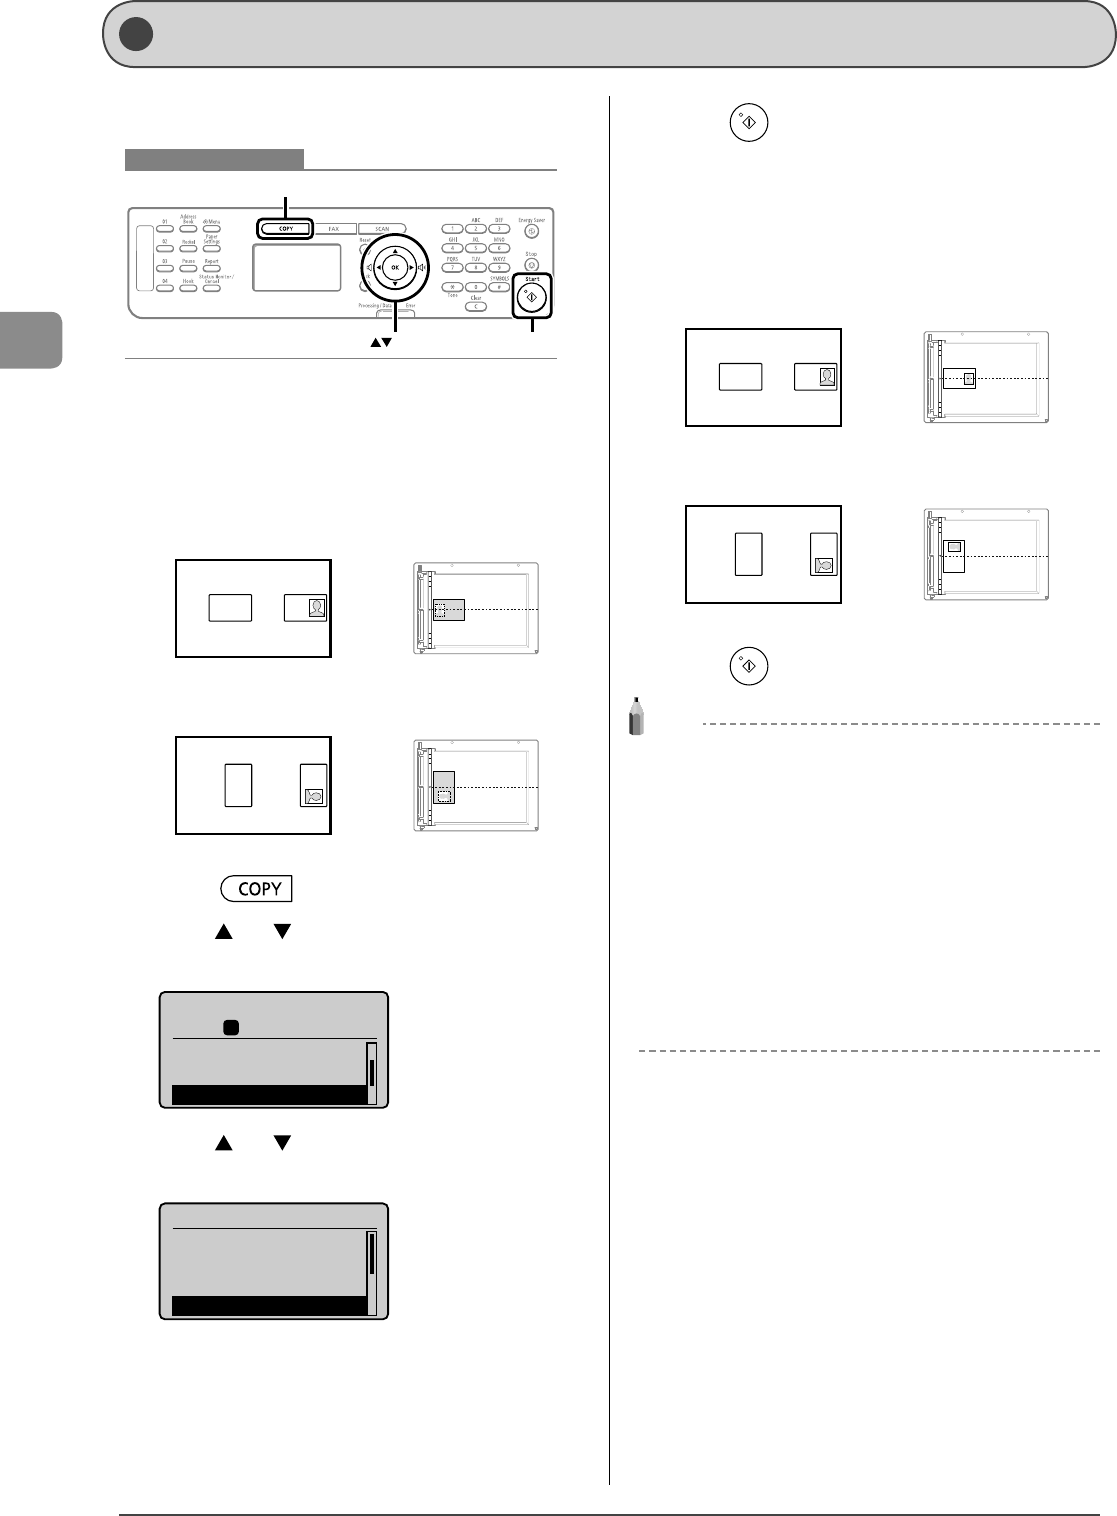
Multiple Documents onto One Sheet (N on 1)
Copy mode screen Setting screen
Copy: Press Start
100% LTR
2-Sided: Off
Copy Ratio: 100% Di
...
N on 1: Off
1
01
N on 1
Off
2 on 1
4 on 1
ID Card Copy
Scan Size
LTR
LGL
STMT
Press [
] or [] to select
<2 on 1> or <4 on 1>
Press [
] or [] to select the size of the
original document → [OK]
Press [] or [] to select <N on 1>
About margins among
documents
When you copy in an N
on 1 layout, margins are
created among the reduced
documents.
When specifying the layout
(1) Press [
] or [] select <Select Layout> → [OK]
N on 1
2 on 1
4 on 1
ID Card Copy
Select Layout
(2) Press [] or [] select the layout → [OK]
Select Layout
2 on 1 (1)
2 on 1 (2)
4 on 1 (1)
4 on 1 (2)
<2 on 1>
Reduce two-page documents to fit
on one sheet of paper.
<4 on 1>
Reduce four-page documents to fit
on one sheet of paper.
3-7
Copying
Copy Settings
Collating Copies
Copy mode screen Setting screen
Copy: Press Start
100% LTR
Copy Ratio: 100% Di
...
N on 1: Off
Collate: Off
1
01
Collate
Off
On
<Off>
Printouts of a complete job are grouped.
For example, if you are copying three copies of a three-page
document, printouts of a complete job are grouped and arranged
in this page order: “1, 1, 1”, “2, 2, 2”, “3, 3, 3”.
<On>
Printouts of a complete job are collated.
For example, if you are printing three copies of a three-page
document, printouts of a complete job are grouped and arranged
in this page order: “1, 2, 3”, “1, 2, 3”, “1, 2, 3”.
Press [] or [] to select <On> → [OK]
Emphasize the Outline of an Image (Sharpness)
Copy mode screen Setting screen
Copy: Press Start
100% LTR
N on 1: Off
Collate: Off
Sharpness: 0
1
01
+
-
Sharpness
- +
[
]
Reduces distorted pattern (moire).
It is appropriate for documents that
contain halftone such as printed
photos.
[
]
Raise the sharpness and emphasize the
outline of text or lines.
It is appropriate for documents which
are blueprints or thinly penciled.
Press [] or [] to select
<Sharpness>
Press [
] or [] to adjust the
sharpness → [OK]
Press [] or [] to select <Collate>
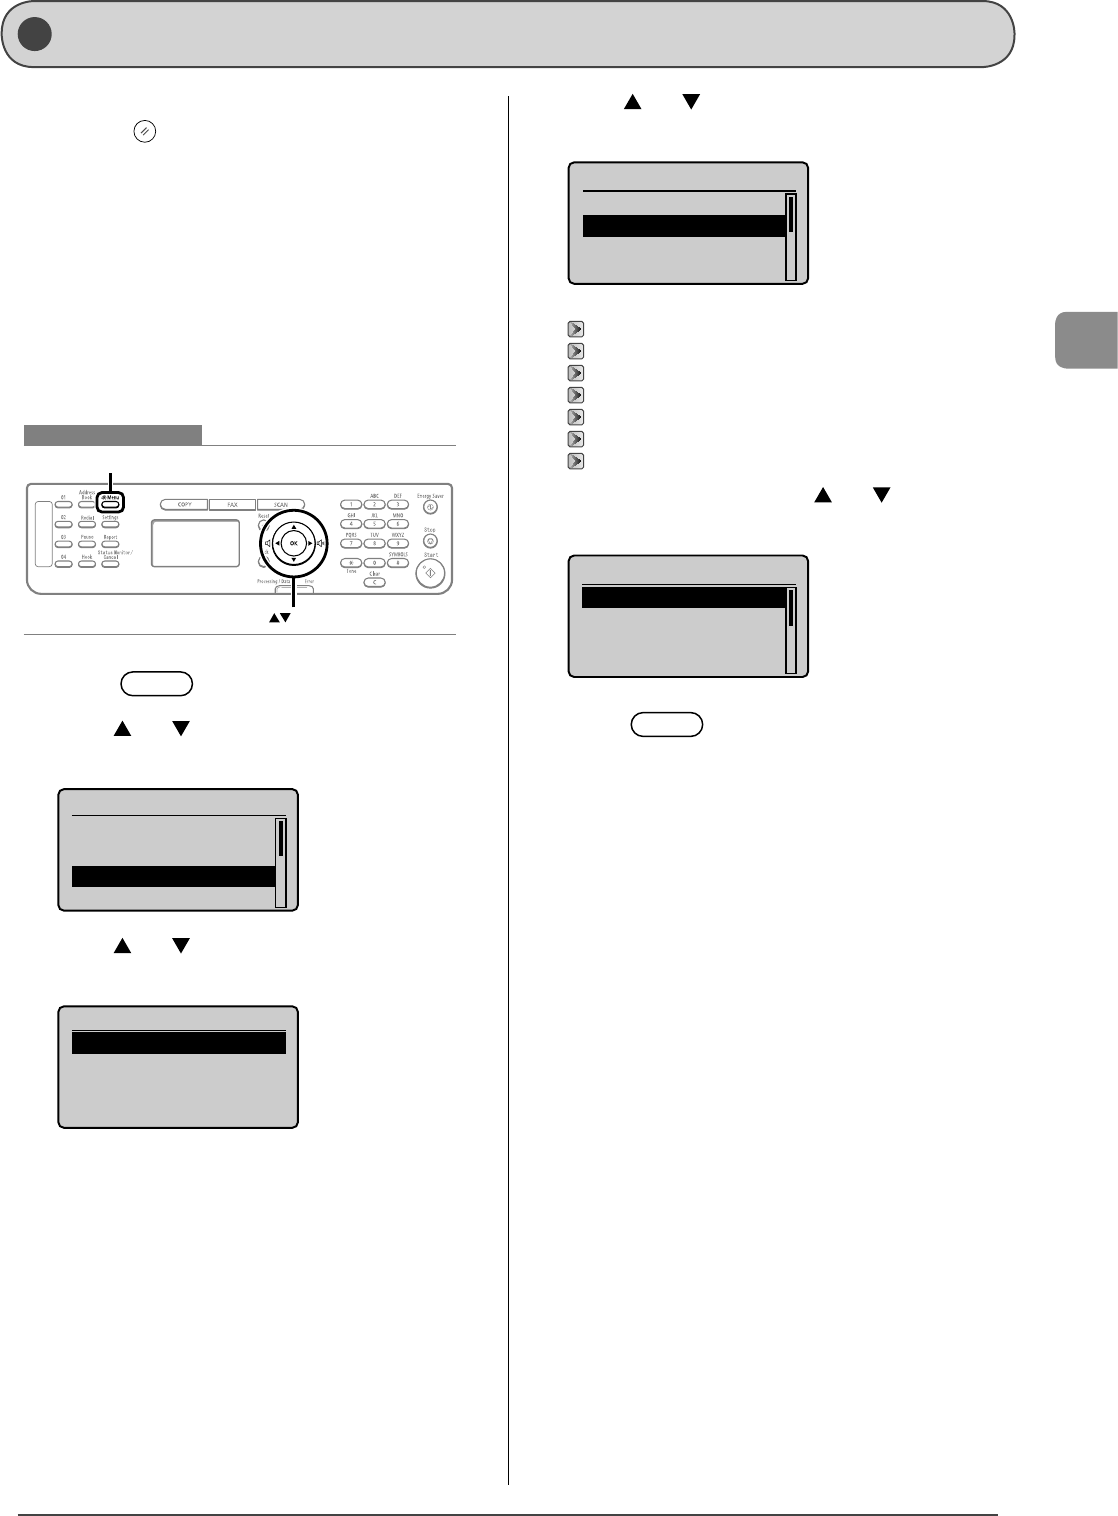
3-8
Copying
You can make a copy of a 2-sided card onto one side of a
paper.
Keys to be used for this operation
Start
COPY
OK
1Place a card on the platen glass, and then close
the feeder.
Place the card with a 1/4” (5 mm) space created from the left edge
of the platen glass.
Additionally, align the center of the card with the arrow mark.
If you want to arrange the cards horizontally
A4
B4
A5
A5
B4
A4
If you want to arrange the cards vertically
A4
B4
A5
A5
B4
A4
2 Press [].
3 Press [] or [] to select <N on 1>, and then
press [OK].
Copy: Press Start
100% LTR
2-Sided: Off
Copy Ratio: 100% Di
...
N on 1: Off
1
01
4 Press [] or [] to select <ID Card Copy>, and
then press [OK].
N on 1
Off
2 on 1
4 on 1
ID Card Copy
5 Press [] (Start).
After scanning the document completely, proceed to the next step.
6Turn and place the card.
Place the card with a 1/4” (5 mm) space created from the left edge
of the platen glass.
Additionally, align the center of the card with the arrow mark.
If you want to arrange the cards horizontally
A4
B4
A5
A5
B4
A4
If you want to arrange the cards vertically
A4
B4
A5
A5
B4
A4
7 Press [] (Start).
NOTE
Placing a document (card)
Place a card on the left half of the platen glass.
Copy ratio
The copy ratio will automatically be set to <100%>.
Usable paper size
A size larger than A4 or Letter
Unavailable functions in combination
You cannot use an ID card copy together with the following
functions.
• 2 on 1/4 on 1
• Collating
• 2-Sided
• Copy ratio
Copying an ID Card
3-9
Copying
The default values of the copy are the function which is
applied when [
] (Reset) is pressed or the power is turned
ON. You can change the default values to suit your needs.
You can register the following types of settings as the default
values.
• Quantity
• Density
• Original type
• 2-Sided
• Copy ratio
• N on 1
• Collating
• Sharpness
Keys to be used for this operation
Menu
OK
1 Press [] (Menu).
2 Press [] or [] to select <Copy Settings>, and
then press [OK].
Menu
Preferences
Timer Settings
Copy Settings
Fax TX Settings
3 Press [] or [] to select <Change Defaults>, and
then press [OK].
Copy Settings
Change Defaults
Correct Density
4 Press [] or [] to select a setting item, and then
press [OK].
Change Defaults
<Apply>
No. of Copies: 01
Density: 0
Original Type: Text...
+
-
For details on the settings, see the following items.
“Adjusting the Density” (→P.3-4)
“Selecting Image Quality (Copy)” (→P.3-4)
“2-Sided Copying (MF4570dn Only)” (→P.3-5)
“Enlarging/Reducing Copies” (→P.3-6)
“Multiple Documents onto One Sheet (N on 1)” (→P.3-6)
“Collating Copies” (→P.3-7)
“Emphasize the Outline of an Image (Sharpness)” (→P.3-7)
5After you are finished press [] or [] to select
<Apply>, and then press [OK].
Change Defaults
<Apply>
No. of Copies: 01
Density: 0
Original Type: Text...
+
-
6 Press [] (Menu) to close the menu
screen.
Changing the Default Values
3-10
Copying
4-1
Chapter
4
Printing from a Computer
This category describes how to print from computers.
* If you are a Macintosh user, see the following.
• To install the Print Driver
→ Starter Guide or Print Driver Guide
• To view how to use each function
→ Print Driver’s Help
To view how to display the Print Driver Guide or Print Driver’s Help, see “For Macintosh Users” (→P.11-4).
Installing the Printer Driver 4-2
Printing from a Computer 4-3
Scaling Documents 4-3
Printing Multiple Pages on One Sheet 4-3
2-sided Printing (MF4570dn Only) 4-4
Checking and Canceling Print Jobs 4-5
4-2
Printing from a Computer
The following procedures are required as the preparations for printing.
Step 1
Select USB or network connection.
Starter Guide → 4 Connecting to a Computer and
Installing the Drivers
Step 2
Install the printer driver.
NOTE
When changing the port number of the machine
Change the port number of the machine.
e-Manual → Security → Restricting Network Connection → Setting the Print Port Number
Change the computer settings.
e-Manual → Network Settings → Setting Up a Computer for Printing/Sending a Fax → Specifying Computer Settings
About the printer driver
The printer driver is software required for printing from an application. The printer driver will convert application software’s print data to print data
for the printer.
The printer driver for this machine has the following features.
• The printer driver for this machine enables you to output print data at an optimum speed by dividing the workload using a computer and the
printer.
• As well as providing faster and more stable printing than conventional models, the printer driver for this machine uses less memory to operate.
• In addition to the conversion of print data, the printer driver for this machine is equipped with the functions capable of spooling print data and
configuring the print condition, and various types of print finishing can be set such as scaling or gutter adjustment.
Installing the Printer Driver
4-3
Printing from a Computer
Scaling Documents
You can enlarge or reduce documents to match the output
paper size.
There are two methods for scaling a document: select the
output size of the document to scale it automatically, or
specify the scaling value manually.
1Click [Page Setup].
For instructions on how to display the printer driver screen, see
“Printing” or “Configuring the Default Print Settings” in the e-Manual.
2Select paper size of the document you created in
the application from [Page Size].
3Select output size of the document from [Output
Size].
The document is scaled automatically according to the settings
made in [Page Size] and [Output Size].
4If you want to increase or decrease the
magnification manually, select [Manual Scaling]
→ specify the scaling ratio for [Scaling].
5 Click [OK].
NOTE
• Depending on the printer model you are using, you may not
be able to magnify the document to the optimum ratio for the
selected page size.
• The display may differ according to the operating system, as well
as the type and version of the printer driver.
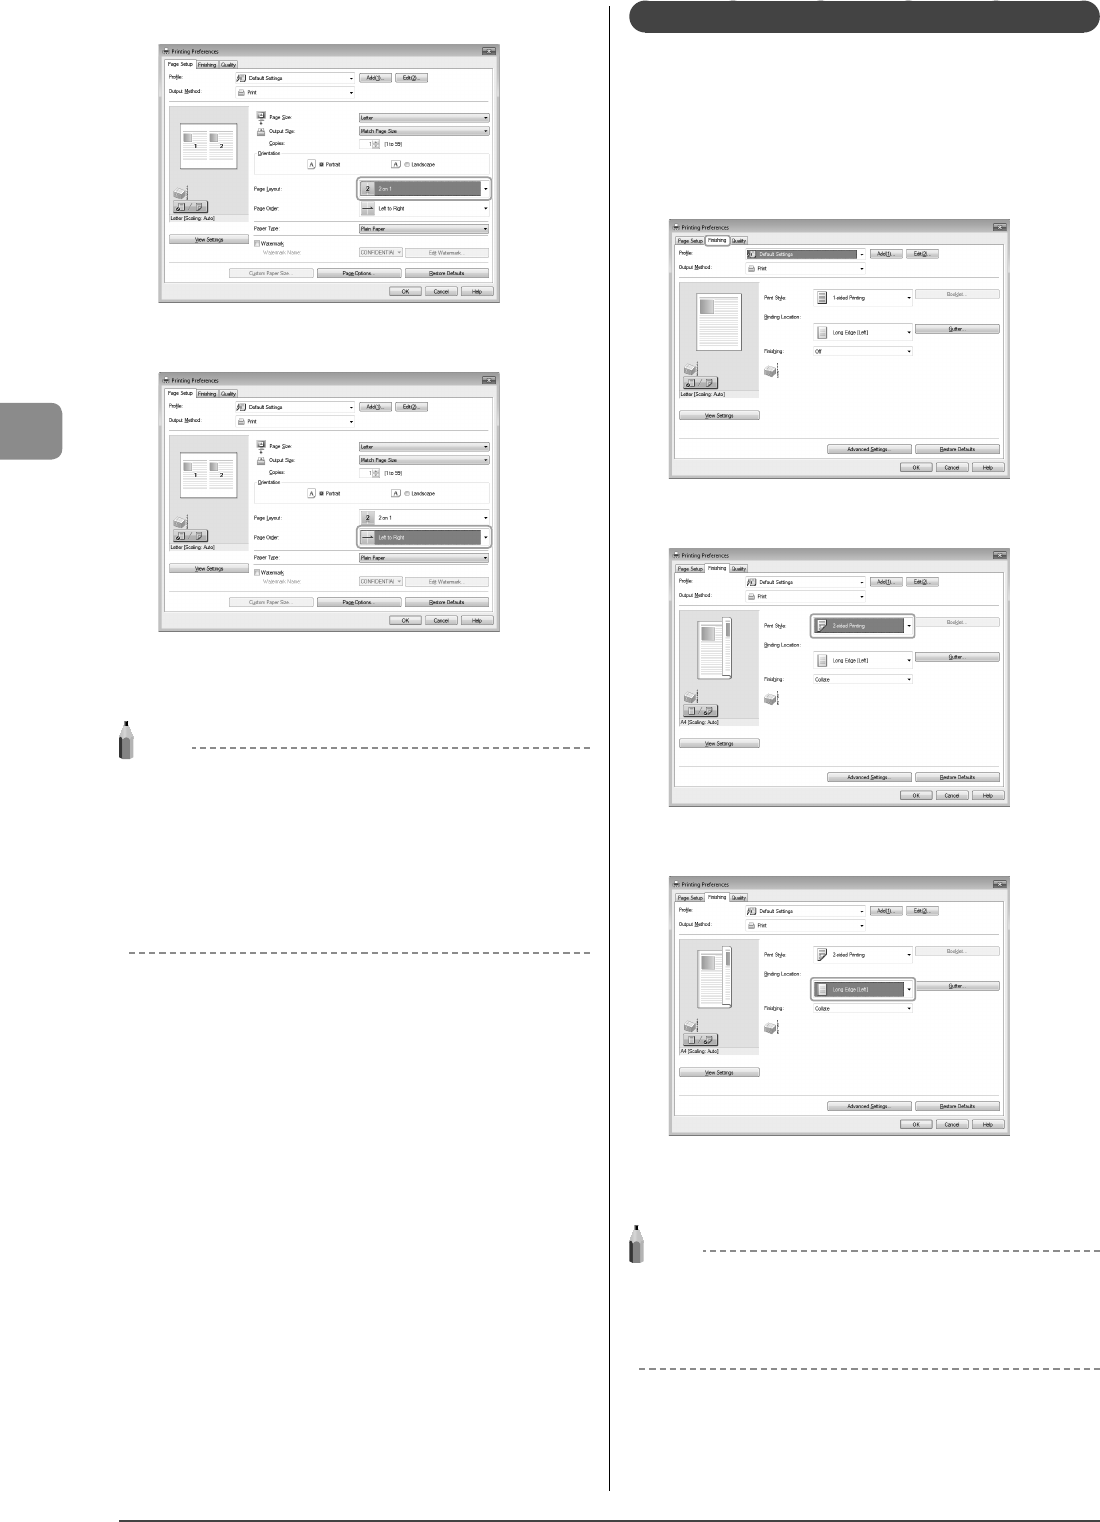
Printing Multiple Pages on One Sheet
You can reduce and print multiple pages on a single sheet of
paper. You can place 2, 4, 6, 8, 9, and 16 pages of documents
on a single sheet of paper. Using this feature, you can make
materials that are easy to view. Also, this feature helps you to
save paper, and save space when storing.
1Click [Page Setup].
For instructions on how to display the printer driver screen, see
“Printing” or “Configuring the Default Print Settings” in the e-Manual.
Printing from a Computer
4-4
Printing from a Computer
2Select the page layout from [Page Layout].
3Select the page order from [Page Order].
The output image is displayed in the preview area.
4 Click [OK].
NOTE
• You cannot enlarge and reduce manually when using this
function.
• Although there may be a function for printing multiple copies
depending on the application you are using, do not use it
together with this function. If you do, printing may not be
executed correctly.
• The display may differ according to the operating system, as well
as the type and version of the printer driver.
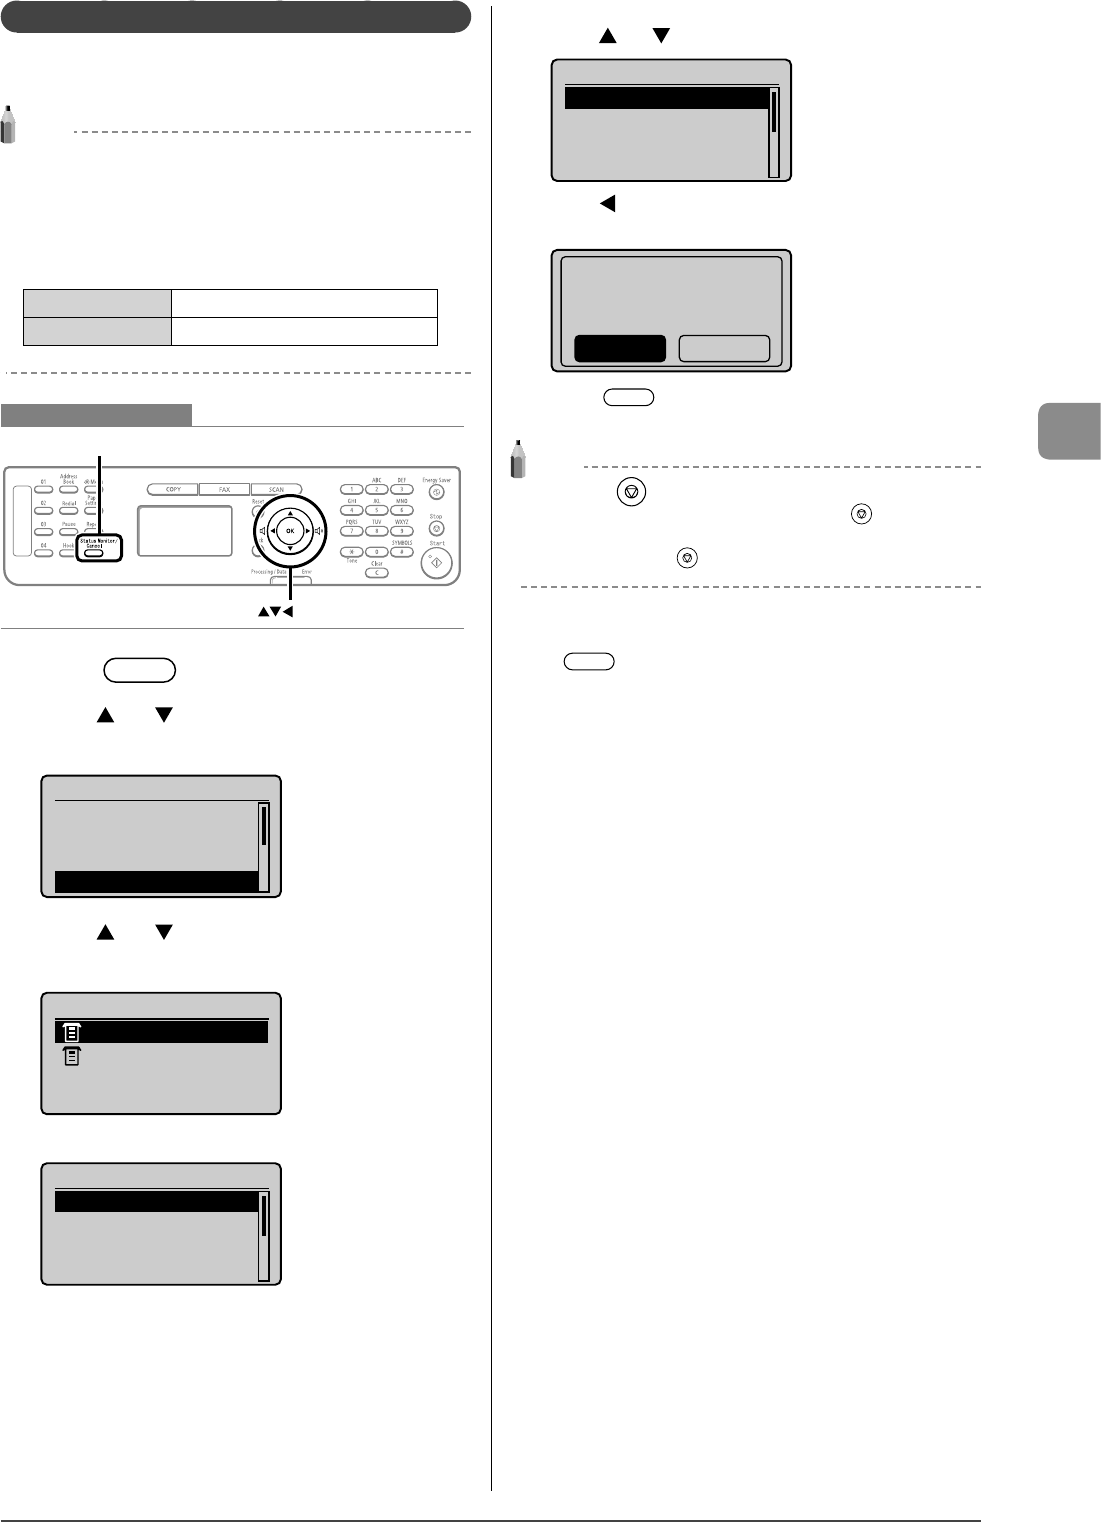
2-sided Printing (MF4570dn Only)
Two-sided printing prints a document on both sides of the
paper. You can reduce paper consumption by half.
1 Click [Finishing].
For instructions on how to display the printer driver screen, see
“Printing” or “Configuring the Default Print Settings” in the e-Manual.
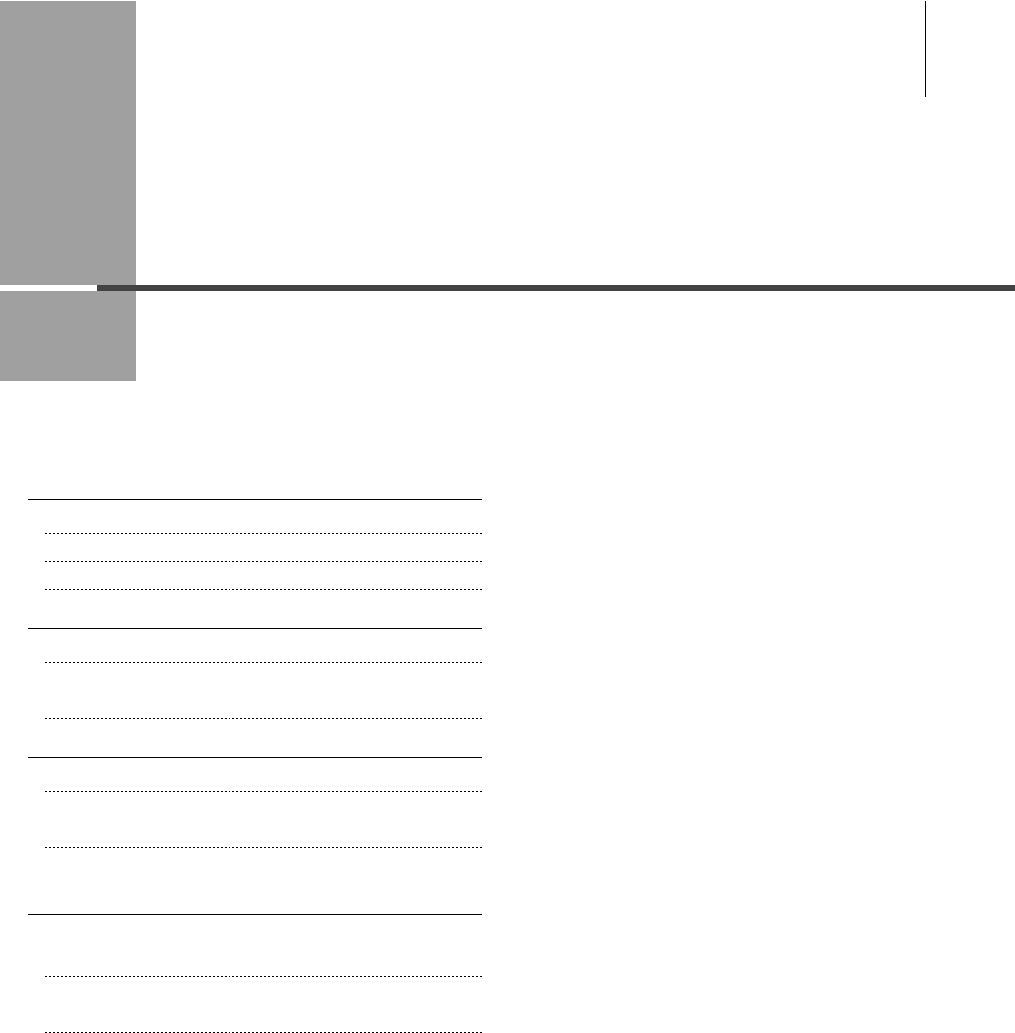
2Select [2-sided Printing] from [Print Style].
3Select the binding edge from [Binding Location].
The output image is displayed in the preview area.
4 Click [OK].
NOTE
• The page sizes for which two-sided printing is available differ
according to printer model. For details, view the online help.
• The display may differ according to the operating system, as well
as the type and version of the printer driver.
4-5
Printing from a Computer
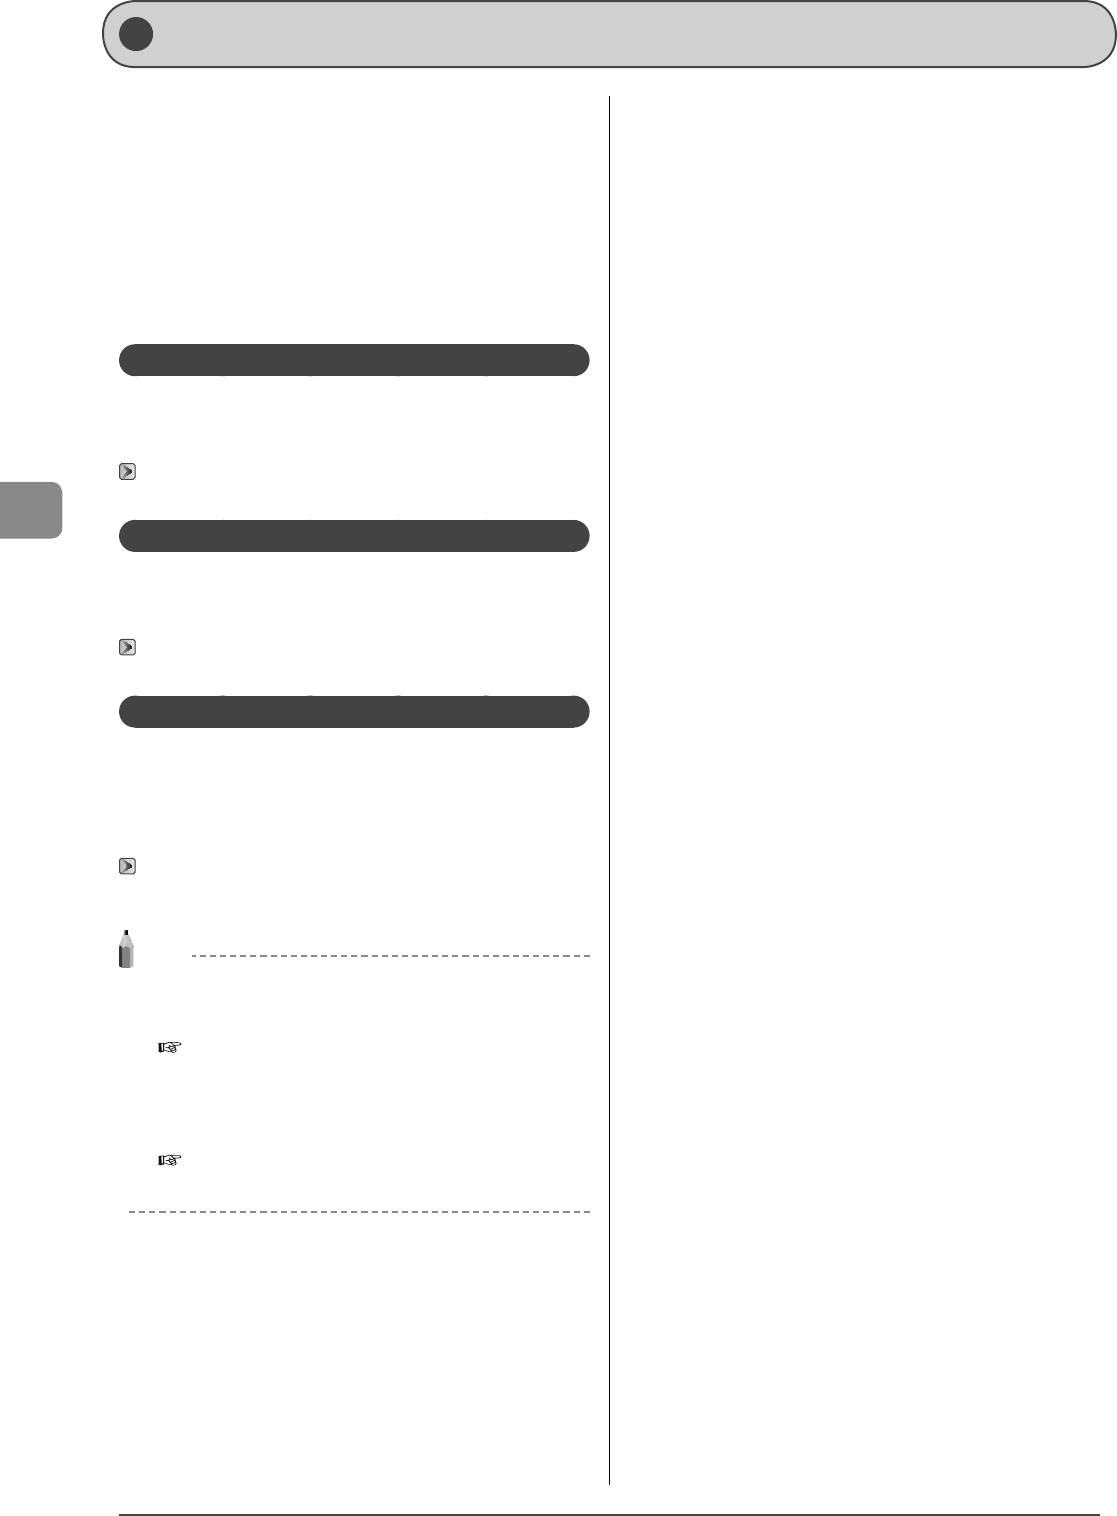
Checking and Canceling Print Jobs
You can check detailed information about print jobs in the
middle of currently printing or waiting.
NOTE
Document name and user name displayed in the
operation panel
Some file name may be displayed incorrectly depending on the
type of the file to be printed.
If the Processing/Data Indicator on the operation panel
is:
Turned on/blinkingA job is being processed.
Turned offNo jobs are in the memory.
Keys to be used for this operation
OK
Status Monitor/Cancel
1 Press [] (Status Monitor/Cancel).
2 Press [] or [] to select <Print Job Status> and
then press [OK].
Status Monitor/Cancel
Device Status
Copy Job Status
Fax Job Status/Hist
...
Print Job Status
3 Press [] or [] to select a job to be checked or
canceled, and then press [OK].
Print Job Status
09:42AM Printing
09:43AM Waiting
The detailed information is displayed.
Details
<Cancel>
Job Number: 0020
Status: Printing
Time: 01/01 09:42 AM
● For canceling
(1) Press [] or [] to select <Cancel>, and then press [OK].
Details
<Cancel>
Job Number: 0020
Status: Printing
Time: 01/01 09:42 AM
(2) Press [] to select <Yes>, and then press [OK].
The print job is canceled.
Cancel?
NoYes
(3) Press [] (Status Monitor/Cancel) to close the
screen.
NOTE
Pressing [] (Stop) can also delete the print jobs
You can delete the print jobs also by pressing [] (Stop).
* If only one print job is processing or waiting, you can stop the
job by pressing [] (Stop) twice.
● For checking only
Press [
] (Status Monitor/Cancel) to close the screen.
4-6
Printing from a Computer
5-1
Chapter
5
Registering Destinations in the Address Book
This section describes the procedures for registering destinations in the address book and
changing or deleting the registered settings.
Address Book 5-2
One-touch Keys 5-2
Coded Dialing 5-2
Group Dialing 5-2
Registering and Editing One-Touch Keys 5-3
Registering and Editing via the Operation Panel 5-3
Registering and Editing One-Touch Keys via the Remote UI
(MF4570dn Only) 5-5
Registering and Editing Coded Dial Codes 5-6
Registering and Editing via the Operation Panel 5-6
Registering and Editing a coded Dial Code via the Remote UI
(MF4570dn Only) 5-8
Registering and Editing Recipients for
Group Dialing 5-9
Registering and Editing a Destination Group via the
Operation Panel 5-9
Registering and Editing a Destination Group via the Remote UI
(MF4570dn Only) 5-12
5-2
Registering Destinations in the Address Book
When faxing documents, you can specify a destination by
manually entering characters with the numeric keys or by
selecting a pre-registered destination from the address book.
You can register frequently used destinations under one-touch
keys and coded dial codes.
You can also save one-touch keys and coded dial codes as a
group.
You can register destinations using the operation panel.
* If you are using MF4570dn, you can also use the Remote UI to
register destinations.
One-touch Keys
You can register up to 4 destinations to one-touch keys. Once
registered, pressing the appropriate one-touch key will recall
the destination number.
“Registering and Editing One-Touch Keys” (→P.5-3)
Coded Dialing
You can register up to 100 destinations to coded dial codes.
Once registered, entering the coded dial code will recall the
destination number.
“Registering and Editing Coded Dial Codes” (→P.5-6)
Group Dialing
You can group the registered recipients (up to 50 recipients)
under one-touch keys and coded dial codes. Group addresses
are to be registered for an unused one-touch key or coded dial
code. Simply specifying the one-touch key or coded dial code
allow you to specify multiple addresses registered as a group.
“Registering and Editing Recipients for Group Dialing”
(→P.5-9)
NOTE
Saving/Reading the address book
The address book can be saved as a file in your computer using the
Remote UI, and the saved file can be read in the machine.
e-Manual → Setting and Managing from Computer →
Managing the Address Book
However, you cannot edit the address book saved as a file.
Viewing destinations registered in the address book
You can view destinations by printing destination lists.
e-Manual → Basic Operation → Printing a List → Printing an
Address Book List
Address Book
5-3
Registering Destinations in the Address Book
This section describes the following procedure.
• Storing one-touch keys
• Editing one-touch keys
• Deleting one-touch keys
Registering and Editing via the
Operation Panel
Keys to be used for this operation
OK
FAX
Address Book
Back
Tone, Numeric keys
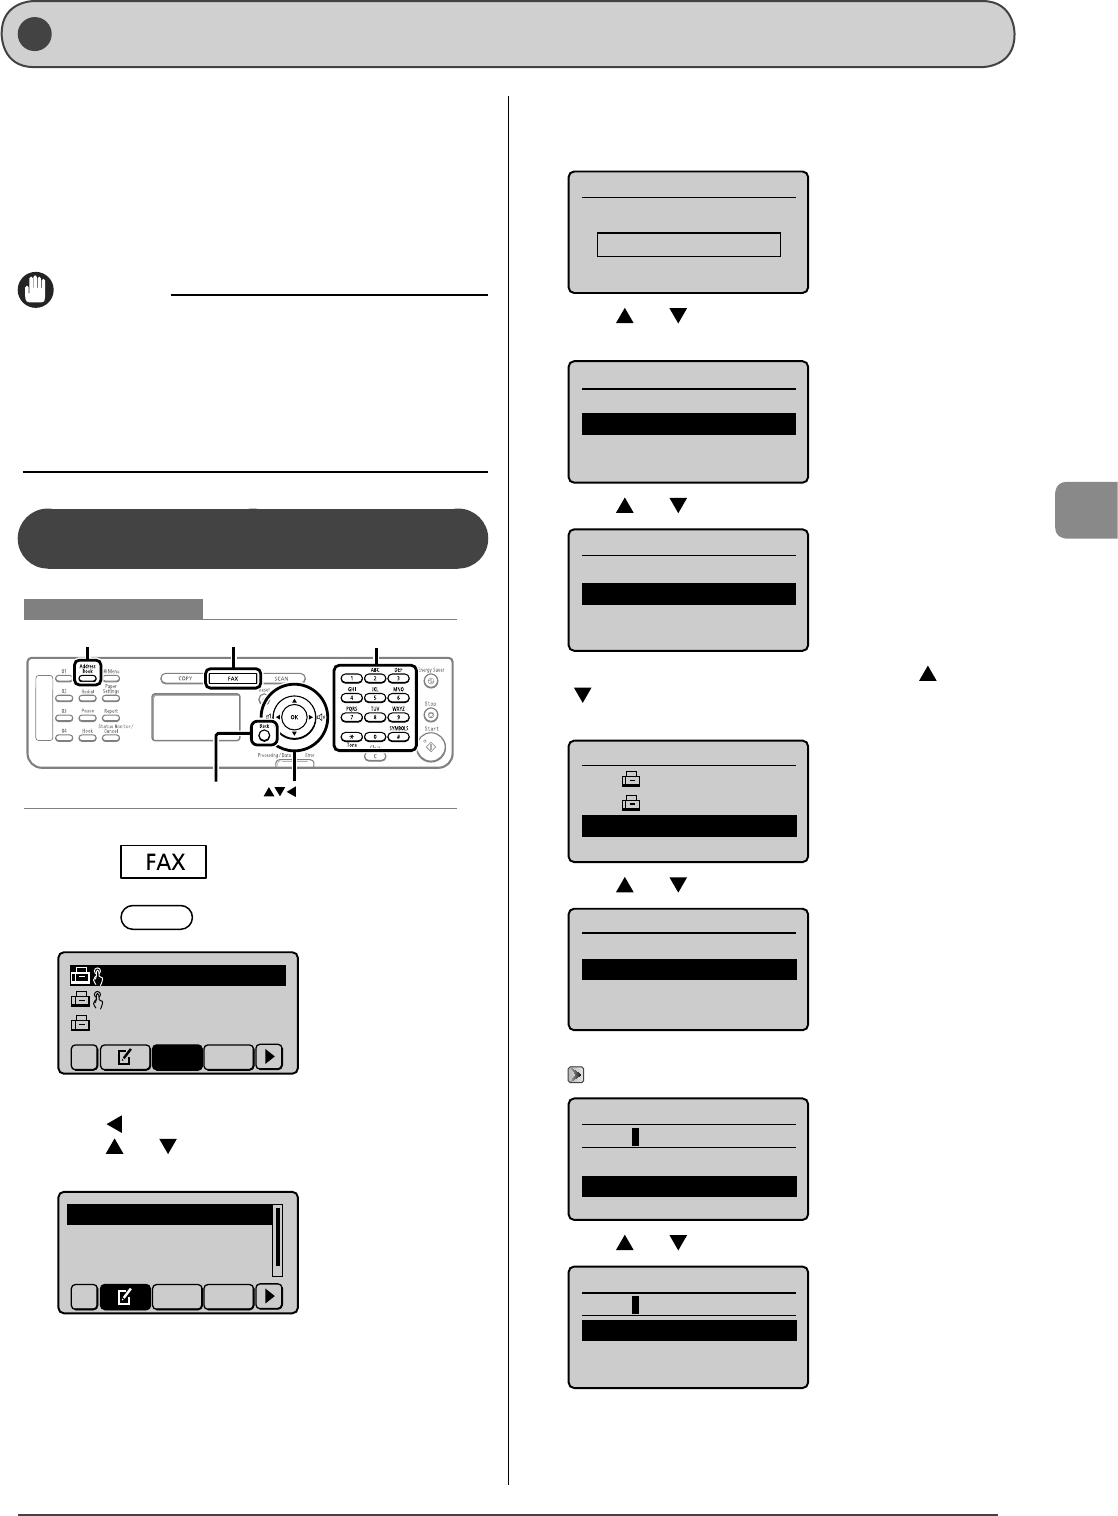
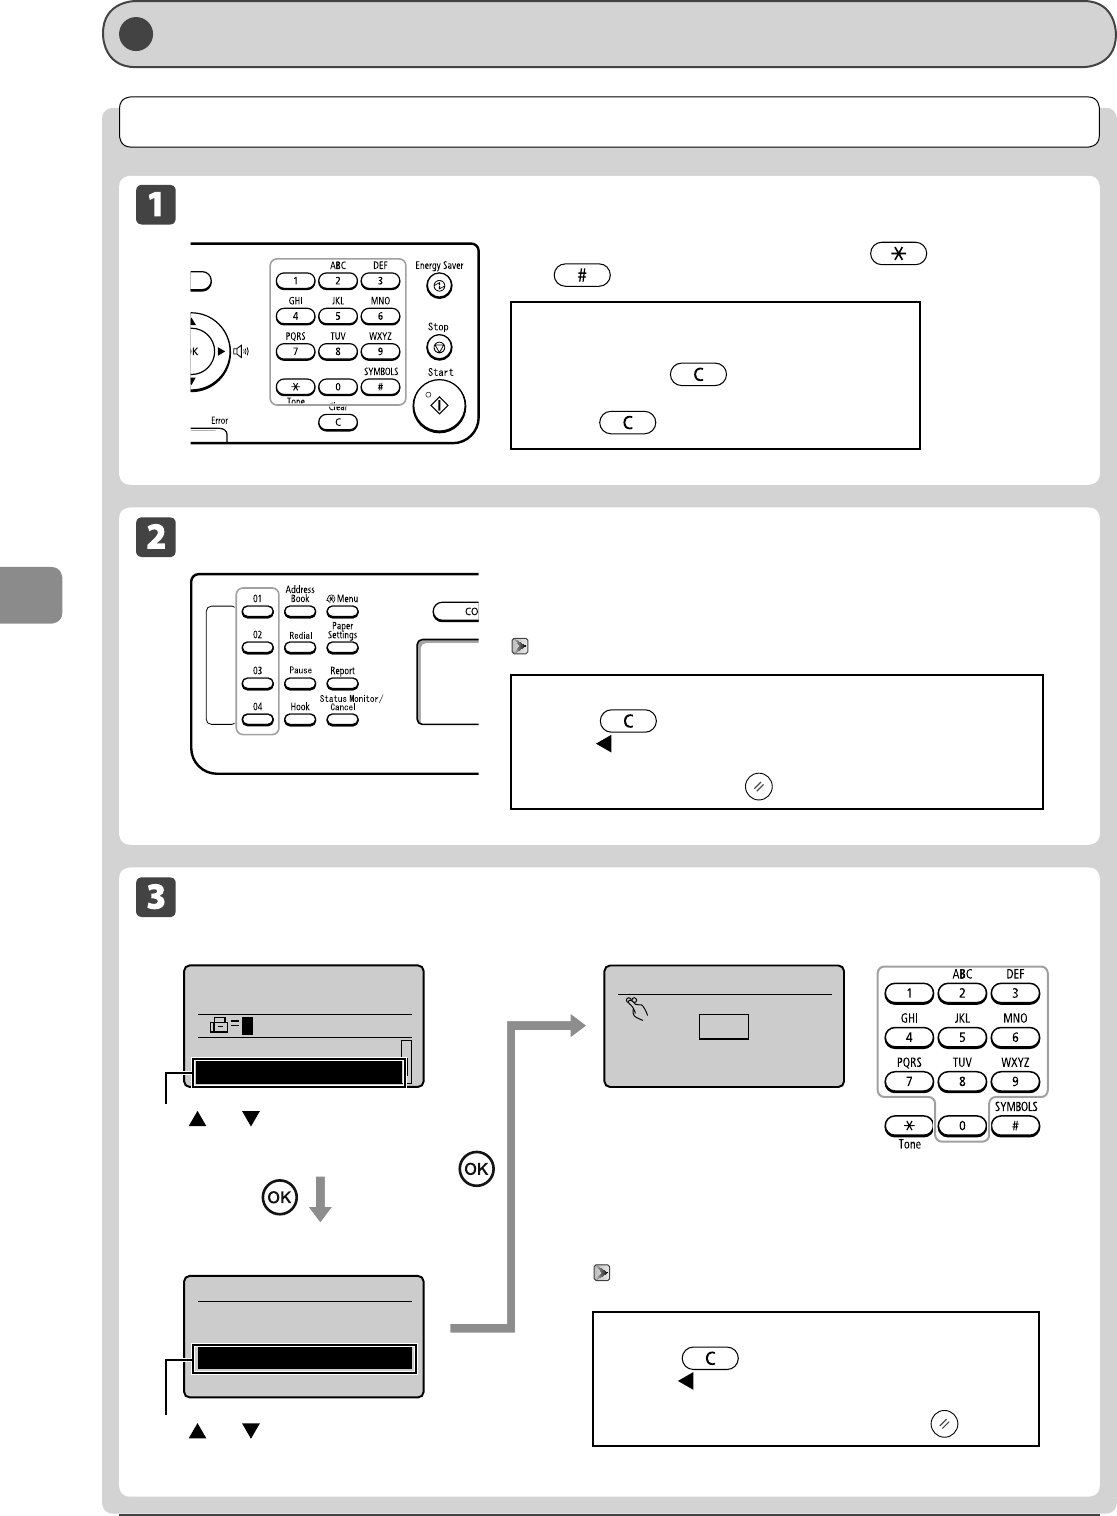
1 Press [].
2 Press [] (Address Book).
● When storing a one-touch key newly
(1) If there are destinations registered, press [].
If you are registering a destination for the first time,
proceed to step (2).
(2) Press [] or [] to select <Register New Destination to
Address Book>, and then press [OK].
Register New Destina
Edit Address Book
Address Book Details
All A-Z
When the address book PIN is specified
Use the numeric keys to enter the PIN, and then press
[OK].
Address Book PIN
(Apply: Press OK)
*******
(3) Press [] or [] to select <One-Touch>, and then press
[OK].
Register Location
Coded Dial
One-Touch
(4) Press [
] or [] to select <Fax>, and then press [OK].
Destination Type
Fax
Group
(5) Press [] or [] to select the number to be registered,
and then press [OK].
Enter Registration No.
01 Not Registered
02 Not Registered
03 Not Registered
04 Not Registered
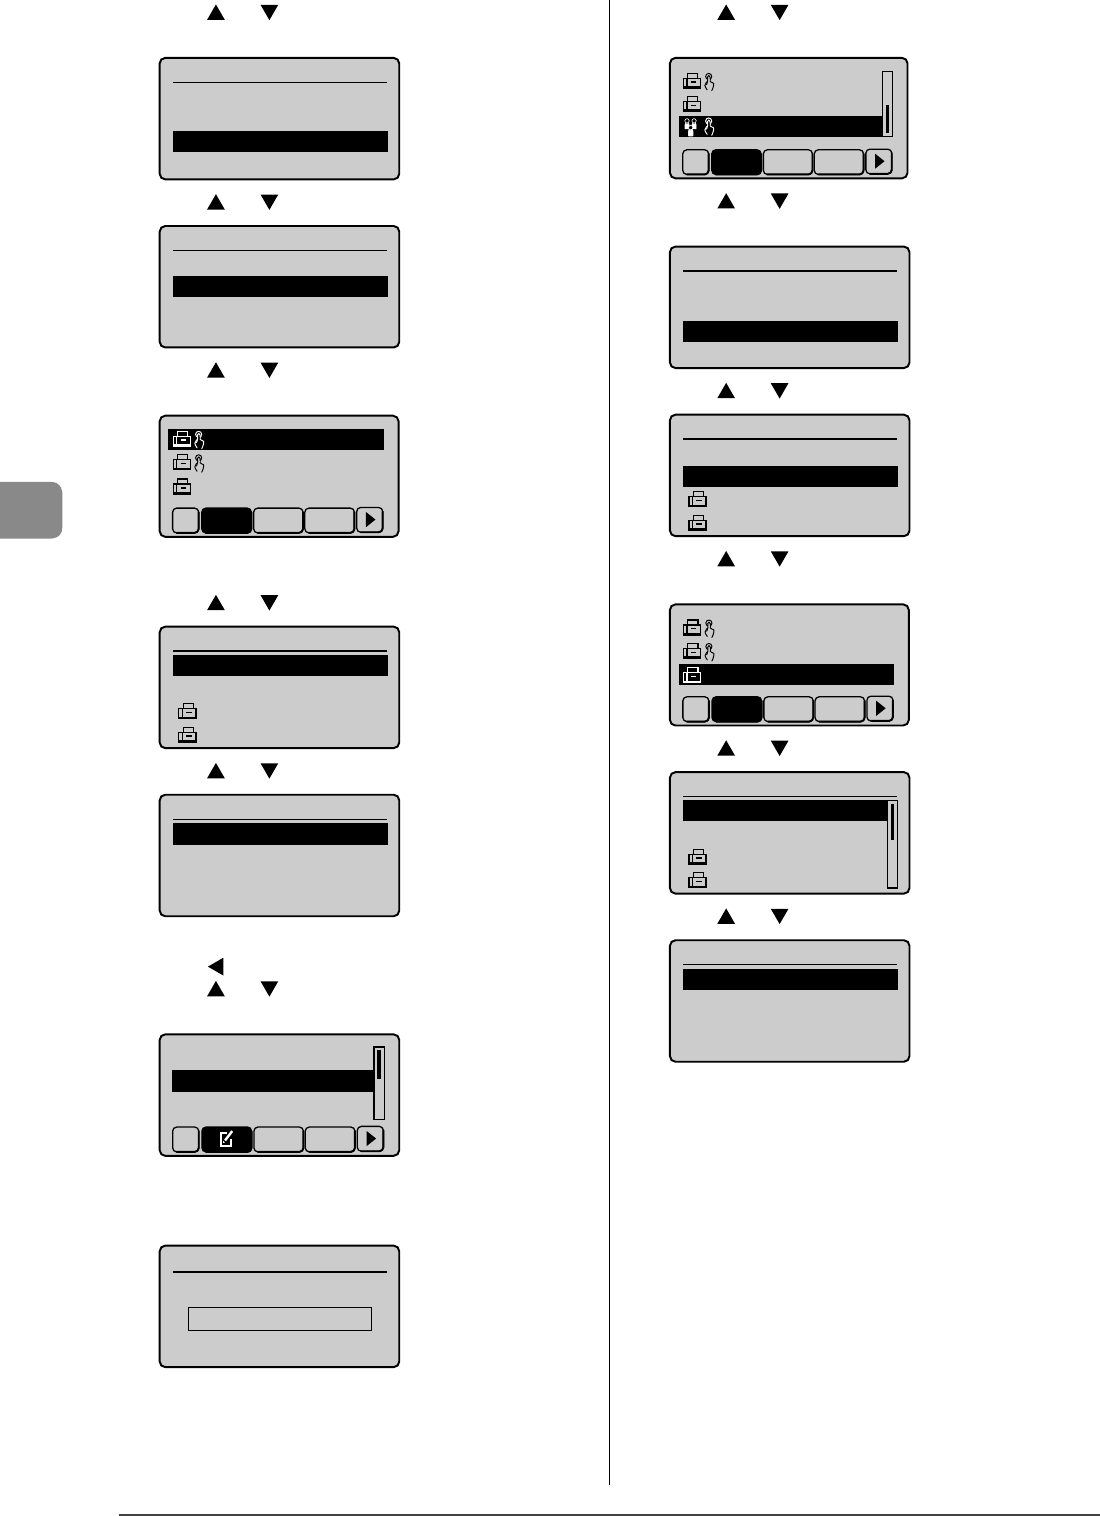
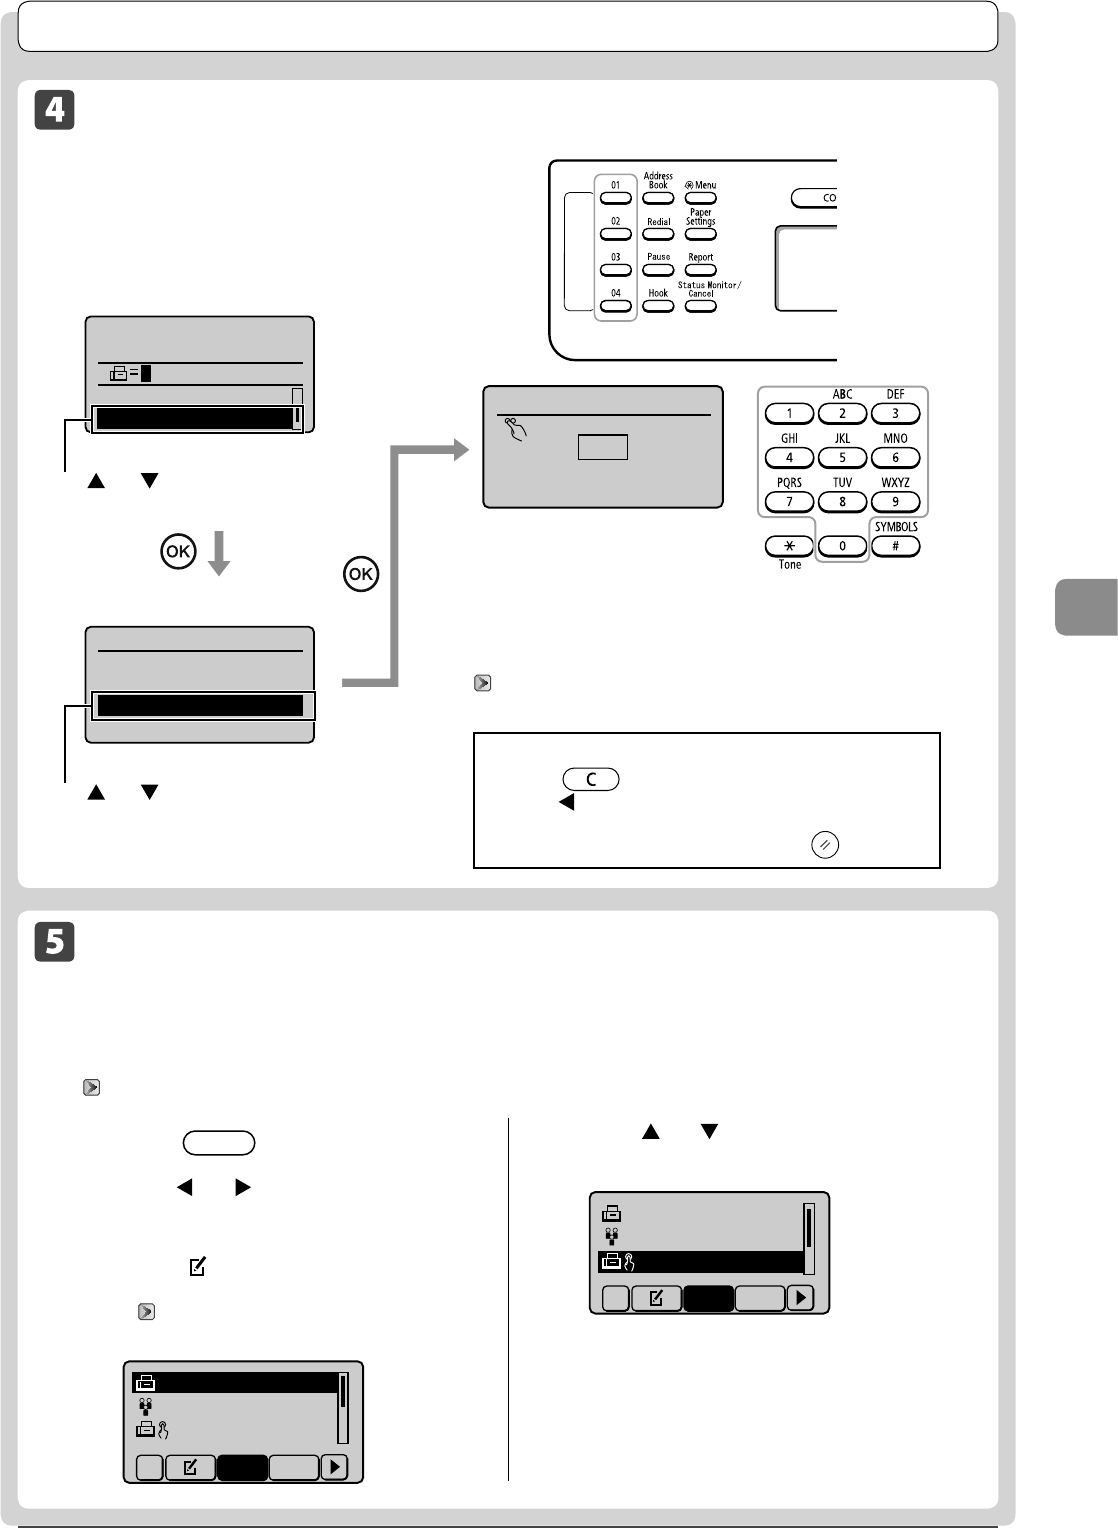
(6) Press [] or [] to select <Name>, and then press [OK].
Fax
<Apply>
Name:
Destination:
One-Touch: 01
(7) Use the numeric keys to specify <Name>.
“Text Input Method” (→P.1-9)
Name (Max 16 char.)
CANON
<Apply>
Entry Mode: A
(8) Press [] or [] to select <Apply>, and then press [OK].
Name (Max 16 char.)
CANON
<Apply>
Entry Mode: A
(9) Press [] or [] to select <Destination>, and then press
[OK].
Fax
<Apply>
Name: CANON
Destination:
One-Touch: 01
(10) Use the numeric keys to specify <Destination>.
Press [OK] to specify <Settings> as needed.
Destination (Max 40)
0123456789
<Apply>
Settings
Registering and Editing One-Touch Keys
5-4
Registering Destinations in the Address Book
(11) Press [] or [] to select <Apply>, and then press [OK].
Destination (Max 40)
0123456789
<Apply>
Settings
(12) Press [] or [] to select <Apply>, and then press [OK].
Fax
<Apply>
Name: CANON
Destination: 0123456
...
One-Touch: 01
● Editing a one-touch key
(1) Press [
].
CANON 0123456789
All A-Z
(2) Press [] or [] to select <Edit Address Book>, and then
press [OK].
Register New Destin
...
Edit Address Book
Address Book Details
All A-Z
When the address book PIN is specified
Use the numeric keys to enter the PIN, and then press
[OK].
Address Book PIN
(Apply: Press OK)
*******
(3) Press [] or [] to select a destination that you want to
edit, and then press [OK].
CANON 0123456789
All A-Z 0-9
(4) Press [] or [] to select an item that you want to edit,
and then press [OK].
- Name
- Destination
- One-Touch
Fax
<Apply>
Name: CANON02
Destination: 9876543
...
One-Touch: 02
(5) When you finish editing, press [
] or [] to select
<Apply>, and then press [OK].
(6) Press [] or [] to select <Apply>, and then press [OK].
Fax
<Apply>
Name: CANON02
Destination: 9876543
...
One-Touch: 02
● Deleting a one-touch key
(1) Press [
].
CANON 0123456789
All A-Z
(2) Press [] or [] to select <Delete From Address Book>,
and then press [OK].
Edit Address Book
Address Book Details
Delete From Address
All A-Z
When the address book PIN is specified
Use the numeric keys to enter the PIN, and then press
[OK].
Address Book PIN
(Apply: Press OK)
*******
(3) Press [] or [] to select a destination that you want to
delete, and then press [OK].
CANON 0123456789
All A-Z 0-9
(4) Press [] to select <Yes>, and then press [OK].
Delete from
address book?
NoYes
3 Press [] (Back) to close the menu screen.
5-5
Registering Destinations in the Address Book
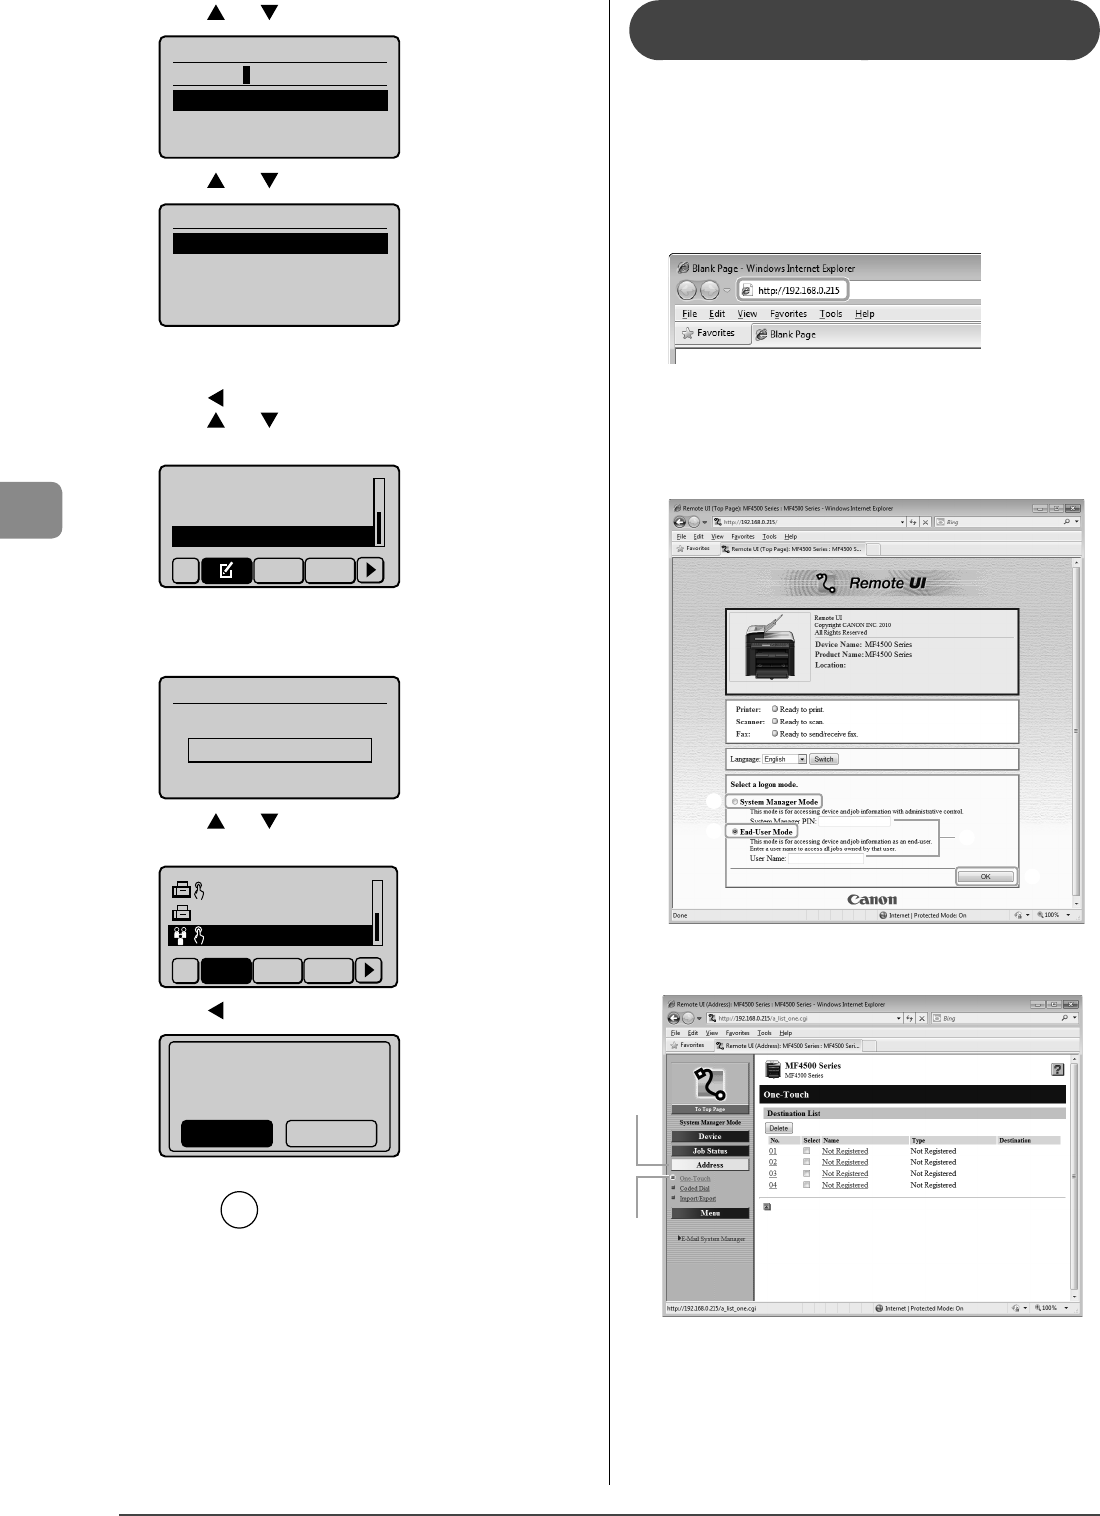
Registering and Editing One-Touch Keys
via the Remote UI (MF4570dn Only)
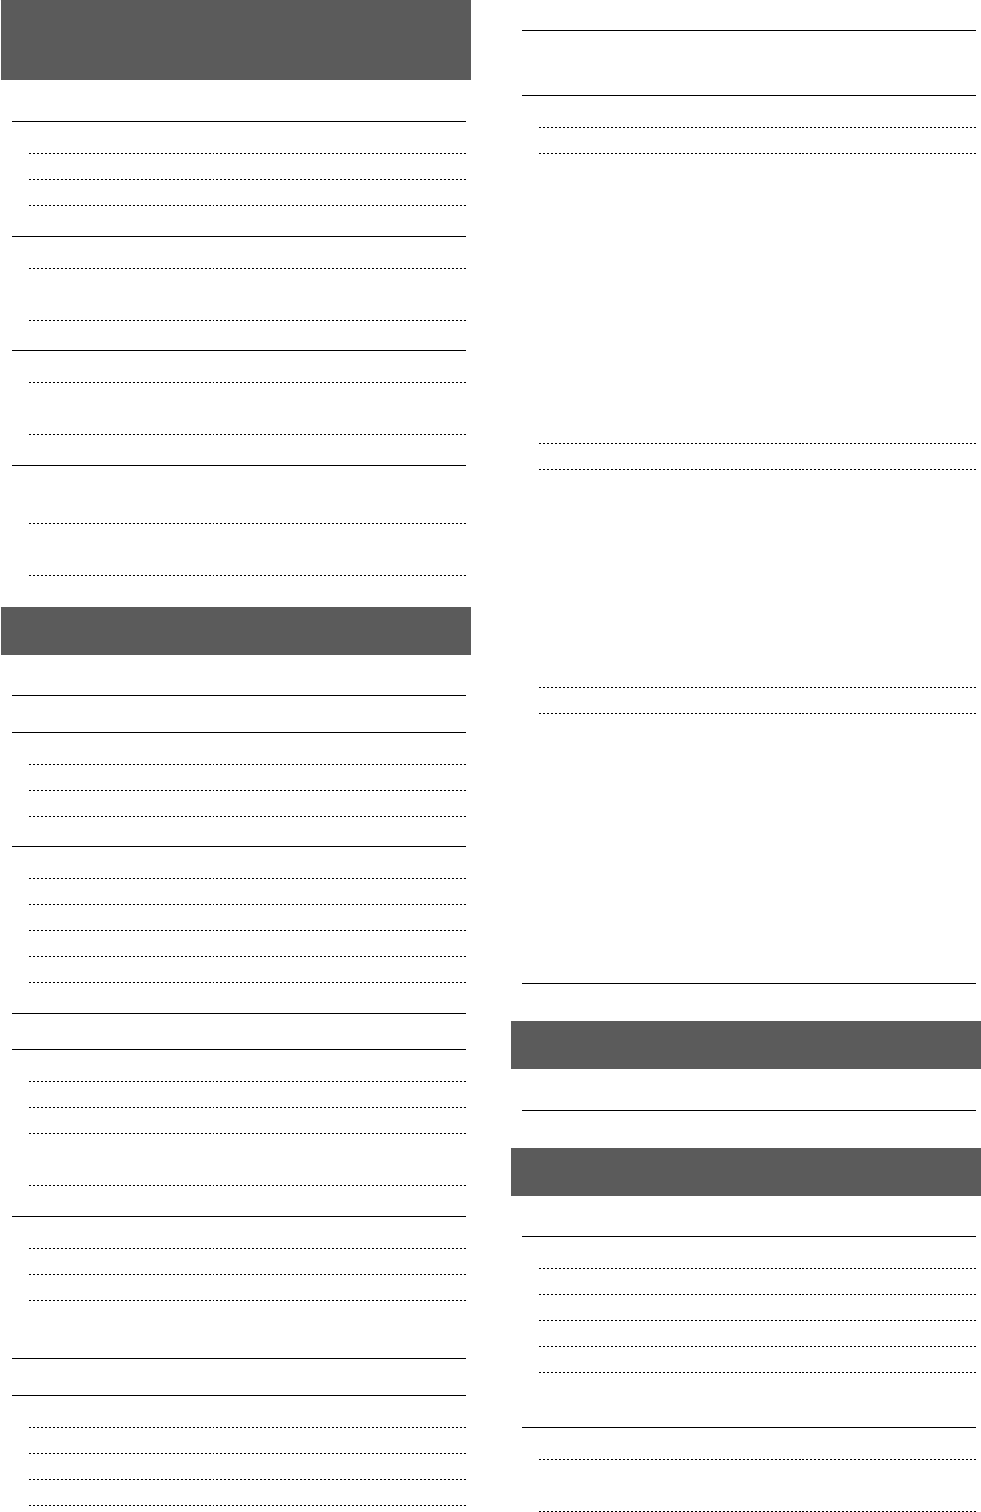
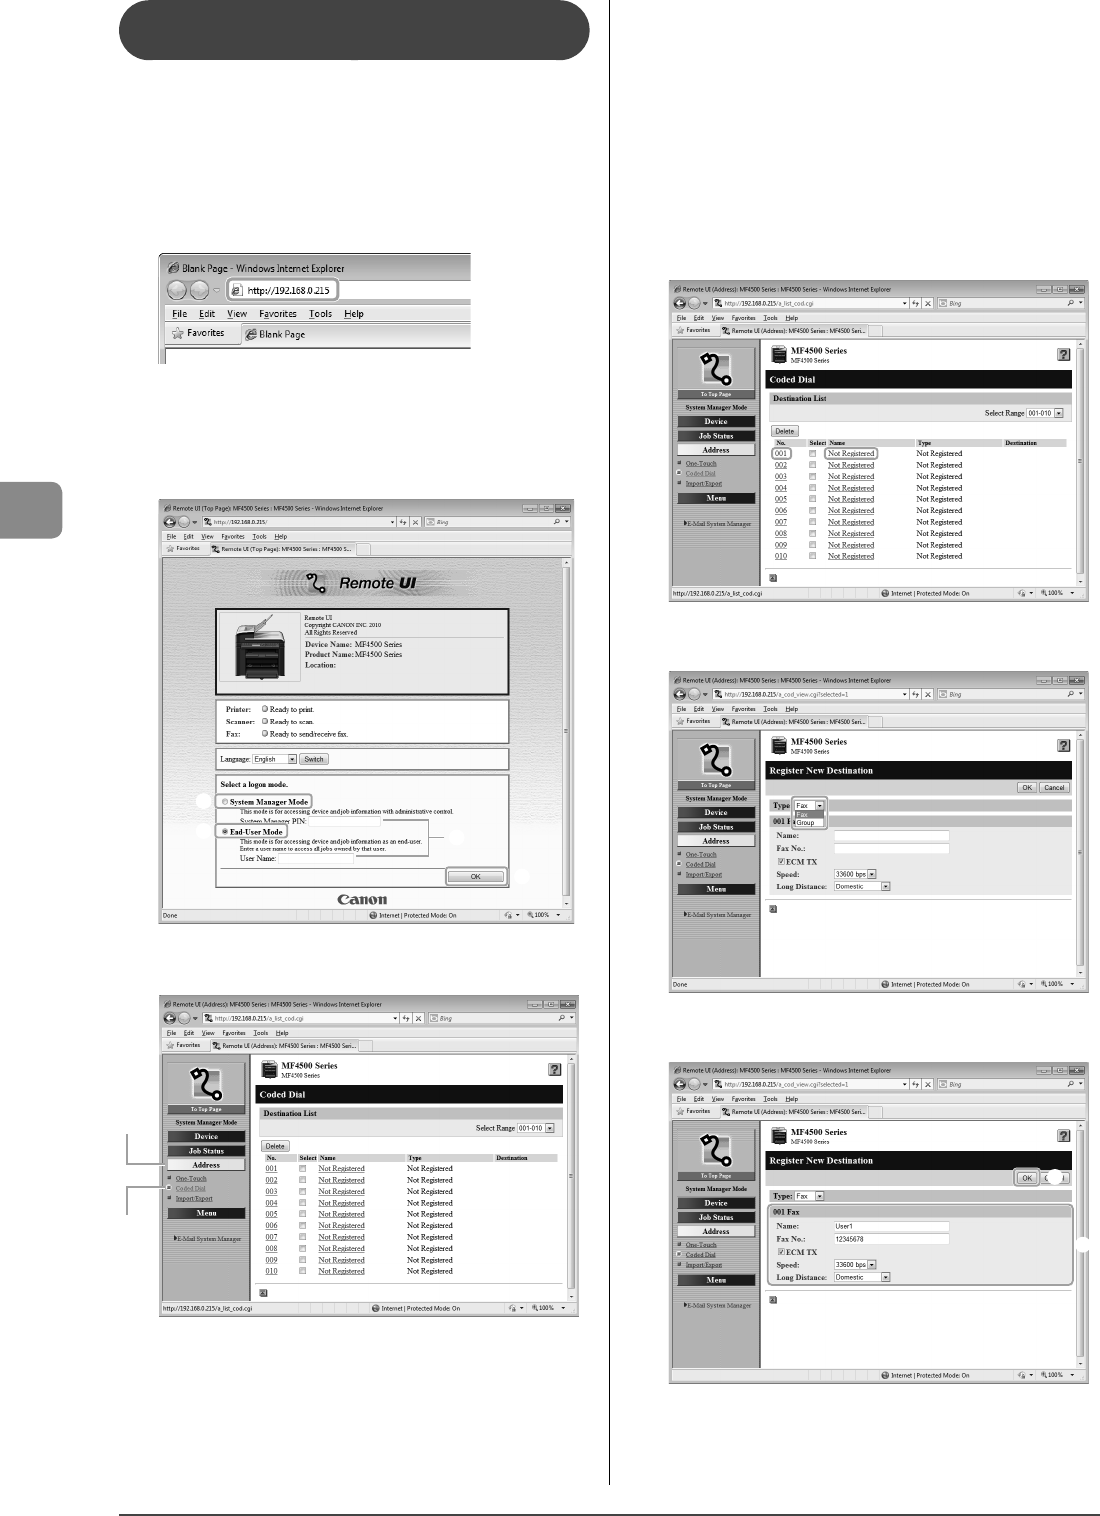
1Start the web browser.
2Enter “http://<the IP address of the machine>/” in
the address field, and then press the [ENTER] key
on your keyboard.
Input Example: “http://192.168.0.215/”
3Log on to the Remote UI.
(1) Select [System Manager Mode].
(2) Enter [System Manager PIN].
(3) Click [OK].
(1)
(1)
(2)
(3)
4 Click [Address] → [One-Touch].
(1)
(2)
● Storing a one-touch key newly
Proceed to Step 5.
● Editing a one-touch key
(1) Click the number or name.
(2) Click [Edit].
(3) Specify the required settings in the edit screen for
destinations, and then click [OK].
● Deleting a one-touch key
(1) Select the check box for which you want to delete the
number, and then click [Delete].
5Click [Not Registered] or the number which is not
registered.
6Select [Fax] from the drop-down list.
7Specify the required settings, and then click [OK].
(1)
(2)
5-6
Registering Destinations in the Address Book
This section describes the following procedure.
• Storing coded dial codes
• Editing coded dial codes
• Deleting coded dial codes
Registering and Editing via the
Operation Panel
Keys to be used for this operation
OK
FAX
Address Book
Back
Tone, Numeric keys
1 Press [].
2 Press [] (Address Book).
● Storing a coded dial code newly
(1) If there are destinations registered, press [
].
If you are registering a destination for the first time,
proceed to step (2).
(2) Press [] or [] to select <Register New Destination to
Address Book>, and then press [OK].
Register New Destina
Edit Address Book
Address Book Details
All A-Z
When the address book PIN is specified
Use the numeric keys to enter the PIN, and then press
[OK].
Address Book PIN
(Apply: Press OK)
*******
(3) Press [] or [] to select <Coded Dial>, and then press
[OK].
Register Location
Coded Dial
One-Touch
(4) Press [
] or [] to select <Fax>, and then press [OK].
Destination Type
Fax
Group
(5) Press [] or [] to select <Name>, and then press [OK].
Fax
<Apply>
Name:
Destination:
Coded Dial: 001
(6) Use the numeric keys to specify <Name>.
“Text Input Method” (→P.1-9)
Name (Max 16 char.)
CANON
<Apply>
Entry Mode: A
(7) Press [] or [] to select <Apply>, and then press [OK].
Name (Max 16 char.)
CANON
<Apply>
Entry Mode: A
(8) Press [] or [] to select <Destination>, and then press
[OK].
Fax
<Apply>
Name: CANON
Destination:
Coded Dial: 001
(9) Use the numeric keys to specify <Destination>.
Press [OK] to specify <Settings> as needed.
Destination (Max 40)
0123456789
<Apply>
Settings
(10) Press [] or [] to select <Apply>, and then press [OK].
Destination (Max 40)
0123456789
<Apply>
Settings
Registering and Editing Coded Dial Codes
5-7
Registering Destinations in the Address Book
(11) Press [] or [] to select <Coded Dial>, and then press
[OK].
Fax
<Apply>
Name: CANON
Destination: 0123456
...
Coded Dial: 001
(12) Press [] or [] to select the number to be registered,
and then press [OK].
Enter Registration No.
001 Not Registered
002 Not Registered
003 Not Registered
004 Not Registered
(13) Press [] or [] to select <Apply>, and then press [OK].
Fax
<Apply>
Name: CANON
Destination: 0123456
...
Coded Dial: 001
● Editing a coded dial code
(1) Press [
].
CANON 0123456789
All A-Z
(2) Press [] or [] to select <Edit Address Book>, and then
press [OK].
Register New Destin
...
Edit Address Book
Address Book Details
All A-Z
When the address book PIN is specified
Use the numeric keys to enter the PIN, and then press
[OK].
Address Book PIN
(Apply: Press OK)
*******
(3) Press [] or [] to select a destination that you want to
edit, and then press [OK].
CANON 0123456789
All A-Z 0-9
(4) Press [
] or [] to select an item that you want to edit,
and then press [OK].
• Name
• Destination
• Coded Dial
Fax
<Apply>
Name: CANON02
Destination: 9876543
...
Coded Dial: 002
(5) When you finish editing, press [] or [] to select
<Apply>, and then press [OK].
(6) Press [] or [] to select <Apply>, and then press [OK].
Fax
<Apply>
Name: CANON02
Destination: 9876543
...
Coded Dial: 002
● Deleting a coded dial code
(1) Press [].
CANON 0123456789
All A-Z
(2) Press [] or [] to select <Delete From Address Book>,
and then press [OK].
Edit Address Book
Address Book Details
Delete From Address
All A-Z
When the address book PIN is specified
Use the numeric keys to enter the PIN, and then press
[OK].
Address Book PIN
(Apply: Press OK)
*******
(3) Press [] or [] to select a destination that you want to
delete, and then press [OK].
CANON 0123456789
All A-Z 0-9
(4) Press [] to select <Yes>, and then press [OK].
Delete from
address book?
NoYes
3 Press [] (Back) to close the menu screen.
5-8
Registering Destinations in the Address Book
Registering and Editing a coded Dial Code
via the Remote UI (MF4570dn Only)
1Start the web browser.
2Enter “http://<the IP address of the machine>/” in
the address field, and then press the [ENTER] key
on your keyboard.
Input Example: “http://192.168.0.215/”
3Log on to the Remote UI.
(1) Select [System Manager Mode].
(2) Enter [System Manager PIN].
(3) Click [OK].
(1)
(1)
(2)
(3)
4 Click [Address] → [Coded Dial].
(1)
(2)
● Storing a coded dial code newly
Proceed to Step 5.
● Editing a coded dial code
(1) Click the number or name.
(2) Click [Edit].
(3) Specify the required settings in the edit screen for
destinations, and then click [OK].
● Deleting a coded dial code
(1) Select the check box for which you want to delete the
number, and then click [Delete].
5Click [Not Registered] or the number which is not
registered.
6Select [Fax] from the drop-down list.
7Specify the required settings, and then click [OK].
(1)
(2)
5-9
Registering Destinations in the Address Book
You can perform the following procedures.
• Registering group addresses
• Adding a recipient to group addresses
• Deleting a recipient from group addresses
• Changing a group name
• Deleting group addresses
IMPORTANT
Before registering group addresses
• Register group addresses for an unused one-touch key or coded
dial codes. Keep a one-touch key or coded dial available for
group dialing.
• Recipients must be registered to one-touch keys or coded dial
codes before they can be added to a group.
Registering and Editing a Destination
Group via the Operation Panel
Keys to be used for this operation
OK
FAX
Address Book
Back
Tone, Numeric keys
1 Press [].
2 Press [] (Address Book).
CANON01 012345678
CANON02 98765432
...
CANON03 00112233
...
All A-Z
● Registering group addresses newly
(1) Press [].
(2) Press [] or [] to select <Register New Destination to
Address Book>, and then press [OK].
Register New to Addr
Edit Address Book
Address Book Details
All A-Z
When the address book PIN is specified
Use the numeric keys to enter the PIN, and then press
[OK].
Address Book PIN
(Apply: Press OK)
*******
(3) Press [] or [] to select <One-Touch> or <Coded Dial>,
and then press [OK].
Register Location
Coded Dial
One-Touch
(4) Press [] or [] to select <Group>, and then press [OK].
Destination Type
Fax
Group
(5) If you selected <One-Touch> in Step (3), press [] or
[] to select the number to be registered, and then press
[OK].
Enter Registration No.
01 CANON01 012345
...
02 CANON02 987654
...
03 Not Registered
04 Not Registered
(6) Press [] or [] to select <Name>, and then press [OK].
Group
<Apply>
Name:
Destinations: 000
One-Touch: 03
(7) Use the numeric keys to specify <Name>.
“Text Input Method” (→P.1-9)
Name (Max 16 char.)
GROUP
<Apply>
Entry Mode: A
(8) Press [] or [] to select <Apply>, and then press [OK].
Name (Max 16 char.)
GROUP
<Apply>
Entry Mode: A
Registering and Editing Recipients for Group Dialing
5-10
Registering Destinations in the Address Book
(9) Press [] or [] to select <Destinations>, and then press
[OK].
Group
<Apply>
Name: GROUP
Destinations::000
One-Touch: 03
(10) Press [] or [] to select <Add>, and then press [OK].
Destination
<Apply>
<Add>
(11) Press [] or [] to select a destination that you want to
add, and then press [OK].
CANON01 012345678
CANON02 98765432
...
CANON03 00112233
...
All A-Z 0-9
(12) Repeat Step (10) and (11) to select the destinations to be
added.
(13) Press [] or [] to select <Apply>, and then press [OK].
Destination
<Apply>
<Add>
CANON01 0123456789
CANON02 9876543210
(14) Press [] or [] to select <Apply>, and then press [OK].
Group
<Apply>
Name: GROUP
Destinations: 002
One-Touch: 03
● Adding destinations to a group
(1) Press [].
(2) Press [] or [] to select <Edit Address Book>, and then
press [OK].
Register New Destin
...
Edit Address Book
Address Book Details
All A-Z
When the address book PIN is specified
Use the numeric keys to enter the PIN, and then press
[OK].
Address Book PIN
(Apply: Press OK)
*******
(3) Press [
] or [] to select a group to which destinations
are added, and then press [OK].
CANON02 9876543
...
CANON03 0011223
...
GROUP 02 Destina
All A-Z 0-9
(4) Press [] or [] to select <Destinations>, and then press
[OK].
Group
<Apply>
Name: GROUP
Destinations: 002
One-Touch: 03
(5) Press [] or [] to select <Add>, and then press [OK].
Destination
<Apply>
<Add>
CANON01 0123456789
CANON02 9876543210
(6) Press [] or [] to select a destination to be added, and
then press [OK].
CANON01 01234567
...
CANON02 98765432
...
CANON03 001122334
All A-Z 0-9
(7) Press [] or [] to select <Apply>, and then press [OK].
Destination
<Apply>
<Add>
CANON01 01234567
...
CANON02 98765432
...
(8) Press [] or [] to select <Apply>, and then press [OK].
Group
<Apply>
Name: GROUP
Destinations: 003
One-Touch: 03
5-11
Registering Destinations in the Address Book
● Deleting destinations from a group
(1) Press [
].
(2) Press [] or [] to select <Edit Address Book>, and then
press [OK].
Register New Destin
...
Edit Address Book
Address Book Details
All A-Z
When the address book PIN is specified
Use the numeric keys to enter the PIN, and then press
[OK].
Address Book PIN
(Apply: Press OK)
*******
(3) Press [] or [] to select a group in which destinations
are deleted, and then press [OK].
CANON02 9876543
...
CANON03 0011223
...
GROUP 03 Destina
All A-Z 0-9
(4) Press [] or [] to select <Destinations>, and then press
[OK].
Group
<Apply>
Name: GROUP
Destinations: 003
One-Touch: 03
(5) Press [] or [] to select a destination to be deleted,
and then press [OK].
Destination
<Add>
CANON01 01234567
...
CANON02 98765432
...
CANON03 001122334
(6) Press [] or [] to select <Delete From Group>, and
then press [OK].
Fax
<Delete From Group>
Name: CANON03
Destination: 0011223
...
Coded Dial: 003
(7) Press [] to select <Yes>, and then press [OK].
Delete from group?
NoYes
(8) Press [
] or [] to select <Apply>, and then press [OK].
Destination
<Apply>
<Add>
CANON01 0123456789
CANON02 9876543210
(9) Press [] or [] to select <Apply>, and then press [OK].
Group
<Apply>
Name: GROUP
Destinations: 002
One-Touch: 03
● Changing the name of a group
(1) Press [
].
(2) Press [] or [] to select <Edit Address Book>, and then
press [OK].
Register New Destin
...
Edit Address Book
Address Book Details
All A-Z
When the address book PIN is specified
Use the numeric keys to enter the PIN, and then press
[OK].
Address Book PIN
(Apply: Press OK)
*******
(3) Press [] or [] to select a group for which the group
name is changed, and then press [OK].
CANON02 9876543
...
CANON03 0011223
...
GROUP 02 Destina
All A-Z 0-9
(4) Press [] or [] to select <Name>, and then press [OK].
Group
<Apply>
Name: GROUP
Destinations: 002
One-Touch: 03
(5) Change <Name>.
“Text Input Method” (→P.1-9)
Name (Max 16 char.)
GROUP A
<Apply>
Entry Mode: A
5-12
Registering Destinations in the Address Book
(6) Press [] or [] to select <Apply>, and then press [OK].
Name (Max 16 char.)
GROUP A
<Apply>
Entry Mode: A
(7) Press [] or [] to select <Apply>, and then press [OK].
Group
<Apply>
Name: GROUP A
Destinations: 002
One-Touch: 03
● Deleting a group
(1) Press [
].
(2) Press [] or [] to select <Delete From Address Book>,
and then press [OK].
Edit Address Book
Address Book Details
Delete From Address
All A-Z
When the address book PIN is specified
Use the numeric keys to enter the PIN, and then press
[OK].
Address Book PIN
(Apply: Press OK)
*******
(3) Press [] or [] to select a group that you want to
delete, and then press [OK].
CANON02 9876543
...
CANON03 0011223
...
GROUP 03 Destina
All A-Z 0-9
(4) Press [] to select <Yes>, and then press [OK].
Delete from
address book?
NoYes
3 Press [] (Back) to close the menu screen.
Registering and Editing a Destination
Group via the Remote UI (MF4570dn Only)
1Start the web browser.
2Enter “http://<the IP address of the machine>/” in
the address field, and then press the [ENTER] key
on your keyboard.
Input Example: “http://192.168.0.215/”
3Log on to the Remote UI.
(1) Select [System Manager Mode].
(2) Enter [System Manager PIN].
(3) Click [OK].
(1)
(1)
(2)
(3)
4 Click [Address] → [One-Touch] or [Coded Dial].
(1)
(2)
● Registering group addresses newly
Proceed to Step 5.
5-13
Registering Destinations in the Address Book
● Adding destinations to a group
(1) Click the number or name.
(2) Click [Edit].
(3) Click [Address Book].
(4) Click [One-Touch] or [Coded Dial] from the drop-down
list, select the check box for the number to be added in a
group, and then click [OK].
● Deleting a destination from a group
(1) Click the number or name.
(2) Click [Edit].
(3) Select the destination from [Members List] to be deleted,
and then click [Delete].
(4) Click [OK].
● Changing the name of a group
(1) Click the number or name.
(2) Click [Edit].
(3) Change a name of [Group Name], and then click [OK].
● Deleting a destination from a group
(1) Select the check box for which you want to delete the
number, and then click [Delete].
5Click [Not Registered] or the number which is not
registered.
6Select [Group] from the drop-down list.
7Enter a name in [Group Name], and then click
[Address Book].
(1)
(2)
8Click [One-Touch] or [Coded Dial] from the drop-
down list, select the check box for the number to
be registered in a group, and then click [OK].
(1)
(3)
(2)
9Check if the registered destinations are displayed
in [Members List], and then click [OK].
(1)
(2)
5-14
Registering Destinations in the Address Book
6-1
Chapter
6
Using the Fax Functions
This section describes the procedure for using the fax functions.
Basic Method for Sending Faxes 6-2
Fax Settings 6-3
Image Quality Settings 6-3
Density Settings 6-3
Sharpness Settings 6-3
Specifying Destinations 6-4
Specifying Destinations by Entering a Fax Number 6-4
Specifying Destinations with the One-Touch Keys 6-4
Specifying Destinations Using Coded Dialing 6-4
Specifying Destinations Using Group Dialing 6-5
Specifying Destinations Using the Address Book 6-5
Redialing (Manual Redialing) 6-6
Useful Fax Sending Methods 6-7
Sending a Fax after Making a Phone Call (Manual Sending) 6-7
Push-button Telephone Service Using a Dial-line 6-7
Sending a Fax Abroad (Adding Pauses) 6-8
Sending to Multiple Destinations at a Time
(Sequential Broadcast) 6-9
Receiving Faxes 6-10
Receive Mode 6-10
Changing the Receive Mode 6-12
Detailed Settings for the Fax/Tel Auto Switch Mode 6-13
Forwarding Received Fax Documents in Memory to
Other Destinations (Manual Forwarding) 6-14
Checking and Managing Fax Documents in
Memory 6-15
Checking and Canceling Fax Jobs 6-15
Printing Received Fax Documents 6-15
Checking and Deleting Received Fax Documents 6-16
Checking the History of Received/Sent Fax Documents 6-17
Changing the Default Values for Fax 6-18
Changing the Fax Settings (Items Specified
Using the [Menu] Button) 6-19
Setting Procedure for Sending Faxes 6-19
Setting Items 6-19
Register Unit Name 6-20
Register Unit Telephone Number 6-20
Select Line Type 6-20
Public Line Connection 6-20
Off-Hook Alarm 6-20
Sender ID 6-20
Change Defaults 6-20
ECM TX 6-20
Pause Time 6-21
Auto Redial 6-21
Check Dial Tone Before Sending 6-21
Setting Procedure for Receiving Faxes 6-21
Setting Items for the Receive Settings 6-22
2-Sided Printing (MF4570dn Only) 6-22
Reduce RX Size 6-22
RX Page Footer 6-22
Continue Print. When Toner Is Nearly Out 6-22
ECM RX 6-22
Incoming Ring 6-23
Remote RX 6-23
Auto RX Switch 6-23
System Settings Procedure 6-23
Setting Items 6-24
TX Start Speed 6-24
RX Start Speed 6-24
Memory Lock Settings 6-24
Select Country/Region 6-24
Address Book PIN 6-25
Restrict New Destinations 6-25
Allow Driver Faxing 6-25
Restrict Sending From History 6-25
Fax No. Confirmation Re-Entry 6-25
Restrict Sequential Broadcast 6-25
Canceling Fax Jobs 6-26
6-2
Using the Fax Functions
Basic Method for Sending Faxes
This section describes the basic procedure for sending faxes.
1
Place documents.
“Placing Documents” (→P.2-4)
“Document Requirements ” (→P.2-2)
2
Press [].
4
Specify the destination.
These are the following methods to specify a destination.
(For details, see P.6-4 to 6-5.)
Entering the fax number
One-touch keys
Coded dialing
Group dialing
Address book
- Sequential broadcast
(→P.6-9)
5
Press [] (Start).
When placing documents in the feeder
Document scanning is started. The fax is sent when the scanning is
finished.
When placing documents on the platen glass
Perform the following procedure.
(1) Press [] or [] to select the size of the original document,
and then press [OK].
(2) Press [] (Start) for each document.
(3) When all documents are scanned completely, select <Start
Sending>, and then press [OK].
3
Set scanning settings for documents as needed.
There are the three items you can specify.
(For details, see P.6-3.)
Image Quality Settings
Density Settings
Sharpness Settings
The settings specified here are effective only for the
current sending operation. To make the settings
effective for all the fax operations, see “Changing the
Default Values for Fax” (→P.6-18).
6-3
Using the Fax Functions
Fax Settings
Image Quality Settings
Fax mode screen Setting screen
Resolution
200 x 100 dpi (Normal
200 x 200 dpi (Fine)
200 x 200 dpi (Photo)
200 x 400 dpi (Super
...
Specify destination.
01/01/2011 12:52AM
RX Mode: Auto
Resolution: 200 x 10
Density Settings
Fax mode screen Setting screen
Specify destination.
01/01/2011 12:52AM
Resolution: 200 x 1
...
Density: 0
Density
- +
+
-
Sharpness Settings
Fax mode screen Setting screen
Specify destination.
01/01/2011 12:52AM
Density: 0
Sharpness: 0
Sharpness
- +
+
-
+
-
Specify the scanning resolution.
Higher resolutions will result in better image
quality, but also longer transmission times.
Specify the scanning density.
You can emphasize the outline of the image in
the document or decrease the contrast.
Press [] or [] to select
<Sharpness>.
<200 dpi x 100 dpi (Normal)>
For text documents
<200 dpi x 200 dpi (Fine)>
For fine text documents
<200 dpi x 400 dpi (Superfine)>
For fine text documents
<200 dpi x 200 dpi (Photo)>
For documents that contain photographs
[]
Makes the scanning density lighter.
[]
Makes the scanning density darker.
[]
If you want to clearly scan halftone images adjust the sharpness to
<->. This can reduce the moire effect (patchy patterns called “moire”).
[]
If you want to clearly scan text or lines, adjust the sharpness to <+>.
This is appropriate for scanning documents with fine markings, such
as blueprint or thinly penciled documents.
Press [] or [] to select
<Resolution>.
Press [
] or [] to select
<Density>.
6-4
Using the Fax Functions
Specifying Destinations
Specifying Destinations
Specifying Destinations by Entering a Fax Number
Specifying Destinations with the One-Touch Keys
Specify the fax number with the numeric keys, [] (Tone),
and [] (SYMBOLS).
Press the one-touch key (01 to 04) of the destination.
To use this feature, you need to pre-register destinations in one-touch keys.
“Registering and Editing One-Touch Keys” (→P.5-3)
Specifying Destinations Using Coded Dialing
Fax mode screen
Specify destination.
01/01/2011 12:52AM
Sharpness: 0
Specify Destination
+
-
Setting screen
Specify Destination
Fax (New)
Address Book
Coded Dial
Enter the three-digit registration number (001 to 100) with
the numeric keys.
To use this feature, you need to pre-register destinations in
coded dials.
“Registering and Editing One-Touch Keys” (→P. 5-3)
Enter coded dial no.
*001
*
Press [] or [] to select <Specify
Destination>.
Press [
] or [] to select <Coded
Dial>.
Correcting destinations
• To cancel a destination
Press and hold [
] (Clear).
• To delete the last character of a destination
Press [
] (Clear).
If you press an incorrect key
(1) Press [
] (Clear).
(2) Press [
] to select <Yes>, and then press [OK].
* If you want to repeat the procedure from specifying the settings for the
document scanning, press [] (Reset).
If you press an incorrect key
(1) Press [
] (Clear).
(2) Press [
] to select <Yes>, and then press [OK].
* If you want to repeat the procedure from specifying the
settings for the document scanning, press [] (Reset).
6-5
Using the Fax Functions
Specifying Destinations
Specifying Destinations Using Group Dialing
● When the numbers are registered in a one-touch key
Press the one-touch key (01 to 04) assigned to the group.
● When the numbers are registered in a coded dial code
Fax mode screen
Specify destination.
01/01/2011 12:52AM
Sharpness: 0
Specify Destination
+
-
Setting screen
Specify Destination
Fax (New)
Address Book
Coded Dial
Enter the three-digit registration number (001 to 100) with
the numeric keys.
To use this feature, you need to pre-register destinations in
coded dials.
“ Registering and Editing Recipients for Group Dialing”
(→P.5-9)
Enter coded dial no.
*001
*
Press [] or [] to select <Specify
Destination>.
Press [
] or [] to select <Coded
Dial>.
If you press an incorrect key
(1) Press [] (Clear).
(2) Press [] to select <Yes>, and then press [OK].
* If you want to repeat the procedure from specifying the
settings for the document scanning, press [] (Reset).
Specifying Destinations Using the Address Book
After entering the characters from the operation panel and searching the abbreviation of destinations from the
registered address book (one-touch keys, coded dial, or group dialing), the destinations to be specified appear on the
display. You can specify the displayed address as a destination.
To use this feature, you need to pre-register destinations in the address book.
“Registering Destinations in the Address Book” (→P.5-1)
1 Press [] (Address Book).
2 Press [] or [] to select search for the
recipient.
• Select <All> to displays all the recipients.
• Select <> at the bottom left of the screen to add or
edit recipients.
“Registering Destinations in the Address Book”
(→P.5-1)
CANON 0123456789
GroupA 2 Destin
...
User01 01234567
...
All A-Z
3 Press [] or [] to select a recipient, and
then press [OK].
CANON 0123456789
GroupA 2 Destin
...
User01 012345678
All A-Z
6-6
Using the Fax Functions
To redial a number, follow the procedures below.
Keys to be used for this operation
OK
FAX
Redial
Start
1 Place documents.
“Placing Documents” (→P.2-4)
“Document Requirements ” (→P.2-2)
2 Press [].
3 Press [] (Redial).
4 Press [] or [] to select a recipient, and then
press [OK].
Redial
012XXXXXX
5 Press [] (Start).
NOTE
Destinations that can be redialed
• A destination entered with the numeric keys
(You may not redial multiple destinations when entering
destinations with the numeric keys.)
• Up to the last three destinations
(Only the last destination when using [
] (Hook))
when sending from history is restricted
Redialing is not available.
“Restrict Sending From History” (→P.6-25)
When turning this machine OFF
Recently dialed numbers are cleared.
When sending by automatic redialing
“Auto Redial” (→P.6-21)
Redialing (Manual Redialing)
6-7
Using the Fax Functions
Sending a Fax after Making a Phone Call
(Manual Sending)
Send a fax manually in the following cases.
• If you want to make a phone call before sending fax
documents
• If the recipient’s fax machine cannot automatically receive
faxes
Keys to be used for this operation
FAX
Start
Numeric keys
1Connect an external telephone to this machine.
For details on connecting, see the following.
e-Manual → Setting Up the Machine → Specifying Initial Fax
Settings and Connecting a Telephone Cable → Connecting a
Telephone Line
2Place documents in the feeder.
“Placing Documents” (→P.2-4)
“Document Requirements ” (→P.2-2)
3 Press [].
4Set scanning settings for documents as needed.
“Fax Settings” (→P.6-3)
5Check the dial tone via the handset of the
external telephone.
The dial tone sounds.
6Dial the recipient’s fax number.
7Talk through the handset to the recipient.
When you hear a beep, proceed to Step 9.
8Ask the recipient to set their fax machine to
receive faxes.
9When you hear a beep, press [] (Start), and
hang up the handset.
After completing the scanning, you can send the fax documents.
NOTE
Restrictions for manual sending
• Scanning from the platen glass is not available.
• The group dialing function is not available.
• Scanning 2-sided documents is not available. (Only one side of
the documents will be scanned.)
Check the dial tone before entering a fax number.
If you enter the number before checking the dial tone, the call may
not be connected or the wrong number may be dialed.
Push-button Telephone Service Using a
Dial-line
Some types of push-button telephone services require
the availability of a push-button line (e.g., banks, airline
reservations, and hotel reservations). If this machine is
connected using a dial-line, you can send the tone signal
temporarily using the following procedures.
Keys to be used for this operation
Start
Hook
Tone, Numeric keys
FAX
1 Press [].
2 Press [] (Hook), and check the dial tone.
The dial tone sounds.
3Use the numeric keys to dial the desired
information service.
Specify destination.
01/01/2011 12:52AM
012XXXXXX
Start Receiving
Resolution: 200 x 1
...
4After responding to the recorded message of the
information service, press [
] (Tone).
You can switch to the tone signal.
Specify destination.
01/01/2011 12:52AM
012XXXXXXT
Start Receiving
Resolution: 200 x 1
...
Useful Fax Sending Methods
6-8
Using the Fax Functions
5Use the numeric keys to enter the required
numbers for the information service.
Specify destination.
01/01/2011 12:52AM
012XXXXXXT3456
Start Receiving
Resolution: 200 x 1
...
6If you want to receive faxes, press [] (Start).
NOTE
Telephone call
The external telephone must be connected to this machine.
Check the dial tone before entering a fax number.
If you enter the number before checking the dial tone, the call may
not be connected or the wrong number may be dialed.
Sending a Fax Abroad (Adding Pauses)
When sending a fax abroad, you may need to insert a pause
within the number.
When communicating abroad, the signal distance is extreme
and the signal route complicated. Because of this, you may not
be able to connect to a recipient by dialing an international
telephone identification number, country code, and the
recipient’s fax number at the same time. In this case, add a
pause after the international telephone identification number.
Because adding a pause provides a point where wait time can
be added when dialing, it is easier to connect to the recipient.
Keys to be used for this operation
Pause
FAX
Numeric keys
Start
1 Place documents.
“Placing Documents” (→P.2-4)
“Document Requirements ” (→P.2-2)
2 Press [].
3Set scanning settings for documents as needed.
“Fax Settings” (→P.6-3)
4Use the numeric keys to enter the international
access code.
For details on international access codes, contact your telephone
company.
Fax Number
012
(Apply: Press OK)
5 Press [] (Pause) to enter a pause as
needed.
- The letter <p> indicating a pause is displayed.
- The default pause is two seconds*. To change the pause time,
see “Pause Time” (→P.6-21).
- When you are adding pauses consecutively, press []
(Pause) again.
* The default value varies depending on the country where you
are using the machine.
Fax Number
012P
(Apply: Press OK)
6Enter the country code, the area code, and the
fax/telephone number using the numeric keys.
Fax Number
012p031XXXXXX
(Apply: Press OK)
7 Press [] (Pause) to add a pause at the
end of the fax/telephone number as needed.
• The letter <P> is displayed at the end of the fax number.
• The pause added to the end of the number is fixed at 10
seconds.
Fax Number
012p031XXXXXXP
(Apply: Press OK)
8 Press [] (Start).
6-9
Using the Fax Functions
Sending to Multiple Destinations at a
Time (Sequential Broadcast)
You can send the same document to multiple destinations.
Keys to be used for this operation
OK
Numeric keys
Start
1 Place documents.
“Placing Documents” (→P.2-4)
“Document Requirements ” (→P.2-2)
2 Press [] or [] to select <Specify Destination>,
and then press [OK].
Specify destination.
01/01/2011 12:52AM
Sharpness: 0
Specify Destination
+
-
3 Press [] or [] to select a method for specifying
destinations, and then press [OK].
• Fax (New)
• Address Book
• Coded Dial
“Specifying Destinations” (→P.6-4)
Specify Destination
Fax (New)
Address Book
Coded Dial
4Repeat Step 2 and 3 to enter all the destinations.
5 Press [] (Start).
NOTE
The number of destinations capable of sequential
broadcast
You can select destinations in the following combinations.
• Specifying destinations using numeric keys: Up to 10
destinations
• One-touch keys: Up to 4 destinations
• Coded dial codes: Up to 100 destinations
When specifying destinations using the numeric keys
Enter the numbers, and then press [OK].
When checking the specified destinations
Press [] or [] to select <Confirm/Edit Destination>, and then
press [OK].
Specify destination.
01/01/2011 12:52AM
Specify Destination
Confirm/Edit Destina
6-10
Using the Fax Functions
This section describes the procedure for receiving faxes.
Receive Mode
Your machine provides multiple methods for automatically or manually receiving faxes.
To select the receive mode that best suits your needs, refer to the flowcharts that follow.
The default receive setting is <Auto> mode.
Auto mode
Receives faxes automatically.
The receiving method depends on whether an external telephone is connected.
Operation for when an incoming call is received
* You can change the number of times the incoming call rings in "Incoming Ring" on P. 6-23.
Without an external telephone connected
When the call is a fax
When the call is a faxWhen the call is a faxWhen the call is a
voice call
When the call is a
voice call
When you pick up the handset while the
incoming call rings
When you do not pick up the handset while
the incoming call rings
When the call is a voice call
An incoming call rings for the specified number of times.
*
The machine receives
the fax automatically.
The machine does not respond.
You can start talking
as is.
The machine receives the
fax automatically.
You cannot start talking.
With an external telephone connected
You can hear a beep.
Following the procedure
below, receive the fax.
(1) Press [Fax].
(2) Press [ ] or [ ] to select
<Start Receiving>, and
then press [OK].
(3) Hang up the handset.
Receiving Faxes
6-11
Using the Fax Functions
For details about the ring start time,
incoming ring time, and after ring option,
see "Detailed Settings for the Fax/Tel Mode" on P. 6-13.
*1
You can change the number of times the incoming
ringing in "Incoming Ring" on P. 6-23.
*2
To adjust the delay before the telephone rings during
an incoming call, set the <Ring Start Time>.
*3
To adjust the length of the incoming ring, set the
<Incoming Ring Time>.
*4
To specify how the machine behaves when you do not
answer an incoming call, set the <Action After Ring>
option.
Operation for when an incoming call is received
An incoming call rings for the specified number of times.
*1
When you do not pick up the handset
within the specified number of times
When you pick up the handset within
the specified number of times
When the call is a fax
When the call
is a voice call
You can hear a
beep.Following the
procedure below, receive the
fax.
(1) Press [Fax].
(2) Press [ ] or [ ] to select
<Start Receiving>, and
then press [OK].
(3) Hang up the handset.
You can start
talking as is.
The machine judges whether the
incoming call is a fax or voice call.
*2
When the call is
a fax
When the call is
a voice call
The machine receives
the fax automatically.
The telephone rings.
*3
When you pick up the
handset during ringing
When you do not pick up
the handset during ringing
You can start talking as is.
The machine hangs up the
telephone or switches to the fax
receive mode.
*4
Receives faxes automatically. (When a call comes in, the telephone will ring. To disable the incoming ring,
see "Incoming Ring" (ĺP.6-23))
Respond to a telephone call by picking up the handset.
Fax/Tel Auto
Switch mode
The telephone rings the number of times specified for the built-in
answering machine.
*1
When you pick up the handset during
ringing
When the built-in answering machine
starts up
When the call is a faxWhen the call is a
voice call
The built-in answering
machine records the
message.
*2
You can start talking as
is.
When the call is a
voice call
When the call is a fax
The machine receives the
fax automatically.
You can hear a beep.
Following the procedure
below, receive the fax.
(1) Press [Fax].
(2) Press [ ] or [ ] to select
<Start Receiving>, and
then press [OK].
(3) Hang up the handset.
Answer mode
Receives faxes automatically.
The built-in answering machine will record messages for unanswered incoming calls.
*1
Set your answering machine to answer after a few rings.
*2
Record a message on your answering machine.
(It is recommend that you insert about 4 seconds of silence at the
beginning of the message or limit the message within 20 seconds.)
Operation for when an incoming call is received
6-12
Using the Fax Functions
Operation for when an incoming call is received
*1
If "Auto RX Switch" (P. 6-23) is set to <On>, the machine switches to the fax
receive operation automatically when the machine rings for a certain time.
*2
When "Remote RX" (P. 6-23) is set, you can also receive fax documents by
dialing from your telephone.
The external phone rings.
When you pick up the handset while the
telephone rings
When the call is a fax
When the call is a voice call
When you do not pick up the handset while
the telephone rings
The machine cannot receive a call or fax.
*1
You can start talking as is.
You can hear a beep.
Following the procedure
below, receive the fax.
*2
(1) Press [Fax].
(2) Press [ ] or [ ] to select
<Start Receiving>, and
then press [OK].
(3) Hang up the handset.
Manual mode
In manual mode, you must pick up the handset to answer calls or receive faxes.
Use this mode if you expect to receive more incoming telephone calls than faxes or expect to seldom receive faxes.
The DRPD service allows you to assign distinctive ring patterns for two phone numbers on a single telephone line.
Your machine will automatically monitor incoming calls and, based on the ring pattern, will let you know if the incoming call is a fax or
voice call. Set the fax ring pattern that matches the pattern assigned by your telephone company. Contact your telephone company
for availability.
DRPD
(Distinctive Ring
Pattern Detection)
mode
Changing the Receive Mode
Select the fax receive mode that best suits your needs.
Keys to be used for this operation
OK
FAX
1 Press [].
2 Press [] or [] to select <RX Mode>, and then
press [OK].
Specify destination.
01/01/2011 12:52AM
RX Mode: Auto
Resolution: 200 x 1
...
3 Press [] or [] to select a receive mode, and
then press [OK].
RX Mode
Auto
Fax/Tel Auto Switch
Manual
Answer
If you select <Fax/Tel Auto Switch>
You need to specify the detailed settings. See “Detailed Settings
for the Fax/Tel Auto Switch Mode” (→P.6-13) and specify the
settings.
If you select <DRPD: Select Fax>
Press [
] or [] to select a ring pattern, and then press [OK].
NOTE
Depending on the connected telephone
Sending or receiving may not work properly.
6-13
Using the Fax Functions
Detailed Settings for the Fax/Tel Auto
Switch Mode
Set the ringing time or the operations for the Fax/Tel Auto
Switch mode.
Keys to be used for this operation
OK
FAX
1 Press [].
2 Press [] or [] to select <RX Mode>, and then
press [OK].
Specify destination.
01/01/2011 12:52AM
RX Mode: Auto
Resolution: 200 x 1
...
3 Press [] or [] to select <Fax/Tel Auto Switch>,
and then press [OK].
RX Mode
Auto
Fax/Tel Auto Switch
Manual
Answer
4 Press [] or [] to select an item to be specified,
and then press [OK].
Fax/Tel Auto Switch
<Apply>
Ring Start Time: 6
Incoming Ring Time:
...
After Ring: RX
<Ring Start Time>
Specify how long the machine will attempt
to detect a fax tone before the handset
starts ringing. Specify a duration between
4 seconds and 30 seconds, and then press
[OK].
<Incoming Ring Time>
Set how long the handset will ring during
an incoming call. Specify a duration
between 15 seconds and 300 seconds, and
then press [OK].
<Action After Ring>
Specify how the machine should behave
when an incoming call is not answered.
Select <End> or <RX>, and then press
[OK].
-<End>: Disconnects the call.
-<RX>: Receives a fax.
5 Press [] or [] to select <Apply>, and then
press [OK].
The receive mode is changed.
Fax/Tel Auto Switch
<Apply>
Ring Start Time: 6
Incoming Ring Time:
...
After Ring: RX
6-14
Using the Fax Functions
When a fax is stored in memory, you can manually forward it to
a specified destination.
Keys to be used for this operation
OK
Start
Status Monitor/Cancel
1 Press [] (Status Monitor/Cancel).
2 Press [] or [] to select <Fax Job Status/
History>, and then press [OK].
Status Monitor/Cancel
Device Status
Copy Job Status
Fax Job Status/Histo
Print Job Status
3 Press [] or [] to select <RX Job Status>, and
then press [OK].
Fax Job Status/History
TX Job Status
RX Job Status
Job History
4 Press [] or [] to select a job that you want to
forward, and then press [OK].
You cannot forward received faxes during
- a receiving operation
- a normal printing operation after completion of receiving
Fax RX Job Status
12:52AM Receiving
12:54AM Waiting:RX
5
Press [ ] or [] to select <Forward>, and then
press [OK].
Details
<Delete>
<Forward>
Job Number: 0004
Status: Waiting to
...
6Specify the forwarding destination.
You can specify the destination via one of the following methods.
“Specifying Destinations with the One-Touch Keys” (→P.6-4)
“Specifying Destinations Using Coded Dialing” (→P.6-4)
“Specifying Destinations Using the Address Book” (→P.6-5)
CANON 0123456789
GroupA 2 Destin
...
User01 01234567
...
All A-Z
7 Press [] (Start).
Forwarding Received Fax Documents in Memory to Other
Destinations (Manual Forwarding)
6-15
Using the Fax Functions
You can check the status of or manage fax documents that are
in the machine’s memory.
Checking and Canceling Fax Jobs
You can check detailed information about fax jobs currently
being sent or received, or waiting to be sent or received. Also,
you can also cancel unnecessary jobs (documents).
Keys to be used for this operation
OK
Status Monitor/Cancel
1 Press [] (Status Monitor/Cancel).
2 Press [] or [] to select <Fax Job Status/
History>, and then press [OK].
Status Monitor/Cancel
Device Status
Copy Job Status
Fax Job Status/Histo
Print Job Status
3 Press [] or [] to select <TX Job Status> or <RX
Job Status>, and then press [OK].
Fax Job Status/History
TX Job Status
RX Job Status
Job History
4 Press [] or [] to select a job to be checked or
canceled, and then press [OK].
Fax TX Job Status
12:52AM Sending
12:54AM Waiting:Scan
The detailed information is displayed.
Details
<Cancel>
Job Number: 0004
Status: Sending
Time: 01/01 12:52 AM
For canceling
(1) Press [] or [] to select <Cancel>, and then press [OK].
Details
<Cancel>
Job Number: 0004
Status: Sending
Time: 01/01 12:52 AM
(2) Press [] to select <Yes>, and then press [OK].
Cancel?
NoYes
The sending or receiving job is canceled. Fax transmission to all
the destinations will be canceled for sequential broadcast.
(3) Press [] (Status Monitor/Cancel) to close the screen.
NOTE
Pressing [] (Stop) can also cancel the fax jobs <h6>
You can cancel the fax job also by pressing [] (Stop).
* If only one job is processing or waiting to be sent or received,
you can stop the job by pressing [] (Stop) twice.
For checking only
Press [] (Status Monitor/Cancel) to close the screen.
Printing Received Fax Documents
You can print fax documents saved in the memory.
NOTE
When printing received documents
• You cannot specify a particular document to print. All received
faxes that are stored in memory will be printed.
• No preview function is available for stored faxes.
If time is specified in <Memory Lock Time>
Fax documents are printed automatically at <Memory Lock End
Time>.
Keys to be used for this operation
Menu
OK
Checking and Managing Fax Documents in Memory
6-16
Using the Fax Functions
1 Press [] (Menu).
2 Press [] or [] to select <System Management
Settings>, and then press [OK].
Menu
Fax TX Settings
Fax RX Settings
Adjustment/Maintena...
System Management Se
When the system manager PIN is specified
Enter the system manager PIN.
“Text Input Method” (→P.1-9)
When you finished entering, press [] or [] to select <Apply>,
and then press [OK].
System Manager PIN
*******
<Apply>
1 2 3 4 5 6 7 8 9 0
<BS>
3 Press [] or [] to select <Communication
Management Settings>, and then press [OK].
System Settings
System Manager Info
...
Device Information
...
Network Settings
Communication Manage
4 Press [] or [] to select <Memory Lock
Settings>, and then press [OK].
If <Memory Lock PIN> is specified, use the numeric keys to enter it,
and then press [OK].
Communication Mgt. Set
Fax Settings
Memory Lock Settings
5 Press [] or [] to select <Off>, and then press
[OK].
Memory Lock Settings
Off
On
Fax documents saved in the memory are printed.
6 Press [] (Menu) to close the menu
screen.
Checking and Deleting Received Fax
Documents
You can check detailed information about fax documents
saved in memory. Also, you can delete unnecessary
documents.
NOTE
Stored documents in memory
You can specify the destination to forward the documents.
“Forwarding Received Fax Documents in Memory to Other
Destinations (Manual Forwarding)” (→P.6-14)
You can print stored documents.
“Printing Received Fax Documents” (→P.6-15)
Keys to be used for this operation
OK
Status Monitor/Cancel
1 Press [] (Status Monitor/Cancel).
2 Press [] or [] to select <Fax Job Status/
History>, and then press [OK].
Status Monitor/Cancel
Device Status
Copy Job Status
Fax Job Status/Histo
Print Job Status
3 Press [] or [] to select <RX Job Status>, and
then press [OK].
Fax Job Status/History
TX Job Status
RX Job Status
Job History
4 Press [] or [] to select a job to be checked or
deleted, and then press [OK].
Fax RX Job Status
12:52AM Receiving
12:54AM Waiting:RX
The detailed information is displayed.
Details
<Delete>
<Forward>
Job Number: 0004
Status: Receiving
6-17
Using the Fax Functions
For canceling
(1) Press [] or [] to select <Delete>, and then press [OK].
Details
<Delete>
<Forward>
Job Number: 0004
Status: Receiving
(2) Press [] to select <Yes>, and then press [OK].
Delete?
NoYes
The received job is deleted.
(3) Press [] (Status Monitor/Cancel) to close the screen.
For checking only
Press [] (Status Monitor/Cancel) to close the screen.
Checking the History of Received/Sent
Fax Documents
You can check the history of received or sent faxes
Keys to be used for this operation
OK
Status Monitor/Cancel
1 Press [] (Status Monitor/Cancel).
2 Press [] or [] to select <Fax Job Status/
History>, and then press [OK].
Status Monitor/Cancel
Device Status
Copy Job Status
Fax Job Status/Histo
Print Job Status
3 Press [] or [] to select <Job History>, and then
press [OK].
Fax Job Status/History
TX Job Status
RX Job Status
Job History
4 Press [] or [] to select a job to be checked, and
then press [OK].
The detailed information is displayed.
Fax History
02:07AM Failed #018
11:19PM Failed #018
00:00AM Failed #099
5 Press [] or [] to select an item to be checked,
and then press [OK].
Details
Job Number: 0004
Result: Failed #018
Started: 01/01 12:5
...
Duration: 00'00
6 Press [] (Status Monitor/Cancel) to close
the screen.
6-18
Using the Fax Functions
The default values for fax are those functions which are
applied automatically when [
] (Reset) is pressed or the
power is turned ON. You can change the default values to suit
your needs.
You can register the following types of settings as the default
values.
• Resolution
• Density
• Sharpness
Keys to be used for this operation
Menu
OK
1 Press [] (Menu).
2 Press [] or [] to select <Fax TX Settings>, and
then press [OK].
Menu
Preferences
Timer Settings
Copy Settings
Fax TX Settings
3 Press [] or [] to select <TX Function Settings>,
and then press [OK].
Fax TX Settings
Basic Settings
TX Function Settings
Fax Setup Guide
4 Press [] or [] to select <Change Defaults>, and
then press [OK].
TX Function Settings
Change Defaults
ECM TX
Pause Time
Auto Redial
5 Press [] or [] to select a setting item, and then
press [OK].
- Resolution/Density/Sharpness
For details on settings, see “Fax Settings” (→P.6-3).
Change Defaults
<Apply>
Resolution: 200 x 100
Density: 0
Sharpness: 0
+
-
+
-
6After specifying the setting, press [] or [] to
select <Apply>, and then press [OK].
Change Defaults
<Apply>
Resolution: 200 x 10
...
Density: 0
Sharpness: 0
+
-
+
-
7 Press [] (Menu) to close the menu
screen.
Changing the Default Values for Fax
6-19
Using the Fax Functions
Change the settings for sending and receiving faxes.
For details on the procedure for setting specifications or the
setting items, see the next items.
“Setting Procedure for Sending Faxes” (→P.6-19)
“Setting Items” (→P.6-19)
“Setting Procedure for Receiving Faxes” (→P.6-21)
“Setting Items for the Receive Settings” (→P.6-22)
“System Settings Procedure” (→P.6-23)
“Setting Items” (→P.6-24)
Setting Procedure for Sending Faxes
Specify the settings for sending faxes using the following
procedure.
This section describes the procedure for changing the setting
for “ECM TX” as an example.
Keys to be used for this operation
Menu
OK
1 Press [] (Menu).
2 Press [] or [] to select <Fax TX Settings>, and
then press [OK].
Menu
Preferences
Timer Settings
Copy Settings
Fax TX Settings
3 Press [] or [] to select <TX Function Settings>,
and then press [OK].
Fax TX Settings
Basic Settings
TX Function Settings
Fax Setup Guide
4 Press [] or [] to select <ECM TX>, and then
press [OK].
TX Function Settings
Change Defaults
ECM TX
Pause Time
Auto Redial
5 Press [] or [] to select <Off> or <On>, and
then press [OK].
ECM TX
Off
On
* When <Apply> appears in the screen, you must select <Apply>
and press [OK] after specifying the setting.
6 Press [] (Menu) to close the menu
screen.
The setting is complete.
Setting Items
The following settings are available for sending faxes.
Send/Receive Settings
Basic
Settings
“Register Unit Name” (→P.6-20)
“Register Unit Telephone Number” (→P.6-20)
“Select Line Type” (→P.6-20)
“Public Line Connection” (→P.6-20)
“Off-Hook Alarm” (→P.6-20)
“Sender ID” (→P.6-20)
TX Function
Settings
“Change Defaults” (→P.6-20)
“ECM TX” (→P.6-20)
“Pause Time” (→P.6-21)
“Auto Redial” (→P.6-21)
“Check Dial Tone Before Sending” (→P.6-21)
Changing the Fax Settings (Items Specified Using the [Menu] Button)
6-20
Using the Fax Functions
Register Unit Name
Your name or company’s name must be registered as the
machine’s name.
When you send a document, the name that you registered
will appear at the top of the recipient’s paper.
How to display the settings
[] (Menu) → <Fax TX Settings> → <Basic Settings>
→ <Register Unit Name>
Settings
You can enter characters (up to 24 characters).
“Text Input Method” (→P.1-9)
NOTE
How to use a username
When you send a document, the sender information that you
registered is printed on the recipient’s paper.
Sending Date/Time
Fax/Telephone Number
(FAX No.)
Page Number
Sender Name
(Unit Name)
Telephone Number
Mark
01/01/2011 02:07 PM FAX123XXXXXXXCANONP.0001
Register Unit Telephone Number
Register your machine’s fax number.
How to display the settings
[] (Menu) → <Fax TX Settings> → <Basic Settings>
→ <Register Unit Telephone Number>
Settings
You can enter numbers with the numeric keys (up to 20
characters).
Select Line Type
If you cannot send a fax, change this setting.
If you are not sure about your telephone line type, contact
your local telephone company.
How to display the settings
[] (Menu) → <Fax TX Settings> → <Basic Settings>
→ <Select Line Type>
Settings
(Bold: Default settings)
Dial 10 PPSSpecify when you are using a dial-line.
ToneSpecify when you are using a tone-line.
Public Line Connection
The following problems may occur when fax receive mode
is selected to <Fax/Tel Auto Switch>.
• The external telephone does not ring.
• Cannot make a call using the external telephone.
You can solve these problems by changing this setting.
How to display the settings
[] (Menu) → <Fax TX Settings> → <Basic Settings>
→ <Public Line Connection>
Settings
(Bold: Default settings)
DirectUse this setting under normal conditions
Adapter 1
Select this option if a problem occurs when
<Direct> is selected.
Adapter 2
Select this option if the problem continues
when <Adapter 1> is selected.
Off-Hook Alarm
Specify whether or not to sound an alarm when the
telephone handset is off the hook.
You can also set the volume of the alarm sound.
How to display the settings
[] (Menu) → <Fax TX Settings> → <Basic
Settings> → <Select Line Type>
Settings
(Bold: Default settings)
OffNo alarm will sound.
On
Off-Hook Alarm Volume:
1 to 5
An alarm will sound at the
specified volume.
Sender ID
You can specify whether the sender ID is added to a
document to be sent.
The sender ID is printed on the top of the sent document.
Information such as your fax number and name is printed,
enabling the recipient to know who sent the document.
How to display the settings
[] (Menu) → <Fax TX Settings> → <Basic
Settings> → <Sender ID>
Settings
(Bold: Default settings)
OffNo sender ID is added.
On
Print Location:
On Image, Above Image
Select the location where the
sender ID is printed.
Mark No. as TEL/FAX:
FAX, TEL
Select a character to be added
in front of a telephone number.
Change Defaults
You can change the settings for when turning the power
ON or pressing [
] (Reset).
How to display the settings
[] (Menu) → <Fax TX Settings> → <TX Function
Settings> → <Change Defaults>
Settings
For details on the settings, see the following item.
“Changing the Default Values for Fax” (→P.6-18)
ECM TX
The ECM (Error Correction Mode) is a function for detecting
and correcting errors during fax communication. Using
the ECM function can diminish send errors even over poor
connections
NOTE
Check the settings for the recipient’s machine also.
The ECM function is available only when the setting for the
machine and recipient’s machine are enabled.
Even if the ECM function is enabled
An error may occur due to the telephone line.
When the ECM function is enabled
It may take additional time to send documents if a problem occurs
with the telephone line.
6-21
Using the Fax Functions
How to display the settings
[] (Menu) → <Fax TX Settings> → <TX Function
Settings> → <ECM TX>
Settings
(Bold: Default settings)
OffDoes not use the ECM function.
OnUses the ECM function.
Pause Time
Specify the length of a pause when [] (Pause) is
pressed.
For deatails on adding pauses, see “Sending a Fax Abroad
(Adding Pauses)” (→P.6-8)
How to display the settings
[] (Menu) → <Fax TX Settings> → <TX Function
Settings> → <Pause Time>
Settings
(Bold: Default settings)
1 to 2 to 15 (seconds)
Auto Redial
Set auto redialing to automatically reattempt to connect to
a destination if the line is busy or a send error occurs. You
can also specify the how many time to redial a number and
an interval between attempts.
How to display the settings
[] (Menu) → <Fax TX Settings> → <TX Function
Settings> → <Auto Redial>
Settings
(Bold: Default settings)
Off
Does not redial automatically.
When redialing manually, see
“Redialing (Manual Redialing)”
(→P.6-6).
On
Redial Times:
1 to 2 to 10 (times)
Set the number of redial
attempts.
Redial Interval:
2 to 99 (minutes)
Set an interval (in minutes)
between redial attempts.
Redial When Err
Occurs: Off, On
Specifies whether or not to redial
when a send error occurs.
Check Dial Tone Before Sending
When sending a fax, you can specify whether or not to
verify the dial tone before dialing.
How to display the settings
[] (Menu) → <Fax TX Settings> → <TX Function
Settings> → <Check Dial Tone Before Sending>
Settings
(Bold: Default settings)
OffDoes not check the dial tone.
OnChecks the dial tone before dialing.
Setting Procedure for Receiving Faxes
Specify the settings for receiving faxes using the following
procedure.
This section describes the procedure for changing the setting
for “ECM RX” as an example.
Keys to be used for this operation
Menu
OK
1 Press [] (Menu).
2 Press [] or [] to select <Fax RX Settings>, and
then press [OK].
Menu
Timer Settings
Copy Settings
Fax TX Settings
Fax RX Settings
3 Press [] or [] to select <Fax Settings>, and
then press [OK].
Fax RX Settings
RX Function Settings
Fax Settings
4 Press [] or [] to select <ECM RX>, and then
press [OK].
Fax Settings
ECM RX
Incoming Ring
Remote RX
Auto RX Switch
6-22
Using the Fax Functions
5 Press [] or [] to select <Off> or <On>, and
then press [OK].
ECM RX
Off
On
* When <Apply> appears in the screen, you must select <Apply>
and press [OK] to apply the setting.
6 Press [] (Menu) to close the menu
screen.
The setting is complete.
Setting Items for the Receive Settings
The receive settings include the following items.
Fax RX Settings
RX Function
Settings
“2-Sided Printing (MF4570dn Only)” (→P.6-22)
“Reduce RX Size” (→P.6-22)
“RX Page Footer” (→P.6-22)
“Continue Print. When Toner Is Nearly Out” (→P.6-
22)
Fax Settings
“ECM RX” (→P.6-22)
“Incoming Ring” (→P.6-23)
“Remote RX” (→P.6-23)
“Auto RX Switch” (→P.6-23)
2-Sided Printing (MF4570dn Only)
Use this option to save paper by printing on both sides of
each sheet.
How to display the settings
[] (Menu) → <Fax RX Settings> → <RX Function
Settings> → <2-Sided Printing>
Settings
(Bold: Default settings)
OffPrints on only one side of each sheet.
OnPrints on both sides of each sheet.
Reduce RX Size
Use this option to scale images so they fit the selected
paper size or at a specified ratio, when receiving faxes.
How to display the settings
[] (Menu) → <Fax RX Settings> → <RX Function
Settings> → <Reduce RX Size>
Settings
(Bold: Default settings)
OffNo image reduction.
On
Ratio: Auto, 97%,
95%, 90%, 75%
<Auto>: Reduces the image size by
automatically
adjusting the reduction ratio.
<97%>, <95%>, <90%>, <75%>:
Reduces the image according to
the specified ratio.
Reduction Direction:
Vertical/Horizontal,
Vertical Only
<Vertical/Horizontal>: Reduces
the image size both vertically and
horizontally.
<Vertical Only>: Reduces the image
vertically only.
RX Page Footer
Specify whether or not to print a received date, day of the
week, time, number, and page number at the bottom of
documents when printing received documents.
How to display the settings
[] (Menu) → <Fax RX Settings> → <RX Function
Settings> → <RX Page Footer>
Settings
(Bold: Default settings)
OffDoes not include the page footer.
OnIncludes the page footer.
Continue Print. When Toner Is Nearly Out
Specify whether or not to continue printing received
documents when the toner is nearly out.
IMPORTANT
When using this option, some documents may be light or blurry,
due to low toner. Beware that data is erased when a received fax is
printed, so you will not be able to reprint a received fax that is too
light or blurred to read.
How to display the settings
[] (Menu) → <Fax RX Settings> → <RX Function
Settings> → <Continue Print. When Toner Is Nearly
Out>
Settings
(Bold: Default settings)
OffPrinting does not continue when the toner is low.
OnPrinting continues when the toner is low.
ECM RX
The ECM (Error Correction Mode) is a function for detecting
and correcting errors during fax communication. Using the
ECM function can diminish receive errors even over poor
connections.
NOTE
Check the settings for the recipient’s machine also
The ECM function is available only when the setting for both the
sender’s and recipient’s machines are enabled.
Even if the ECM function is enabled
An error may occur due to a poor connection.
When the ECM function is enabled
It may take time to receive documents if a problem occurs with the
telephone line.
How to display the settings
[] (Menu) → <Fax RX Settings> → <Fax Settings>
→ <ECM RX>
Settings
(Bold: Default settings)
OffDoes not use the ECM function.
OnUses the ECM function.
6-23
Using the Fax Functions
Incoming Ring
Specify whether or not the external telephone will ring
during an incoming call if <RX Mode> is set to <Auto> or
<Fax/Tel Auto Switch>.
You can also specify the number of ringing times.
After the external telephone rings for specified times, the
machine automatically starts receiving when receiving a
fax. When receiving a call, only when <RX Mode> is set to
<Fax/Tel Auto Switch>, the machine’s speaker rings.
How to display the settings
[] (Menu) → <Fax RX Settings> → <Fax Settings>
→ <Incoming Ring>
Settings
(Boldface: Default settings)
Off
The telephone does not ring
during an incoming call.
On
Ring Times: 1 to 2 to 99
(times)
The telephone rings during an
incoming call.
You can specify the number of
ringing times in <Ring Times>.
Remote RX
If an external telephone is connected, you can switch to the
fax receiving mode immediately by dialing the ID number
for fax receiving using the dial buttons of the telephone
during a phone call.
How to display the settings
[] (Menu) → <Fax RX Settings> → <Fax Settings>
→ <Remote RX>
Settings
(Boldface: Default settings)
OffRemote receiving is disabled.
On
Remote RX ID:
00 to 25 to 99
Remote receiving is enabled.
You can specify an ID number for fax
receiving in <Remote Receive ID>.
Auto RX Switch
Specify how long an incoming call should ring before the
machine automatically switches to fax mode. This option is
available when the <RX Mode> is set to <Manual>.
How to display the settings
[] (Menu) → <Fax RX Settings> → <Fax Settings>
→ <Auto RX Switch>
Settings
(Bold: Default settings)
Off
The machine will not
automatically switch to fax
mode.
On
Incoming Ring Time: 1
to 15 to 99 (seconds)
The machine will
automatically switch to fax
mode after the specified
period.
System Settings Procedure
Specify the system settings using the following procedure.
This section describes the procedure for changing the setting
for “TX Start Speed” as an example.
Keys to be used for this operation
Menu
OK
1 Press [] (Menu).
2 Press [] or [] to select <System Management
Settings>, and then press [OK].
Menu
Fax TX Settings
Fax RX Settings
Adjustment/Maintena...
System Management Se
When the system manager PIN is specified
Enter the system manager PIN.
“Text Input Method” (→P.1-9)
When you are finished entering, press[] or [] to select <Apply>,
and then press [OK].
System Manager PIN
*******
<Apply>
1 2 3 4 5 6 7 8 9 0
<BS>
3 Press [] or [] to select <Communication
Management Settings>, and then press [OK].
System Settings
System Manager Info
...
Device Information
...
Network Settings
Communication Manage
4 Press [] or [] to select <Fax Settings>, and
then press [OK].
Communication Mgt. Set
Fax Settings
Memory Lock Settings
6-24
Using the Fax Functions
5 Press [] or [] to select <TX Start Speed>, and
then press [OK].
Fax Settings
TX Start Speed
RX Start Speed
6 Press [] or [] to select the send start speed,
and then press [OK].
TX Start Speed
33600 bps
14400 bps
9600 bps
7200 bps
* When <Apply> appears in the screen, you must select <Apply>
and press [OK] after specifying the setting.
7 Press [] (Menu) to close the menu
screen.
The setting is complete.
Setting Items
The following system management settings are available.
System Settings
Communications
Settings
Fax Settings
“TX Start Speed” (→P.6-24)
“RX Start Speed” (→P.6-24)
“Memory Lock Settings” (→P. 6-24)
“Select Country/Region” (→P.6-24)
Restrict Sending
“Address Book PIN” (→P.6-25)
“Restrict New Destinations” (→P.6-25)
“Allow Driver Faxing” (→P.6-25)
“Restrict Sending From History” (→P.6-25)
“Fax No. Confirmation Re-Entry” (→P.6-25)
“Restrict Sequential Broadcast” (→P.6-25)
TX Start Speed
Change the transmission start speed if you have difficulty
Libble takes abuse of its services very seriously. We're committed to dealing with such abuse according to the laws in your country of residence. When you submit a report, we'll investigate it and take the appropriate action. We'll get back to you only if we require additional details or have more information to share.
Product:
Forumrules
To achieve meaningful questions, we apply the following rules:
First, read the manual;
Check if your question has been asked previously;
Try to ask your question as clearly as possible;
Did you already try to solve the problem? Please mention this;
Is your problem solved by a visitor then let him/her know in this forum;
To give a response to a question or answer, do not use this form but click on the button 'reply to this question';
Your question will be posted here and emailed to our subscribers. Therefore, avoid filling in personal details.
Register
Register getting emails for Canon MF4570 Image Class at:
new questions and answers
new manuals
You will receive an email to register for one or both of the options.
Get your user manual by e-mail
Enter your email address to receive the manual of Canon MF4570 Image Class in the language / languages: English as an attachment in your email.
The manual is 7,38 mb in size.
You will receive the manual in your email within minutes. If you have not received an email, then probably have entered the wrong email address or your mailbox is too full. In addition, it may be that your ISP may have a maximum size for emails to receive.
The manual is sent by email. Check your email
If you have not received an email with the manual within fifteen minutes, it may be that you have a entered a wrong email address or that your ISP has set a maximum size to receive email that is smaller than the size of the manual.
The email address you have provided is not correct.
Please check the email address and correct it.
Your question is posted on this page
Would you like to receive an email when new answers and questions are posted? Please enter your email address.