20 21
DE
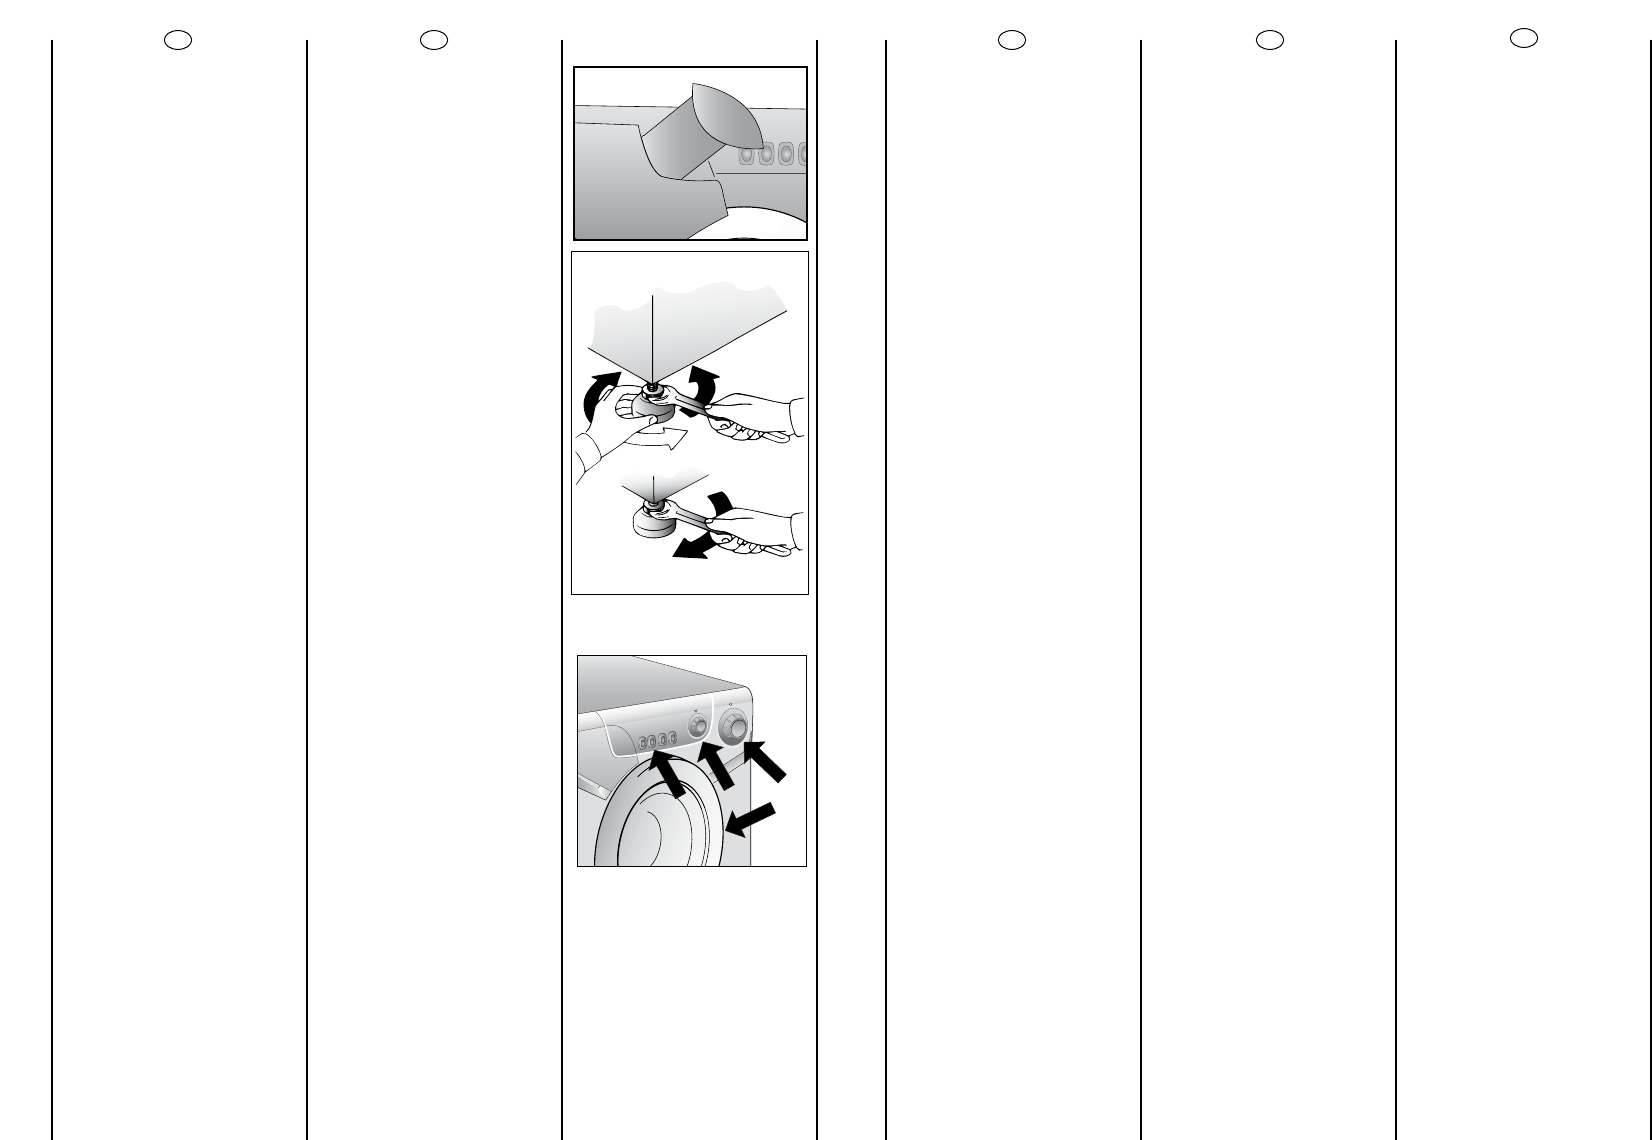
Kleben Sie die mitgelieferte
Programmtabelle in der
gewünschten Sprache auf
die herausziehbare
Halterung.
Ausrichten der Maschine
über die vorderen
Verstellfüße
a) Kontermuttern in
Uhrzeigersinn lösen.
b) Standfuß einregulieren, bis
das Gerät genau
ausgerichtet ist (möglichst
mit der Wasserwaage
justieren!).
c) Kontermutter (gegen den
Uhrzeigersinn) festziehen.
Wichtig: Sollte das Gerät auf
eien Sockel aufgestellt
werden, ist es durch eine
Sockelbefestigung zu
sichern. Erkundigen Sie sich
bitte hierfür im Fachhandel.
Der Hersteller haftet nicht für
unsachgemäße Aufstellung
und Installation.
Sicherstellen, daß die Start-
Stop-Taste (C) nicht
gedrückt ist.
Sicherstellen, daß alle
Schalter auf “0” stehen, und
das Bullauge geschlossen ist.
Stecker einstecken.
Nach der Installation muß
der Anschluß zugänglich
sein.
Nalepte samolepicí ätítek s
popisem pracích programå
v öeätinë na vÿsuvnou
destiöku jak ukazuje
obrázek
Praöka má 2 pohyblivé
noïiöky, kterÿmi lze vyrovnat
vodorodnou polohu praöky.
aa))
Otáöejte maticí äroubu
po smëru hod. ruöiöek a
pak måïete püizpåsobit
vÿäku noïiöky.
bb))
Otáöením sniïujte nebo
zdvihejte noïiöku, dokud
perfektnë nepüilne k
podlaze.
cc))
Upevnëte polohu noïiöky
otoöením matice äroubu
proti smëru hod. ruöiöek.
Zkontrolujte, Ïe tlaãítko
START/STOP (C) není
stisknuté.
Ujistëte se, ïe väechny
knoflíky (ovládací prvky) jsou
v pozici ”0” a dvíüka jsou
zavüená.
Zapojte záströku do sítë.
Po instalaci spotfiebiãe se
ujistûte, Ïe spotfiebiã je
umístûn tak, aby byla
snadno pfiístupná zásuvka.
CZ
PL
Przykleiç zaäåczonå naklejkë
w odpowiednim jëzyku do
ruchomej wkäadki.
Wypoziomowaç pralkë
manipulujåc jej przednimi
nóãkami.
aa))
Przekrëciç w kierunku
zgodnym z kierunkiem
wskazówek zegara nakrëtkë
blokujåcå nóãkë pralki.
bb))
Przekrëciç nóãkë
podnoszåc jå lub
opuszczajåc, tak aby
uzyskaç doskonaäe
przyleganie do podäoãa.
cc))
Zablokowaç nóãkë
przykrëcajåc nakrëtkë w
kierunku przeciwnym do
ruchu wskazówek zegara, aã
bëdzie przylegaäa do dna
pralki.
Upewnij sië, ãe przycisk
wäåczajåcy pralkë (C) nie
jest wciéniëty.
Upewnij sië, ãe wszystkie
pokrëtäa så ustawione w
pozycji „0”, a drzwiczki pralki
så zamkniëte.
Wäoãyç wtyczkë kabla
zasilajåcego do gniazda
sleciowego.
Po zainstalowaniu,
urzådzenie naleãy ustawiç w
pozycji zapewniajåcej
swobodny dostëp do
kontaktu (wtyczki).
FR
Appliquer la légende des
programmes sur le support
extractible.
Mettre la machine à niveau
avec les pieds avant.
a) Tourner dans le sens des
aiguilles d’une montre
l’écrou de façon à
dévérouiller la vis du pied.
b) Tourner le pied et le faire
monter ou descendre
jusqu’à obtenir une parfaite
adhérence au sol.
c) Enfin bloquer le pied en
revissant l’écrou dans le sens
inverse des aiguilles d’une
montre et le faire adhérer au
fond de la machine.
Vérifier que le bouton
Marche/Arrêt (C) ne soit pas
enfoncé.
Vérifier que toutes les
manettes soient sur la
position “0” et que le hublot
soit fermé.
Brancher la prise.
Une fois l'appareil installé, la
prise électrique doit rester
accessible .
IT
Applichi la legenda adesiva
in dotazione nella lingua
appropriata sul supporto
estraibile.
Livelli la macchina con i
piedini anteriori.
a) Girare in senso orario il
dado per sbloccare la vite
del piedino.
b) Ruotare il piedino e farlo
scendere o salire fino ad
ottenere la perfetta
aderenza al suolo.
c) Bloccare infine il piedino
riavvitando il dado in senso
antiorario, fino a farlo
aderire al fondo della
lavatrice.
Si assicuri che il pulsante
Marcia/Arresto (C) non sia
premuto.
Si assicuri che tutte le
manopole siano in posizione
“0” e l’oblò sia chiuso.
Inserisca la spina.
L’ a pparecchio deve essere
posto in modo che la spina
sia accessibile ad
installazione avvenuta.