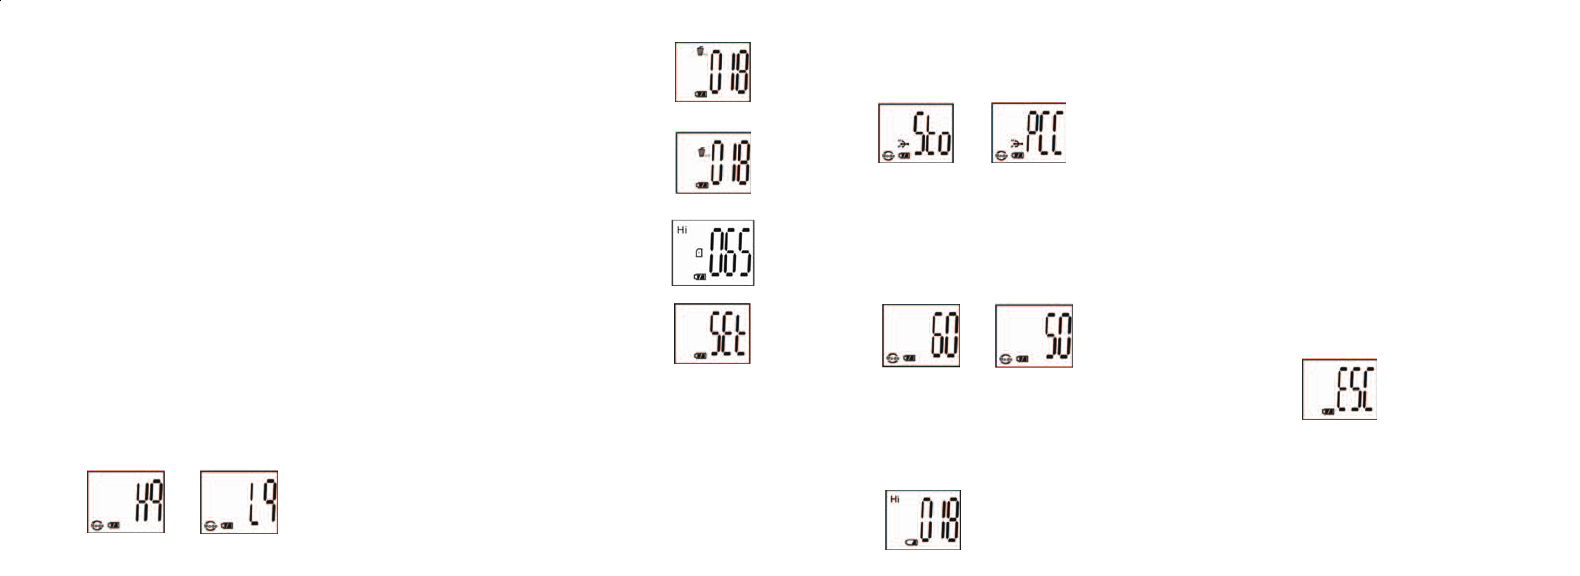
B. Wählen Sie STO (Integrierter Speicher) oder PCC (PC CAM) Modus, indem Sie den SNAP-Knopf
betätigen. Drücken Sie anschließend den MODE-Knopf zur Bestätigung und zum Übergang auf die nächste
Einstellung
C. Wählen Sie 50 Hz oder 60 Hz Kamera-Output, indem Sie den SNAP-Knopf betätigen. Drücken Sie
anschließend den MODE-Knopf zur Bestätigung und zum Übergang auf die nächste Einstellung. Die
Kamera ist auf „60“ voreingestellt, was der Frequenz in den USA entspricht. Um „50“ zu wählen, drücken
Sie den SNAP-Knopf, bis „60“ auf „50“ überspringt. Bestätigen Sie diese Wahl mit einem Druck auf den
SNAP-Knopf. Es ist wichtig, die passende Frequenz (50 oder 60) für Ihr Land einzustellen, damit das Bild
nicht flackert
D. Verlassen des Einstellungsmodus durch Drücken des SNAP-Knopfs.
16. Das Batteriesymbol zeigt den Ladezustand der Batterie an. Wenn das Batterie-Symbol blinkt, müssen die
Batterien bald gewechselt werden.
42 43
12. Wenn Sie alle Bilder aus dem Kameraspeicher löschen möchten, wählen Sie den Modus
„Delete All”. Bestätigen Sie mit einem Druck auf den SNAP-Knopf. Nun blinkt die
Bildanzahl. Während des Löschvorgangs ertönt ein Signalton, der immer höher wird. Sobald
der Löschvorgang abgeschlossen ist, wird die Bildanzahl Null gestellt, das heißt die Anzahl der
nun möglichen Aufnahmen erscheint.
13. Wenn das Symbol „Delete Last“ (letzte Aufnahme löschen) erscheint, sieht die Anzeige so
aus. Drücken Sie SNAP, um die letzte Aufnahme aus dem Kameraspeicher zu löschen. Die
Bildanzahl steigt automatisch an, sobald die Aufnahme gelöscht ist
14. Sobald eine SD-Karte in die entsprechende Öffnung eingeschoben wird, erscheint das SD-
Symbol auf der LCD-Anzeige. Wenn eine SD-Karte eingelegt ist, werden die aufgenommenen
Bilder auf der Karte gespeichert. Die Anzahl der Aufnahmen ändert sich, weil die SD-Karte
über eine andere Speicherkapazität verfügt.
15. Drücken Sie den MODE-Knopf solange, bis der SET-Modus auf der LCD-Anzeige
erscheint. Mit einem Druck auf SNAP gelangen Sie in den Einstellungsmodus. Zum
Ändern der Einstellungen Bildqualität (Voreinstellung: Hoch), Integrierter Speicher/PC Cam
(Voreinstellung: Integrierter Speicher), 50 Hz/60 Hz Frequenz (Voreinstellung: 60 Hz) gehen
Sie wie folgt vor:
A. Wählen Sie Hq (Hohe Qualität) oder Lq (Niedrige Qualität) Bildqualität, indem Sie den SNAP-Knopf
betätigen. Drücken Sie anschließend den MODE-Knopf zur Bestätigung und zum Übergang auf die nächste
Einstellung.