indicates trademarks registered in the United States. These marks may be registered in other nations or otherwise protected by common law.
Bowex, the B logo, Bowex Trainer, Nautilus, Schwinn, and Universal are trademarks owned by or licensed to Nautilus, Inc. Polar
®
, OwnCode
®
,
Android™, Google Play™, and Nut Thins
®
are trademarks of their respective owners. Apple and the Apple logo are trademarks of Apple Inc.,
registered in the U.S. and other countries. App Store is a service mark of Apple Inc. The Bluetooth
®
word mark and logos are registered trademarks
owned by Bluetooth SIG, Inc., and any use of such marks by Nautilus, Inc. is under license.
ORIGINAL MANUAL - ENGLISH VERSION ONLY
Welcome to the Bowflex™
BXT6/BXT028
fitness machine!
Assembly / Owner’s Manual
3
Important Safety Instructions
When using an electrical appliance, basic precautions should always be followed, including the following:
This icon means a potentially hazardous situation which, if not avoided, could result in death or serious injury.
Obey the following warnings:
Read and understand all Warnings on this machine.
Carefully read and understand the Assembly/Owner’s Manual.
Carefully read and understand the Assembly instructions. Read and understand the complete Manual. Keep the Manual
for future reference.
To reduce the risk of electrical shock or unsupervised usage of the equipment, always unplug this machine from the
electrical outlet immediately after using and before cleaning.
To decrease the risk of burns, electric shock, or injury to persons, read and understand the complete Assembly/Owner’s
Manual. Failure to follow these guidelines can cause a serious or possibly fatal electrical shock or other serious injury.
• Keep bystanders and children away from the product you are assembling at all times.
• Do not connect power supply to the machine until instructed to do so.
• The machine should never be left unattended when plugged in. Unplug from outlet when not in use, and before putting on or taking off parts.
• Before each use, examine the machine for damage to power cord, loose parts or signs of wear. Do not use if found in this condition. If purchased
in US/Canada, contact Customer Service for repair information. If purchased outside US/Canada, contact your local distributor for repair
information.
• Not intended for use by persons with medical conditions where those conditions may impact the safe operation of the treadmill or pose a risk of
injury to the user.
• Do not drop or put objects into any opening of the machine.
• Never operate this treadmill with the air openings blocked. Keep the air openings free of lint, hair and the like.
• Do not assemble this machine outdoors or in a wet or moist location.
• Make sure assembly is done in an appropriate work space away from foot traffic and exposure to bystanders.
• Some components of the machine can be heavy or awkward. Use a second person when doing the assembly steps involving these parts. Do not
do steps that involve heavy lifting or awkward movements on your own.
• Set up this machine on a solid, level, horizontal surface.
• Do not try to change the design or functionality of this machine. This could compromise the safety of this machine and will void the warranty.
• If replacement parts are necessary, use only genuine Nautilus replacement parts and hardware. Failure to use genuine replacement parts can
cause a risk to users, keep the machine from operating correctly and void the warranty.
• Do not use until the machine has been fully assembled and inspected for correct performance in accordance with the Manual.
• Use this machine only for its intended use as described in this manual. Do not use attachments not recommended by the manufacturer.
• Do all assembly steps in the sequence given. Incorrect assembly can lead to injury or incorrect function.
• Connect this machine to a properly grounded outlet only (see Grounding or Earthing Instructions).
• Keep the power cord away from heat sources and hot surfaces.
• Do not operate where aerosol products are being used.
• To disconnect, turn all controls to the off position, then remove plug from outlet.
• SAVE THESE INSTRUCTIONS.
Assembly / Owner’s Manual
4
Important Safety Instructions
Before using this equipment, obey the following warnings:
Read and understand the complete Manual. Keep the Manual for future reference.
Read and understand all warnings on this machine. If at any time the Warning labels become loose, unreadable or dislodged,
replace the labels. If purchased in US/Canada, contact Customer Service for replacement labels. If purchased outside US/Canada,
contact your local distributor for them.
To reduce the risk of electrical shock or unsupervised usage of the equipment, always unplug the power cord from the
wall outlet and/or the machine and wait 5 minutes before cleaning, maintaining or repairing the machine. Place the
power cord in a secure location.
• Children must not be let on or near to this machine. Moving parts and other features of the machine can be dangerous to children.
• Not intended for use by anyone under 14 years of age.
• Consult a physician before you start an exercise program. Stop exercising if you feel pain or tightness in your chest, become short of breath, or
feel faint. Contact your doctor before you use the machine again. Use the values calculated or measured by the machine’s computer for reference
purposes only.
• Before each use, examine this machine for damage to power cord, power receptacle, loose parts or signs of wear. Do not use if found in this
condition. If purchased in US/Canada, contact Customer Service for repair information. If purchased outside US/Canada, contact your local
distributor for repair information.
• Maximum user weight limit: 136 kg (300 lbs.). Do not use if you are over this weight.
• This machine is for home use only.
• Do not wear loose clothing or jewelry. This machine contains moving parts. Do not put fingers or other objects into moving parts of the exercise
equipment.
• Always wear rubber soled athletic shoes when you use this machine. Do not use the machine with bare feet or only wearing socks.
• Set up and operate this machine on a solid, level, horizontal surface.
• Use caution when you step on and off the machine. Use the supplied foot support platforms for stability before walking on the moving belt.
• To prevent injury, stand on the foot support platforms before you start the machine or end a workout. Do not dismount the machine by standing on
the moving Walking Belts and exiting off the rear of the machine.
• Disconnect all power before servicing this machine.
• Do not operate this machine outdoors or in moist or wet locations.
• Keep at least 0.6 m (24”) on each side of the machine and 2 m (79”) behind the machine clear. This is the recommended safe distance for access
and passage around and emergency dismounts from the machine. Keep third parties out of this space when machine is in use.
• Do not over exert yourself during exercise. Operate the machine in the manner described in this manual.
• Perform all regular and periodic maintenance procedures recommended in the manual.
• Read, understand, and test the Emergency Stop Procedure before use
• Keep the walking belt clean and dry.
• Do not drop or put objects into any opening of the machine.
• Do not stand on machine motor cover or front trim cover.
• Keep power cord away from heat source and hot surfaces.
• This machine must be connected to an appropriate, dedicated electrical circuit. Nothing else must be connected to the circuit.
• Always connect the power cord to a circuit capable of handling 15 amperes for 110V AC or 10 amperes for 220-240V AC with no other loads
applied.
• Connect this machine to a correctly grounded outlet; consult a licensed electrician for assistance.
• Do not operate where aerosol products are being used.
• Do not let liquids touch the electronic controller. If it does, the controller must be inspected and tested for safety by an approved technician before
it can be used again.
• The electrical wiring for the residence in which the machine will be used must obey the applicable local and provincial requirements.
• Exercise on this machine requires coordination and balance. Be sure to anticipate that changes in belt speed and incline angle of deck can occur
during workouts, and be attentive in order to avoid loss of balance and possible injury
• A machine should never be left unattended when plugged in. Unplug from outlet when not in use, and before putting on or taking off parts.
Assembly / Owner’s Manual
5
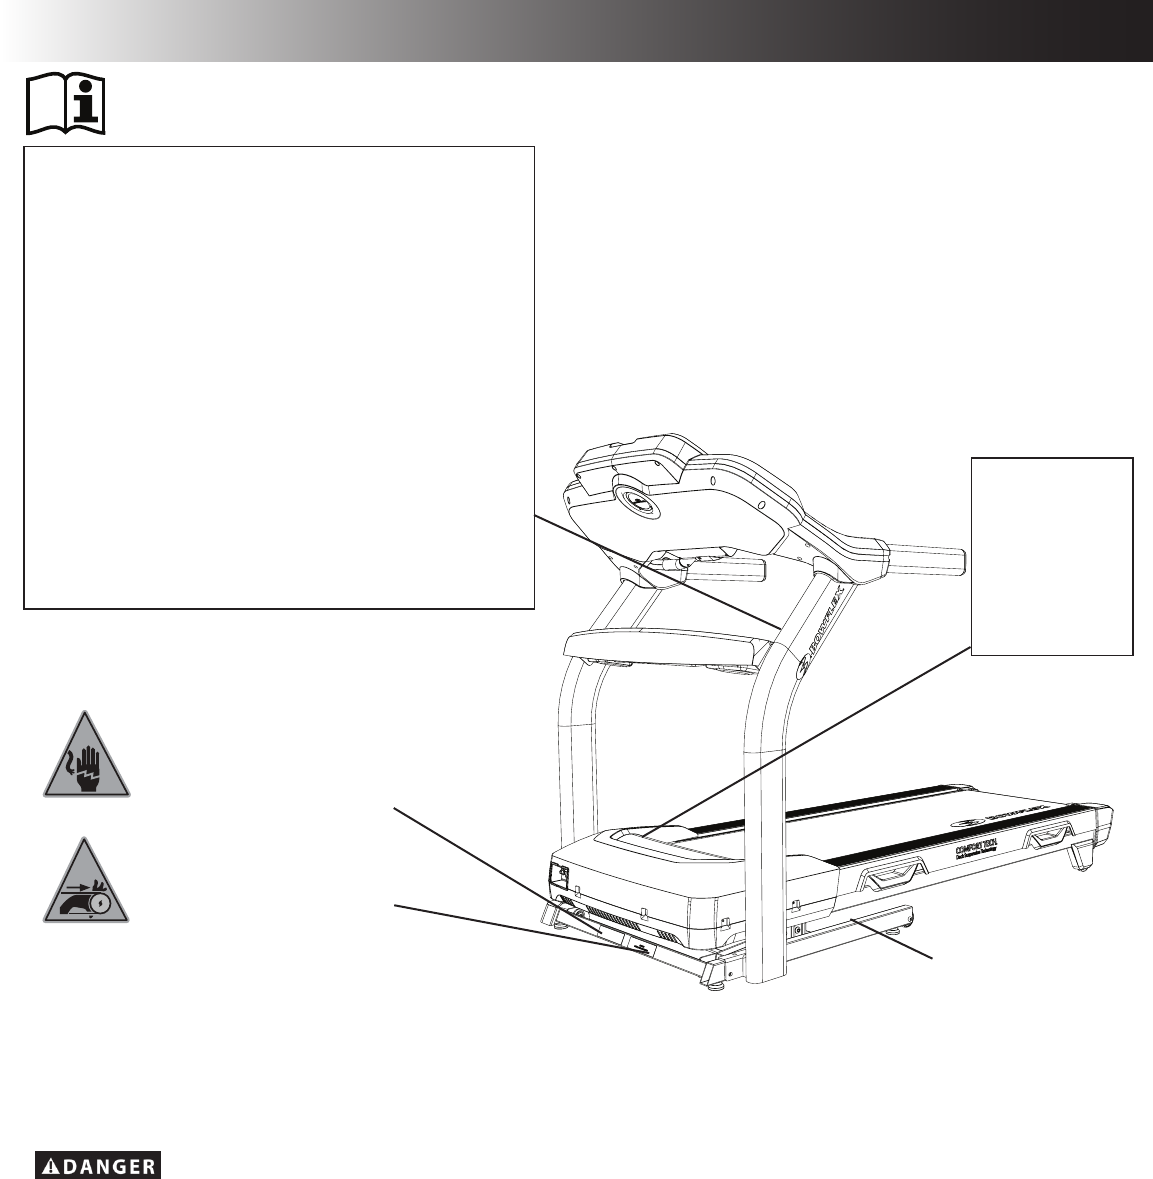
Safety Warning Labels and Serial Number
CAUTION
Risk of Injury to Persons - To Avoid injury, use extreme caution
when stepping onto or off of a moving belt. Read instruction
manual before using.
WARNING!
• Injury or death is possible if caution is not used while using this
machine.
• Keep children and pets away.
• Read and follow all warnings on this machine.
• Refer to the Owner’s Manual for additional warnings and safety
information.
• The heart rate displayed is an approximation and should be used
for reference only.
• Not intended for use by anyone under 14 years of age.
• The maximum user weight for this machine is 136 kg. (300 lbs)
• This machine is for home use only.
• Consult a physician prior to using any exercise equipment.
(This label is only available on the BXT6 machine in English and
French Canadian.)
Serial Number and
Product Specication
WARNING!
- Moving parts can crush and cut.
- Keep guards in place.
- Lock out power before servicing.
WARNING!
HAZARDOUS VOLTAGE.
- Contact may cause electrical shock or burn.
- Turn off and lock out power before servicing.
REVISIONS
ECO
REVISION
REV DESCRIPTION
APPROVED
DATE
TITLE.
PART NO.
REV.
SHEET 1 OF 1
SCALE: 1:1
DO NOT SCALE DRAWING
1. ALL ITEMS MUST BE RoHS COMPLIANT
2. ALL DIMENSIONS APPLY BEFORE PLATING OR COATING.
3. REMOVE ALL BURRS, BREAK SHARP EDGES 0.5 MM MAX.
4. ALL MACHINES SURFACES Ra 3.2 uM.
5. ALL APPLICABLE NAUTILUS STANDARDS AND
SPECIFICATIONS APPLY.
6. ALL DIMENSIONS ARE IN MILLIMETERS
7. ALL DUAL DIMENSIONS ARE IN INCH
UNLESS OTHERWISE SPECIFIED:
METRIC
THIRD ANGLE
PROJECTION
INTERPRET DIMENSIONS AND TOLERANCES
PER ASME Y14.5M - 1994
2.5
1.5
0.75
0.25
1°
X.
X.X
X.XX
X.XXX
ANGULAR
C
SIZE
This document is the property of Nautilus, Inc. It may not be reproduced in whole or part, provided to third parties, or used for any purposes other than the performance of work for Nautilus, Inc. without written authorization. All rights are reserved, including copyrights.
TOLERANCES.
DRAWN
DESIGNED
DATE
METRIC_C_REV G
NAUTILUS, INC.
16400 SE NAUTILUS DRIVE, VANCOUVER, WA 98683
LIFECYCLE
- -
APPROVALS
- -
- -- -
WARRANTY ITEM:
D.LOVELY
08 /13 / 2009
D.LOVELY
B
002-2353
TC PULL IN WARNING
MATERIAL.
COLOR.
DIE LINE
PMS 152
PMS 109
BLACK
WHITE
Labels must be created from an agency approved tamper proof labeling system
such as "UL Recognized component marking and labeling system (example: UL PGGU2) or equivalent.
Label and adhesive must be rated for surface it is applied to (painted metal or ABS plastic),
Label and adhesive must be rated for 60 degrees C minimum. Labels must meet UL 1647 Permanence of Marking Test.
ADRAWING RELEASE
BCHANGED SIZE
8/17/0912745
12247DLOVELY
DLOVELY
120mm
30.5mm
-Moving parts can crush and
cut.
-Keep guards in place.
-Lock out power before
servicing.
REVISIONS
ECO
REVISION
REV DESCRIPTION
APPROVED
DATE
TITLE.
PART NO.
REV.
SHEET 1 OF 1
SCALE: 1:1
DO NOT SCALE DRAWING
1. ALL ITEMS MUST BE RoHS COMPLIANT
2. ALL DIMENSIONS APPLY BEFORE PLATING OR COATING.
3. REMOVE ALL BURRS, BREAK SHARP EDGES 0.5 MM MAX.
4. ALL MACHINES SURFACES Ra 3.2 uM.
5. ALL APPLICABLE NAUTILUS STANDARDS AND
SPECIFICATIONS APPLY.
6. ALL DIMENSIONS ARE IN MILLIMETERS
7. ALL DUAL DIMENSIONS ARE IN INCH
UNLESS OTHERWISE SPECIFIED:
METRIC
THIRD ANGLE
PROJECTION
INTERPRET DIMENSIONS AND TOLERANCES
PER ASME Y14.5M - 1994
2.5
1.5
0.75
0.25
1°
X.
X.X
X.XX
X.XXX
ANGULAR
C
SIZE
This document is the property of Nautilus, Inc. It may not be reproduced in whole or part, provided to third parties, or used for any purposes other than the performance of work for Nautilus, Inc. without written authorization. All rights are reserved, including copyrights.
TOLERANCES.
DRAWN
DESIGNED
DATE
METRIC_C_REV G
NAUTILUS, INC.
16400 SE NAUTILUS DRIVE, VANCOUVER, WA 98683
LIFECYCLE
- -
APPROVALS
- -
- -- -
WARRANTY ITEM:
D.LOVELY
08 /17 / 2009
D.LOVELY
B
002-2354
TC SHOCK WARNING
MATERIAL.
COLOR.
DIE LINE
PMS 152
PMS 109
BLACK
WHITE
Labels must be created from an agency approved tamper proof labeling system
such as "UL Recognized component marking and labeling system (example: UL PGGU2) or equivalent.
Label and adhesive must be rated for surface it is applied to (painted metal or ABS plastic),
Label and adhesive must be rated for 60 degrees C minimum. Labels must meet UL 1647 Permanence of Marking Test.
72mm
30.5mm
ADRAWING RELEASE
BCHANGED SIZE
8/17/0912745
12247DLOVELY
DLOVELY
WARNING!Keep
young children away
from this machine
at all times. Contact
with the moving
surface may result in
severe friction burns.
(This label is only
available on the
BXT028 machine
in English and
Chinese.)
• Use this machine only for its intended use as described in this manual. Do not use attachments not recommended by the manufacturer.
• This appliance is not intended for use by persons with reduced physical, sensory or mental capabilities, or lack of knowledge, unless they have
been given supervision or instruction concerning use of the appliance by a person responsible for their safety. Keep children under the age of 14
away from this machine.
• Children should be supervised to ensure that they do not play with the appliance.
Grounding Instructions (for a 120V AC system )
This product must be grounded. If it should malfunction or break down, grounding provides a path of least resistance for electric current to reduce
the risk of electric shock. This product is equipped with a cord having an equipment-grounding conductor and a grounding plug. The plug must be
plugged into an appropriate outlet that is properly installed and grounded in accordance with all local codes and ordinances.
Improper connection of the equipment-grounding conductor can result in a risk of electric shock. Check with a qualied
electrician or service person if you are in doubt as to whether the product is properly grounded. Do not modify the plug
provided with the product – if it will not t the outlet, have a proper outlet installed by a qualied electrician.
(These labels are in English and French Canadian on the BXT6 machine,
and English, French Canadian and Chinese on the BXT028 machine.)
Assembly / Owner’s Manual
6
Safety Warning Labels and Serial Number
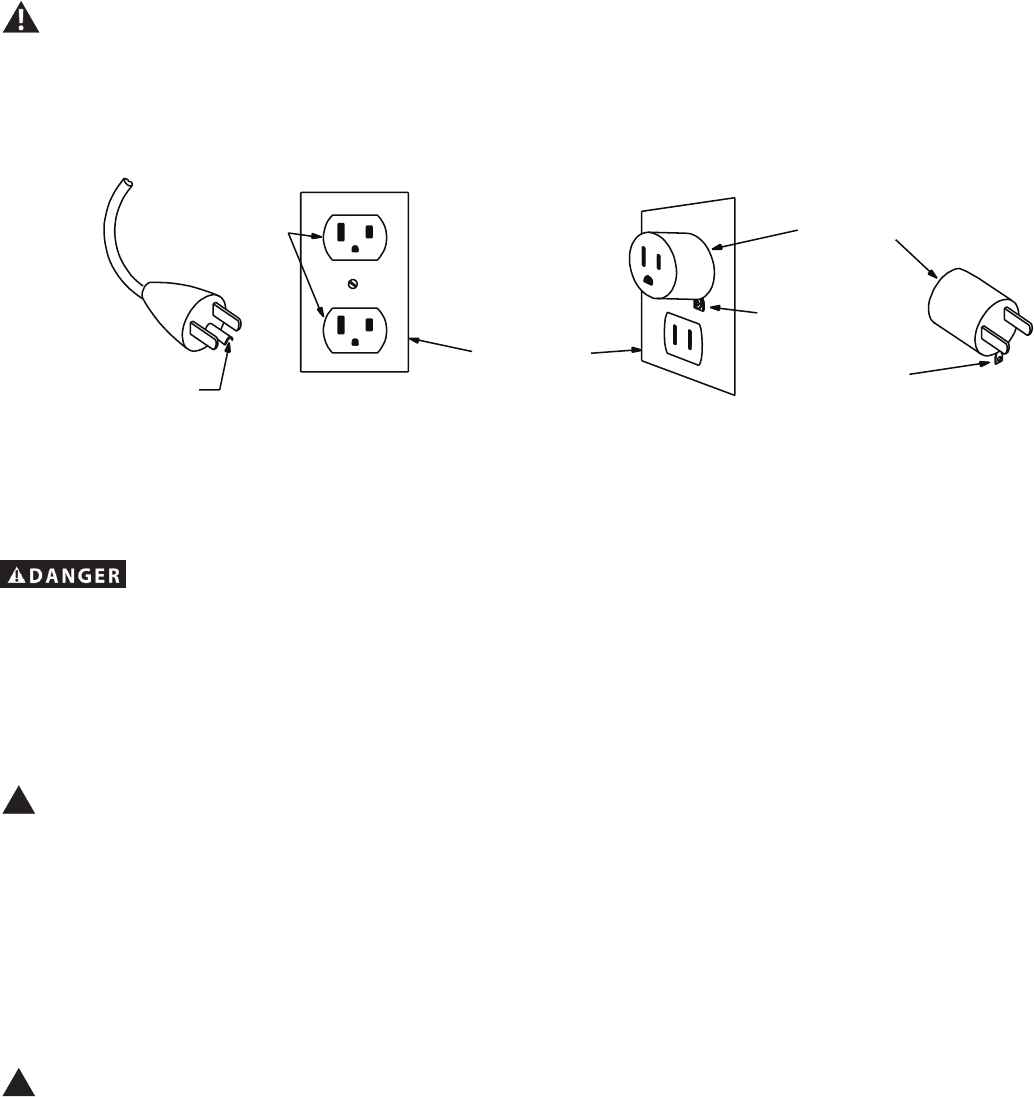
Metal Screw
Tab for Grounding
Screw
Adapter
Grounded
Outlet Box
Grounded
Outlet
Grounding Pin
Earthing Instructions(for a 220-240V AC system )
This product must be electrically earthed. If a malfunction occurs, correct earthing decreases the risk of electric shock. The power cord is equipped
with an equipment-earthing conductor, and must be connected to an outlet that is properly installed and earthed.
The electrical wiring must comply with all applicable local and provincial standards and requirements. Incorrect
connection of the equipment-earthing conductor can result in a risk of electric shock. Consult a licensed electrician if
you are not sure that the machine is correctly earthed. Do not change the plug on the machine – if it does not t the
outlet, have a correct outlet installed by a licensed electrician.
If you connect the machine to an outlet with RCBO (Residual-Current circuit Breaker with Overload protection), machine operation can cause the
circuit to trip. A Surge Protector Device is recommended to protect the machine.
!
If a Surge Protector Device (SPD) is used with this machine, be sure that it matches the power rating of this equipment (220-240V
AC). Do not connect other appliances or devices to the surge protector in combination with this machine.
Make sure that the product is connected to an outlet having the same conguration as the plug. Use the appropriate adapter
supplied with this product.
Emergency Stop Procedure
The Treadmill machine is equipped with a Safety Key that can prevent serious injury, as well as prevent children from playing with and/or being
injured on the machine. If the Safety Key is not correctly inserted into the Safety Key Port, the belt will not operate.
!
Always attach the Safety Key Clip to your clothing during your workout.
When you use the machine, only remove the Safety Key in an emergency. When the key is removed while the machine is in
operation, it will stop quickly, which could cause the loss of balance and possible injury.
For safe storage of the machine, and to prevent unsupervised operation of the machine, always remove the Safety Key and
disconnect the power cord from the wall outlet and the AC input. Place the power cord in a secure location.
The Console will display “ + SAFETY KEY ”, or add Safety Key, for a Safety Key fault. The Treadmill machine will not start a Workout, or will end and
clear an active Workout, when the Safety Key is removed. Inspect the Safety Key and be sure it is connected to the Console correctly.
If you connect the machine to an outlet with GFI (ground fault interrupt) or AFI (arc fault interrupt), machine operation can cause the circuit to trip.
This machine is for use on a nominal 120-V circuit, and has a grounding plug that looks like the plug illustrated below. A temporary
adapter that looks like the adapter illustrated may be used to connect this plug to a 2-pole receptacle as shown if a properly
grounded outlet is not available.
The temporary adapter should be used only until a properly grounded outlet can be installed by a qualied electrician. The tab for the grounding
screw must be connected to a permanent ground such as a properly grounded outlet box cover. Whenever the adapter is used, it must be held in
place by a metal screw.
Assembly / Owner’s Manual
7
Specifications / Before Assembly
Before Assembly
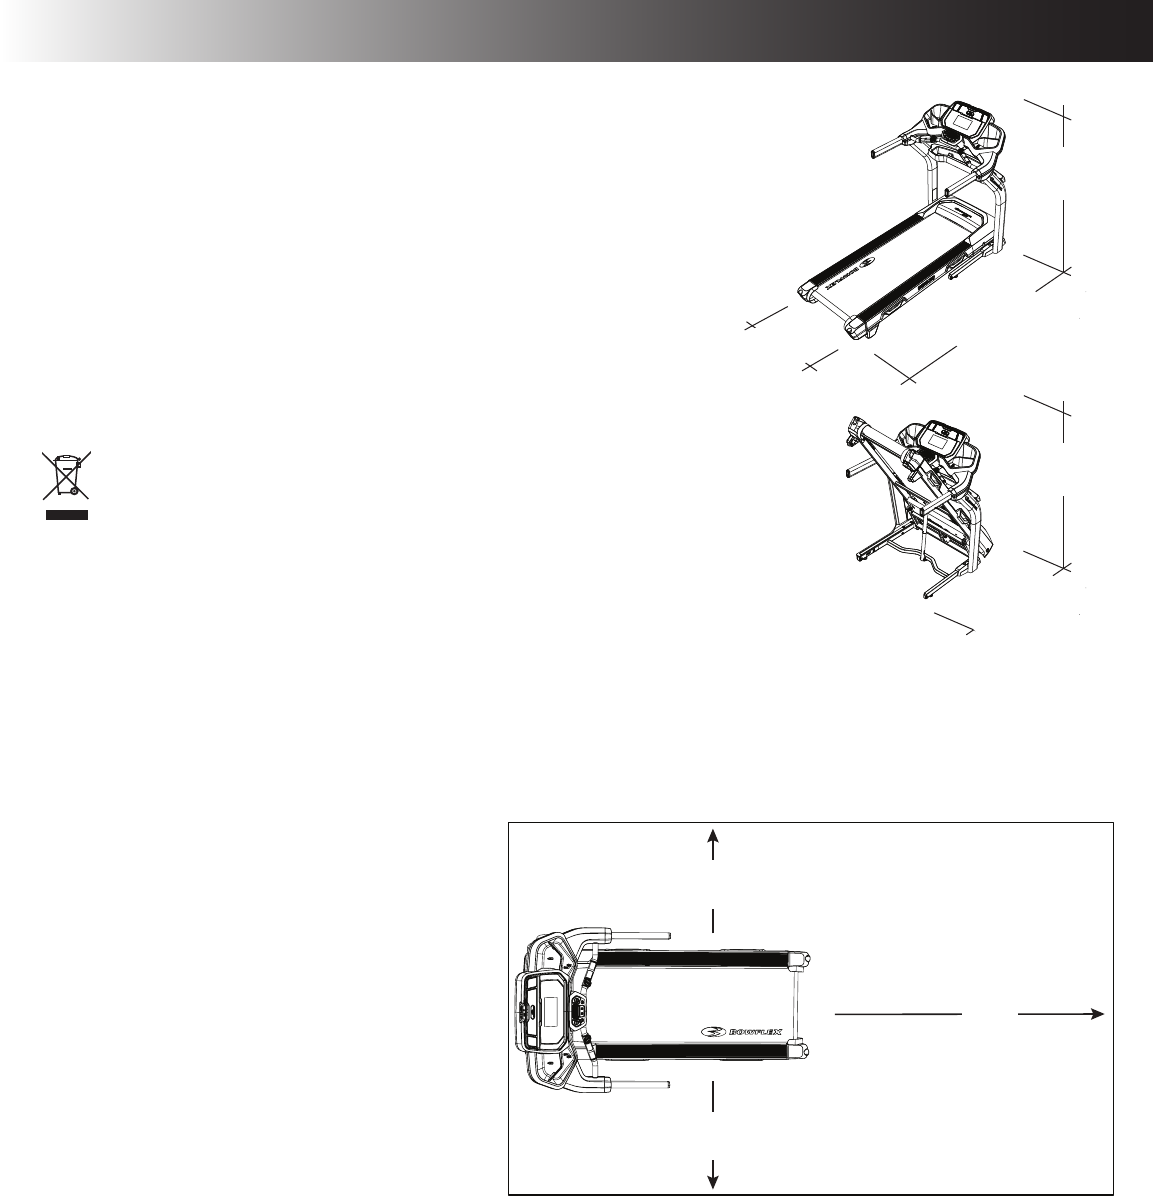
Select the area where you are going to set up and operate your machine. For safe operation, the location must be on a hard, level surface. Allow a
minimum workout area of 212 cm x 400 cm (83.6” x 157.2”). Be sure that the workout space you are utilizing has adequate height clearance, taking
into consideration the height of the user and the maximum incline of the machine.
Basic Assembly
Follow these basic points when you assemble your
machine:
• Read and understand the “Important Safety
Instructions” before assembly.
• Collect all the pieces necessary for each assembly
step.
• Using the recommended wrenches, turn the bolts
and nuts to the right (clockwise) to tighten, and the
left (counterclockwise) to loosen, unless instructed
otherwise.
• When attaching 2 pieces, lightly lift and look
through the bolt holes to help insert the bolt
through the holes.
• The assembly requires 2 people.
• Do not use any power tools for assembly.
Machine Mat
The Bow ex™ Machine Mat is an optional accessory that helps keep your workout area clear and adds a layer of protection to your oor. The rubber
machine mat provides a non-slip, rubber surface which limits static discharge and reduces the possibility of display errors. If possible, put your
Bow ex™ Machine Mat in your selected workout area before you begin assembly.
To order the optional machine mat, contact Customer Service (if purchased in US/Canada) or your local distributor (if purchased outside US/
DO NOT CUT the Shipping Strap on the Base Assembly until it has been placed face up in the appropriate work space.
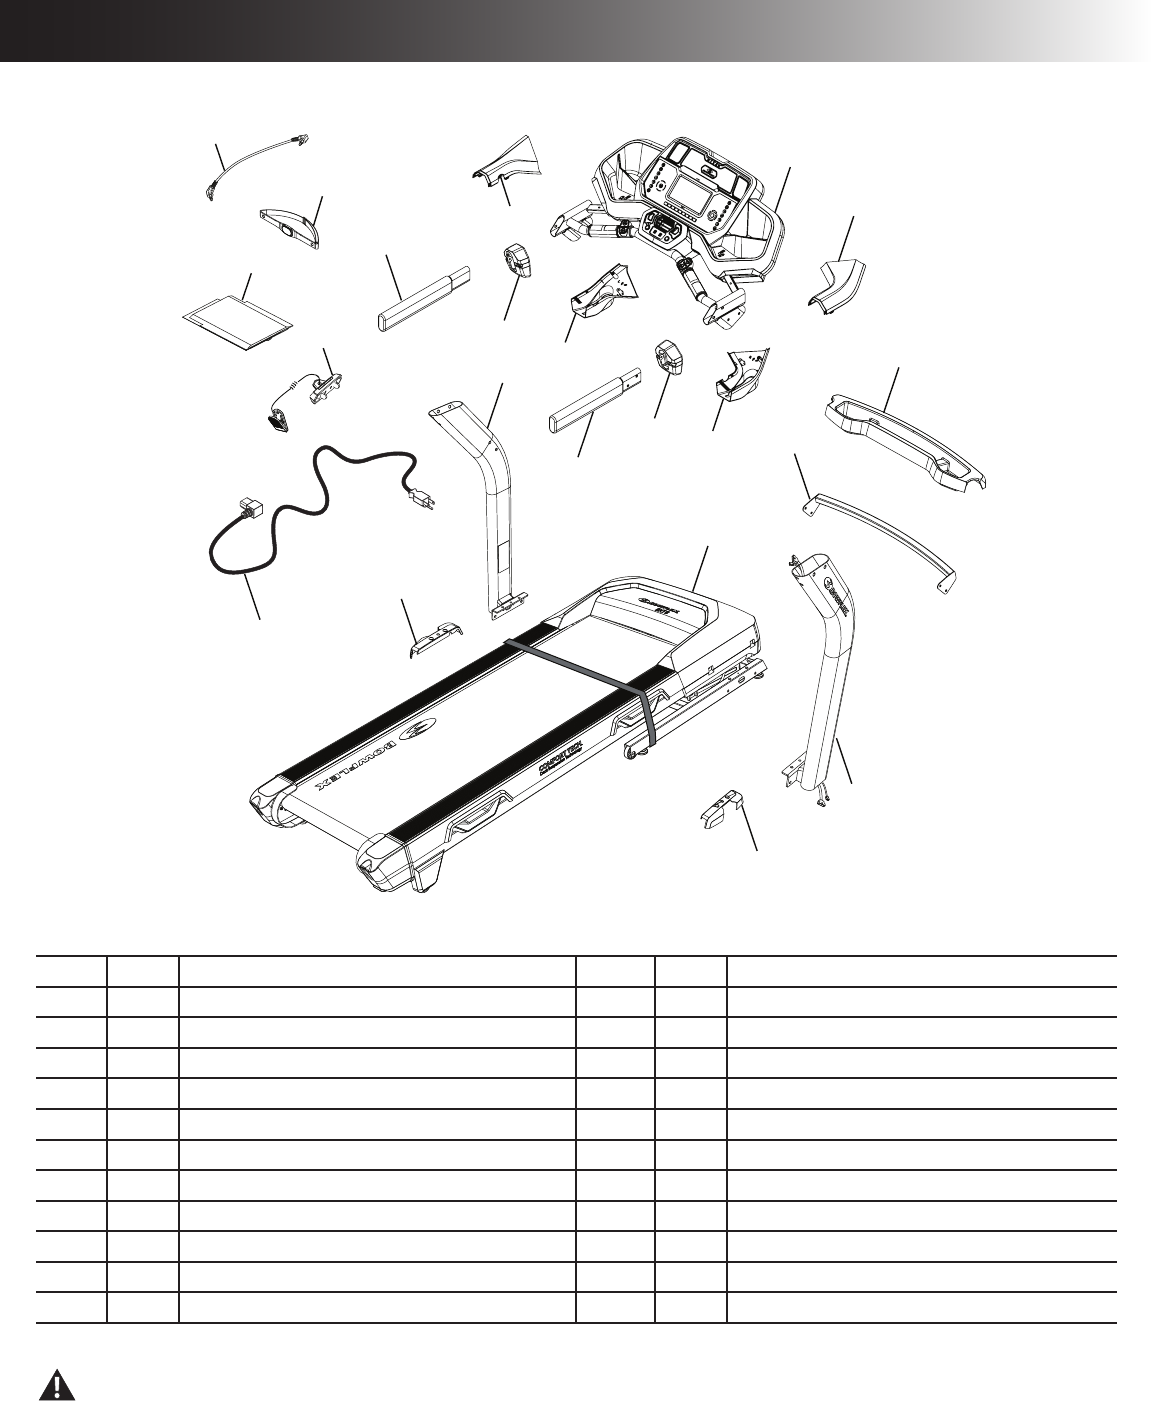
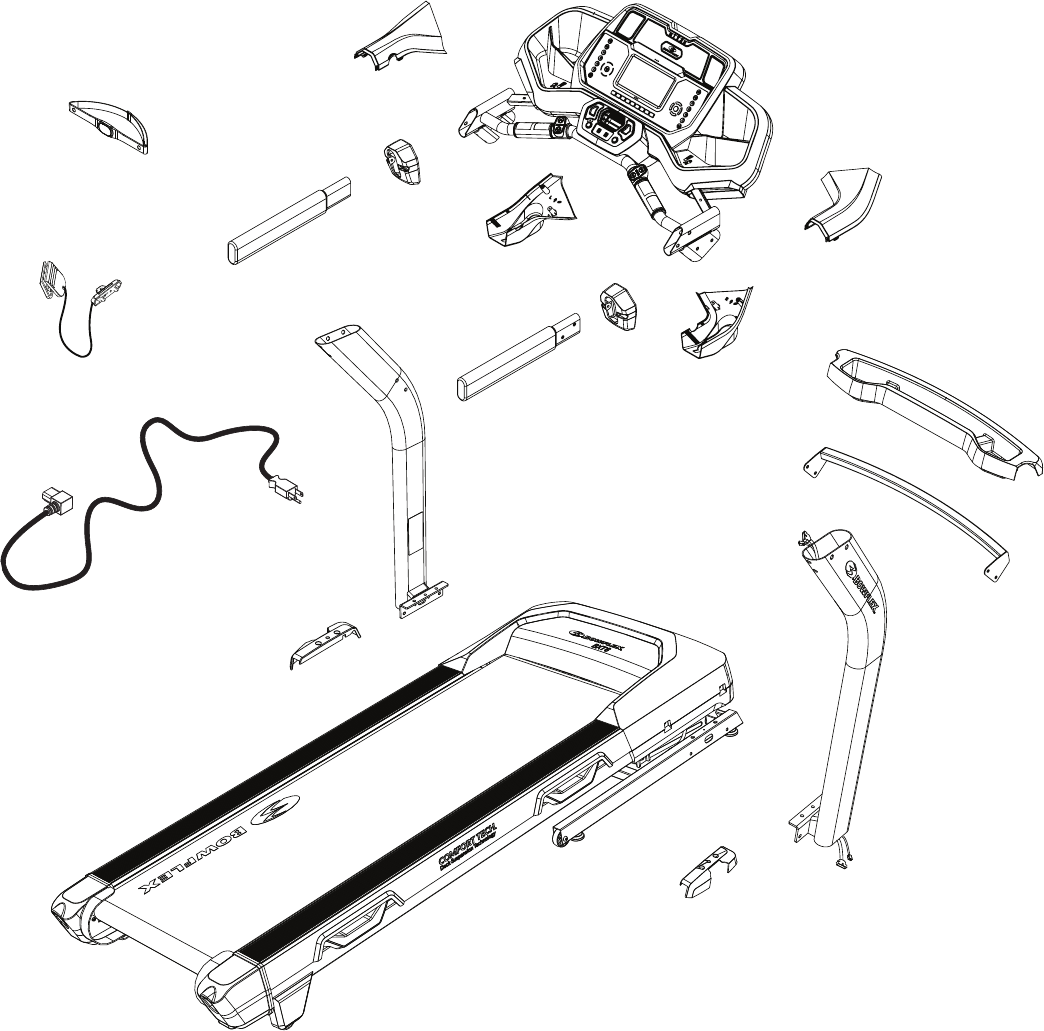
Parts
1
18
9
5
2
3
8
10
14
11
13
12
17
16
15
6
19
20
7
4
21
Assembly / Owner’s Manual
9
Hardware / Tools / Assembly
ItemQtyDescriptionItemQtyDescription
A22Socket Hex Head Screw, M8x1.25x20 BlackE6Curved Washer, M8x18 Black
B4Socket Hex Head Screw, M8x1.25x70 BlackF6Pan Phillips Head Screw, M4x16 Black
C26Lock Washer, M8x18 BlackG6Flat Washer, M4x10 Black
D20Flat Washer, M8x18 BlackH4Pan Phillips Head Screw, M3.9x16 Black
Note: Select pieces of Hardware have been provided as spares on the Hardware Card. Be aware that there may be remaining Hardware
after the proper assembly of your machine.
6mm #2
Tools
Included
DO NOT CUT the Shipping Strap on the Base Assembly until it has been placed face up as shown in the
appropriate work space.
*
A
B
C
D
E
FGH
Assembly / Owner’s Manual
10
14
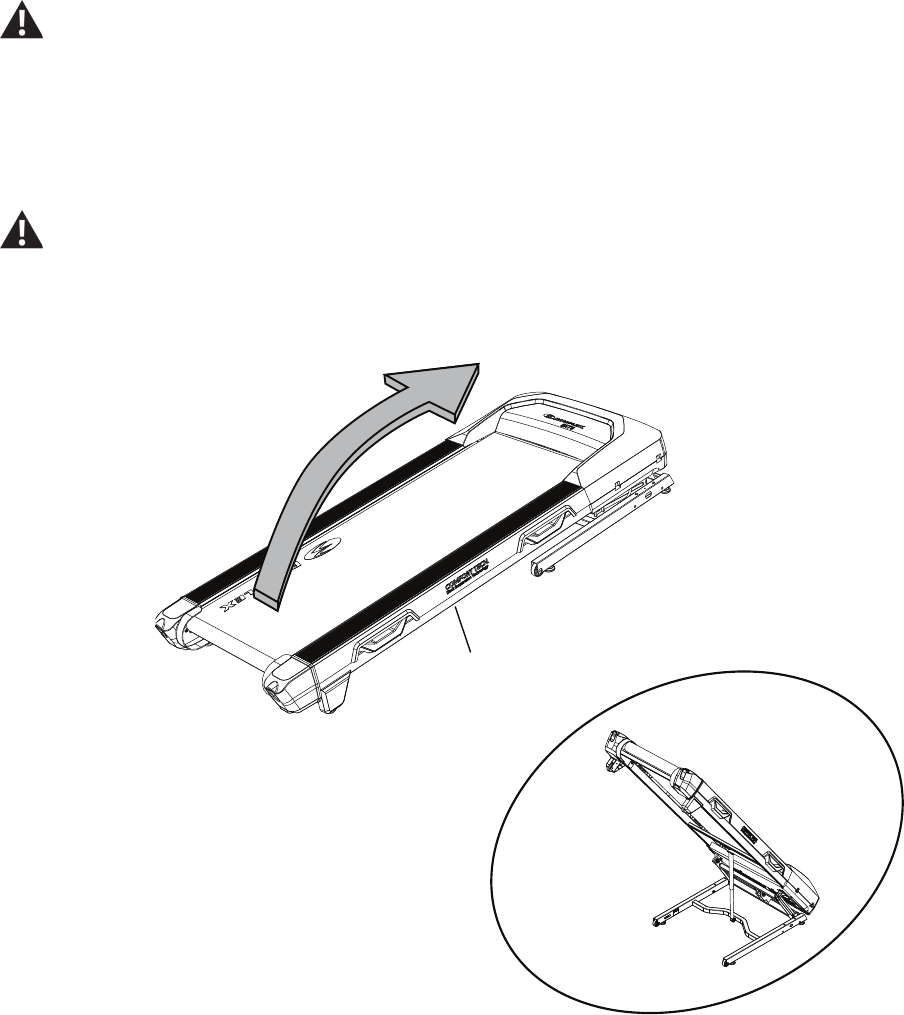
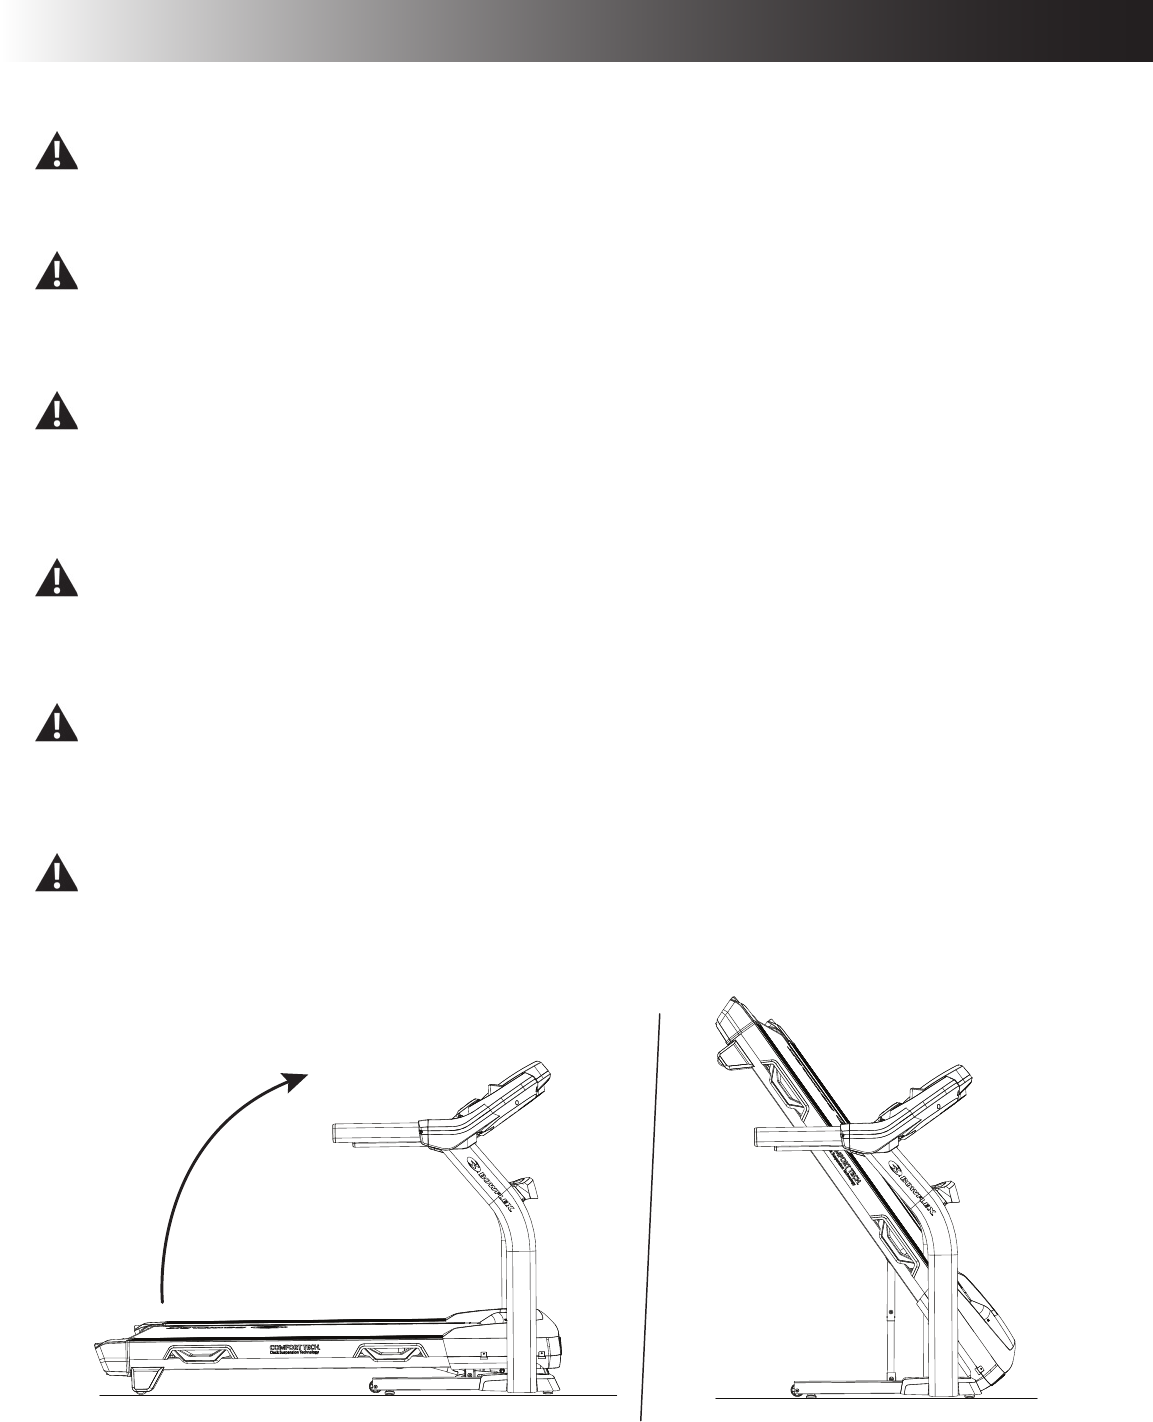
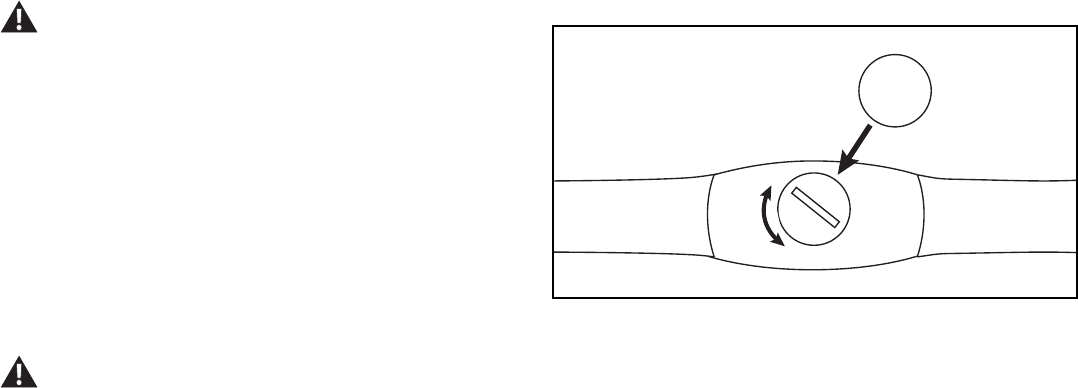
1. Fold the Walking Deck on the Base Assembly
Cut the Shipping Strap on the Base Assembly. Make sure that there is safe clearance around, on and above your treadmill. Make sure there is no
object to spill or cause blockage from the fully folded position. Be sure there is adequate height clearance for the raised deck.
Using the support bar found below the rear of the walking belt, lift the walking deck fully upward and engage the hydraulic lift. Be sure that the
hydraulic lift is correctly locked in place.
Use proper safety precautions and lifting techniques. Bend your knees and elbows, keep your back straight and pull up equally with
both arms. Make sure that your own physical strength is capable of lifting the walking deck until it engages the locking mechanism.
Use a second person if necessary.
Do not use the walking belt or rear roller to lift the treadmill. These parts do not lock in place and can abruptly move. Injury to you
or damage to the machine can occur.
Make sure that the locking mechanism is engaged. Carefully pull back on the Walking Deck and make sure that it does not move. When you do this,
keep clear of movement path in case the treadmill lock is not engaged.
Do not lean against the treadmill when it is folded. Do not put items on it that could cause it to become unstable or fall.
Assembly / Owner’s Manual
11
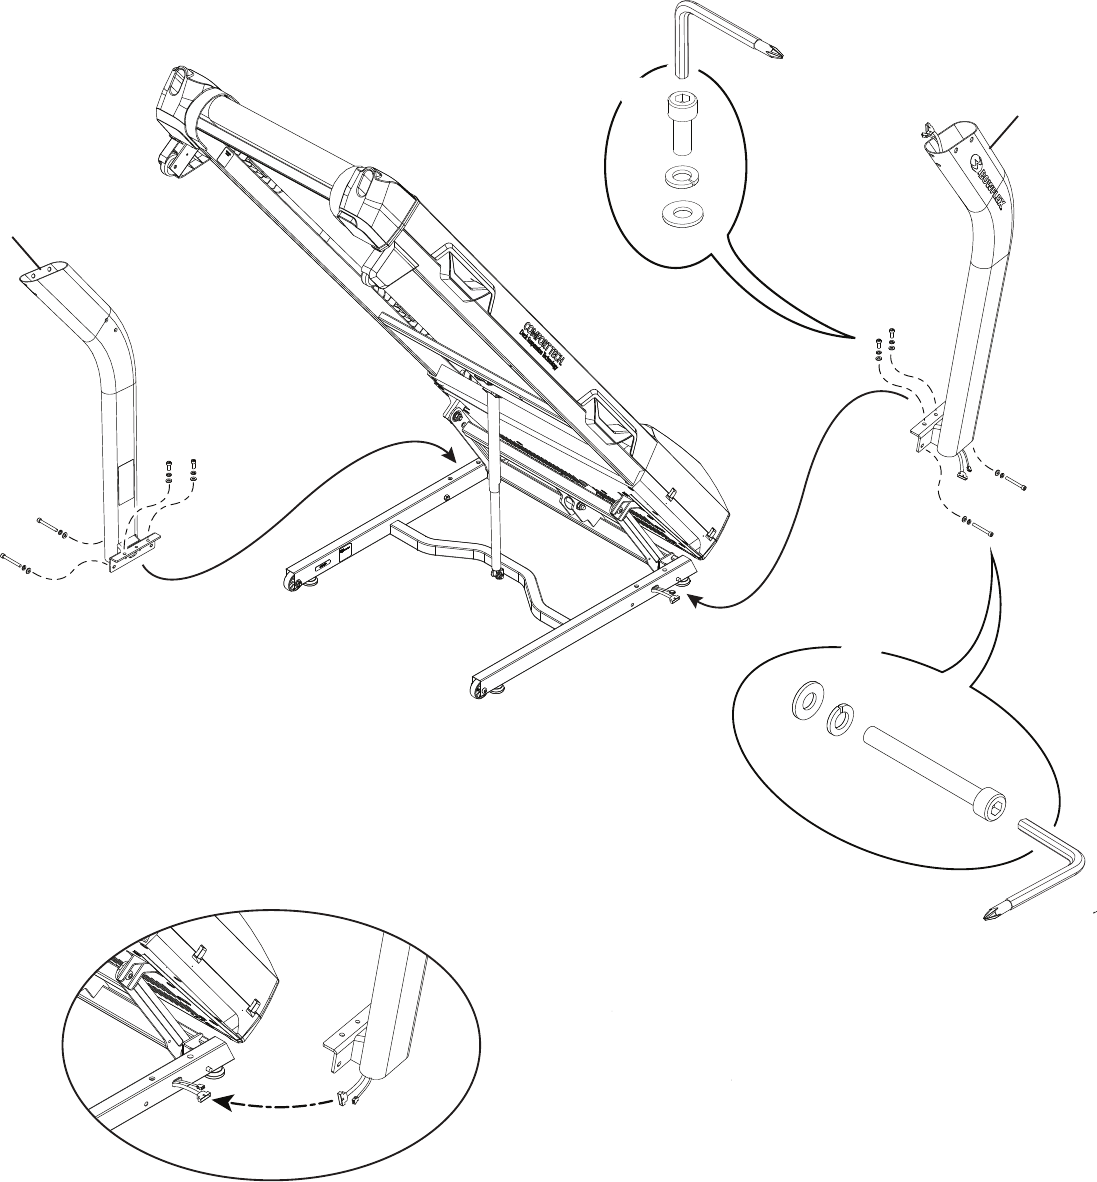
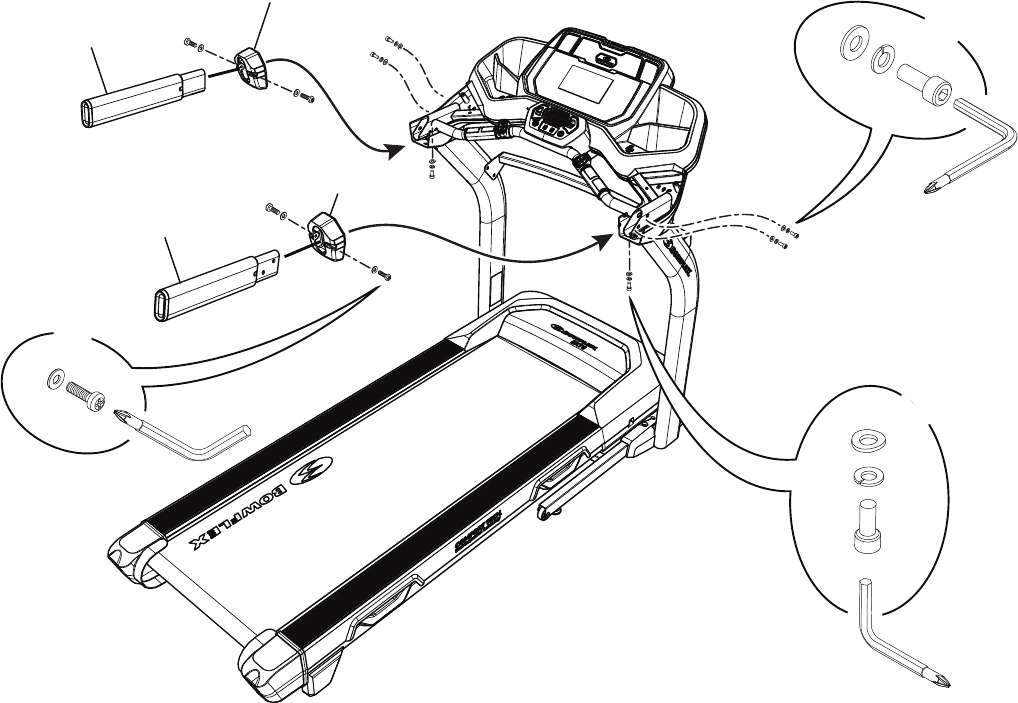
2. Connect the Input/Output (I/O) Cables and Attach the Uprights to Frame
Note:Do not crimp cables. Do not fully tighten Hardware until instructed.
15
A
D
C
X4
B
D
X4
C
12
6mm
6mm
Assembly / Owner’s Manual
12
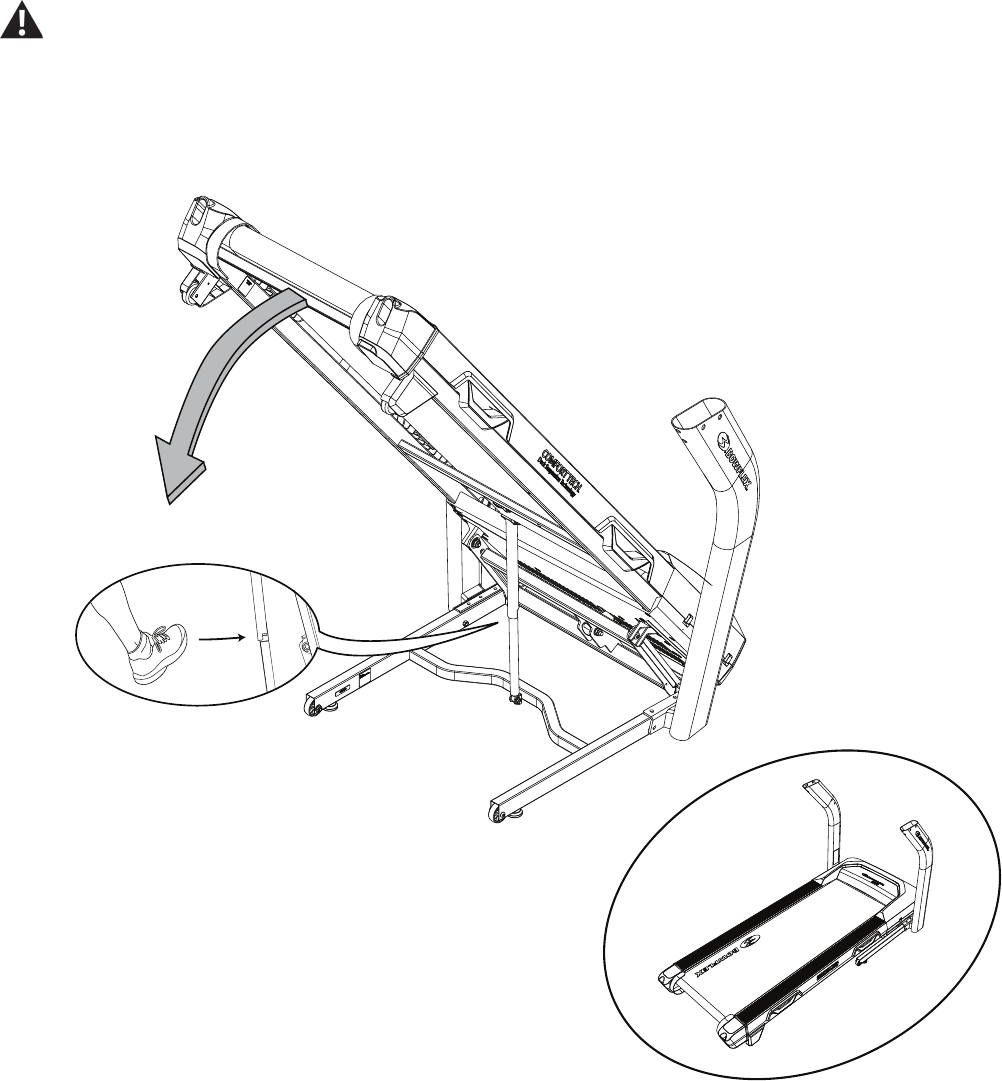
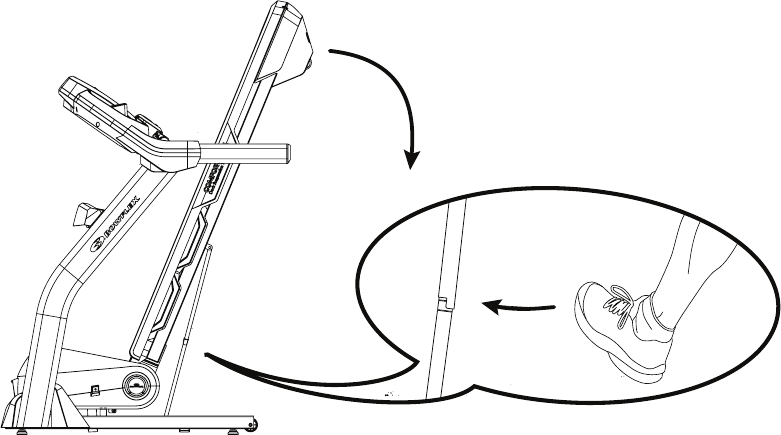
3. Unfold the Walking Deck
Slightly push the walking deck forward toward the front of the machine. With your left foot lightly push the top part of the hydraulic lift forward until the
locking tube releases and you can pull the walking deck slightly toward the rear of the machine. Hold up the rear of the walking deck, and move to
the side of the machine.
Keep clear of the movement path of the walking deck.
The hydraulic lift is set up to drop lightly. Hold onto the walking deck until approximately 2/3 of the movement down. Make sure that you use proper
lifting technique; bend your knees and keep your back straight. The walking deck can possibly drop quickly in the last part of the movement.
Assembly / Owner’s Manual
13
4. Attach the Crossbar to the Frame Assembly
Note:Do not crimp cables. Do not fully tighten Hardware until instructed.
A right (“ R ”) decal has been applied to the right side of this part to assist with assembly.
11
A
D
C
X4
6mm
Assembly / Owner’s Manual
14
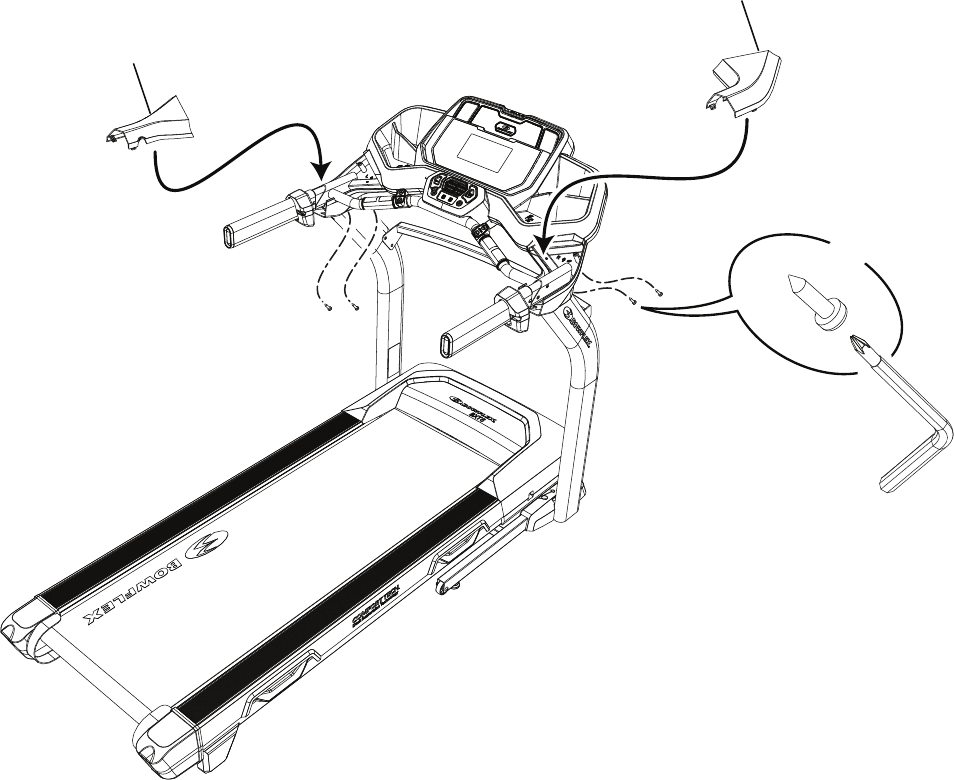
5. Place the Lower Junction Covers onto the Uprights
Note: Do not let the Console Cables to fall into the Right Upright.
8
5
Assembly / Owner’s Manual
15
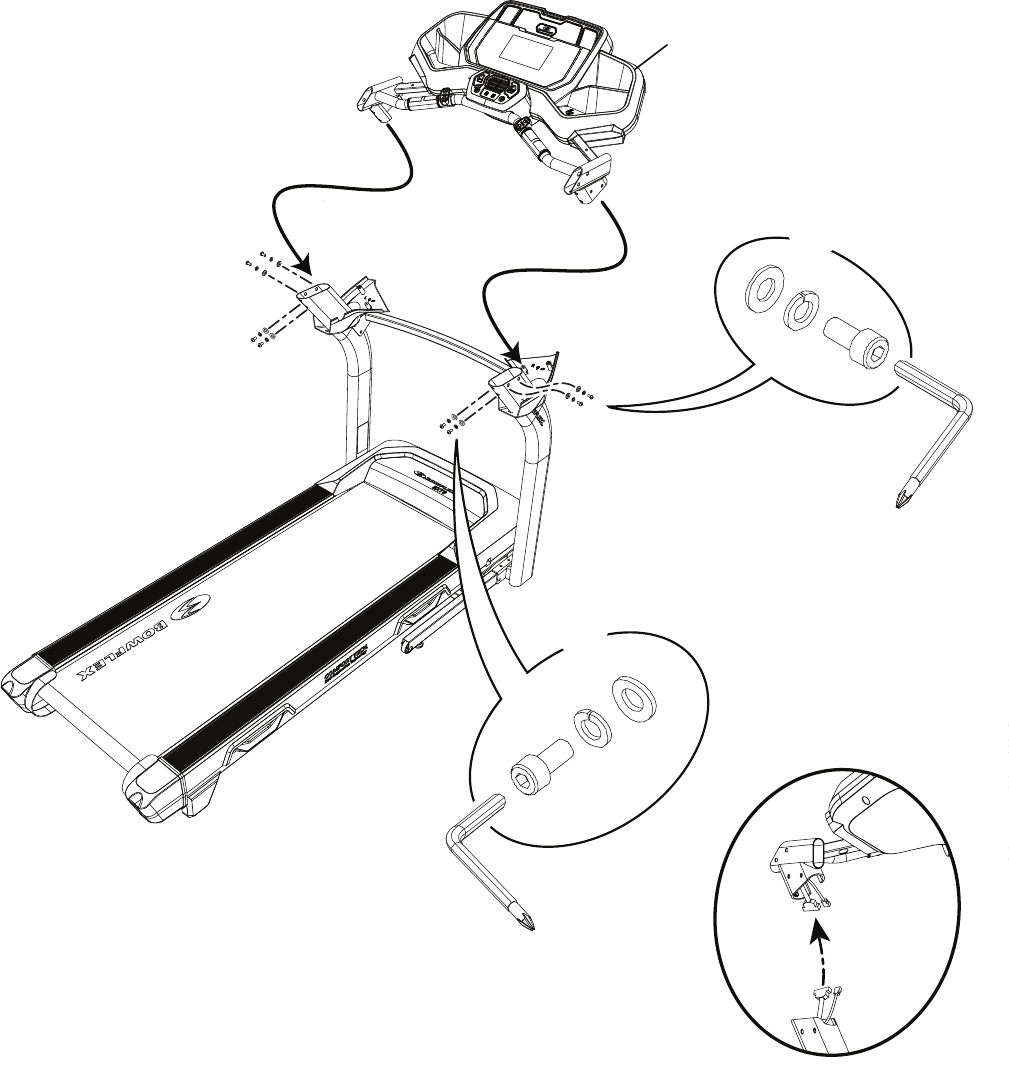
6. Connect the Cables and Attach the Lower Junction Covers and Console Assembly
Note: Do not crimp the Cables.
6mm
D
A
X4
C
1
6mm
A
C
E
X4
Assembly / Owner’s Manual
16
7. Fold the Walking Deck and tighten ALL Hardware from previous steps
8
10
#2
F
X2
G
8
10
#2
F
X2
G
8. Attach the Base Shrouds to the Frame Assembly, and then unfold the Walking Deck
Note: Unfold the Walking Deck after the Base Shrouds have been attached to the Frame Assembly.
Assembly / Owner’s Manual
17
9. Attach the Side Handlebars through the Junction Cover End Caps to the Frame Assembly
Note: A mark has been applied to all right (“ R ”) and left (“ L ”) parts to assist with assembly.
3
6
A
D
C
6mm
X4
4
7
X2
6mm
A
C
E
F
G
X4
#2
Assembly / Owner’s Manual
18
10. Snap the Junction Covers into Place and Secure with Hardware to the Frame Assembly
Note: A mark has been applied to all right (“ R ”) and left (“ L ”) parts to assist with assembly.
9
2
H
X4
#2
Assembly / Owner’s Manual
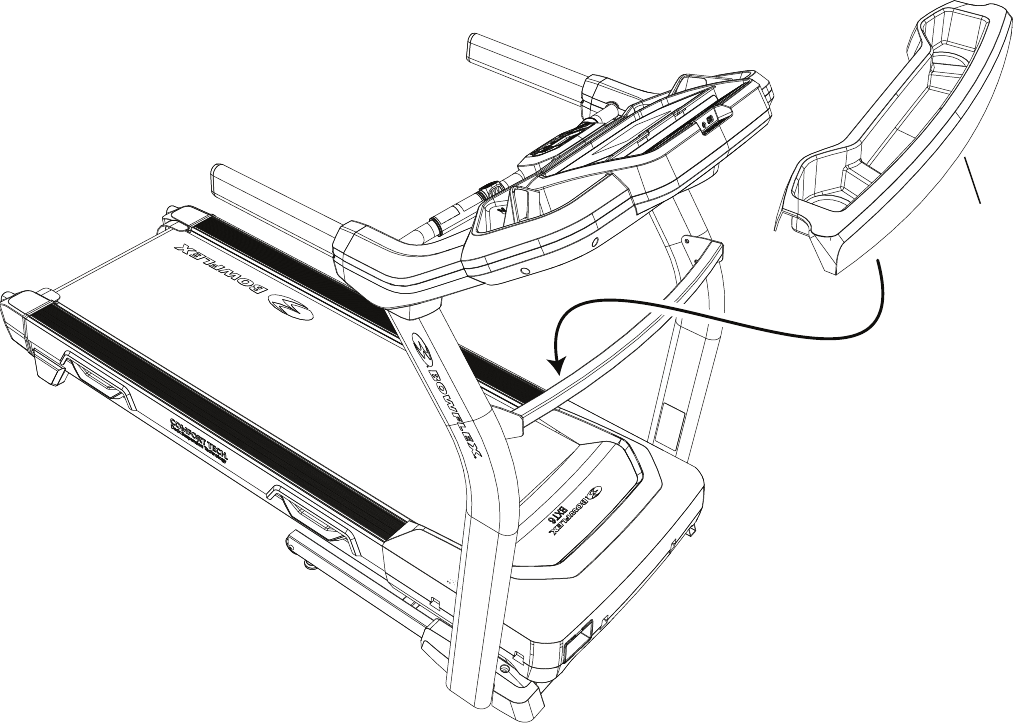
19
11. Attach the Crossbar Tray to the Frame Assembly
10
Assembly / Owner’s Manual
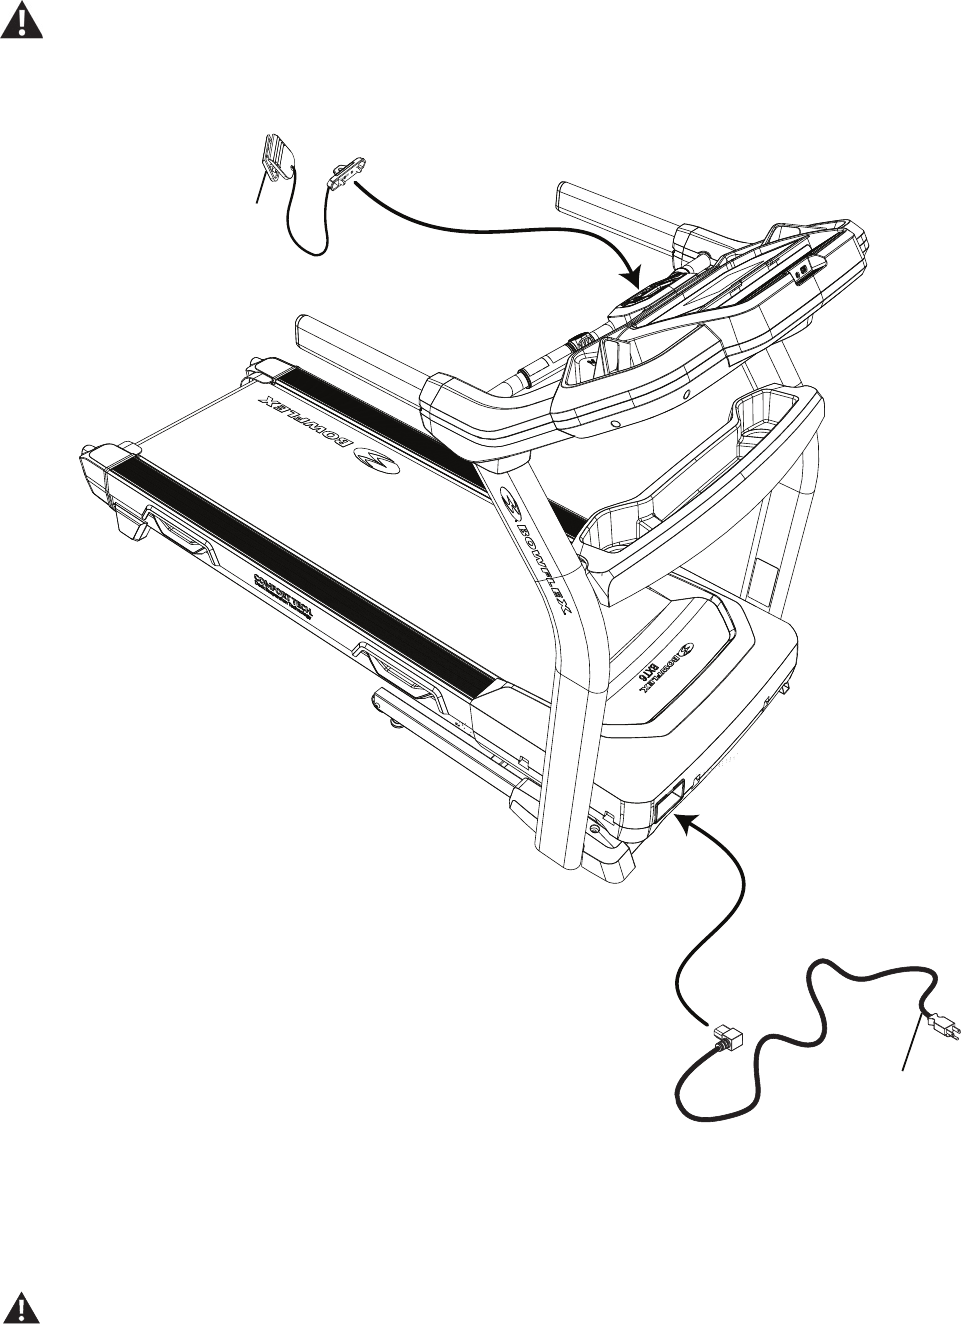
20
12. Connect the Power Cord and Safety Key to the Frame Assembly
Connect this machine to a properly grounded outlet only (see Grounding or Earthing Instructions).
Note: When ready to operate the machine, be sure to turn on the power with the Power Switch.
13. Final Inspection
Inspect your machine to ensure that all fasteners are tight and components are properly assembled.
Note:Remove any protective covers from the face of the Console.
Be sure to record the serial number in the eld provided at the front of this manual.
Do not use until the machine has been fully assembled and inspected for correct performance in accordance with the Owner’s
Manual.
17
18
Assembly / Owner’s Manual
21
Moving and Storing the Machine
The machine can be moved by one or more persons. Use caution when you move the machine. The treadmill is heavy and can be
awkward. Make sure that your own physical strength is capable of moving the machine. Use a second person if necessary.
1. Before the machine can be moved, inspect the Walking Deck to be sure the Incline setting is at “1”. If necessary, adjust the Incline setting to “1”.
Be sure the area below the machine is clear before adjusting the incline of the Deck. Fully lower the incline of the Deck after each
workout.
2. Remove the Safety Key and place it in a secure location.
When this machine is not in operation, remove the Safety Key and keep out of the reach of children.
3. Make sure that the power switch is turned Off, and the power cord is disconnected.
4. You must fold the treadmill before you move it. Never move the treadmill if it is not folded.
Never move the machine with the Walking Deck not folded. Rotating or moving parts can pinch, resulting in personal injury.
5. Make sure that there is safe clearance around, on and above your treadmill. Make sure there is no object to spill or cause blockage from the fully
folded position.
Be sure there is adequate height clearance for the raised deck.
6. Using the support bar found below the rear of the walking belt, lift the walking deck fully upward and engage the hydraulic lift. Be sure that the
hydraulic lift is correctly locked in place.
Use proper safety precautions and lifting techniques. Bend your knees and elbows, keep your back straight and pull up equally with
both arms. Straighten your legs to lift. Make sure that your own physical strength is capable of lifting the walking deck until it
engages the locking mechanism. Use a second person if necessary.
Do not use the walking belt or rear roller to lift the treadmill. These parts do not lock in place and can abruptly move. Injury to you
or damage to the machine can occur.
Adjustments
Assembly / Owner’s Manual
22
7. Make sure that the locking mechanism is engaged. Carefully pull back on the walking deck and make sure that it does not move. When you do
this, keep clear of movement path in case the treadmill lock is not engaged.
Do not lean against the treadmill when it is folded. Do not put items on it that could cause it to become unstable or fall.
Do not connect the power cord or try to operate the treadmill in the folded position.
8. Carefully tilt the base frame of the folded treadmill a small distance back on the transport wheels while grasping the front support bar.
Do not use the Console, handlebars, or lifted walking deck to lift or move the treadmill. Damage to the treadmill can occur.
Keep clear of the movement path of the lifted walking deck.
9. Roll the machine on the transport wheels to its new location.
Place the machine on a clean, hard, level surface, free from unwanted material or other objects that may hamper your ability to
move freely. A rubber mat should be used below the machine to prevent the release of static electricity and protect your ooring.
Do not put objects in the path of the walking deck when lowered.
NOTICE: Move the machine carefully so that it does not hit other objects. This can damage the Console operation.
10. Prior to use, refer to the “Unfolding the Machine” procedure in this manual.
Unfolding the Machine
1. Make sure there is sufcient space to lower the walking deck.
Keep a minimum clearance behind the machine of 2 m (79”) and 0.6 m (24”) on each side. This is the recommended safe distance
for access, movement and emergency dismounts from the machine.
Place the machine on a clean, hard, level surface, free from unwanted material or other objects that may hamper your ability to
move freely with a sufcient clear workout area. A rubber mat below the machine is recommended to prevent electrostatic dis-
charge and protect your oor.
Be sure that the workout space you are utilizing has adequate height clearance, taking into consideration the height of the user and
the maximum incline of the deck.
2. Make sure there is no object on or around the treadmill to spill or cause blockage from the fully unfolded position.
3. Slightly push the walking deck forward toward the console. With your left foot lightly push the top part of the hydraulic lift forward until the locking
tube releases and you can pull the walking deck away from the console. Hold up the rear of the walking deck, and move to the side of the machine.
Keep clear of the movement path of the walking deck.
Assembly / Owner’s Manual
23
4. The hydraulic lift is set up to drop lightly. Hold onto the walking deck until approximately 2/3 of the movement down. Make sure that you use
proper lifting technique; bend your knees and keep your back straight. Lower the weight with your legs. The walking deck can possibly drop quickly
in the last part of the movement.
Assembly / Owner’s Manual
24
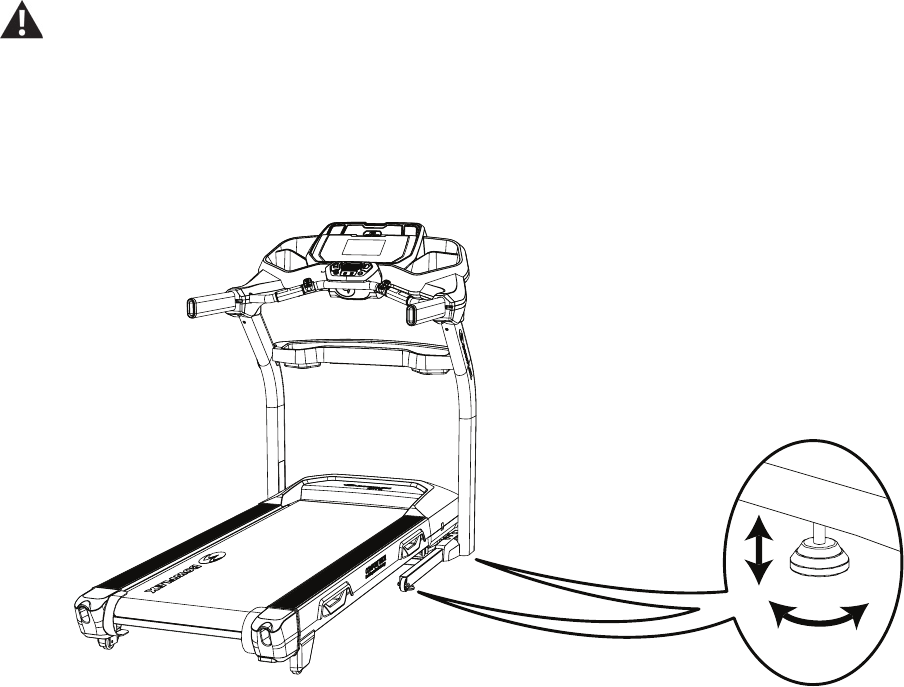
Leveling the Machine
The machine needs to be leveled if your workout area is uneven. To adjust:
1. Place the machine in your workout area.
2. Adjust the levelers until they all contact the oor.
Do not adjust the levelers to such a height that they detach or unscrew from the machine. Injury to you or damage to the machine
can occur.
3. Adjust until the machine is level.
Make sure the machine is level and stable before you exercise.
Treadmill Belt
Your treadmill comes equipped with a durable, high quality walking belt designed to provide many hours of reliable service. The walking belt on a
treadmill that has not been operated for a length of time, either in factory packaging or after assembly, can exhibit a “thumping” noise when started.
This is due to the belt taking on the curve of the front and rear rollers. This is a common occurrence and does not indicate a problem with your ma-
chine. After the treadmill has been used for a short period of time the thumping noise will discontinue. The amount of time will vary depending on the
temperature and humidity of the environment where the treadmill is placed.
Assembly / Owner’s Manual
25
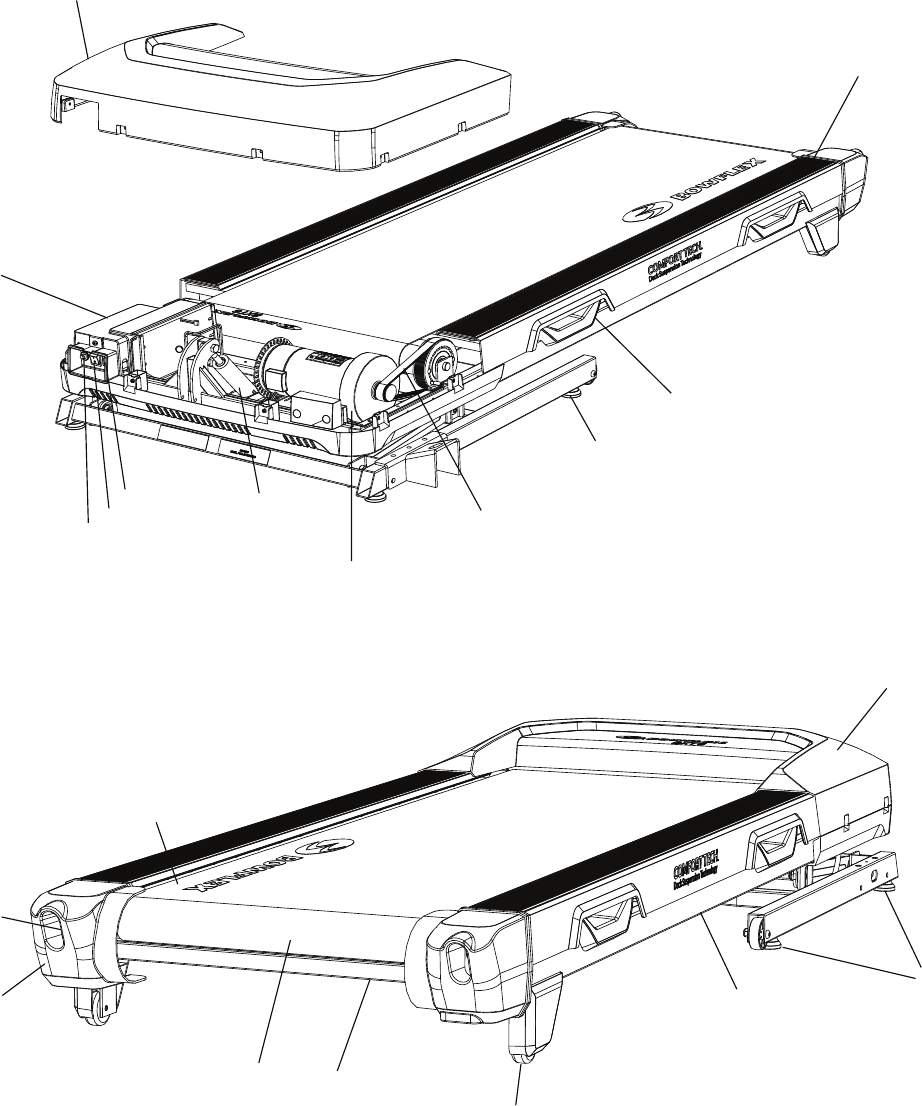
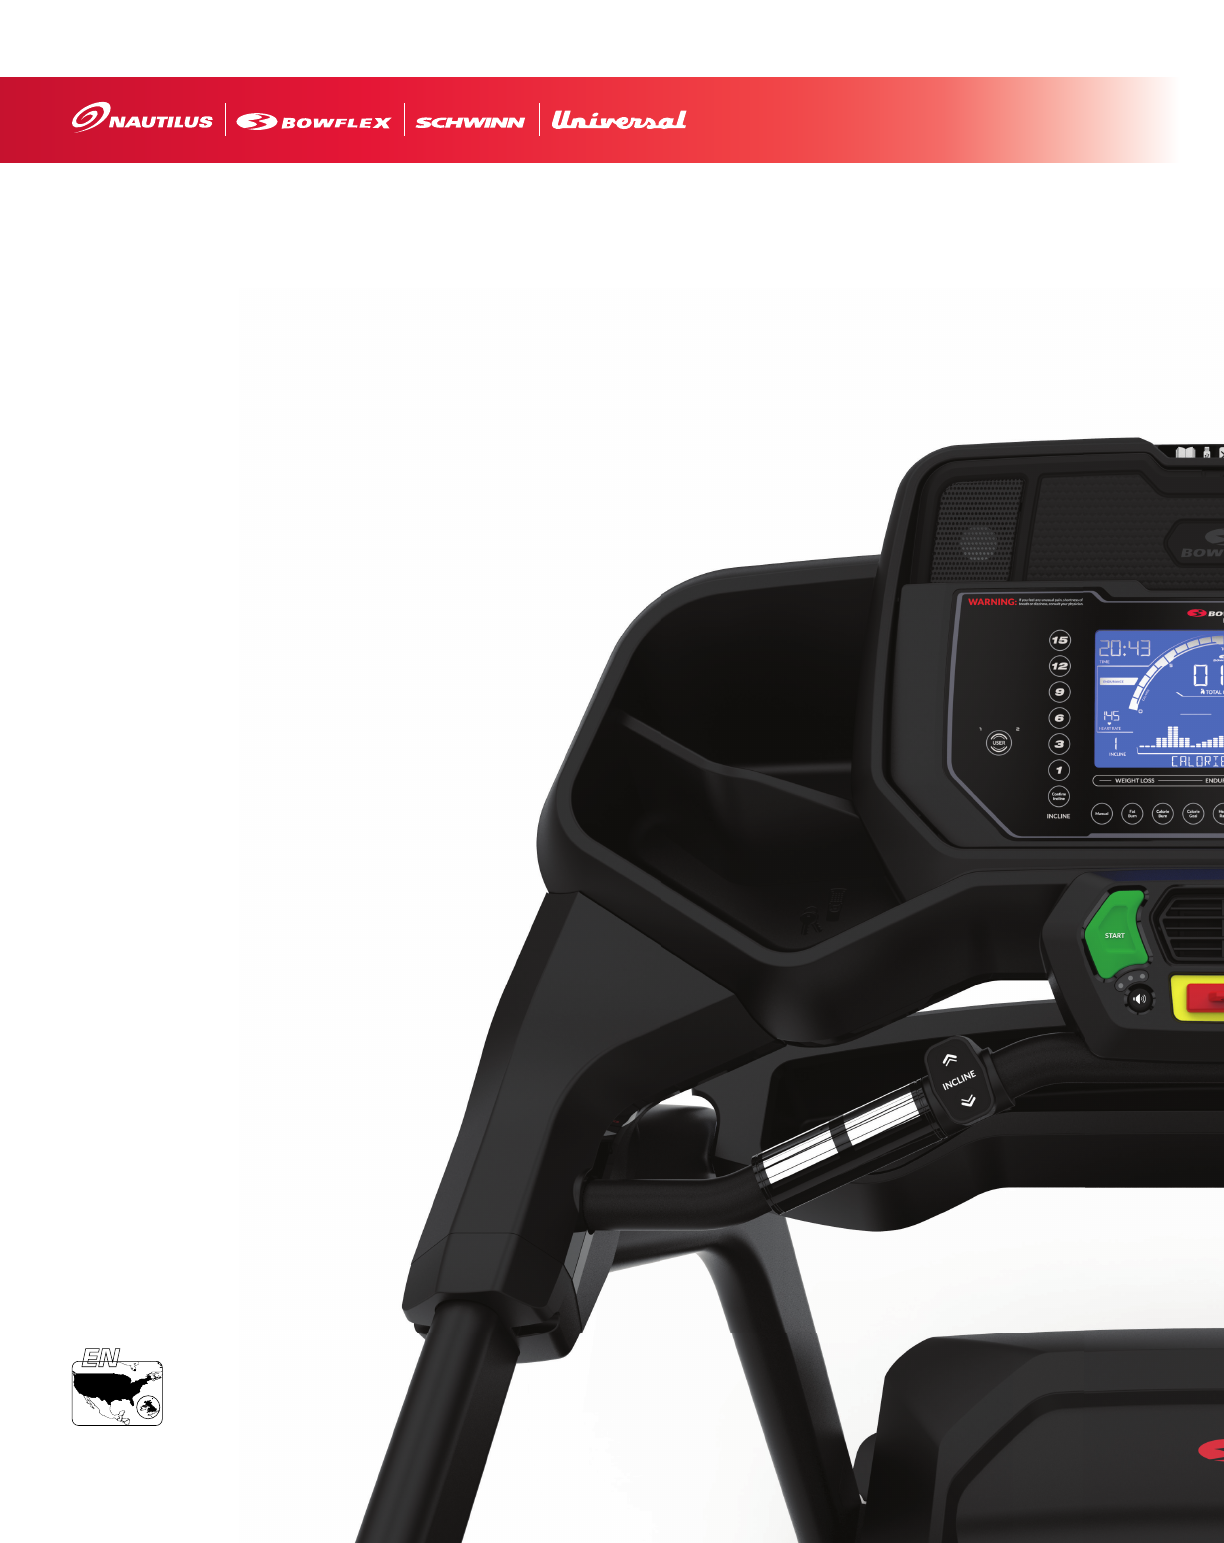
Features
Use the values calculated or measured by the machine’s computer for reference purposes only. The heart rate
displayed is an approximation and should be used for reference only. Over exercising may result in serious injury or
death. If you feel faint stop exercising immediately.
Heart Rate Strap
Console
Media Cable
Incline Controls
Water Bottle Holder
/ Storage Tray
USB Port
MP3 Input/ Charger
Side Handlebar
Ergo Bar
Contact Heart Rate (HR) Sensors
Fan
Emergency Safety Key Port
Side Foot Support Rails
Walking Belt and Deck
Lift Handle
Lift Shock (under
Walking Deck)
Base
Leveler
Transport Wheel
Dampener
Power Inlet
Fuse
Power Switch
Speaker
Media Shelf
Speed Controls
Front Support Bar
Upright
Motor Cover
Walking belt Tension Bolt
Deck Support Wheel
Water Bottle Holder
/ Storage Tray
Assembly / Owner’s Manual
26
Bluetooth
®
App Connected display
Display shows when the machine is paired with the App.
Pre-Set Incline buttons
Selects an incline setting for the Walking Deck. After pushing a Pre-Set Incline button, push the Conrm Incline button within 12 seconds for the
Walking Deck to be adjusted to the desired incline.
Confirm Incline button
Activates the incline motor to adjust the Walking Deck to the selected Pre-Set Incline setting.
Active User display
The Active User display shows the selected user prole. A user prole is always selected. From a power up, the last User will be the default User.
Note: For more accurate calorie count, be sure to edit your User Prole.
Console
CONFIRM
INCLINE
Program buttons
Active User display
Pre-Set Incline buttons
Pre-Set Speed buttons
Bluetooth
®
App Connected display
Incline Controls
Speed Controls
Assembly / Owner’s Manual
27
User button
Push to select the desired User Prole, push and hold for 3 seconds to edit the selected User Prole.
Increase () / Decrease () buttons
The Increase / Decrease buttons change a value, or move through options. A button will light up to indicate it is an available option.
Enter button
Conrms information or a selection.
Left () / Right () buttons
Push to shift the currently active segment. A button will light up to indicate it is an available option.
Pre-Set Speed buttons
Selects a speed setting for the Walking Belt. After pushing a Pre-Set Speed button, push the Conrm Speed button within 12 seconds for the Walk-
ing Belt to be adjusted to the desired speed.
Confirm Speed button
Adjusts the Walking Belt to the selected Pre-Set Speed setting.
Program buttons
Push to select one of the workout Programs. The illuminated light around the button shows the currently selected program. A Workout Program is
always selected.
START button
Push to start the currently selected workout Program, or resume a paused workout.
STOP/PAUSE button
Push to pause a workout, exit the User Prole or Machine Settings mode, or end a paused workout.
Volume button and indicator lights
The Volume button sets the sound level of the Console, and the indicator lights show the current setting; low (1 LED), medium (2 LEDs), high (3
LEDs), or off (no LEDs).
Fan button
Controls 4-speed fan (off, low, medium, high).
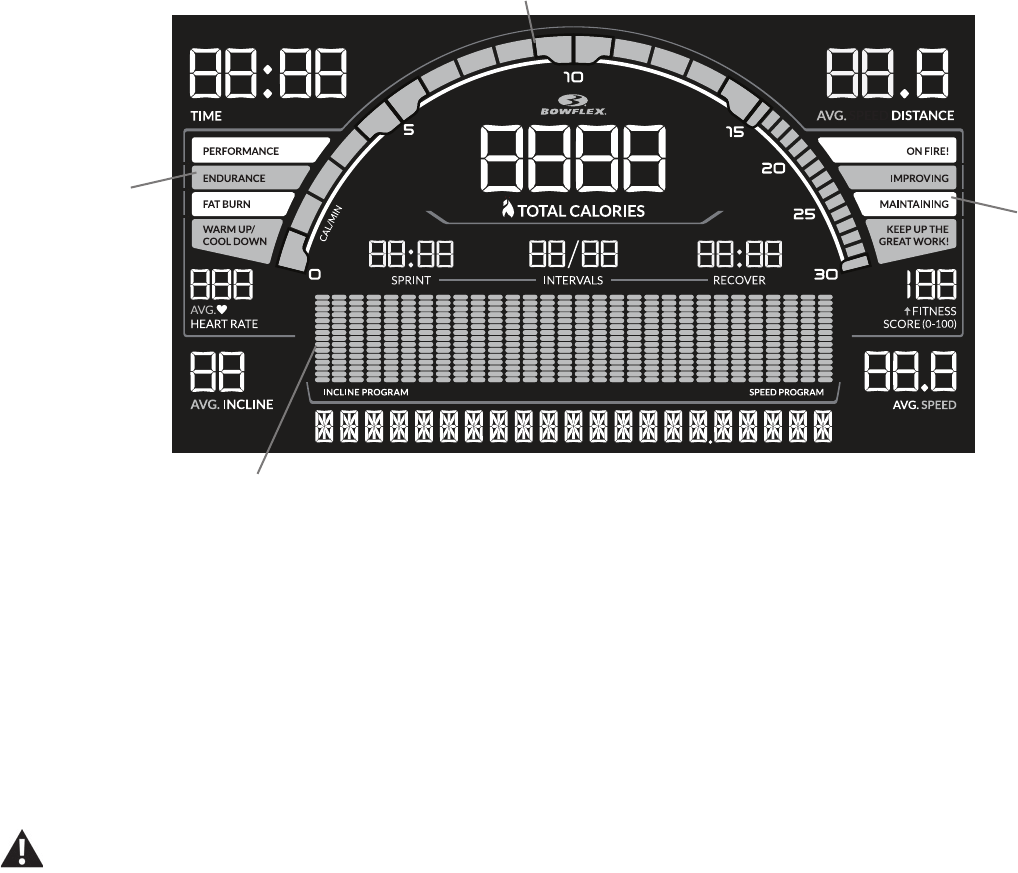
Console Display
Time display
Counts in minutes and seconds the total time of your workout (e.g. 15:42 minutes). The maximum time for a workout is 99:59.
Burn Rate display
The Burn Rate display shows the rate of calories burned for a minute at the current workout levels.
Assembly / Owner’s Manual
28
Workout Segment Display
Burn Rate display
Heart Rate
Zone display
Fitness Score
Zone display
Distance display
The Distance display shows your workout distance in miles or kilometers based on the user setting. Miles is the default setting.
Heart Rate Zone display
During a workout, the Heart Rate Zone displays the current Heart Rate Zone based on the age of the selected user.
Warm-Up/Cool Down: 1-59% of maximum heart rate, Fat Burn: 60-69%, Endurance: 70-79%, Performance: 80% and higher.
Heart Rate display
The Heart Rate display shows your heart beats per minute. The heart icon will ash when acquiring the rate. With a stable reading, the icon will be
shown as solid.
The heart rate displayed is an approximation and should be used for reference only.
Total Calories display
The Total Calories display counts your total calories. The maximum value for calories during a workout is 9999.
Sprint display
During an Interval workout, the Sprint display shows the remaining time of the Sprint segment of the current Interval. Each Interval has a Sprint and a
Recover segment. Sprint is the high Intensity segment of an Interval workout.
Intervals display
During an Interval workout, the Intervals display show the currently active Interval and the total number of Intervals for the workout. Each Interval has
a Sprint and a Recover workout segment.
Recover display
The reduced workout segment of an Interval workout, counting down until the next Sprint segment.
Assembly / Owner’s Manual
29
Fitness Score Zone display
The display shows the current Fitness Score Zone for the selected User. At the end of a workout, if the Fitness Score has increased, an upward
arrow icon will be displayed to show the increase in the score.
Note: This display is blank during the workout.
Fitness Score Display
The Fitness Score Display shows the current Fitness Score of the selected User Prole.
Incline display
The Incline display shows the current percent of Incline for the Walking Deck.
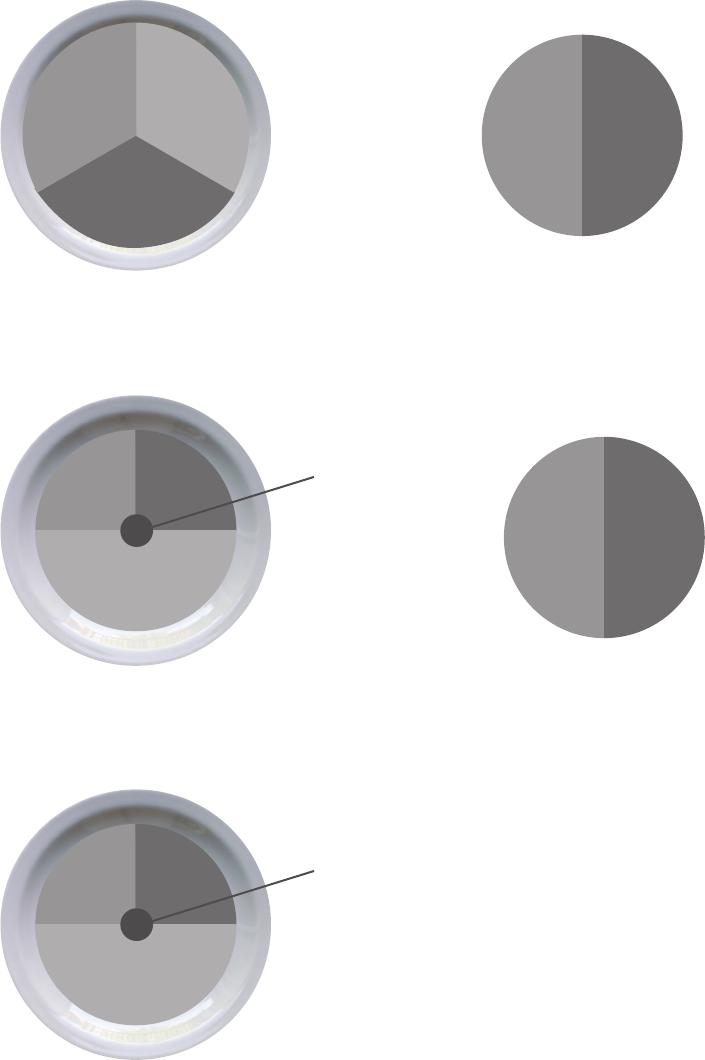
Workout Segment display
The Workout Segment display shows the course prole of the workout program. A course prole has 30 columns with 15 segments. The segments
show changes of incline or speed depending on the type of workout. Under the display, the Incline or Speed Program display denes the workout
segments.
The more intense the incline or speed setting, the higher the number of segments. The ashing column shows your location in the workout.
Incline Program display
The Incline Program display shows that the segments of the Workout Segment display are incline based.
Speed Program display
The Speed Program display shows that the segments of the Workout Segment display are speed based.
Speed display
The Speed display shows your current speed in miles (MI) or kilometers (KM) per hour to one decimal (e.g. 3.4 MI).
Incline and Speed Controls
The Incline and Speed Controls are located on the Ergo Bar. The incline and speed of the walking belt can be controlled from these controls. The
buttons on the left side include an Incline Increase button and an Incline Decrease button. The controls on the right side include a Speed Increase
button and a Speed Decrease button. Push and hold the button to quickly adjust the incline or speed setting.
Do not push these buttons when grabbing onto the Ergo Bar.
Bluetooth
®
Connectivity with the “Bowflex Results Series™” Fitness App
This tness machine is equipped with Bluetooth
®
connectivity and can wirelessly sync with the “Bowex Results Series™” Fitness App on supported
devices. The Software App syncs with your tness machine to track total calories burned, time, distance, and more. Records and stores every work-
out for quick reference. Plus, it automatically syncs your workout data to MyFitnessPal
®
and Under Armour
®
Connected Fitness to make hitting your
daily calorie goal easier than ever! Track your results and share with friends and family.
1. Download the free Software App, named the “Bowex Results Series™” Fitness App. The software app is available on the App Store and Google
Play™.
Note: For a complete list of supported devices, review the software app on the App Store or Google Play™.
2. Follow the instructions on the Software App to sync your device to your exercise machine.
Assembly / Owner’s Manual
30
Workout with Other Fitness Apps
This tness machine has integrated Bluetooth
®
connectivity which allows it to work with a number of digital partners. For our latest list of supported
partners, please visit: www.nautilus.com/partners
USB Charging
If a USB Device is attached to the USB Port, the Port will attempt to charge the Device. The power supplied from the USB Port may not be enough to
operate the Device and charge it at the same time.
Remote Heart Rate Monitor
Monitoring your Heart Rate is one of the best procedures to control the intensity of your exercise. The Console reads the telemetry HR signals from
the Heart Rate Chest Strap Transmitter that operates in the 4.5kHz - 5.5kHz range.
Note:The heart rate chest strap must be an uncoded heart rate strap from Polar Electro or an uncoded POLAR
®
compatible model.
(Coded POLAR
®
heart rate straps such as POLAR
®
OwnCode
®
chest straps will not work with this equipment.).
If you have a pacemaker or other implanted electronic device, consult your doctor before using a wireless chest strap or other
telemetric heart rate monitor.
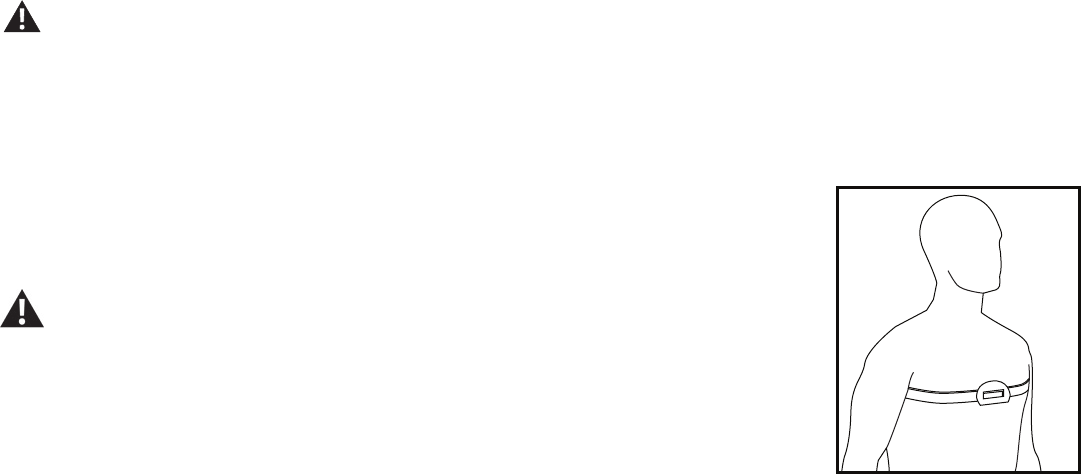
Chest Strap
Using the provided heart rate transmitter chest strap lets you monitor your heart rate at any time during your
workout.
Consult a physician before you start an exercise program. Stop exercising if you feel pain or
tightness in your chest, become short of breath, or feel faint. Contact your doctor before you use
the machine again. The heart rate displayed is an approximation and should be used for reference
only.
To put on your chest strap:
1. Secure the strap around your chest just below the chest muscles.
2. Lift the transmitter off your chest and moisten the two Grooved Electrode Areas on the back.
3. Check that the wet electrode areas are rmly against your skin.
The transmitter will send your heart rate to the machine’s receiver and display your estimated Beats Per Minute (BPM).
Always remove the transmitter before you clean the chest strap. Clean the chest strap regularly with mild soap and water, and thoroughly dry it. Re-
sidual sweat and moisture may keep the transmitter active and drain the battery in the transmitter. Dry and wipe clean the transmitter after each use.
Note: Do not use abrasives or chemicals such as steel wool or alcohol when you clean the chest strap, as they can damage the electrodes
permanently.
Assembly / Owner’s Manual
31
If the Console does not display a heart rate value, the transmitter may be at fault. Check that the textured contact areas on the chest strap are
making contact with your skin. You may need to lightly wet the contact areas. Check that the curve of the transmitter is oriented upward. If no signal
appears or you need further assistance, contact Customer Service (if purchased in US/Canada) or your local distributor (if purchased outside US/
Canada).
Before discarding a chest strap, remove the battery. Dispose of in accordance with local regulations and/or at approved recycling
centers.
Contact Heart Rate Sensors
Contact Heart Rate (CHR) sensors send your heart rate signals to the Console. The CHR sensors are the stainless steel parts of the Handlebars.
To use, put your hands comfortably around the sensors. Be sure that your hands touch both the top and the bottom of the sensors. Hold rm, but
not too tight or loose. Both hands must make contact with the sensors for the Console to detect a pulse. After the Console detects four stable pulse
signals, your initial pulse rate will be shown.
Once the Console has your initial heart rate, do not move or shift your hands for 10 to 15 seconds. The Console will now validate the heart rate.
Many factors inuence the ability of the sensors to detect your heart rate signal:
• Movement of the upper body muscles (including arms) produces an electrical signal (muscle artifact) that can interfere with pulse detection. Slight
hand movement while in contact with the sensors can also produce interference.
• Calluses and hand lotion may act as an insulating layer to reduce the signal strength.
• Some Electrocardiogram (EKG) signals generated by individuals are not strong enough to be detected by the sensors.
• The proximity of other electronic machines can generate interference.
If your heart rate signal ever seems erratic after validation, wipe off your hands and the sensors and try again.
The heart rate displayed is an approximation and should be used for reference only.
Heart Rate Calculations
Your maximum heart rate usually decreases from 220 Beats Per Minute (BPM) in childhood to approximately 160 BPM by age 60. This fall in heart
rate is usually linear, decreasing by approximately one BPM for each year. There is no indication that training inuences the decrease in maximum
heart rate. Individuals of the same age could have different maximum heart rates. It is more accurate to nd this value by getting a stress test than by
using an age related formula.
Your at rest heart rate is inuenced by endurance training. The typical adult has an at rest heart rate of approximately 72 BPM, where as highly
trained runners may have readings of 40 BPM or lower.
The Heart Rate table is an estimate of what Heart Rate Zone (HRZ) is effective to burn fat and improve your cardiovascular system. Physical condi-
tions vary, therefore your individual HRZ could be several beats higher or lower than what is shown.
The most efcient procedure to burn fat during exercise is to start at a slow pace and gradually increase your intensity until your heart rate reaches
between 60 – 85% of your maximum heart rate. Continue at that pace, keeping your heart rate in that target zone for over 20 minutes. The longer
you maintain your target heart rate, the more fat your body will burn.
Assembly / Owner’s Manual
32
Fat-Burning Target Heart Rate
20-24
FAT-BURNING TARGET HEART RATE
Heart Rate BPM (beats per minute)
Age
25-29
0
50
100
150
200
250
30-3435-3940-4445-4950-5455-5960-6465-6970+
196
191
186
181
176
171
166
161
156
151
146
167
162
158
154
150
145
141
137
133
128
126
Maximum Heart Rate
Target Heart Rate Zone
(keep within this range
for optimum fat-burning)
118
115
112
109
106
103
100
97
94
91
88
The graph is a brief guideline, describing the generally suggested target heart rates based on age. As noted above, your optimal target rate may be
higher or lower. Consult your physician for your individual target heart rate zone.
Note: As with all exercises and fitness regimens, always use your best judgment when you increase your exercise time or intensity.
Assembly / Owner’s Manual
33
Fitness Basics
Frequency
To maintain good health, lose weight and improve your cardiovascular endurance, try and use the Bowex™ tness machine a minimum of 3 times
per week, 30 minutes each day.
If you are new to exercise (or returning to a regular exercise program), and you are unable to comfortably complete 30 minutes of continuous exer-
cise at one time, just do 5 – 10 minutes, and gradually increase your workout time until you can reach 30 minutes total.
If your schedule is busy, and you are unable to t 30 minutes of continuous exercise into your day, try accumulating 30 minutes by doing multiple
shorter workouts on the same day. For example, 15 minutes in the morning and 15 minutes in the evening.
For best results, combine your Bowex™ tness machine workouts with a strength training program using a Bowex™ home gym or Bowex™
SelectTech™ dumbbells, and follow the Bowex™ Body Weight Loss Guide that is included in this manual.
Consistency
Busy work schedules, family obligations and daily chores can make it difcult to t regular exercise into your life. Try these tips to increase your
chances of success:
Schedule your workouts the same way you schedule meetings or appointments. Select specic days and times each week, and try not to change
your workout times.
Make a commitment to a family member, friend or spouse, and encourage each other to stay on track each week. Leave messages with friendly
reminders to be consistent, and keep each other accountable.
Make your workouts more interesting by alternating between steady state (single-speed) workouts and interval training (varied speed) workouts. The
Bowex™ tness machine is even more fun when you add this kind of variety.
Apparel
It is important to wear appropriate, safe and comfortable footwear and clothing when using the Bowex™ tness machine, including:
• Rubber-soled athletic walking or running shoes.
• Exercise clothing that allows you to move freely, and keep comfortably cool.
• Athletic support that provides stability and comfort.
Do not wear loose clothing or jewelry. This machine contains moving parts. Do not put fingers, feet, or other objects into moving
parts of the exercise equipment.
Always wear rubber soled athletic shoes when you use this machine. Do not use the machine with bare feet or only wearing socks.
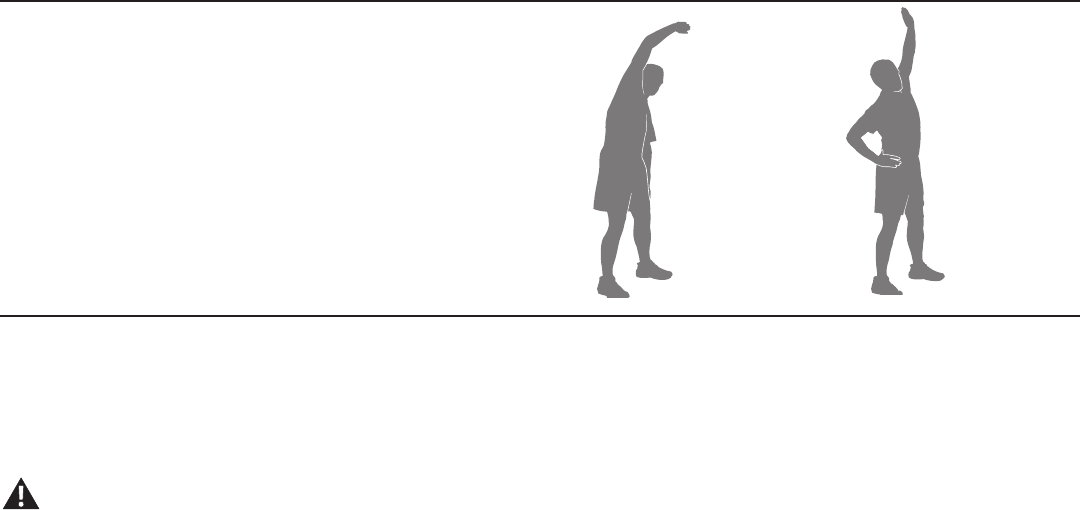
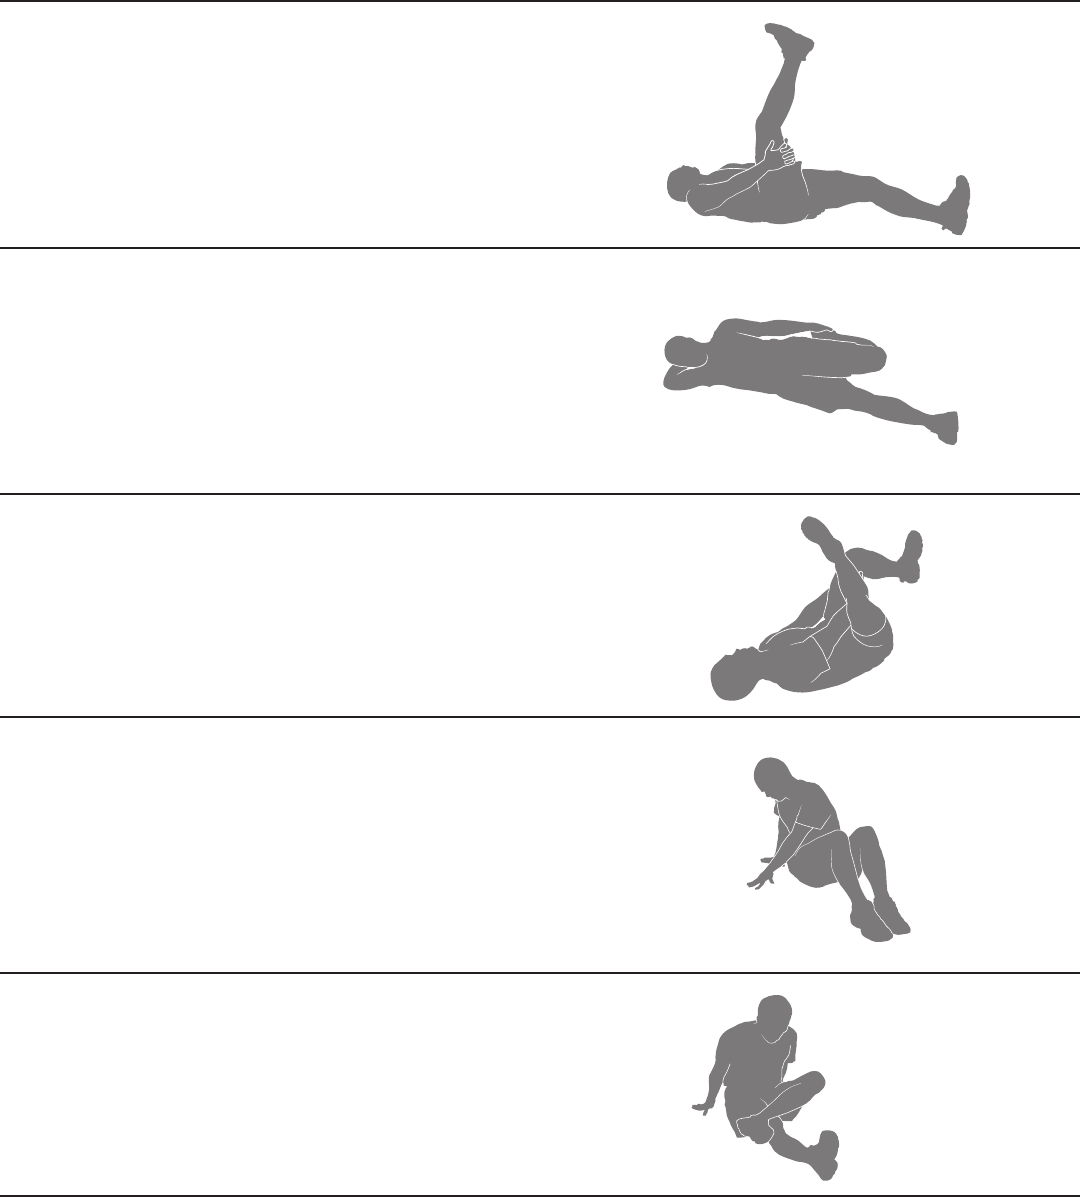
Warm-Up *
Before you use your Bowex™ tness machine, consider doing these dynamic warm-up stretches, which will help prepare your body for the workout:
Place the ball of one foot on the edge of a step or staircase.
Place the other foot slightly in front. Lower the heel of the
back foot as far as comfortably possible, keeping the knee
straight. Release the stretch by lifting the heel as high as
comfortably possible. Each repetition of the sequence should
take 1 to 3 seconds. Repeat as a continuous, controlled, uid
sequence 10 or 20 times. Repeat the stretch with the other
leg
Assembly / Owner’s Manual
40
Getting Started
Consult a physician before you start an exercise program. Stop exercising if you feel pain or tightness in your chest, become short
of breath, or feel faint. Contact your doctor before you use the machine again. Use the values calculated or measured by the
machine’s computer for reference purposes only.
Place the machine on a clean, hard, level surface, free from unwanted material or other objects that may hamper your ability to
move freely with a sufcient clear workout area. A rubber mat below the machine is recommended to prevent electrostatic dis-
charge and protect your oor.
Be sure that the workout space you are utilizing has adequate height clearance, taking into consideration the height of the user
and the maximum incline of the deck.
1. With the tness machine in your workout area, inspect the walking belt to make sure it is centered and aligned. If necessary, refer to the
“Aligning the Walking Belt” Procedure in the Maintenance section of this manual.
Note: This machine is for home use only.
2. Examine below the walking belt for any objects. Be sure it is clear below the machine.
3. Connect the Power Cord to a correctly grounded/earthed AC wall outlet.
Do not step on the power cord and plug.
Note: The machine is designed to plug directly into a properly wired and grounded/earthed outlet.
4. If you use the Remote Heart Rate Monitor, follow the Chest Strap directions.
5. Switch on the power. Power is now supplied to the machine.
6. Straddle the walking belt and stand on the Side Foot Support Platforms. Put the Safety Key into the Safety Key Port and clip the Safety Key
cord to your clothing.
Care should be used when mounting or dismounting the machine.
To prevent injury, stand on the Side Foot Support Platforms before you start the machine or end a workout. Do not dismount the
machine by standing on the moving Walking Belt and exiting off the rear of the machine.
• Examine the Safety Key and be sure it is connected to the Console correctly.
Note: if the Safety Key is not installed, the machine will allow the User to perform all activities except to activate the Walking Belt. The Console will
display reminders to insert the Safety Key ( “ERROR SAFETY KEY” and “INSERT SAFETY KEY” ).
• Always attach the Safety Key Clip to your clothing during workouts.
• If there is a need to immediately stop the machine, pull out the Safety Key to shut off the power to the Belt and Incline Motors. This will quickly
stop the belt (brace yourself- this is an abrupt stop) and clear the workout. Push the PAUSE/STOP button to stop the belt and pause the
program.
7. Push the USER button to select the desired User for the workout.
8. Push the desired Program button to select the workout program.
9. With your desired workout selected, push the START button.
If the selected workout is a Speed Program, the Console will ask for the maximum speed of the workout. Use the Increase/Decrease buttons
and push the Enter button.
10. The Console will display “RAMPING UP” as the Walking Belt gets up to speed. Be sure to carefully step onto the walking belt.
The belt will only move after a 3 second, audible beep countdown unless the machine has been muted.
Always use the handlebars to step on or off the treadmill, or when the incline or speed change.
To perform an emergency dismount, grab onto the Front or Side Handlebars and safely step onto the Side Foot Platforms. Bring the
Walking Belt to a stop and carefully step off the machine.
Operations
Assembly / Owner’s Manual
41
If the Sound has been muted on a Speed Based workout program, the Console will display the “AUDIO OFF” prompt for a few
seconds.
Note: Your treadmill comes equipped with a durable, high quality walking belt designed to provide many hours of reliable service. The walking
belt on a treadmill that has not been operated for a length of time, either in factory packaging or after assembly, can exhibit a “thump-
ing” noise when started. This is due to the belt taking on the curve of the front and rear rollers. This is a common occurrence and does
not indicate a problem with your machine. After the treadmill has been used for a short period of time the thumping noise will discon-
tinue. The amount of time will vary depending on the temperature and humidity of the environment where the treadmill is placed.
As you use your fitness machine, the Console will show “LUBRICATE BELT” followed by “REVIEW USER MANUAL” at set times. This
is only a reminder and should be added to your inspection schedule. Only apply lubricant as necessary. Push any button to accept the
reminder.
Power Up / Idle Mode
The Console will enter Power Up mode when initially plugged into a power source and the On/Off button is switched to On.
The belts will only move after a 3 second, audible beep countdown unless muted.
Shut Off (Sleep Mode)
If the Console does not receive any input for ve minutes, it will automatically shut off.
Push any button to start (wake up) the Console.
To prevent unsupervised operation of the machine always turn the power switch to Off, remove the Safety Key, and disconnect the
power cord from the wall outlet and machine power input. Place the power cord in a secure location.
Initial Setup / Adjust Date and Time
During the rst power-up, the Console will request the date and time for workout tracking. To adjust these settings after the Initial Setup, push and hold
the Right () and PAUSE/STOP buttons from the Power-Up Mode screen.
1. The Console display shows the SET DATE prompt with the default date setting. The month value will be the currently active values (ashing).
Push the Increase () or Decrease () buttons to adjust the currently active value (ashing). Push the Left () or Right () buttons to change
which segment is the currently active value (month / day / year ).
2. Push the Right button until the next prompt is displayed.
3. The Console display shows the SET TIME prompt with the default time setting. The hour value will be the currently active values (ashing). Push
the Increase/Decrease buttons to adjust the currently active value (ashing). Push the Left/Right buttons to change which segment is the currently
active value (hour / minute / AM or PM).
4. Push Enter to set.
The Console goes to the Power-Up Mode screen.
User Proles
The Console is equipped with 2 User Proles. Each User Prole has values and options specic to it:
• Gender
• Age
• Display Units
• Weight
• Sound Volume
• Erase Workouts
Assembly / Owner’s Manual
42
Select a User Prole
Every workout is saved to the User Prole. Be sure to select the proper User Prole before starting a workout. The last User that completed a
workout will be the default User.
User Proles are assigned the default values until they are customized by editing. Be sure to edit the User Prole for more accurate calorie and heart
rate information.
Edit User Prole
1. From the Power-Up Mode screen, push the User button to select one of the User Proles.
2. Push and hold down for 3 seconds the User button to edit the User Prole.
3. The Console display shows the Gender prompt and the current value.
Push the Increase or Decrease buttons to change the displayed Gender value, and push the Enter button to accept the displayed value.
Note: To exit the User Profile options, push the PAUSE/STOP button and the console will go back to the Power-Up Mode screen.
4. To edit the other User data (Age, Display Units, Weight, and Screen Brightness) use the Increase/Decrease buttons to adjust, and push Enter to
set each option.
Note: To return to the previous prompt push the Left, or Back, arrow button.
5. The Console display shows the Erase Workouts prompt and the current value ( “NO” ). To erase all workouts for the selected User, push the
Increase () or Decrease () button to change the value to “YES”, and push Enter. The Console will now conrm if the User wants to erase the
workouts. Use the Increase () or Decrease () button to change the value to “YES”, and push Enter. The workouts for this User have been
erased.
6. The Console display shows the conrmation screen for two seconds, and then will go to the Power-Up Mode screen
Workout Programs
Each Workout Program has 30 columns allowing for a variety of workouts. For each Workout Program, the Workout Segment display either shows
incline (Incline Program) or speed (Speed Program) columns. For a Speed Program, when a workout starts the Console will ask for the maximum
speed. Use the Increase/ Decrease buttons to adjust the value, and press START to accept and begin the workout.
As each column is done, the Console hides it so only the remaining columns are visible. The user can also manually adjust the incline and speed
values at any time during a workout.
During a Prole Program workout, the Console will make an audible beep when the next segment of the workout occurs. Be
prepared for changes in Incline and Speed with each segment change.
If the Sound has been muted, the Console will display the “AUDIO OFF” prompt for a few seconds.
Manual
(Speed Program - open-ended workout, 1 minute each column)
Note: maximum time is 99:59.
Assembly / Owner’s Manual
43
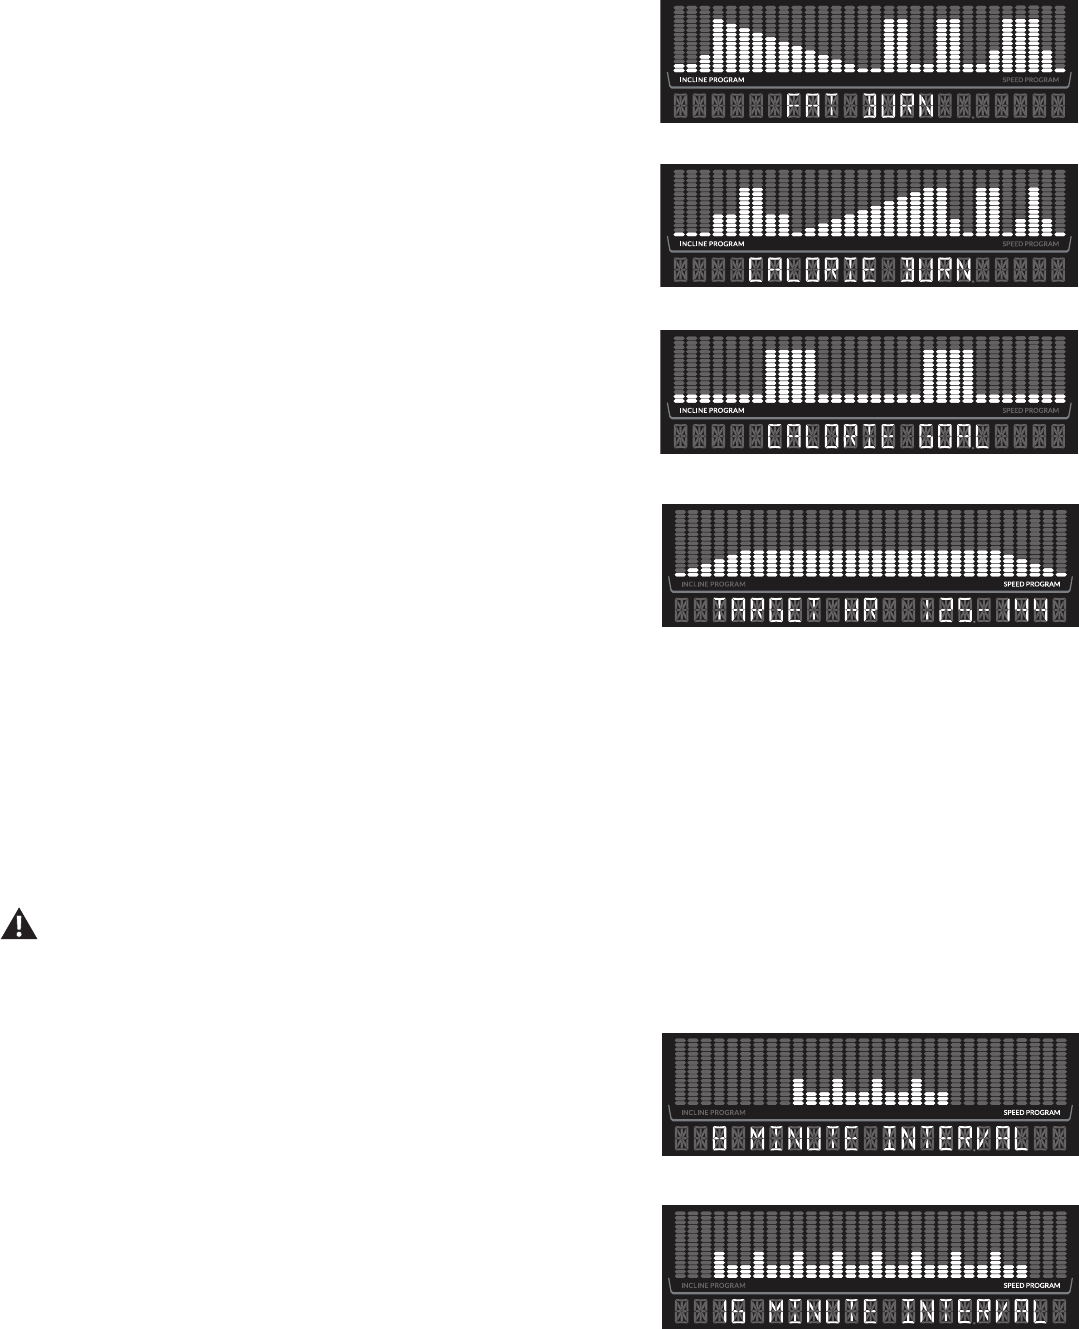
Fat Burn
(Incline Program - 30 minutes, 1 minute each column)
Calorie Burn
(Incline Program - 30 minutes, 1 minute each column)
Calorie Goal
(Incline Program - 300 calories, 1 minute each column)
Before a workout, push the Increase () or Decrease () buttons to adjust the Goal by
50 calorie increments.
Note: 50 calories is the minimum, 9950 calories is the maximum.
Target Heart Rate (HR)
(Speed Program - 30 minutes plus the initial time to raise heart rate into the Endurance
heart rate zone)
Interval Workout Programs
During an Interval Workout, the User will be encouraged to adjust the Walking Belt speed between an increased burst of speed ( “Sprint” ) to a slower
paced, ‘catch your breath’ time period ( “Recover” ). This shift will be repeated for the total number of intervals. The Console will count down the time
remaining of the active part of the Interval. The Console will also show the current Interval and how many Intervals need to be completed ( “01/08” is
the rst Interval of a total of eight Intervals).
The ”Sprint” period of an Interval Workout is a suggested workout level increase, and should only be followed if your physical
tness level allows.
8 Minute Interval
(Speed Program - 4 intervals, Sprint 30 seconds and Recover 90 seconds for each
interval)
16 Minute Interval
(Speed Program - 8 intervals, Sprint 30 seconds and Recover 90 seconds for each
interval)
Assembly / Owner’s Manual
44
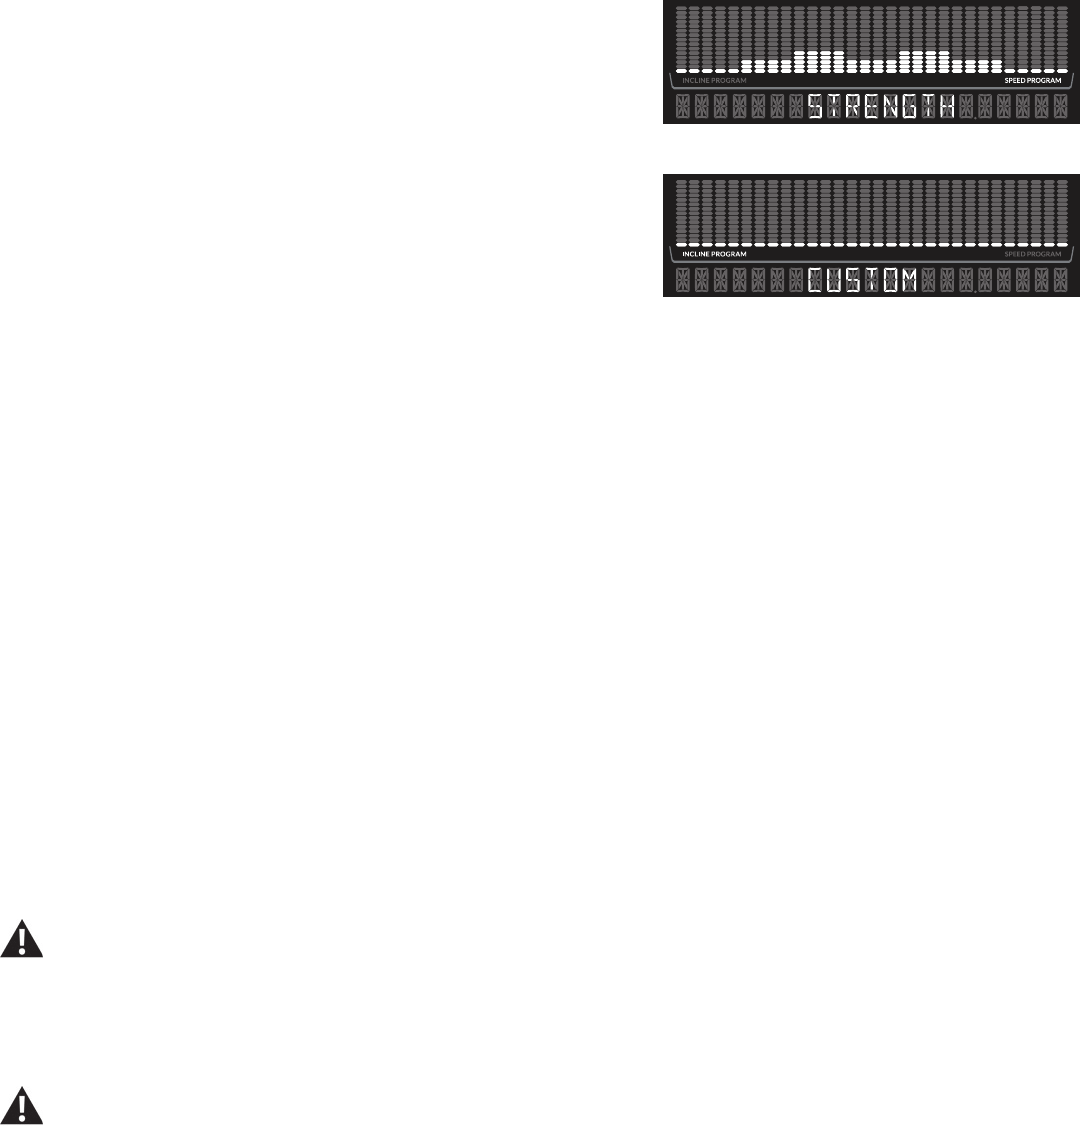
Strength
(Speed Program - 30 minutes, 1 minute per column)
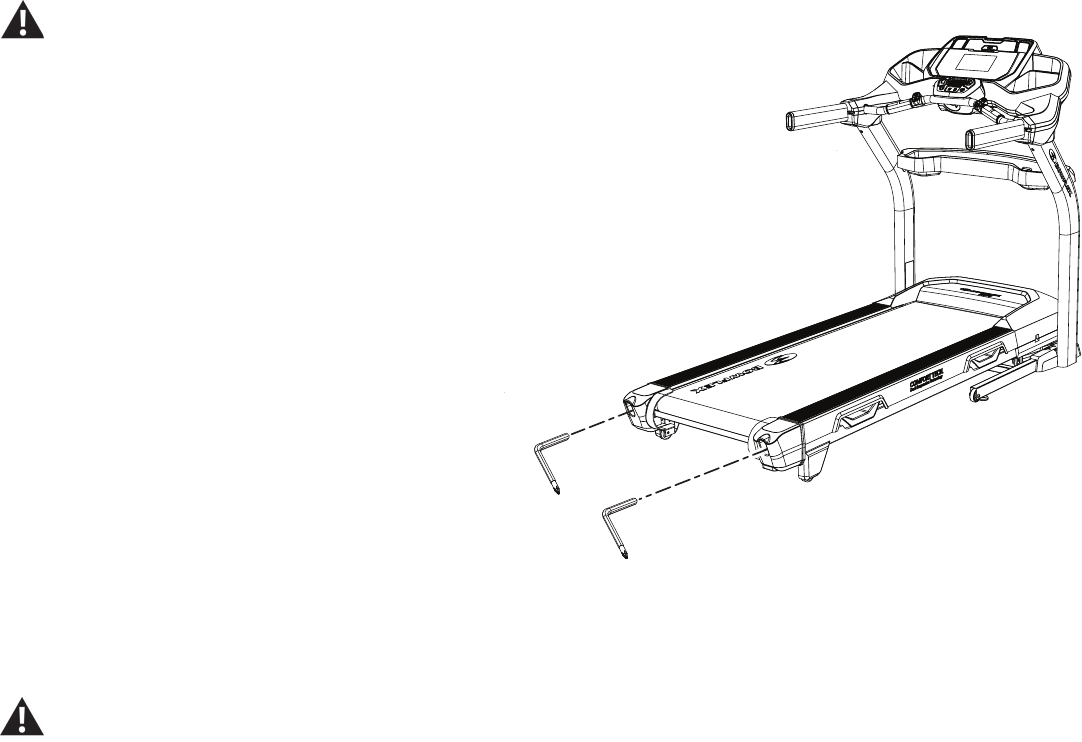
Custom
(Incline Program - open-ended workout, 1 minute each column or saved workout)
The Custom workout program allows a user to “design as you go”, adjusting the currently
active incline segment of each column. When the workout ends, the workout will be as-
signed to the Custom program.
In addition to the “design as you go” option, a completed workout can be saved as the Custom program. All modications to the workout segments
are saved, allowing the same workout to be repeated by selecting the Custom workout.
Note: Once a completed workout is saved as a custom workout, it may be desired to reset the program. To reset the Custom program, push
and hold for 3 seconds the Custom button. The Console will display RESET CUSTOM YES. Push Enter to reset, or PAUSE/STOP to
exit reset option.
Starting a Workout
To begin a workout:
1. Review the currently selected User Prole. Push the USER button to change the active User Prole.
2. Straddle the belts and stand on the Side Foot Support Platforms. Put the Safety Key into the Safety Keyhole and clip the Safety Key cord to your
clothing.
3. Push the button for the desired Program Workout. The Console will show the selected workout.
4. Push the START button.
If the workout is a Speed Program, the Console will request the maximum speed of the Walking Belt. Use the Increase() or Decrease()
buttons to adjust the Maximum Speed and push Enter. The Prole Program will adjust so the Maximum Speed value is the highest Speed of the
Prole Program when accepted.
The belt will only move after a 3 second, audible beep countdown unless the machine has been muted.
If the Sound has been muted on a Speed Based workout program, the Console will display the “AUDIO OFF” prompt for a few
seconds.
Note: Be sure to read the “Before You Start” section of your manual.
During a Prole Program workout, the Console will make an audible beep (unless muted) when the next segment of the workout
occurs. Be prepared for changes in Incline and Speed with each segment change.
If during a workout the User pushes one of the Program buttons, the Console will ask if they would like to switch workouts. If the User conrms the
switch by pressing the Enter button, the current workout will be ended. The new workout program will be displayed, and will begin when the START
button is pushed.
Assembly / Owner’s Manual
45
Changing Incline Levels
Push the Incline Level Increase() or Decrease() buttons to change the incline angle of the Deck at any time with the Safety Key installed. To
rapidly change the incline level push the desired Pre-Set Incline button, and then the Conrm Incline button. The Deck will adjust to the selected
incline setting.
Note: After a Pre-Set Incline button is pushed, the Confirm Incline button must be pushed within 12 seconds.
Be sure the area below the machine is clear before lowering the Deck. Fully lower the Deck after each workout.
Exercise on this machine requires coordination and balance. Be sure to anticipate that changes in belt speed and incline angle of
deck can occur during workouts, and be attentive in order to avoid loss of balance and possible injury.
Be sure that the workout space you are utilizing has adequate height clearance, taking into consideration the height of the user and
the maximum height of the fully inclined Deck.
Changing the Walking Belt Speed
During a workout, the Walking Belt starts at 1.0 mph/kph. To adjust the speed of the Walking Belt, push the Speed Increase or Decrease button to
adjust by 0.1 mph/kph increments. Push and hold down the Speed Increase or Decrease button to adjust the increments quickly.
To rapidly change the Speed level push the desired Pre-Set Speed button, and then the Conrm Speed button. The Walking Belt will adjust to the
desired speed.
Note: After a Pre-Set Speed button is pushed, the Confirm Speed button must be pushed within 12 seconds.
Pausing or Stopping a Workout
1. With a rm hold on the Handlebars, step off of the belts and onto the Side Foot Support Platforms on either side of the Walking Deck.
2. Push PAUSE/STOP to pause the workout. The belts will slow to a complete stop.
Note: If a paused workout is not restarted in 5 minutes, the machine will end the workout and display the workout results.
3. To restart your workout, push the START button. To end your workout, push PAUSE/STOP again. The Console will display your workout results.
4. The Console will ask if you would like to save the workout as the Custom workout program. Use the Increase or Decrease buttons to modify the
option, and push Enter. After 5 seconds the Console will perform the currently selected option.
To prevent unsupervised operation of the machine always turn the power switch to Off, remove the Safety Key, and disconnect the
power cord from the wall outlet and machine power input. Place the power cord in a secure location.
Workout Complete / Results
When the goal of a workout is achieved the Console will display, “Workout Complete,” for two seconds and then bring the Walking Belt to a stop. The
Console will display the workout results.
Note:If a workout is completed with a USB Flash Drive already inserted, the Console will not export the new Workout Results until the
Console exits the Results mode and displays the Power-Up Mode screen. If the Console does not receive any further input after 5
minutes, the Console will shut off.
Assembly / Owner’s Manual
46
Customize the Goal for the Calorie Goal Program
The workout goal for the Calorie Goal program can be adjusted. Once changed, the new value will be the default for future Calorie Goal workouts.
1. Push the Calorie Goal button.
2. Push the Increase or Decrease buttons to adjust the displayed calorie goal value.
The default Calorie Goal value is 300 calories and is adjusted in 50 calorie increments. 50 calories is the minimum value for a workout, 9950
calories the maximum value.
3. Push START to set the value and begin a Calorie Goal Program workout.
Target Heart Rate (HR) Program
The Target Heart Rate Program adjusts the incline to get and keep the User in the Endurance heart rate zone. When the heart rate reaches the
zone, the 30 minute workout begins.
Note: The console must be able to read the heart rate information from the Heart Rate Monitor for the program to work correctly.
1. Push the Target HR button.
2. The Console shows the TARGET HR values for the selected user. Push OK.
Consult a physician before you start an exercise program. Stop exercising if you feel pain or tightness in your chest, become short
of breath, or feel faint. Contact your doctor before you use the machine again. Use the values calculated or measured by the
machine’s computer for reference purposes only. The heart rate displayed on the console is an approximation and should be used
for reference only.
The Target Heart Rate program uses the age of the user prole to set the Endurance heart rate zone values. Review the user prole to be sure the
age value is correct.
Note: Be sure to allow time for your heart rate to reach the desired heart rate zone when setting the goal. The Console will display the heart
rate value based on the current User settings.
Fitness Score Display
The Fitness Score is based on an estimate of the User’s VO2 Max and calorie burn over their last ve workouts. VO2 Max estimates are calculated
using performance data (time, distance and average heart rate or an estimate of average heart rate if that data is unavailable). VO2 Max is the
maximal oxygen consumption of the aerobic physical tness of the individual, and is a determinant of the endurance capacity of the User during
prolonged exercise. ( V = Volume, O2 = Oxygen, and Max = maximum rate ).
For every workout completed that is longer than 10 minutes or a mile (1.6 km) in distance, the Console will apply those workout values toward your
Fitness Score. This value is displayed on the Fitness Score Display area of the Console.
Note: Using a Heart Rate Chest Strap provides the most accurate information to calculate the Fitness Score. A Fitness Score is provided
when a minimum of 10 minutes or 1 mile (1.6 km) of distance is done during a workout. If no heart rate is supplied, an approximation
based on the User Profile will be used to calculate the score.
The Fitness Score may change only slightly for a User that performs the same length of workout at a similar intensity level. However, if that same
User were to increase intensity over the same length of a workout, their score would increase. Since the score is based on VO2 Max (estimated),
even a small score increase shows a signicant shift in the User’s tness level.
Note: A User’s score may drop slightly if fatigue is present. With the proper combination of exercise and rest, a User’s Fitness Score will rise
in a similar way to their VO2 Max. This will also be reflected in their ability to perform longer or faster workouts. Fitness Scores should
only be compared to your previous scores and not to other User Profiles.
Assembly / Owner’s Manual
47
Celebrations
When a Celebration is earned the Console will make an audible sound, display the name of the achievement, and animate the lights in a certain
sequence.
• For every 100 calories burned
• Farthest Workout
• Longest (timed) Workout
• Maximized Calories per minute (Cal/Min) rate display
Fitness Score
Age
100
80
60
40
20
18-2526-3536-4546-5556-6565+
Potential for Improvement
100
80
60
40
20
Fitness Score
User Fitness Level Based on Fitness Score
poor
excellent
good
high average
average
low average
Age
Potential for Improvement
poor
excellent
good
high average
average
low average
Assembly / Owner’s Manual
48
Machine Settings Mode
The Machine Settings Mode lets you view the total run hours for the machine and the current versions of the main systems.
1. Hold down the PAUSE/STOP button and Decrease() button together for 3 seconds while in the Power-Up Mode to access the Machine
Settings Mode.
Note: Push PAUSE/STOP to exit the Machine Settings Mode and return to the Power-Up Mode screen.
2. The Console displays the TOTAL HOURS for the machine.
3. Push the Right button to go to the next option.
4. The Console display shows the current Console Firmware Version.
5. Push the Right button to go to the next option.
6. The Console display shows the current Motor Control Board Firmware Version.
7. Push the Right button to go to the next option.
8. The Console display shows the current BLE Version.
9. Push the Right button to go to the next option.
10. The Console displays the DISCONNECT BLE NO prompt.
Note: If you want to disconnect the Bluetooth
®
transmitter, push the Increase/Decrease buttons to select the “DISCONNECT BLE YES”
option, and push Enter. The Console will exit the Machine Settings Mode and return to the Power-Up Mode screen.
11. Push the Right button to go to the next option.
12. The Console displays the VIEW ERROR MSG NO option. This option is for Service Technicians use only.
13. Push the Right button to go to the next option.
14. The Console displays the RESET CONSOLE NO prompt.
Note: If you want to reset the Console to factory settings, push the Increase/Decrease buttons to select the “RESET CONSOLE YES”
option, and push Enter. Turn the machine off when the Console displays the “POWER CYCLE NOW” prompt.
15. Push the Right button to exit the Machine Settings Mode and return to the Power-Up Mode screen.
Assembly / Owner’s Manual
49
Maintenance
Read all maintenance instructions fully before you start any repair work. In some conditions, an assistant is required to do the necessary tasks.
Equipment must be regularly examined for damage and repairs. The owner is responsible to make sure that regular maintenance is
done. Worn or damaged components must be repaired or replaced immediately. Only manufacturer supplied components can be
used to maintain and repair the equipment.
If at any time the Warning labels become loose, unreadable or dislodged, replace the labels. If purchased in US/Canada, contact
Customer Service for replacement labels. If purchased outside US/Canada, contact your local distributor for them.
To reduce the risk of electrical shock or unsupervised usage of the equipment, always unplug the power cord from the
wall outlet and the machine and wait 5 minutes before cleaning, maintaining or repairing the machine. Place the power cord in a secure
location.
Daily: Before each use, examine the exercise machine for loose, broken, damaged, or worn parts. Do
not use if found in this condition. Repair or replace all parts at the rst sign of wear or damage,
except for the Walking Deck. The Walking Deck is designed for wear on both sides of it. If only
one side of the Walking Deck is worn, a replacement Deck is not required. It is recommended
that a qualied service technician is used to ip the Walking Deck. After each workout, use a
damp cloth to wipe your machine and Console free of moisture.
Note: Avoid excessive moisture on the Console.
Weekly:Check for smooth roller operation. Wipe the machine to remove dust, dirt, or grime.
Do not remove the Motor Control Board (MCB) Cover, as dangerous voltages and
moving parts are present. The components are serviceable only by approved
service personnel or by following service procedures supplied by Nautilus, Inc.
Note: Do not use petroleum based products.
Monthly
or after 20 hours:
Make sure all bolts and screws are tight. Tighten as necessary.
Quarterly: Or after 25 hours—Lubricate the walking belt with a 100% pure silicone lubricant.
Silicone lubricant is not intended for human consumption. Keep out of reach of
children. Store in a safe place.
Note: Do not use petroleum based products.
Cleaning
To reduce the risk of electrical shock, always unplug the power cord and wait 5 minutes before cleaning, maintaining or
repairing this machine.
Wipe the treadmill down after each use to keep the treadmill clean and dry. It may be necessary to use a mild dish soap at times to remove all dirt
and salt from the belt, painted parts and the display.
NOTICE: If necessary, only use a mild dish soap with a soft cloth to clean the Console. Do not clean with a petroleum based solvent,
automotive cleaner, or any product that contains ammonia. Do not clean the Console in direct sunlight or at high temperatures.
Do not apply too much moisture to the Console.
Assembly / Owner’s Manual
50
Adjusting the Belt Tension
If the walking belt starts to slip during use, it is necessary to adjust the tension. Your treadmill has tension bolts at the rear of the treadmill.
1. Remove the Safety Key and place it in a secure location.
When this machine is not in operation, remove the Safety Key and keep out of the reach of children.
2. Make sure that the power switch is turned Off, and the
power cord is disconnected.
3. Use a 6 mm hex wrench to turn the right and left belt adjust-
ment bolts clockwise a 1/2 turn, rst one bolt and then the
other bolt.
4. After you adjust each side the 1/2 turn, inspect the walking
belt. From the belt’s midpoint, a correctly tensioned belt
should only have an inch of give. To check, pull the belt up-
ward at its midpoint and measure the distance to the deck. If
the distance is more than an inch, the belt is loose. Repeat
this step if necessary.
If you turn one side more than the other, the belt will move
away from that side of the treadmill and may need realign-
ment.
NOTICE: Too much tension on the belt causes unnecessary
friction and wears the belt, motor and electronics.
Aligning the Walking Belt
The walking belt should be centered on your treadmill at all times. Running style and a non-level surface can cause the belt to move off center. Minor
adjustments to the 2 bolts at the rear of the treadmill are necessary when the belt is off center.
1. Push the START button to start the walking belt.
Be sure not to touch the walking belt or step on the power cord. Keep bystanders and children away from the product you are
servicing at all times.
2. Stand at the rear of the treadmill to see which direction the belt moves.
3. If the belt moves to the left, turn the left belt adjustment bolt 1/4 turn clockwise and the right belt adjustment bolt 1/4 turn counterclockwise.
If the belt moves to the right, turn the left adjustment bolt 1/4 turn counterclockwise and the right adjustment bolt 1/4 turn clockwise.
4. Monitor the path of the belt for approximately 2 minutes. Continue to adjust the bolts until the walking belt is centered.
5. Push PAUSE/STOP twice to stop the walking belt and end the Quick Start workout.
6mm
Assembly / Owner’s Manual
51
Lubricating the Walking Belt
Your treadmill is equipped with a low maintenance deck and belt system. The Walking Belt is pre-lubricated. Belt friction can affect the function and
life of the machine. Lubricate the belt every 3 months or every 25 hours of use, whichever comes rst. Even if the treadmill is not in use, silicone will
dissipate and the belt will dry out. For the best results, lubricate the deck periodically with a silicone lubricant using the following instructions:
1. Turn off the power to the machine with the power switch.
2. Unplug the treadmill fully from the wall outlet, and remove the power cord from the machine.
To reduce the risk of electrical shock, always unplug the power cord and wait 5 minutes before cleaning, maintaining or
repairing this machine. Place the power cord in a secure location.
Note: Make sure the treadmill is located on a surface that is easy to clean.
3. Apply a few drops of the lubricant on the deck below the belt. Carefully lift the belt and apply a few drops of the lubricant the entire width of the
belt. A very thin layer of silicone lubricant on the entire deck below the belt is desired.
NOTICE: Always use a 100% pure silicone lubricant. Do not use a degreaser like WD-40
®
as this could seriously impact performance. We can
recommend that you use the following:
• 100% pure silicone, available at most hardware and auto parts stores.
• Lube-N-Walk
®
Treadmill Lubrication Kit, available from your local specialty tness dealer or Nautilus, Inc.
Silicone lubricant is not intended for human consumption. Keep out of reach of children. Store in a safe place.
4. Manually rotate the belt 1/2 of the length of the belt and apply lubricant again.
If you used spray lubricant, wait 5 minutes before turning on power to the machine to allow the aerosol to dissipate.
5. Connect the power cord back into the machine and then into the wall outlet.
6. Turn on the power to the machine with the power switch.
7. Stay to one side of your machine and start the belt at the slowest speed. Let the belt operate for approximately 15 seconds.
Be sure not to touch the walking belt or step on the power cord. Keep bystanders and children away from the product you are
servicing at all times.
8. Switch off your machine.
9. Take care to clean up any excess lubricant from the deck.
To decrease the possibility of slipping, be sure the deck area is free from grease or oil. Clean off any excess oil from the machine
surfaces.
As you use your tness machine, the Console will show “LUBRICATE BELT” followed by “REVIEW USER MANUAL” at set times. This is only a
reminder and should be added to your inspection schedule. Only apply lubricant as necessary. Push any button to accept the reminder.
Assembly / Owner’s Manual
52
Replace Batteries in Chest Strap
The heart rate (HR) chest strap uses a CR2032 battery.
Do not perform this procedure outdoors or in moist or wet locations.
1. Using a coin, loosen the slotted cover on the battery bay. Remove the
cover and battery.
2. When replacing the battery, insert it in the battery bay with the +
symbol facing up.
Note: The chest strap uses CR2032 size batteries.
3. Reinstall the cover on the strap.
4. Discard the old battery. Dispose of in accordance with local
regulations and/or at approved recycling centers.
5. Inspect your chest strap to ensure function.
Do not use until the equipment has been fully assembled and inspected for correct performance in accordance with the Owner’s
Manual.
CR2032
+
Assembly / Owner’s Manual
53
Maintenance Parts
Console Assembly
Right Upper Junction Cover
Left Upper Junction Cover
Heart Rate Chest Strap
Left Lower
Junction Cover
Right Lower Junction Cover
Crossbar Tray
Crossbar
Side Handlebar, Right
Side Handlebar, Left
Right Upright
Left Upright
Left Base Shroud
Right Base Shroud
Base Assembly
Power Cord
Safety Key
Left Junction
Cover End Cap
Left Junction Cover End Cap
Assembly / Owner’s Manual
54
Maintenance Parts (Base Assembly)
Walking Belt
Adjustment
Screw
Motor Cover
Drive Belt
Drive Motor
A/C Inlet
Motor Control Board Cover
Side Foot Platform
Fuse
Power Switch
Transport Wheel
Deck Cushioner
Leveler
Walking Belt
Motor Cover
Deck Lift Shock Assembly
Rear Roller
Rear Roller
Cover
Transport Handle
Base Support
Incline Motor
Assembly / Owner’s Manual
55
Leveler
Troubleshooting
Condition/ProblemThings to CheckSolution
No display/partial display/unit
will not turn on
Check electrical (wall) outletMake sure unit is plugged into a functioning wall outlet. Test the outlet with a
known functioning device such as a lamp.
Check connection at front of unitConnection should be secure and undamaged. Replace power cord or con-
nection at unit if either are damaged.
Check data cable integrityAll wires in cable should be intact. If any are visibly crimped or cut, replace
cable.
Check data cable
connections/orientation
Be sure cable is connected securely and oriented properly. Small latch on
connector should line up and snap into place.
Check console display for
damage
Check for visual sign that console display is cracked or otherwise damaged.
Replace Console if damaged.
Console DisplayIf Console only has partial display and all connections are ne, replace the
Console.
If the above steps do not resolve the problem, contact Customer Service (if
inside US/Canada) or your local distributor (if outside US/Canada).
Unit operates but Contact Heart
Rate (HR) not displayed
Sensor gripBe sure hands are centered on HR sensors. Hands must be kept still with
relatively equal pressure applied to each side.
Dry or calloused handsSensors may have difculty with dried out or calloused hands. A conductive
electrode cream (heart rate cream) can help make better conduct. These are
available on the web or at medical or some larger tness stores.
If tests reveal no other issues, contact Customer Care for further assistance.
Unit operates but Telemetric HR
not displayed
Chest StrapStrap should be “POLAR
®
” compatible and uncoded. Make sure strap is
directly against skin and contact area is wet. Make sure the transmitter has
the curve oriented upward.
Check User ProleSelect the Edit User Prole option for the User Prole. Go to the WIRELESS
HR setting and make sure that the current value is set to ON.
InterferenceTry moving unit away from sources of interference (TV, Microwave, etc).
Replace Chest StrapIf interference is eliminated and HR does not function, replace strap.
Replace ConsoleIf HR still does not function, contact Customer Service (if inside US/Canada)
or your local distributor (if outside US/Canada).
Speed display is not accurateDisplay set to wrong unit of
measure. (English/Metric)
Change display to show correct units.
Speed does not adjust (machine
turns on and operates)
Check ConsoleCheck for visual sign that Console is damaged. Replace Console if damaged.
Lower and Upper I/O Cables
(requires console removal)
All wires in the cables should be intact. If any are cut or crimped, replace
cable.
Drive BeltCheck to be sure drive belt is around drive pulley and motor; inspect tension.
If the above steps do not resolve the problem, contact Customer Service (if
inside US/Canada) or your local distributor (if outside US/Canada).
Incline does not adjust (machine
turns on and operates)
Check ConsoleCheck for visual sign that Console is damaged. Replace Console if damaged.
Lower and Upper I/O Cables
(requires console removal)
All wires in the cables should be intact. If any are cut or crimped, replace
cable.
Incline Adjuster Assembly
(requires cover removal)
Be sure Incline Adjuster Assembly is attached to Incline Motor drive screw.
If the above steps do not resolve the problem, contact Customer Service (if
inside US/Canada) or your local distributor (if outside US/Canada).
Assembly / Owner’s Manual
56
Condition/ProblemThings to CheckSolution
Console shuts off (enters sleep
mode) while in use
Check electrical (wall) outletMake sure unit is plugged into a functioning wall outlet. Test the outlet with a
known functioning device such as a lamp.
Check connection at front of unitConnection should be secure and undamaged. Replace power cord or con-
nection at unit if either are damaged.
Check data cable integrityAll wires in the cable should be intact. If any are cut or crimped, replace
cable.
Check data cable connections/
orientation
Be sure cable is connected securely and oriented properly. Small latch on
connector should line up and snap into place.
Reset machineUnplug unit from electrical outlet for 3 minutes. Reconnect to outlet.
If the above steps do not resolve the problem, contact Customer Service (if
inside US/Canada) or your local distributor (if outside US/Canada).
Fan will not turn on or will not
turn off
Reset machineUnplug unit from electrical outlet for 5 minutes. Reconnect to outlet.
Fan will not turn on, but Console
operates
Check for blockage of fanUnplug unit from electrical outlet for 5 minutes. Remove material from fan. If
necessary, detach the Console to help with removal. Replace the Console if
unable to remove blockage.
Unit rocks/does not sit levelCheck leveler adjustmentAdjust levelers until machine is level.
Check surface under unitAdjustment may not be able to compensate for extremely uneven surfaces.
Move machine to level area.
Thumping sound when belt
operates
Walking beltWalking belt needs to be used for wear in period. Sound will go away after
the wear in period.
Walking belt not alignedMachine levelingMake sure the machine is level. Refer to the procedure for leveling the
machine in this manual.
Walking belt tension and align-
ment
Make sure the walking belt is centered and tension is correct. Refer to the
procedures for adjusting tension and aligning the belt in this manual.
Motor sounds strainedSilicone lubrication on walking
belt
Apply silicone to the inner surface of the walking belt. Refer to the belt lubri-
cation procedure in this manual.
Hesitation or walking belt slips
when in use
Belt tensionAdjust the belt tension at the rear of the machine. Refer to the procedure for
adjusting belt tension in this manual.
Belt stops moving while in useSafety keyPlug Safety Key into Console. (See Emergency Stop Procedure in the Impor-
tant Safety Instructions section.)
Motor overloadUnit may be overloaded and draw too much current, which causes power to
turn off to protect motor. Refer to maintenance schedule for belt lubrication.
Make sure the walking belt tension is correct, and start unit again.
If the above steps do not resolve the problem, contact Customer Service (if
inside US/Canada) or your local distributor (if outside US/Canada).
Console displays “LUBRICATE
BELT” followed by “REVIEW
USER MANUAL”
Belt lubricationConsult lubrication schedule and apply if necessary. Push any button to exit
the notice.
Console continuously displays
a different program every 15
seconds
Console is in demonstration
mode
Push and hold down the ENTER and PAUSE/STOP buttons for 3 seconds.
Assembly / Owner’s Manual
57
Workout results will not sync
with Bluetooth
®
enabled device
Current console mode Machine must be in Idle Mode to sync. Push the PAUSE/STOP button until
the Power-Up Mode screen is displayed.
Total time of workoutA workout must be longer than 1 minute to be saved and posted by the
Console.
Fitness machineUnplug unit from electrical outlet for 5 minutes. Reconnect to outlet.
Bluetooth
®
enabled deviceConsult your device to be sure that the Bluetooth
®
wireless feature has been
enabled on it.
Fitness App Review Specications of Fitness App and conrm your device is compatible.
Contact appsupport@nautilus.com (if inside US/Canada) or your local dis-
tributor (if outside US/Canada) for further assistance.
Assembly / Owner’s Manual
58
Introduction and Overview
Welcome to the Bowex™ Body Weight Loss Guide. This guide is designed to be used with your Bowex™ equipment and will help you:
• Lose weight and get lean
• Improve your health and wellness
• Increase your energy and vitality
Consult a physician before you start an exercise program or a new health and diet plan. Stop exercising if you feel pain or tightness
in your chest, become short of breath, or feel faint. Contact your doctor before you use the machine again. Use the values calcu-
lated or measured by the machine’s computer for reference purposes only. The heart rate displayed on the console is an approxi-
mation and should be used for reference only.
By focusing on the main three elements of the Bowex™ Body Weight Loss Guide- quality, balance, and consistency- you’ll be able to reach and
maintain your weight loss and tness goals for the next six weeks and beyond.
• Quality – The emphasis of this plan is on eating more whole foods and getting the most nutrients from your calories as possible. Making the
majority of your diet from foods that have a single ingredient (for example fruits, vegetables, sh, lean protein, eggs, beans, nuts, and whole
grains) provides the vitamins, minerals, ber, protein, and healthy fats your body needs.
• Balance – Each of the meals and snacks in this guide have a source of ber or smart carbohydrate, protein, and healthy fat to keep your
energy levels consistent throughout the day to fuel your workouts. By having this balance you’ll feel fuller longer, which is critical to weight loss
success.
• Consistency – Getting about the same number of calories each day is important for your metabolism and your mindset. If you overdo it one
day, don’t try to make up for it the next day by not eating or cutting your calories drastically. Get right back on track by following this guide!
Results & Expectations
Results will vary depending on your age, starting weight, and exercise level but on average you may lose 1-3 lbs per week and experience increased
energy levels.
5 Tips for Long-Term Success
1. Keep a food log including hunger levels and water intake. Free online food logs and mobile apps are available at www.mytnesspal.com and
www.loseit.com
2. Weigh and/or take measurements weekly – no more and no less. Weighing weekly rather than daily or every other day is best. You’ll track
your progress and keep yourself in check without getting discouraged if the scale doesn’t move for a few days. And remember, weight is just
a number and it’s inuenced by muscle gain as well as fat loss. Feeling how your clothes t can often be a better indicator of progress as your
body adapts to exercise and nutrition changes.
3. Measure portions – To avoid portion creep, use measuring cups and spoons for grains (rice, pasta, cereal), beans, nuts, oils, and dairy. Use
the Portion Sizes Guide for other foods.
4. Plan ahead – Make a meal plan for the week or log your food a day in advance. Planning sets you up for success, especially for social events
and eating out.
5. Practice your desired long-term habits – It’s easy to justify poor eating choices when you’re only focused on the short term. Focus on the
long term satisfaction of a slimmer, healthier you rather than the temporary gratication you’ll get from splurging.
How to Use this Guide
• Eat breakfast within 90 minutes of waking up and balance your meals and snacks throughout the day
– Don’t go longer than 5-6 hours without eating
– If you’re not used to eating breakfast, start out small with a piece of fruit and have something else 1-2 hours later. Your body adapts to
not eating breakfast, but as soon as you start eating early in the day and cutting back on dinner portions you’ll notice your hunger will
increase. This is a good sign your metabolism is working!
• Mix and match meal options
– Select 1 option from the appropriate meal plan (male or female) for breakfast, lunch, and dinner, paying close attention to portion sizes
– Select 1-2 snack options per day
– You have the option to substitute one snack for one treat under 150 calories
– Use the meal plan, sample options, and grocery list to create your own meals for more variety
Bowflex™ Body Weight Loss Guide
Assembly / Owner’s Manual
59
– You can swap out any type of protein, vegetables or smart carbs for the suggested meal options. For example:
• Turkey for tuna
• Any sh or seafood for chicken
• Cooked vegetables instead of salad
• Eat your calories
– Cut out high calorie beverages like soda, juices, coffee drinks, and alcohol
– Stick with water, unsweetened tea, and coffee. Aim for a minimum of 64oz (1.9 liters) of water per day to stay well hydrated
• If you’re still hungry after or in between meals:
– Have a glass of water and wait 15-20 minutes. Many times we mistake thirst (or even boredom!) for hunger. Wait out the initial urge to eat
and sometimes it will pass.
– If you’re still hungry after waiting 15-20 minutes have a snack or mini-meal with fruit, vegetables, and protein.
If your goal is muscle gain or strength:
• Use the same meal plan but increase portion sizes in the same ratios to increase the total number of calories you eat every day. For example,
increase portion sizes of protein and smart carbs at meals by 50%. Adding a snack is another option to meet your body’s increased calorie
needs in order to gain muscle and strength.
• Focus on post-workout nutrition by having one of your snacks within 30 minutes after you complete your workout. Make sure to have a com-
bination of carbohydrates such as fruit with protein (yogurt, milk, or protein powder) to promote muscle growth and recovery. Chocolate milk is
also a great option.
Meal Plan Overview
The female meal plan provides about 1400 calories, and the male plan provides about 1600 calories, of high quality nutrition to not only help you
lose weight and feel great but get the most out of your calories. The vitamins, minerals, and antioxidants from eating mostly whole foods help sup-
port optimal health. These calorie levels will result in healthy weight loss for the majority of people. Keep in mind that everyone’s metabolism is very
different depending on age, height, weight, activity level, and genetics. Pay close attention to your weight, hunger levels, and energy and adjust your
calories if needed.
Follow these guidelines if you’re over 55:
• If you’re over 55, you need fewer calories because your metabolism slows as you age. Stick with three meals with one optional snack per day.
Follow these guidelines if you’re under 25:
• If you’re under 25 you may need more calories. Add another snack if you feel low on energy or are extremely hungry.
Breakfast
Breakfast includes a smart carb, fruit, and a source of protein, which will also have fat. With a balance of carbohydrates and ber from the smart carb
and fruit combined with protein and fat, you’ll energize your day and help control hunger levels throughout the day.
Snacks
Each snack is a balance of carbohydrates and protein to keep your blood sugar more consistent, which means you won’t experience hunger and
energy level spikes and drops.
This happens when you have a high carb-only snack like chips, candy, soda, crackers, or pretzels.
Lunch and Dinner
Lunch combines lling ber from vegetables and smart carbs with a lean, or low-fat, protein. The healthy fat can come either from the protein added
during cooking (nuts on a salad) or as a dressing or sauce (such as oil and vinegar salad dressing).
Assembly / Owner’s Manual
60
protein
veggies
rich
carbs
Here’s an overview of what an ideal day looks like:
(See Portion Size Guide for proper serving sizes)
smart
carb
protein/fat
Breakfast
Lunch
Dinner
Snack #1
Snack #2
fruit
smart
carb
protein
healthy
fat
smart
carb
protein
veggies
smart
carb
protein
healthy
fat
smart
carb
protein
veggies
Assembly / Owner’s Manual
61
Breakfast OptionsFruitSmart CarbProtein/Fat
Fruit and Nut Oatmeal Cook
plain oats in water. Top with fruit,
nuts, milk, cinnamon, and honey.
Berries or bananaPlain oats
(Regular or quick-cook)
Nuts and milk
Egg Mufn Cook egg/s. Toast
bread and top with 1 slice of
cheese, 1 slice of ham, and
tomato.
TomatoEnglish mufn or sandwich thinEgg, ham, and cheese
Yogurt Power Parfait Top yogurt
with fruit. Sprinkle with 1 serving
of nuts, 2-3 tbsp wheat germ, or
ground axseed, 1 tbsp oats, and
cinnamon.
Chopped fruit of your choiceOats, wheat germ, and ground
Lean beef: sirloin, chuck, round, tenderloin, 93% lean (organic and
grass fed is best)
Canned salmon or tuna (in water)
Nitrate-free, reduced sodium ham, turkey, chicken, or roast beef lunch-
meat
Any type of bean, dry or canned low-sodium varieties
Tofu and tempeh
Tips: Look for “Choice” or “Select” cuts of meat rather than “Prime”.
Prime cuts are fattier. Limit intake of highly processed meat and
imitation meat products like sausage, bacon, pepperoni, and hot dogs to
once a week or less.
FROZEN FOODS
All vegetables without sauce
All fruit
Grains and grain medleys
CRACKERS, SNACKS & ENERGY BARS
Any unsalted nuts or seeds
Air-popped or light popcorn
Edamame in the pod
Energy bars
Crackers
Hummus
Tips: Limit crackers, pretzels, and chips to 2-3 servings per week.
Always pair with protein such as hummus, cheese, or nuts. Look for
energy bars with less than 200 calories and 20g of sugar and at least 3g
of protein and 3g of ber. Look for crackers with less than 130 calories
and 4g or less of fat per serving.
FATS & OILS
Avocado
Olive, grapeseed, walnut, sesame, or axseed oil
Butter/spreads: look for products free of trans fats and partially
hydrogenated oils on the ingredient list.
Tips: Light olive oil refers to the avor, not the calorie content. Always
measure oil and butter. Even if a fat is considered healthy, it’s still very
high in calories and portions need to be controlled.
DRESSINGS, CONDIMENTS & SAUCES
Vinegars: rice, wine, balsamic
All fresh or dried herbs and spices
Mustard
Salsa and chili sauce
Marinara sauce with no high-fructose corn syrup
Lemon and lime juice
Bottled minced garlic and ginger
Low-sodium soy sauce
Tips: Look for products free of MSG, added colors, and high fructose
corn syrup. Look for sauces under 50 calories per serving. Avoid cream
based sauces and dressings like ranch, bleu cheese, and alfredo.
All fruits and vegetables, fresh and frozen, are great choices. Since every meal has one or both, your shopping cart should reect this.
Assembly / Owner’s Manual
65
Keep It Going
Tips for continued weight loss and maintaining changes
• Keep weighing yourself weekly, even after you’ve reached your goal weight
• Continue keeping a food log. If you have your meal plan well-established, log your food every other week to keep yourself on track. Don’t
feel like you have to do it every day.
• Prepare for plateaus. The scale might not budge for a few weeks or even months after some initial weight loss. This is normal and to be ex-
pected. It’s the body’s natural process for adjusting to your new lower weight. Stay focused on your long-term goal, celebrate your successes
and changes, and mix up your workouts to help overcome the plateau.
• Calorie adjustments for maintaining weight loss. Once you’ve reached your goal weight, you can increase your calories 100-200 per day
as long as your activity level stays the same
• Treat yourself. Have a non-food reward for each goal you hit such as a massage, a new outt, or an outing with friends and family
• Use the resources below to nd new recipes, get expert advice, and support to stay motivated
Resources
Downloadable Resources from Bowex™ Website (www.Bowex.com/Resources)
• Grocery Shopping List for Fridge (Blank Form)
• 7 Day Meal Planning Form
• Additional Dinner Options
• Pre and Post Workout Fueling Guide
Questions & Support
• Ask questions, post suggestions, and connect with our online Bowex™ Dietitian on the Bowex Facebook page
Recipes
• www.wholeliving.com
• www.eatingwell.com
• www.whfoods.org
• www.livebetteramerica.org
Online food logs
• www.mytnesspal.com
• www.loseit.com
Assembly / Owner’s Manual
66
Assembly / Owner’s Manual
67
( if purchased in US/Canada ) Warranty
Who Is Covered
This warranty is valid only to the original purchaser and is not transferable or applicable to any other person(s).
What Is Covered
Nautilus, Inc. warrants that this product is free from defects in materials and workmanship, when used for the purpose intended, under normal conditions, and provided it receives
proper care and maintenance as described in the Product’s Assembly and Owner’s manual. This warranty is good only for authentic, original, legitimate machines manufactured by
Nautilus, Inc. and sold through an authorized agent and used in the United States or Canada.
Terms
Warranty terms for products purchased in US/Canada are as stated below.
• Frame 10 years
• Drive Motor 10 years
• Mechanical parts 3 years
• Electronics 3 years
• Labor 1 year
(Labor support does not include the installation of replacement parts involved in the initial product assembly and preventative maintenance services. All repairs covered
under the labor portion of the warranty must be preauthorized by Nautilus.)
For warranty & service of products purchased outside US/Canada, please contact your local distributor. To find your local international distributor, go to: www.nautilusinternational.com
How Nautilus Will Support the Warranty
Throughout the terms of the warranty coverage, Nautilus, Inc. will repair any machine that proves to be defective in materials or workmanship. Nautilus reserves the right to replace
the product in the event a repair is not possible. When Nautilus determines replacement is the correct remedy, Nautilus may apply a limited credit reimbursement toward another
Nautilus, Inc. brand Product, at our discretion. This reimbursement may be prorated based on length of ownership. Nautilus, Inc. provides repair service within major metropolitan
areas. Nautilus, Inc. reserves the right to charge the consumer for travel outside these areas. Nautilus, Inc. is not responsible for dealer labor or maintenance charges beyond the
applicable warranty period(s) stated herein. Nautilus, Inc. reserves the right to substitute material, parts or products of equal or better quality if identical materials or products are not
available at the time of service under this warranty. Any replacement of the product under the terms of the Warranty in no way extends the original Warranty period. Any limited credit
reimbursement may be prorated based on length of ownership. THESE REMEDIES ARE THE EXCLUSIVE AND SOLE REMEDIES FOR ANY BREACH OF WARRANTY.
What You Must Do
• Retain appropriate and acceptable Proof of Purchase.
• Operate, maintain, and inspect the Product as specified in the Product Documentation (Assembly, Owner’s Manuals, etc.).
• Product must be used exclusively for the purpose intended.
• Notify Nautilus within 30 days after detecting an issue with the Product.
• Install replacement parts or components in accordance with any Nautilus instructions.
• Perform diagnostic procedures with a trained Nautilus, Inc representative if requested.
What Is Not Covered
• Damage due to abuse, tampering or modification of the Product, failure to properly follow assembly instructions, maintenance instructions, or safety warnings as stated in the
Product Documentation (Assembly, Owner’s Manuals, etc), damage due to improper storage or the effect of environmental conditions such as moisture or weather, misuse,
mishandling, accident, natural disasters, power surges.
• A machine placed or used in a commercial or institutional setting. This includes gyms, corporations, work places, clubs, fitness centers and any public or private entity that has a
machine for use by its members, customers, employees or affiliates.
• Damage caused by exceeding maximum user weights as defined in the Product’s Owner’s manual or warning label.
• Damage due to normal usage and wear and tear.
• This warranty does not extend to any territories or countries outside the United States and Canada.
How to Obtain Service
For Products purchased directly from Nautilus, Inc. contact the Nautilus office listed on the Contacts page of the products Owner’s manual. You may be required to return the defective
component to a specified address for repair or inspection, at your expense. Standard ground shipping of any warranty replacement parts will be paid by Nautilus, Inc. For products
purchased from a retailer, you may be asked to contact your retailer for warranty support.
Exclusions
The preceding warranties are the sole and exclusive express warranties made by Nautilus, Inc. They supersede any prior, contrary or additional representations, whether oral or
written. No agent, representative, dealer, person or employee has the authority to alter or increase the obligations or limitations of this warranty. Any implied warranties, including the
WARRANTY OF MERCHANTABILITY and any WARRANTY OF FITNESS FOR A PARTICULAR PURPOSE, are limited in duration to the term of the applicable express warranty provided
above, whichever is longer. Some states do not allow limitations on how long an implied warranty lasts, so the above limitation may not apply to you.
Limitation of Remedies
EXCEPT AS OTHERWISE REQUIRED BY APPLICABLE LAW, THE PURCHASER’S EXCLUSIVE REMEDY IS LIMITED TO REPAIR OR REPLACEMENT OF ANY COMPONENT DEEMED BY
NAUTILUS, INC. TO BE DEFECTIVE UNDER THE TERMS AND CONDITIONS STATED HEREIN. IN NO EVENT WILL NAUTILUS, INC. BE LIABLE FOR ANY SPECIAL, CONSEQUENTIAL,
INCIDENTAL, INDIRECT OR ECONOMIC DAMAGES, REGARDLESS OF THE THEORY OF LIABILITY (INCLUDING, WITHOUT LIMITATION, PRODUCT LIABILITY, NEGLIGENCE OR OTHER
TORT) OR FOR ANY LOST REVENUE, PROFIT, DATA, PRIVACY OR FOR ANY PUNITIVE DAMAGES ARISING OUT OF OR RELATED TO THE USE OF THE FITNESS MACHINE EVEN IF
NAUTILUS, INC. HAS BEEN ADVISED OF THE POSSIBILITY OF SUCH DAMAGES. THIS EXCLUSION AND LIMITATION SHALL APPLY EVEN IF ANY REMEDY FAILS OF ITS ESSENTIAL
PURPOSE. SOME STATES DO NOT ALLOW THE EXCLUSION OR LIMITATION OF CONSEQUENTIAL OR INCIDENTAL TYPE DAMAGES SO THE ABOVE LIMITATION MAY NOT APPLY TO
YOU.
State Laws
This warranty gives you specific legal rights. You may also have other rights, which vary from state to state.
Expirations
If the warranty has expired, Nautilus, Inc. may assist with replacements or repairs to parts and labor, but there will be a charge for these services. Contact a Nautilus office for
information on post-warranty parts and services. Nautilus does not guarantee availability of spare parts after expiration of warranty period.
International Purchases
If you purchased your machine outside of the United States consult your local distributor or dealer for warranty coverage.
Libble takes abuse of its services very seriously. We're committed to dealing with such abuse according to the laws in your country of residence. When you submit a report, we'll investigate it and take the appropriate action. We'll get back to you only if we require additional details or have more information to share.
Product:
Forumrules
To achieve meaningful questions, we apply the following rules:
First, read the manual;
Check if your question has been asked previously;
Try to ask your question as clearly as possible;
Did you already try to solve the problem? Please mention this;
Is your problem solved by a visitor then let him/her know in this forum;
To give a response to a question or answer, do not use this form but click on the button 'reply to this question';
Your question will be posted here and emailed to our subscribers. Therefore, avoid filling in personal details.
Register
Register getting emails for Bowflex BXT6 at:
new questions and answers
new manuals
You will receive an email to register for one or both of the options.
Get your user manual by e-mail
Enter your email address to receive the manual of Bowflex BXT6 in the language / languages: English as an attachment in your email.
The manual is 18,07 mb in size.
You will receive the manual in your email within minutes. If you have not received an email, then probably have entered the wrong email address or your mailbox is too full. In addition, it may be that your ISP may have a maximum size for emails to receive.
If you have not received an email with the manual within fifteen minutes, it may be that you have a entered a wrong email address or that your ISP has set a maximum size to receive email that is smaller than the size of the manual.
The email address you have provided is not correct.
Please check the email address and correct it.
Your question is posted on this page
Would you like to receive an email when new answers and questions are posted? Please enter your email address.