English–2
1 609 929 984 • (04.03) T
■ Danger of scalding! Never open the tank and the
bayonet connections during operation.
Before opening the tank and the bayonet con-
nections, switch off the unit, pull the mains plug
and allow the unit as well as the remaining water to
cool. Only then open the tank or the bayonet con-
nections (see Filling or Refilling with Water).
■ Always provide for a secure stance when working.
■ Carry the unit only with the handle. Do not pull on
the cable or the hose.
■ Do not stretch or kink the hose.
■ Place the unit in a secure and stable manner on a
level floor. Do not overturn the unit.
■ Danger of scalding! In case the unit falls over,
hot water enters the hose and can run out the end
of the hose.
Switch off the unit immediatly, pull the mains plug,
allow to cool and only then empty the hose.
■ Take hold of the steam shield only by the handle.
■ While working, keep other persons out of the work-
ing area!
■ Never leave the unit unattended when switched on.
■ Never allow children to use the machine.
■ Do not make alterations or connect attachments to
the unit.
■ Bosch is able to ensure flawless functioning of the
machine only if the original accessories intended
for it are used.
The Rubber Surge Protector 3 in the filler opening of
the tank serves as a check valve to hold back steam
or boiling water when the tank cap is suddenly opened
in an improper manner.
The Safety Valve in the tank cap allows steam to es-
cape from the tank when the pressure is too high (e.g.,
when the hose is kinked).
An additional Overpressure Valve in the unit allow
steam to escape into the intermediate space between
the tank wall and outer housing when the pressure is
excessive. The condense water that results can run
out of the housing at the bottom.
Never open the tank and the bayonet connections
during operation. Danger of scalding!
The Overheating Protection built into the heating el-
ement switches the heating element off when water is
not refilled in time. The unit is still switched on and the
red indicator in the On/Off switch 6 lights. For further
procedures, see Filling or Refilling with Water.
Mounting the Handle of the Steam Shield
Screw the handle to the steam shield 1 with the Phillips
head screws.
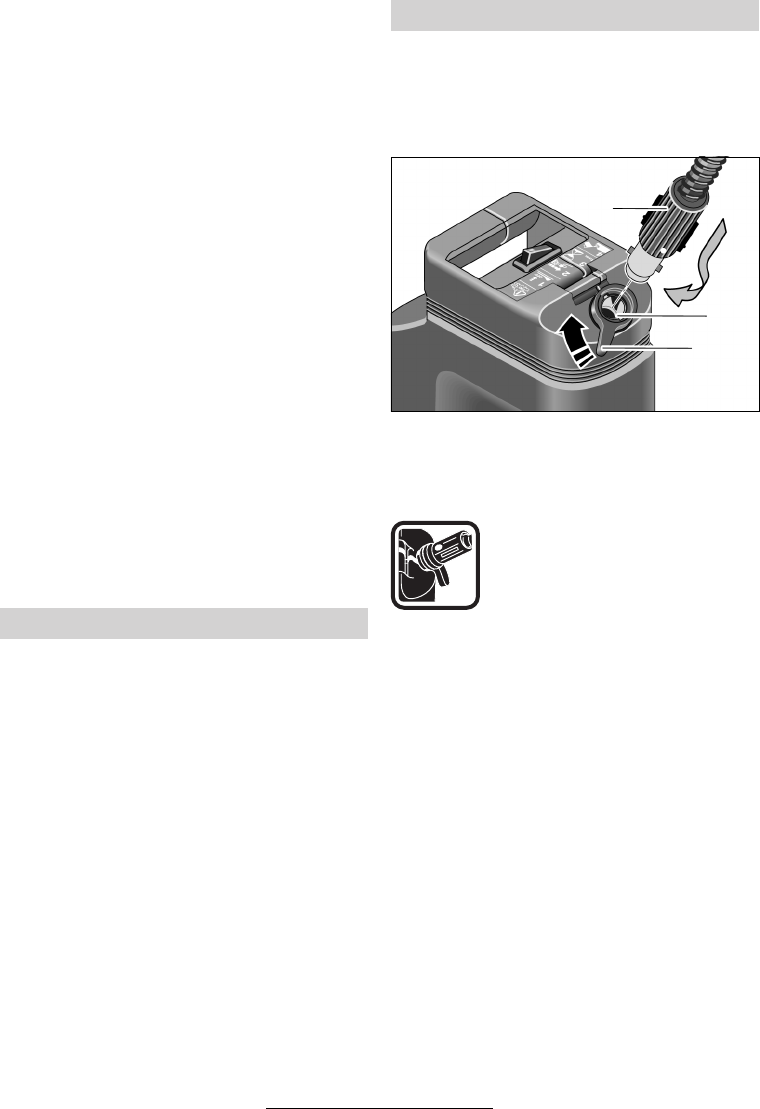
Connecting the Steam Shield and the Hose
Turn the safety lock 9 upward in the clockwise direc-
tion.
Insert the bayonet connector 8 of the hose in the hose
connection 7 of the unit and twist in the clockwise di-
rection.
The red marking must be aligned with
the groove on the unit.
Release the safety lock 9.
Insert the steam shield 1 or the steam nozzle onto the
free end of the hose until the bayonet connector can
be seen to latch.
☞ Take care that the tank and bayonet connec-
tion are securely fastened.
Never open the tank and the bayonet connec-
tions during operation.
Safety Devices
Before Use
8
7
9