26
Prior to installation
Preparing the wall
❑
The wall must be flat and perpendicular.
❑
Ensure that the wall is capable of
providing a firm hold for mounting
screws and plugs.
Weight in kg:
Exhaust air Recirculating air
20,0 20,5
We reserve the right to construction changes within the
context of technical development.
Changing over from exhaust-
air to recirculating mode
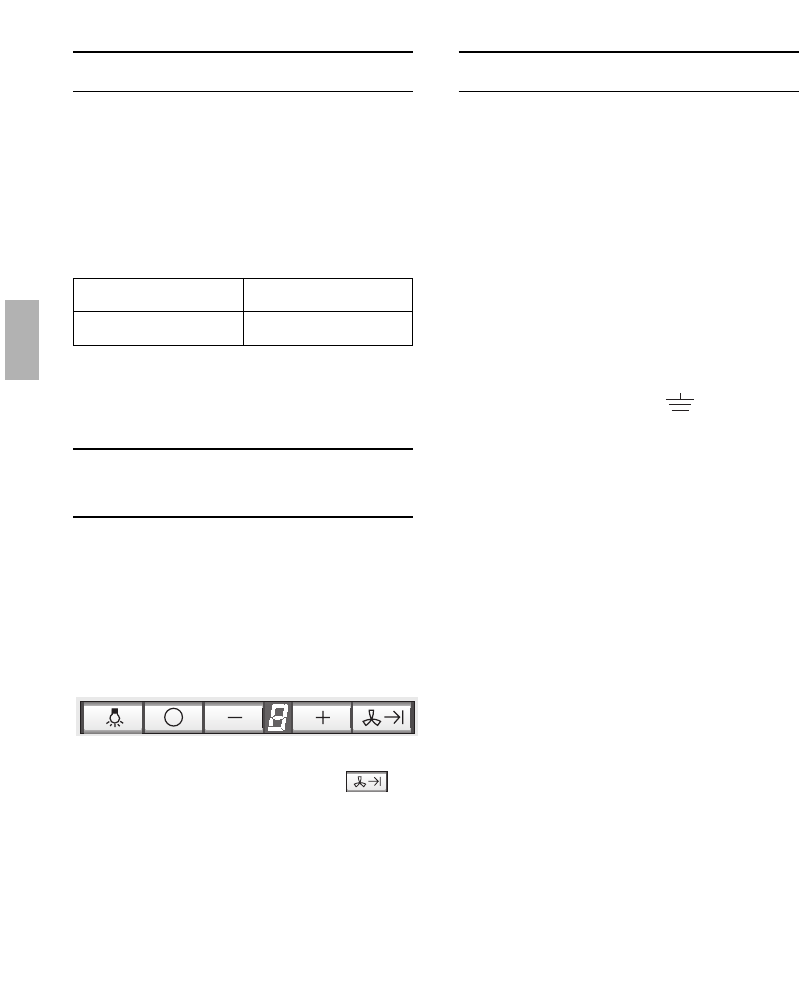
Changing the electronic control system
to recirculating mode:
❑
The standard factory setting is for
operation in exhaust-air mode.
❑
To change the mode, the extractor hood
must have been connected up and
should be switched off.
1. Press and hold the 0 button.
2. While
{ is displayed, press the
button until
ã is displayed. When this
has taken place, release the buttons.
❑
ã goes out shortly afterwards.
The electronic control system will then
have been set to recirculating mode.
❑
By repeating steps 1 and 2, you can
change the electronic control system
back to exhaust-air mode (
# in display).
Electrical connection
WARNING: THIS APPLIANCE MUST BE
EARTHED
IMPORTANT: Fitting a Different Plug:
The wires in the mains lead are coloured in
accordance with the following code:
Green and Yellow – Earth
Blue – Neutral
Brown – Live
If you fit your own plug, the colours of
these wires may not correspond with the
identifying marks on the plug terminals.
This is what you have to do:
1. Connect the green and yellow (Earth)
wire to the terminal in the plug marked
‘E’ or with the symbol ( ), or
coloured green or green and yellow.
2. Connect the blue (Neutral) wire to the
terminal in the plug marked ‘N’ or
coloured black.
3. Connect the brown (Live) wire to the
terminal marked ‘L’, or coloured red.
The extractor hood should only be
connected to an earthed socket that has
been installed according to relevant
regulations.
If possible, site the earthed socket directly
above the chimney panelling in the ceiling.
Electrical data:
Are to be found on the name plate inside
the appliance after removal of the filter
frame.
ṇ Before undertaking any repairs,
always disconnect the extractor hood from
the electricity supply.
Length of the connecting cable: 1.30 m.
If it is necessary to wire the extractor
hood directly into the mains:
The extractor hood should only be
connected to the electricity supply by a
properly qualified electrician.
A separator must be installed in the house-
hold circuit. A suitable separator is a switch
that has a contact gap of more than 3 mm
and interrupts all poles. Such devices
include circuit breakers and contactors.
ṇ If the connecting cable for this applian-
ce is damaged, the cable must be replaced
by the manufacturer or his customer
service or a similarly qualified person in
order to prevent serious injury to the user.
This extractor hood corresponds to EC
regulations concerning RF interference
suppression.