Turning the temperature control clockwise will lower the inside temperature. Keep in mind that the tempera-
ture will change depending on the ambient temperature (of the location), the frequency of door opening and
the amount of food in the appliance.
During initial operation, turn the temperature control to the highest setting first, until the appliance has reached
the desired operating temperature. Afterwards it is recommended to turn the control back to a medium setting;
correcting the temperature at a later point would then be easier.
Storing food
Storing foodStoring food
Storing food
NOT
NOTNOT
NOTE:
E:E:
E:
Always store food covered or packed in order to prevent drying-out and transfer of odor or taste onto other
food items.
You may pack the food with:
•Polyethylene plastic bags or foil
•Plastic containers with a lid
•Special elasticated plastic covers
•Aluminum foil
22
The following safety precautions are recommended
The following safety precautions are recommendedThe following safety precautions are recommended
The following safety precautions are recommended
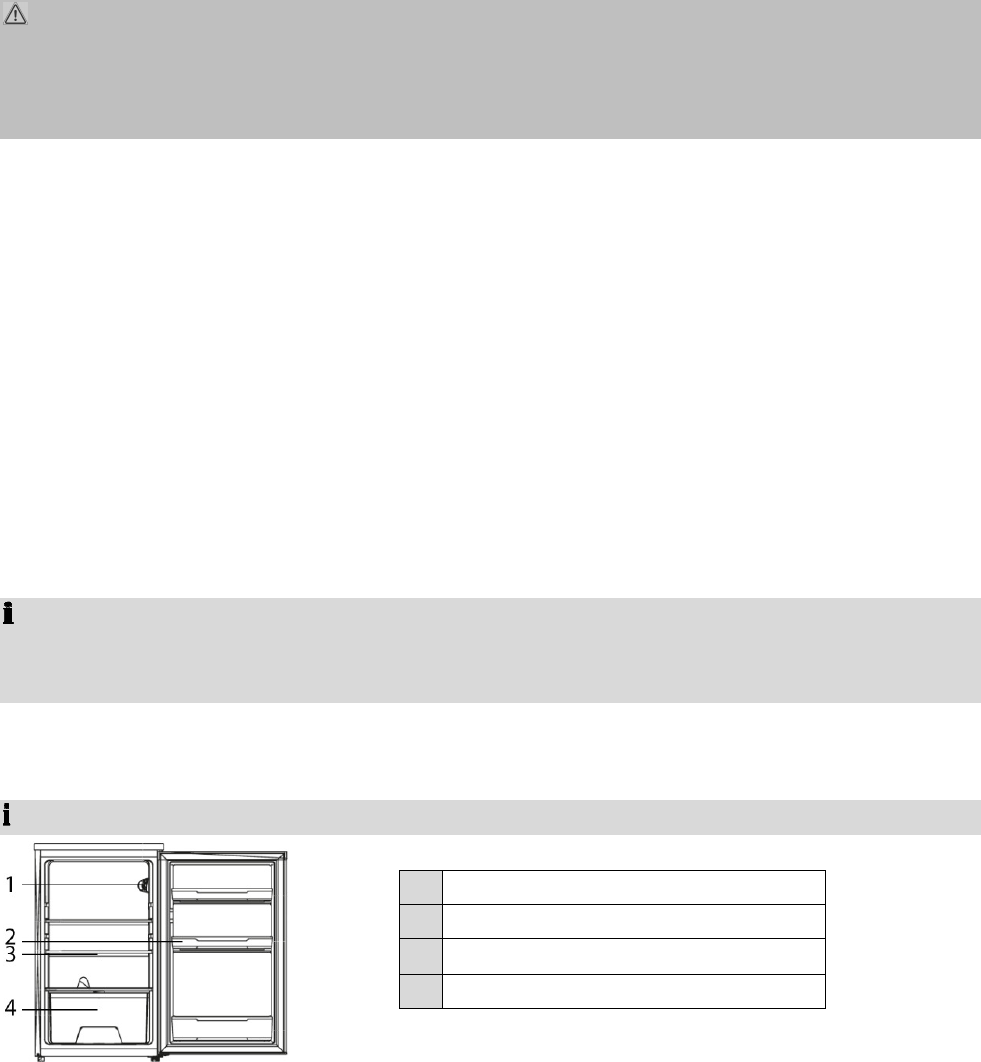
•The device is suitable for storing fresh food and drinks.
•Store fresh packed items on the glass shelves and fresh fruits and vegetables in the vegetable box.
•Place bottles in the door storage rack.
•Store meat well packed and only for 2 to 3 days. Avoid contact with cooked dishes.
•Let warm food cool down before putting it in the device.
Defrosting
DefrostingDefrosting
Defrosting
The appliance has an automatic defrosting system. During defrosting the water drops drain off at the rear side
of the cooling chamber. The water running through a flume, is collected in a container underneath the com-
pressor, where it will evaporate. Make sure the water discharge opening does not get clogged. Clean it care-
fully with a pipe cleaner or knitting needle. A light formation of ice on the rear side during operation is normal.
CAUTION
CAUTIONCAUTION
CAUTION:
::
:
Never use metal objects (e.g. knives) for removing possibly ice from the vaporizer. The vaporizer could be
damaged. A defect vaporizer could cause serious damages.
Operating noise
Operating noiseOperating noise
Operating noise
Type of sound
Type of soundType of sound
Type of sound
Cause / solution
Cause / solutionCause / solution
Cause / solution
Normal
Normal Normal
Normal
noise
noisenoise
noise
Mumbling Caused by the compressor during its operation.
This is stronger when it turns on or off.
Liquid sounds Caused by the circulation of the refrigerant in the appliance.
Click sounds The temperature control turns the compressor on or off.
Disturbing noises Vibration of the shelves or cooling coils – check if those are securely fastened.
Switching
SwitchingSwitching
Switching
off
offoff
off
To switch off the appliance t
To switch off the appliance tTo switch off the appliance t
To switch off the appliance turn the temperature
urn the temperature urn the temperature
urn the temperature control
control control
control to
to to
to the off
the off the off
the off state.
state.state.
state.
If the appliance is out of use for long periods:
•Remove the appliance content.
•Disconnect the mains plug or switch off the fuse.
•Thoroughly clean the appliance (see ”Cleaning and Maintenance”).
•Leave open the appliance door to prevent unpleasant odours.
Tips for
Tips forTips for
Tips for
Energy saving
Energy savingEnergy saving
Energy saving
•Disconnect the plug if you do not use the appliance.
•Do not install the appliance near stoves, heaters or other heat sources. In case of higher ambient tempera-
tures, the compressor will run more frequently and longer.
•Ensure sufficient ventilation at the bottom and rear side. Never block ventilation openings.
•Allow warm dishes to cool down before putting them in the appliance.
•Do not adjust the temperature colder than necessary.
23
•Do not open the door longer than necessary.
•The seal of the appliance door must be completely intact, so that the door closes properly.
Cleaning
CleaningCleaning
Cleaning
and Maintenance
and Maintenanceand Maintenance
and Maintenance
WARNING:
WARNING:WARNING:
WARNING:
•Always turn off the appliance and disconnect the plug or turn off / unscrew the fuse before cleaning and
user maintenance.
•Do not use steam cleaners for cleaning the appliance; moisture could enter electrical components. Risk of
Risk of Risk of
Risk of
electric shock!
electric shock!electric shock!
electric shock! Hot steam could damage the plastic parts. The appliance must be dry before restarting op-
eration.
CAUTION
CAUTIONCAUTION
CAUTION:
::
:
•Do not use a wire brush or other sharp, abrasive items.
•Do not use any acidic or abrasive detergents.
•Do not damage the refrigerant circuit.
C
CC
Clean the
lean the lean the
lean the appliance
applianceappliance
appliance
including
including including
including interior regularly:
interior regularly:interior regularly:
interior regularly:
•Remove the appliance content and storage at a cool location.
•Use warm water and a mild detergent for cleaning the appliance interior as well as the exterior.
•Clean the water discharge channel / opening carefully with a pipe cleaner or knitting needle.
•After everything was thoroughly dried, you can restart the operation.
Reverse the bulb
Reverse the bulbReverse the bulb
Reverse the bulb
Lamp specifications: 220
Lamp specifications: 220Lamp specifications: 220
Lamp specifications: 220-
--
-240
240240
240
V
V V
V -
--
-
max.
max. max.
max. 2
22
2
W
WW
W
•Remove the screw from the lamp cover.
•Press on the lamp cover and remove to the back.
•Replace the defect illuminant.
•Reattach the lamp cover and fasten the screw.
•Reconnect the device and turn on.
Repairs
RepairsRepairs
Repairs
A wrong or improperly performed repair brings danger to the user.
Repairs to electrical appliances must only be carried out by an authorized specialist. A damaged power cord
must be changed only by a qualified electrician.
24
Troubleshooting
TroubleshootingTroubleshooting
Troubleshooting
Before you contact an authorized specialist
Before you contact an authorized specialistBefore you contact an authorized specialist
Before you contact an authorized specialist
Pr
PrPr
Problem
oblemoblem
oblem
Possible cause
Possible causePossible cause
Possible cause
Solution
SolutionSolution
Solution
The appliance is
not working
properly or at all.
-Is the unit not connected to mains power?
-Is the temperature control properly set?
-Is the place unqualified?
-Does the content prevent the appliance
door from closing properly?
-Are the ventilation openings clear of ob-
struction?
-Insert the plug properly in the contact socket.
Check the fuse.
-Check the temperature setting.
-Check the ambient temperature.
-Check the appliance content.
-Unblock the ventilation openings, install the
appliance freely.
Appliance cools
too much.
Is the temperature control set properly? Check the temperature setting.
The food is too
warm.
-Is the temperature control set properly?
-Was the appliance door open for an ex-
tended period?
-Is the temperature control set properly?
-Was the appliance door open for an ex-
tended period?
-Was large quantity of food placed in the
appliance within the last 24 hours?
-Is the appliance near a heat source?
-Check the temperature setting.
-Open the door only as long as necessary.
-Check the temperature setting.
-Open the door only as long as necessary.
-Turn the control panel to a colder setting tem-
porally.
-Check the location (see “Installation”).
Loud noise dur-
ing operation.
Does the appliance not stand vertical or
horizontal?
Adjust the feet accordingly. Liquid flow sounds
in the cooling circuit are normal.
Water on the
bottom.
-Is the temperature control set properly?
-Is the water discharge channel / opening
blocked?
-Check the temperature setting.
-Clean the water discharge channel / opening.
Light does not
work.
-Is the unit not connected to mains power?
-Is the light bulb defect?
-Insert the plug properly in the contact socket.
Check the fuse.
-See the section “Reverse the bulb”.
The housing
sides are very
warm.
The refrigeration cycle takes place in the foaming. The heat exchangers are installed in the
housing covered. The appliance cut the interior heat, which must be dissipated through the
housing areas.
Water on the
outer surface.
On days of high humidity, condensation might occur on the outer surface of the appliance. This
is no malfunction; you may simply wipe the water off.
NOTE:
NOTE:NOTE:
NOTE:
If a problem still persists after following the steps above, please contact your trader or an authorized techni-
cian.
25
Technical Data
Technical DataTechnical Data
Technical Data
Measures /
Measures / Measures /
Measures / W
WW
Weights
eightseights
eights
Height x Width x Depth cm
84.5 x 50.1 x 54.0
Net weight kg
25.0
Electrical connection
Electrical connectionElectrical connection
Electrical connection
Connection power W
70
Connection voltage V~ / Hz
220-240 / 50
The right to make technical and design modifications in the course of continuous product development re-
mains reserved.
Product data sheet for household refrigerators/freezers a
Product data sheet for household refrigerators/freezers aProduct data sheet for household refrigerators/freezers a
Product data sheet for household refrigerators/freezers according to regulation (EU) No. 1060/2010
ccording to regulation (EU) No. 1060/2010ccording to regulation (EU) No. 1060/2010
ccording to regulation (EU) No. 1060/2010
Brand
BrandBrand
Brand
Bomann
BomannBomann
Bomann
Model
ModelModel
Model
VS 366
VS 366VS 366
VS 366
Category
CategoryCategory
Category
1)
1)1)
1)
1
11
1
Energy Efficiency class
2)
A+
Annual Energy consumption
3)
kWh/a
114
Net capacity cooling total l
110
- thereof cold storage compartment
-
- thereof wine storage compartment
-
- thereof cellar compartment
-
- thereof storage compartment for fresh-food l
110
Net capacity freezing total l
-
Star rating
4)
-
Design temperature of other compartments
-
Coldest storage temperature of wine storage compartment
-
Frost-free
-
Temperature rise time h
-
Freezing capacity kg/24h
-
Climate class
5)
N/ST
Noise emission dB(A) re1 pW
39
Built-in / integrable
- / -
Wine storage appliance
-
1) Category:
1 = Refrigerator with one or more fresh-food storage compartments, 2 = Refrigerator-cellar, Cellar and Wine storage appliances, 3 = Refrigerator-chiller and
Refrigerator with a 0-star compartment, 4 = Refrigerator with a one-star compartment, 5 = Refrigerator with a two-star compartment, 6 = Refrigerator with a
three-star compartment, 7 = Refrigerator-freezer, 8 = Upright freezer, 9 = Chest freezer, 10 = Multi-use and other refrigerating appliances.
2) A+++ (highest efficiency) to G (lowest efficiency).
3) Annual energy consumption „XYZ” kWh per year based on standard test results for 24 h. Actual energy consumption will depend on how the appliance is
used and where is located.
4) * = compartment: a frozen-food storage compartment in which the temperature is not warmer than -6°C.
** = compartment: a frozen-food storage compartment in which the temperature is not warmer than -12°C.
*** = compartment: a frozen-food storage compartment in which the temperature is not warmer than -18°C.
26
*(***) = food freezer compartment in which the temperature is not warmer than -18°C and a min. freezing capacity in 24 h.
5) Climate class SN: ambient temperature of +10°C up to +32°C.
Climate class N: ambient temperature of +16°C up to +32°C.
Climate class ST: ambient temperature of +16°C up to +38°C.
Climate class T: ambient temperature of +16°C up to +43°C.
This appliance has been tested according to all relevant current CE guidelines, such as electromagnetic com-
patibility and low voltage directives, and has been constructed in accordance with the latest safety regulations
Disposal
DisposalDisposal
Disposal
Meaning of the “Dustbin” Symbol
Meaning of the “Dustbin” SymbolMeaning of the “Dustbin” Symbol
Meaning of the “Dustbin” Symbol
Protect our environment; do not dispose of electrical equipment in the domestic waste.
Please return any electrical equipment that you will no longer use to the collection points provided for their
disposal.
This helps avoid the potential effects of incorrect disposal on the environment and human health.
This will contribute to the recycling and other forms of reutilization of electrical and electronic equipment.
Information concerning where the equipment can be disposed of can be obtained from your local authority.
WARNING:
WARNING:WARNING:
WARNING:
Remove or disable any existing snap and bolt locks, if you take the appliance out of operation or dispose it.
Libble takes abuse of its services very seriously. We're committed to dealing with such abuse according to the laws in your country of residence. When you submit a report, we'll investigate it and take the appropriate action. We'll get back to you only if we require additional details or have more information to share.
Product:
Forumrules
To achieve meaningful questions, we apply the following rules:
First, read the manual;
Check if your question has been asked previously;
Try to ask your question as clearly as possible;
Did you already try to solve the problem? Please mention this;
Is your problem solved by a visitor then let him/her know in this forum;
To give a response to a question or answer, do not use this form but click on the button 'reply to this question';
Your question will be posted here and emailed to our subscribers. Therefore, avoid filling in personal details.
Register
Register getting emails for Bomann VS 366 at:
new questions and answers
new manuals
You will receive an email to register for one or both of the options.
Get your user manual by e-mail
Enter your email address to receive the manual of Bomann VS 366 in the language / languages: English as an attachment in your email.
The manual is 0,43 mb in size.
You will receive the manual in your email within minutes. If you have not received an email, then probably have entered the wrong email address or your mailbox is too full. In addition, it may be that your ISP may have a maximum size for emails to receive.
The manual is sent by email. Check your email
If you have not received an email with the manual within fifteen minutes, it may be that you have a entered a wrong email address or that your ISP has set a maximum size to receive email that is smaller than the size of the manual.
The email address you have provided is not correct.
Please check the email address and correct it.
Your question is posted on this page
Would you like to receive an email when new answers and questions are posted? Please enter your email address.