814578
32
Zoom out
Zoom in
Previous page
1/36
Next page
1
Description
Measuring Beaker [1]
Lid [2]
Mixing container [3]
Blades [4]
Lower Cover [6]
[7] Connector for blade driver
Sensor for Mixing Container [8]
Motor Block [11]
[5] Blade Holder
[12] On/Off Button
Locking mechanism of the
Mixing Container [9]
[10] Control Element
[13] Power cable
EN2
Contents
DESCRIPTION .................................................................................................................................................................................1
INTRODUCTION .............................................................................................................................................................................4
INFORMATION ABOUT THIS USER MANUAL ..............................................................................................................................5
SAFETY FUNCTIONS ......................................................................................................................................................................5
SAFETY PRECAUTIONS .................................................................................................................................................................6
OPERATING NOTES .......................................................................................................................................................................8
UNPACKING, CONTENTS AND START-UP ....................................................................................................................................9
REQUIREMENTS OF THE INSTALLATION LOCATION ...............................................................................................................10
ELECTRICAL CONNECTION ........................................................................................................................................................10
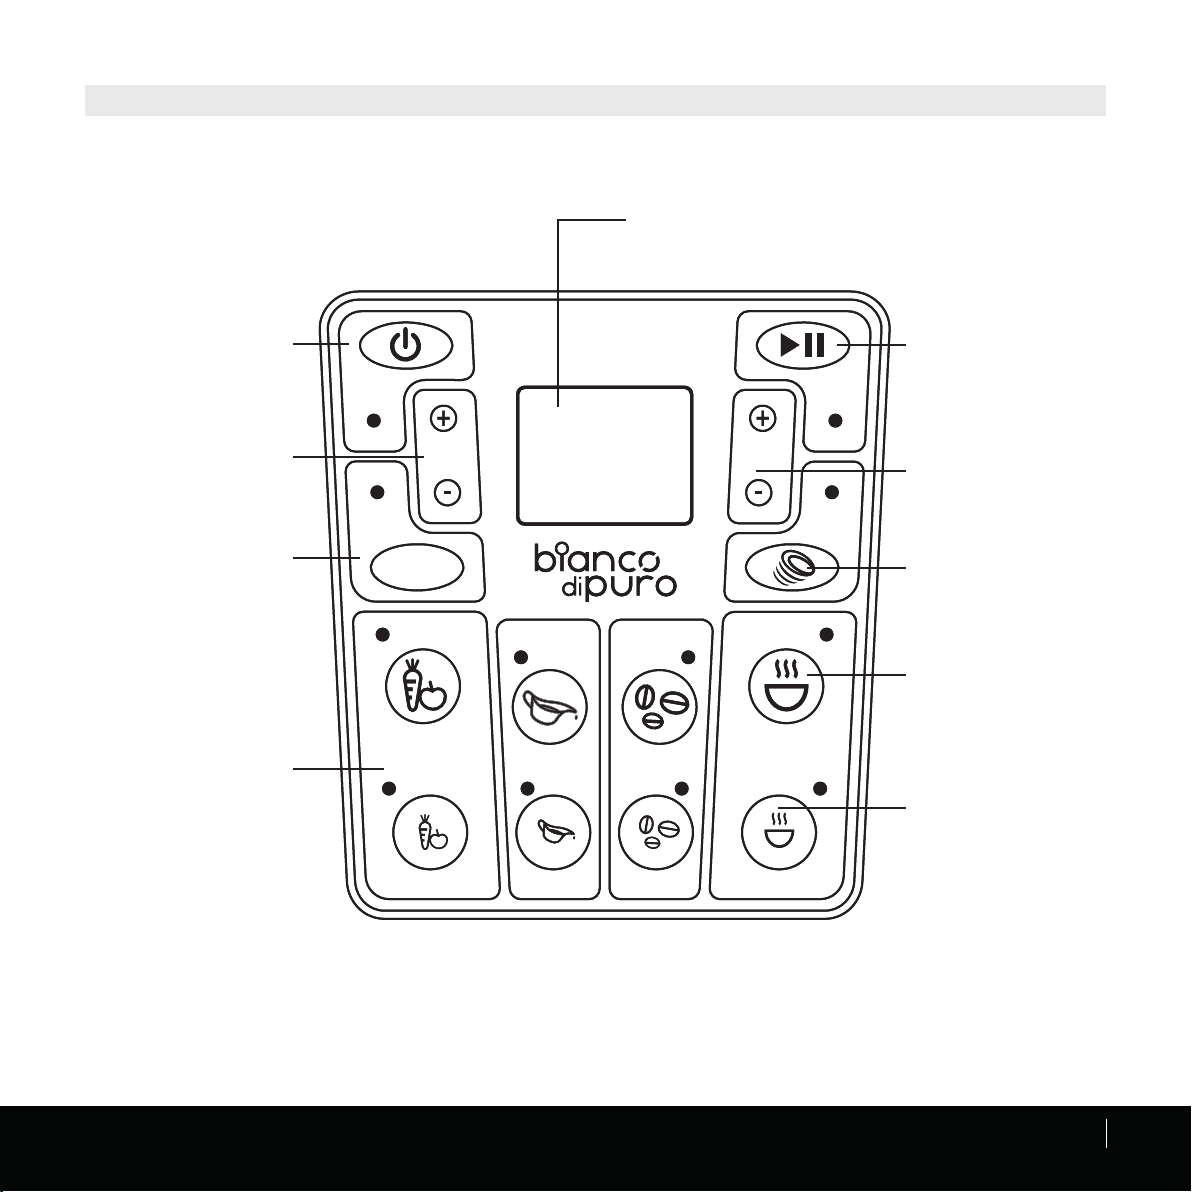
CONTROL PANEL OVERVIEW .....................................................................................................................................................11
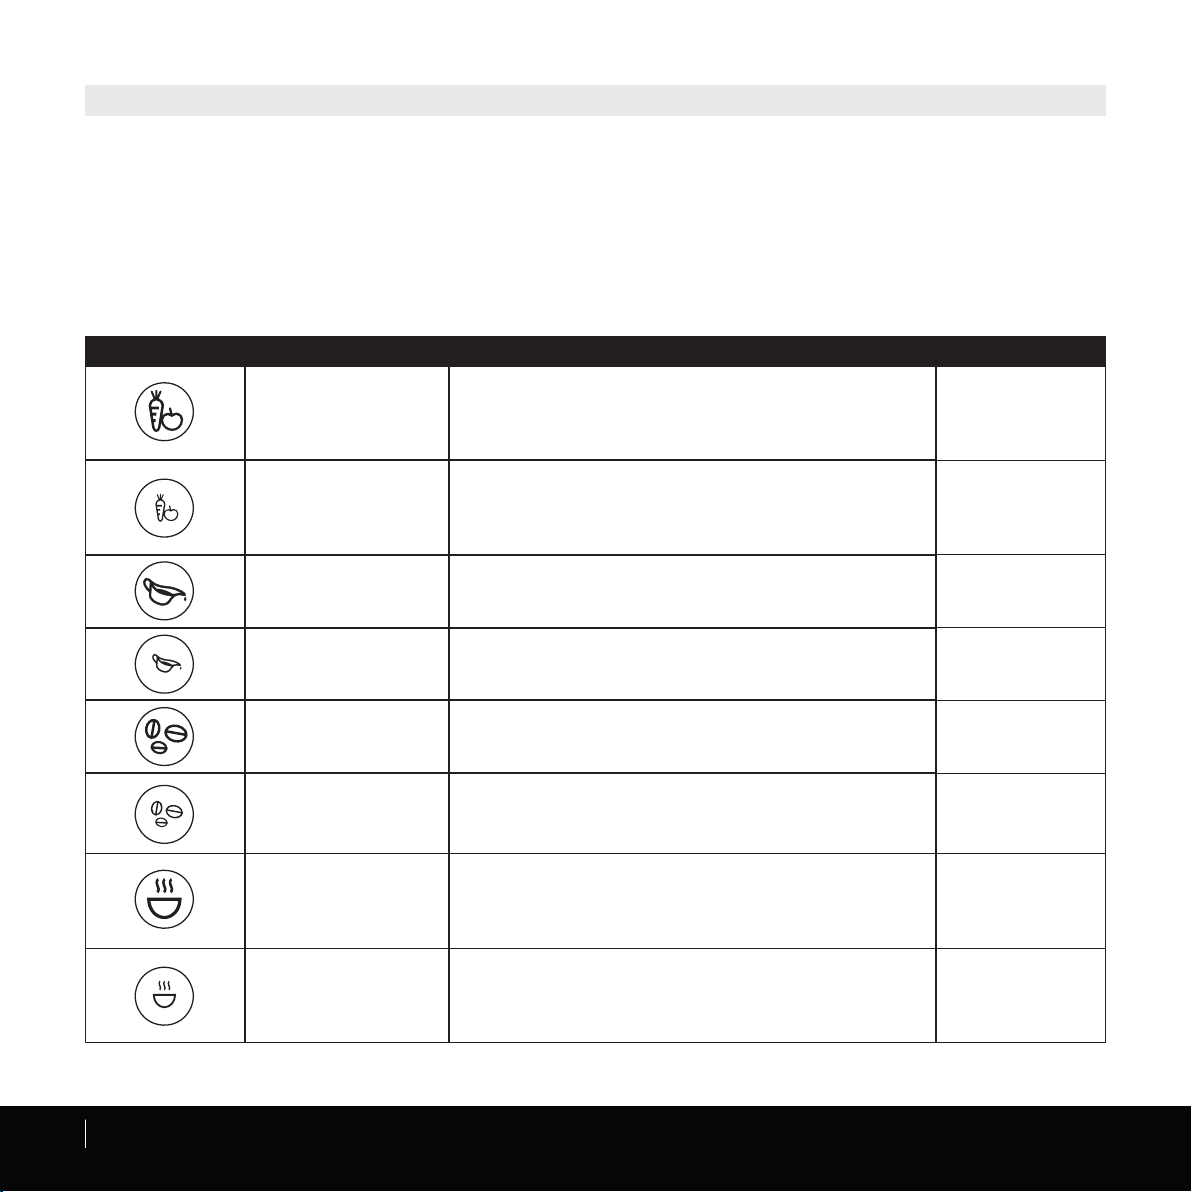
OPERATING PROGRAMM BUTTONS ..........................................................................................................................................12
OPERATING forte 2.0 ..................................................................................................................................................................13
OPERATING forte 2.0 WITH PRESET PROGRAMMS ..................................................................................................................14
PROGRAMME DESCRIPTION ......................................................................................................................................................15
OPERATING forte 2.0 MANUAL MODE .....................................................................................................................................16
OPERATING THE TAMPER TM .....................................................................................................................................................17
MEASURING BEAKER, LID AND SEAL RING ..............................................................................................................................18
SAFETY GUIDELINES FOR CLEANING .......................................................................................................................................18
CLEANING THE MIXING CONTAINER (INCL. LID), THE MOTOR BLOCK AND TAMPER ........................................................19
INSTRUCTIONS FOR GENERAL PREPARATION .........................................................................................................................20
RECIPES TO TRY - GREEN SMOOTHIES .....................................................................................................................................22
RECIPES TO TRY - GREEN SAUCE, TOMATO SAUCE AND HUMMUS ......................................................................................23
RECIPES TO TRY - TOMATO SOUP, ASPARAGUS SOUP AND CAULIFLOWER SOUP ..............................................................24
3
Contents
RECIPES TO TRY - CASHEW MUSH, ALMOND MUSH .............................................................................................................. 25
RECIPES TO TRY - APRICOT PUDDING, LEMON CREAM AND NUT PUDDING ..................................................................... 26
RECIPES TO TRY - CASHEW MILK, ALMOND MILK AND HEMP MILK .................................................................................... 27
RECIPES TO TRY - TOMATO DRESSING, PEANUT DRESSING AND ZUCCHINI DRESSING ................................................... 28
RECIPES TO TRY - ICE CREAM ................................................................................................................................................... 29
RECIPES TO TRY - FRUIT SMOOTHIES ....................................................................................................................................... 30
RECIPES TO TRY - SOY MILK ...................................................................................................................................................... 31
TECHNICAL DATA ....................................................................................................................................................................... 32
DISPOSAL NOTE ......................................................................................................................................................................... 33
DISPOSAL OF USED BATTERIES ................................................................................................................................................. 34
CONTACTS AND CUSTOMER SERVICE ................................................................................................ 34
INDEX .......................................................................................................................................................................................... 35
WARRANTY .................................................................................................................................................................................. 36
EN4
Dear Customer,
We are pleased that you have decided to care for your health, with the aid of forte 2.0!
You have bought an acknowledged quality product, and we thank you for your purchase.
The green smoothies are the perfect way for healthy nutrition. They deliver highly concentrated vital materials in their most
natural style. These are many times higher than in conventionally prepared food. With the forte 2.0, they are prepared in no
time, taste deliciously and supply you with essential nutrients to master the daily challenges.
True to the motto: “You are what you eat!“
We hope you enjoy your new path to healthy nutrition.
Introduction
5
Information about this User Manual
Safety Functions
This user manual is an integral part of your forte 2.0 and provides important information for start-up, safety, proper use and
maintenance of your device.
The user manual must always be available with the device. It must be read by every user who deals with start-up,
operation, cleaning and maintenance of your forte 2.0.
Your forte 2.0 has 3 safety functions in order to protect third parties and the device from damage.
Overheating protection
The motor of your forte 2.0 is equipped with a temperature control. If the motor or the blades turn too slowly due to too
solid foods or too little uid, there is a danger of overheating. If the motor should switch off for that reason, the overheating
protection of your forte 2.0 is activated. Let your forte 2.0 cool off for about 45 minutes in a well-ventilated area, afterwards
you can use your forte 2.0 as usual.
Overload protection
This protects the motor in case the blades in the jar are not able to rotate because of a blockage (forgotten items in the jar,
such as spoons).
Sensor for mixing container
The sensor for the mixing container (Fig. [8], page 1) recognizes if the container has been set up correctly. If the container is
not, or has not been placed correctly onto motor block, your forte 2.0 will not turn on. Never attempt to bypass the sensor in
order to protect third parties and in order to prevent damage at the device.
EN6
Safety Precautions
Please observe the following safety precautions for the safe use of the device:
Check the forte 2.0 before the rst use for externally visible damage of the housing, electrical connection as well as the
power plug. Do not operate a damaged device.
In case of damage to the power cable, the device must not be put into operation.
If water or another uid has entered the motor block, contact your service as soon as possible. Disconnect
the power plug and do not operate the device any more.
Never place the power plug in water or other uids, never wipe the power plug with a wet or moist cloth. Never touch the
power plug with wet or moist hands.
In case of damage to the power cable, it must be replaced only by the manufacturer or a service agent to avoid a hazard.
Repairs within the warranty period must only be carried out by the customer service. Incorrect repairs
can lead to considerable hazards for the user. In addition to that, the warranty is voided.
Defective parts must only be replaced with original parts, because only original parts ensure that the safety requirements
are fullled.
Never put your hands in mixing container during operation. It will cause injuries.
Operate the device with the original mix container only or a matching one from the product range.
Fill the mixing container only up to the maximum marking (max. marking).
7
Safety Precautions
Children and frail people must always be supervised by a person responsible for their safety, when using the forte 2.0.
Always store the device and the mixer attachment in a place inaccessible to children.
Always disconnect the power cable by pulling the plug from the power socket and not by pulling the cable.
Make sure that the power cable is not caught anywhere, causing the device to fall and injuring people.
Operate the device only with a lled mix container.
Do not operate the device in direct sunlight or near other heat sources.
Make sure during operation that the lid and measuring beaker correctly close the mix container.
Always disconnect the power cable before cleaning moving parts.
Pay attention to the blade unit during cleaning, the sharp blades are a risk of injury.
Do not try to dismantle the blades from the mixing container, they are permanently xed to the device.
Never leave the device without supervision during operation.
To avoid injury or burns, do not touch the blade driver on the engine block and the bottom of the mixing container directly
after blending.
EN8
Operating Notes
If you want to prepare sauces, soups or nut milk, add the ingredients in 2 to 3 steps, depending on their hardness. The
amount should not be too little, but also not too much. Too many ingredients in one process can lead to overheating and
automatic shutdown of the motor. Wait in that case until the device cools off as described above (see page 5).
Always keep the lid closed during the operation of your forte 2.0. This avoids any scalding or splashes of hot foods.
Never put your hands into the mixing container during operation to avoid injuries. Do not dip any objects into the mixing
container during operation, since otherwise the motor, blades and other parts of the device can be destroyed. Except for
the supplied tamper TM that may only be used through the lid opening (Fig. [2], page 1), since it cannot contact the blades
through the opening for the measuring beaker. On page 17, you will nd the description of the tamper.
When preparing hot drinks, soy milk or soups, make especially sure that the lid is closed well and your forte 2.0 is standing
securely. It is advisable to rst with start at low speed and then to increase it gradually. Alternatively you can either use the
Pulse mode or one of the preset programmes (soup, sauce or soy milk, see page 14).
Always pour liquids and soft ingredients rst into the mixing container and afterwards the harder ingredients, such as ice
cubes, green leaves etc.
If the chosen programme or the manual mode is nished, please wait until the blades are fully stopped before removal of
the mixing container. Otherwise the connection can be damaged.
If a singed smell exudes from the motor block, stop the device immediately and disconnect the power cable. The smell can
result from abrasion of the rubber bearing of the connection if it was not mounted correctly. In this case, please contact
your customer service immediately.
When preparing thick and sticky ingredients such as dough, it can happen that the motor and the blades turn idly, this is
because an air bubble has formed in the ingredients, stop the programme and remove only the measuring beaker. Your
can remove the air bubble through the opening with the included tamper TM. Replace the measuring beaker and continue
the preparation.
9
Unpacking, Contents and Start-up
Contents
Start-up
Please proceed as follows to unpack your forte 2.0:
Remove the device and all accessories from the carton. On the outer sides of the styrofoam packaging you will nd the
lid and the tamper TM.
Remove all packing material from the device and the accessories
Keep the packaging material during the warranty period in order to pack appropriately for warranty case.
Please note
Do not remove any stickers on the device because they are attached for safety reasons and are required for warranty
enquiry.
Please do not remove the stickers on the handle of the tamper. On this, the safe use of the tamper is shown.
This device is delivered with the following components:
motor block forte 2.0
2 liter mixing container, Tritan plastic, BPA-free
lid with integrated measuring beaker
tamper TM
this user manual
Attention:
During the start-up of the device, personal injury or property damage can occur.
Observe the safety precautions on page 6.
Packing materials must not be used to play with, because there is danger of suffocation.
Before mixing, ensure that the seal ring is properly installed on the container cover and the measuring cup is
inserted.
Make sure that you have closed the mixing container with the container lid before mixing.
!
EN10
Requirements of the Installation Location
Electrical Connection
The device must be placed on a level, at, solid and nonslip surface that ensures the load capacity.
Take care that the device cannot fall over.
Do not place a cloth under the device.
Choose the installation location so that children cannot play with the device or reach into it and cannot pull the power
cord of the device.
Place the unit only inside and do not operate it outdoors.
For the safe and faultless operation of the device, the following points for the electrical connection must be observed:
Before connecting, compare the technical data of the device, voltage and frequency 220 - 240 Volts / 50 - 60 Hz, with your
power supply. This data must conform so that the forte 2.0 is not damaged. In case of doubt ask your electrician.
The electrical safety can only be ensured, if it is connected to a properly installed protective earth system.
The manufacturer takes no responsibility for damages caused by a missing or disconnected protective earth.
Make sure that the power cable is undamaged and does not pass over hot surfaces or sharp edges.
The power cable must not be pulled tight or under tension.
Make sure that the power plug is properly inserted into the power socket, a loose plug can lead to overheating of the
device or electric shock.
11
Start
STOP
Time Speed
Overview Control Panel
Start / Stop button
Remaining time display
Mode display
Level display
Display of the active program
Pulse button
Manual Speed
adjustment
4 preset programmes
On / Off button
Small quantity of the
4 preset programmes
Manual time setting
Pause button
Display of the
respective Function
Start
STOP
Time Speed
EN12
Operating Programme Buttons
On/Off Button
Use this button to turn on the mixer. Please note that you can only switch on the blender when the mixing container is correctly
positioned on the engine block. After switching on, the LC display and the on / off LED light up in blue.
Buttons TIME + / - and SPEED + / -
Use the “Time +” and “Time” buttons to select the run time in 1 minute increments. Select the speed steps (1 to H) with the
“Speed +” and “Speed -” buttons. To start, press the start / stop button.
Pulse Button
By repeatedly pressing the Pulse button briey, for example, oil can be added after completion of the soup program, when
preparing an almond or spice to taste food. When you release the key, your forte 2.0 stops automatically. The elapsed time (eg:
00:06) and H are displayed in the display during the active Pulse mode, the Start / Stop button and the Pulse LED ash in blue.
8 Programmes
Your forte 2.0 features 4 preset programmes: green smoothie, sauce, nuts and bisque. The programmes are divided into two
volume selection.
Use the small volume programme buttons to get an optimal mixing result on the half-lled mixing container. (max. 1/2 lling
capacity).
For volume up to 2 liters, use the bigger volume programme buttons for an optimal mixing result.
The running time is different for the two volume selection of programmes.
Pause Button (pause function)
If you want to pause a programme during running or the manual mode at short notice without deactivating the program or the
manual mode, press this button once. The engine stops and you can add more ingredients to the blender container and resume
mixing by pressing the Start / Pause button again.
Note on the pause function
Before proceeding, please ensure that the mixing container is properly closed with the container lid including the beaker insert.
If you remove the mixing container from the engine block, the engine block will switch off and you must restart the program
or the manual mode.
13
Operating forte 2.0
Connect your forte 2.0 to a power socket with the correct electric specications. You can nd them on the type plate at the
back side of the device and in chapter „Technical Data“ on page 32. Make sure that the power plug is properly inserted into
the power socket.
Start-up
In order to use your forte 2.0, it is necessary to place on the mixing container on the motor block properly. Without the mixing
container your forte 2.0 does not start. If you put the container on the engine block, you will hear a long beep and the display
as well as the buttons light up briey. Now your forte 2.0 is in energy saving mode.
Standby Mode
In Standby Mode, the display shows „00:00 “ and the speed level is set to 1 . LED will light up blue on the control panel. Now,
you can use the preset programmes (→ page 14) or the Manual Mode (→ page 16) of your forte 2.0.
Energy Saving Mode1
The motor block automatically switches from the standby mode to the energy saving mode after 3 minutes of inactivity. The
display is now off and the On/Off button lights up blue. To return the mixer to the standby mode, press the power button once.
1Power consumption in Energy Saving Mode: 0,343 Watt
Power consumption without mixing coontainer: 0,222 Watt
EN14
Operating forte 2.0 preset programmes
Start up a preset programme
To use a preset programme, your forte 2.0 must be in Standby Mode. Select your desired programme by pressing a programme
button. The chosen programme is shown by the ashing of the symbol. By pressing the Start/Stop button, the remaining time
and the speed level is shown at the display. Upon completion the programme your forte 2.0 stops automatically.
You can also pause a started program so you can add more ingredients during the break.
For more information, see the following page.
Symbol Programme Programme description Display
Green Smoothie
Level 10 for 20 seconds, 2 seconds stop. Level 6 for 10
seconds, 2 seconds stop. Level 10 for 40 seconds, 2 sec-
onds, stop. Level 6 for 10 seconds. Soft start at startup.
Total run-time 01:26 Min
Remaining time,
Speed level
Green Smoothie
(1/2 quantity)
Level H for 18 seconds, 2 seconds stop. Level 6 for 5
seconds, 2 seconds stop. Level H for 23 seconds. Soft
start at startup.
Total run-time 00:50 Sec.
Remaining time,
Speed level
Sauce
Level 8 for 2 seconds and 1 second. stop. In total 5 repe-
titions. Then level 10 for 45 seconds. Soft start at startup.
Total run-time 01:00 Min.
Remaining time,
Speed level
Sauce
(1/2 quantity)
Level 8 for 2 seconds and 1 second. stop. In total 5 repe-
titions. Then level 10 for 25 sec. Soft start at startup.
Total run-time 00:40 sec.
Remaining time,
Speed level
Nuts
Level 5 for 4 seconds. Level 8 for 2 seconds and 1 second
stop, 14 repetitions. Soft start at startup.
Total run-time 00:45 Sec.
Remaining time,
Speed level
Nuts
(1/2 quantity)
Level 5 for 4 seconds. Level 8 for 2 seconds and 1 second
stop, 9 repetitions. Soft start at startup.
Total run-time 00:30 Sec.
Remaining time,
Speed level
Bisque
Level 7 in 5 seconds, then level 10 in 5-10 seconds. Level
10 is kept until the end of the programme. Soft start at
startup.
Total run-time 08:00 Min
Remaining time,
Speed level
Bisque
(1/2 quantity)
Level 7 in 7 seconds, then level 10 in 3 seconds. Level
10 is kept until the end of the programme. Soft start at
startup.
Total run-time 04:20 Min.
Remaining time,
Speed level
15
The pause function allows you to pause a programme or manual mode without terminating the program or manual mode
prematurely.
To pause, press the Start / Pause button once. The engine stops and you can add more ingredients, or if necessary, dissolve an
air bubble with the enclosed tamper.
Press the Start / Pause button again to resume the process. It will then continue from the time of the interruption to the regular
program end and then turns itself off.
Note: If you remove the mixing container from the engine block during pause, it will be switched off completely. This restarts
the previously selected programme or manual mode.
Small volume programme are recommended if the mixing container is only lled up to half.
For small volume of ingredients, please use the lower program buttons since a program run time adapted to this lling quantity.
Green Smoothie
Serves for the preparation of smoothies that contains fruit and green leaf.
Sauce
Prepare a homemade cashew milk and delicious sauces, dips, dressing, bread spreads and much more.
Nuts
For grinding coffee beans, nuts or cereals. The 0.9 liter drying container is recommended. (Not included, please order
separately).
Bisque
By the time of 8 minutes, you heat the content to nearly 80 °C. Therefore, it is possible to prepare hot soups easily. If you want
to prepare a soup in raw food quality, you can use the soup program of small volume selection in a fully lled mixing container.
As a result, the mixture is heated to approximately 42 ° C.
Note For more recipe ideas, see page 22
Pause function
Pause function
EN16
Operating forte 2.0 Manual Mode
Manual Mode
In addition to the 4 automatic programs, you can also operate the forte 2.0 in a manual mode. You can set the desired runtime
and speed level.
Time Adjustment
To adjust the time setting, use the (TIME+) or (TIME–) buttons to set the run time in steps of 1 minute. The set run time is
displayed in the LC display (eg: 02:00). Each key press is conrmed by a short acknowledgment tone. The runtime can be
selected up to a maximum of 10 minutes.
The runtime can be adjusted during operation in 1 minute. If the remaining time is less than 1 minute, a subsequent reduction
in the running time results in the manual mode being terminated.
Speed Adjustment
In Manual mode the speed can be set from level 1 to level 10 (H) by pressing the (SPEED+) and (SPEED-) button.
The selected speed setting is illustrated as followed:
„01, 02, 03, 04, 05, 06, 07, 08, 09, H“.
With the selected speed step you can regulate the speed of 1,500 rpm (Speed 1) to 32,000 rpm (Speed H).
The speed can also be changed during manual operation during operation.
Remove the mixing container only when the blades do not rotate anymore!
17
Operating the Tamper TM
Run the tamper only through the lid opening of the measuring beaker. (see Fig. 2, page 1). Use only the provided tamper and
NO OTHER objects to press the mixing content towards the blades. The less water you use, the more you have to work with
the tamper. If you use other objects, the device can be damaged irreparably.
Overview
With the aid of the tamper you can remove any air bubbles, e.g. when preparing dough, in the mixing container, without
touching the blades.
Important note:
When using the tamper, always hold the blender container with your free hand!
2.0-Liter Mixbehälter / 2.0-liter mixing container
EN18
Measuring Beaker, Lid and Seal Ring
Safety Guideline for Cleaning
Place the measuring beaker (Fig. [1], page1) in the opening of the lid (Fig. [2], page 1) and twist it tight towards the right.
Now, place the lid rmly on the mixing container. Turn the measuring beaker to the left to take it off and lift it off the lid.
You can remove the seal ring from the lid for easy cleaning. Please take care, that the seal ring is placed in the lid after cleaning.
This chapter provides important tips for cleaning and maintenance and care of your forte 2.0.
Please note the following safety guidelines before and during cleaning of your forte 2.0:
Pull the power plug from the power socket before cleaning!
Do not open the housing of the device under any circumstances.
If live contacts are touched and the electrical system is charged, this can lead to an electric shock or even death.
Never place the power plug in water for cleaning.
Never clean the power plug with a wet cloth.
Never touch the power plug with wet hands.
19
Cleaning of the Mixing Container (incl. Lid), Motor Block and Tamper
Cleaning of the mixing container and lid
Carefully when cleaning: The stainless steel blade can cause injury!
The mixing container is not suitable for the dishwasher!
The mixing container can be cleaned with a brush or dish cloth under running water.
Do not use aggressive or abrasive cleaning agents or solvents.
Clean the mixing container with a mild cleaning agent (detergent) or ll 2 cups of water into the mixing container, add
some detergent, close the lid (incl. measuring beaker) and press the Pulse button for some times.
Always clean the mixing container directly after each use.
Do not place the mixing container upside down.
Do not try to dismantle the blades from the container since they are permanently xed to the mixing container.
The silicone seal ring can be removed from the lid cover for cleaning. Please ensure that the sealing ring is attached to the
cover after cleaning. This is the only way to ensure the tightness of the cover.
Take care that the contacts of the motor block are dried properly when putting on the mixing container.
Cleaning of the motor block
Clean the motor block with a soft and moist cloth.
The mat above the engine block can be removed for easy cleaning. When reassembling the mat, ensure that the opening
of the mixing container sensor is free and that the motor coupling can move freely. The mat must lie at.
Do not use any aggressive cleaning agents or solvents.
Never immerse the motor block in water or other uids (danger of short circuit).
Never rinse the motor block under running water (danger of short circuit).
Cleaning the tamper TM
The tamper can be cleaned with a brush or dish cloth under running water.
If water has entered the motor block, disconnect the power plug and please
contact your service immediately.
!
EN20
Instructions for General Preparation
With the high performance mixer the preparation of many dishes is very simple. You only add the ingredients
in the mixing container and select the desired automatic programme. In no time, you can prepare delicious desserts, healthy
smoothies or a delicious warm or hot soup. And much more!
Practice has shown every start is a bit difcult. Therefore, we have identied the most frequently asked questions with
appropriate solutions for you.
While preparation the blender works smoothly and suddenly stucks.
It may be that a larger piece stucks at the bottom of the mixing container. Turn off the device and try to remove the large pieces
with the tamper. Sometimes it can be bubbles only that you can remove with the tamper easily. If necessary, add more water.
When a mass of the ingredients is pressed against the walls of the mixing container and settles there.
The blades run empty.
This happens especially when smaller amounts are crushed, as well as in the preparation of almond and walnut mush. A solution
is that you push the mass with the tamper from the edge towards the knife – make sure the device is switched off. Adding
liquids ensures that the mass remains at the bottom of the mixing container where it can be processed by the blades.
The mixer stucks and then strike completely.
Your high performance mixer has a thermal protection which ensures that the device does not overheat.
Take frequent breaks so that it can cool down. If the overheating protection is active, wait 45 minutes. After that time your
high performance mixer is ready to use as usual.
21
Instructions for General Preparation
Almonds, walnuts, sunower seeds and seeds are crushed in the blender, but there will be no creamy mush.
Add tablespoon wise neutral edible oil, until the knife have a grip again and a creamy consistency develops. It often helps to
stir the nut mixture with the tamper. Blend with a low speed selection.
During long-term preparation of nut mush, a heating must be expected because of the frictional effects. You should make sure
that the mass in blender is not heated above 42 °C in order to meet the raw food criteria where no trans fats are allowed. Have
some breaks while preparation to cool down the puree as well as the device.
Note Latest recipes can be found on our website at www.biancodipuro.com.
EN22
Recipes to try - Green Smoothies
Sweet Apple Smoothie
You will need:
1 ripe banana (without skin)
2 hands of baby spinach
leaves of a carrot
2 sweet apples
4 kohlrabi leaves
500 ml of fresh water
Preparation
Peel the banana. Divide the apple into
quarters and remove the stem and
the blossom root, the seeds should
be used with. Wash the baby spinach
briey. Give all ingredients into mixing
container and add the water. Now, start
the programme “Green Smoothie”.
Done!
Enjoy!
Green Power Smoothie
You will need:
1 banana
1 apple or mango
1 handful of chard or spinach
½ tbsp. of oil (coconut oil)
100 ml of apple juice
100 ml of fresh water
Preparation
Peel banana. Divide the apple into
quarters and remove the stem and
the blossom root. Remove stone of
mango. Wash chard or spinach briey.
Put all ingredients in the blender
and start the programme “Green
Smoothie”.
Done!
Enjoy!
Sweet Cherry Smoothie
You will need:
1 mango
14 cherries
2 nectarines
250 g of lamb’s lettuce
½ bunch parsley
½ peeled lemon
500 ml of fresh water
Preparation
Remove stone of mango, cherries and
nectarines, wash the lettuce short, peel
the skin of the lemon with a vegetable
peeler.
Put all ingredients in the blender and
start “Green Smoothie”.
Done!
Enjoy!
23
Recipes to try – Green Sauce, Tomato Sauce and Hummus
Green Sauce
You will need:
some fresh lettuce leaves
celery with green leaves
1 tbsp. of tomato paste
2 tbsp. of olive oil
2 tbsp. of fresh lemon juice
2 tbsp. of fresh water
salt and pepper
Preparation
Put all ingredients in the mixing
container and start the programme
“Sauce”. Done!
This green sauce goes perfectly with
pancakes, noodles, fresh potatoes and
much more.
Enjoy!
Tomato Sauce
You will need:
7 medium tomatoes
2 small shallots
8 fresh basil leaves
1 tbsp. of agave syrup
2 tbsp. of olive oil
fresh parsley, chili
salt and pepper
Preparation
Place all ingredients in the mixing
container and start the programme
“Sauce”. Add the tomato sauce with
salt and pepper to taste.
Done!
Enjoy!
Hummus
You will need:
250 g of chickpeas (from the can)
1 tbsp. of tahini (sesame paste)
4 tbsp. of olive oil
juice of one fresh lemon
some garlic
½ tbsp. of cumin
salt and pepper
Preparation
Place all ingredients in the mixing
container and start the programme
“Sauce”. Add hummus with salt and
pepper to taste.
Done!
Enjoy!
EN24
Recipes to try - Tomato Soup, Asparagus Soup and Cauliower Soup
Tomato Soup
You will need:
500 g of tomatoes
1 red bell pepper
2 oranges
60 g of cashew nuts
2-4 basil leaves
sea salt and black pepper
Preparation
Put the ingredients in the mixing
container and start the programme
“Bisque”. Add the soup with some sea
salt and black pepper to taste.
1-2 tbsp oil round off the taste.
Done!
Enjoy!
Asparagus Soup
You will need:
60 g of almonds
300 g of peeled white asparagus
1 small spring onion
½ banana (without shell)
250 ml of fresh water
juice of half a lemon
1 tbsp. of organic lemon peel
sea salt
freshly ground white pepper
4 tbsp. of watercress
Preparation
Fill the almonds in the mixing container
and start the programme “Nuts”.
Add all ingredients to the ground
almonds and start the programme
“Bisque”. After 8 minutes, your soup
is ready.
Add salt and pepper to taste before
serving sprinkled with cress.
1-2 tbsp oil round off the taste.
Done!
Enjoy!
Cauliower Soup
You will need:
1 small spring onion
1 clove of garlic
½ cauliower
300 ml of fresh water
1 ripe avocado (without shell)
3 tbsp. of lemon juice
3 tbsp. of chives
sea salt
freshly ground white pepper
Preparation
Peel spring onion and garlic, chop the
cauliower coarsely.
Fill onion, garlic and cauliower in
the mixing container and start the
programme “Nuts”.
If you light the onions and the garlic
before, the herbe taste loses with these
ingredients.
Now, add the fresh water and the
avocado (without stone) in the blender
and start the programme”Bisque”.
Stir in the chives and add salt and
pepper to taste. Done!
1-2 tbsp oil round off the taste.
Done!
Enjoy!
25
Recipes to try – Cashew Mush and Almond Mush
Cashew Mush
You will need:
400 g of cashew nuts
about 4 tbsp. of oil
(sunower oil or thistle oil)
Preparation
Put the cashews in the mixing container,
pour the oil in the mixing container and
start programme “Nuts”.
Then mix manuallyuntil a ne paste has
been produced. This may take some
time to complete. Done!
Enjoy!
Almond Mush
You will need:
400 g of almonds
4 tbsp. of oil
(almond oil or sunower oil)
Preparation
Pour the almonds together with the oil
in the mixing container and start the
programme ”Nuts”.
Then mix manually until a ne paste has
been been made. This may take some
time to complete.
Enjoy!
“In the preperation of nut mush,
you must press the nuts with the
tamper to the
blades. In this process, there may be
a higher temperature. Please have a
couple of small breaks while mixing
to allow the mush and the device to
cool down. In case of overheating, the
mixer automatically switches off. After
about 45 minutes, it is ready for use
again.
If the nuts are not nely ground
enough add a little bit of oil.“
Enjoy!
Tipp: The various walnuts should be soaked in fresh water 12 hours before processing.
Do not use back the soaked water.
For these recipes, you must work with your Stampfer TM.
When using the stamper, always hold the mixing container with your hand!
EN26
Recipes to try – Apricot Pudding, Lemon Cream and Nut Pudding
Apricot Pudding
You will need:
1 large banana
400 g of apricots (pitted)
50 ml of milk
3 tbsp. of cane sugar
1 tbsp. of fresh lemon juice
1 tbsp. of carob our
2 tbsp. of sliced almonds
2 lemon balm leaves
Preparation
Peel the banana and halve the apricots.
Put banana, apricots, milk, sugar and
lemon juice in the mixing container
and start the programme “Nuts”. Add
carob our and mix briey with the
Pulse button.
Cool the pudding thoroughly in the
refrigerator. Before serving, garnish the
pudding with almond ake and lemon
balm.
Enjoy!
Lemon Cream
You will need:
250 g of cashew nuts
1 tbsp. abrasion of one lemon
juice of one lemon
100 ml of fresh water
5 tbsp. of agave syrup
Preparation
Put all ingredients in the mixing
container and start the programme
“Sauce”.
Put the lemon cream before serving in
the refrigerator and allow to cool well.
Enjoy!
Nut Pudding
You will need:
100 g of shelled walnuts
100 g of hazelnuts
100 g of almonds
2 large bananas
300 ml of nut milk
4 tbsp. of cane sugar
1 pinch of sea salt
2 tbsp. of ground cinnamon
some ground vanilla bourbon
Preparation
Put the nuts in the blender and let
the shred them with
programme “Nuts”.
Peel the bananas and put them
together with the other ingredients to
the nut our.
Now, start the programme “Sauce” to
blend all ingredients. Fill the nished
walnut pudding in a bowl. cool it
before serving.
Enjoy!
27
Recipes to try - Cashew Milk, Almond Milk and Hemp Milk
Cashew Milk
You will need:
100 g of cashew nuts
1 L of fresh water
salt and sweetener
Preparation
Fill the cashew nuts with the fresh water
into the mixing container. Start the
programme “Sauce”. Add the almond
milk with sweetener and salt to taste.
Done!
Enjoy!
Almond Milk
You will need:
100 g of peeled almonds
500 ml of fresh water
sweetener
pinch of salt
Preparation
Put the ingredients in the blender and
start the programme “Sauce”. Add the
almond milk with sweetener and salt to
taste.
Done!
Enjoy!
Tip:
If you lter the milk after mixing, it will
become milder and lighter.
Hemp Milk
You will need:
85 g of hemp seeds
500 ml of fresh water
or
50 g of peeled hemp seeds
750 ml of fresh water
Preparation
Fill the hemp seeds in the mixing
container and add the fresh water.
Now, start the programme “Sauce”.
Done!
Enjoy!
Tip:
If you lter the milk after mixing, it will
become milder and lighter.
EN28
Recipes to try - Tomato Dressing, Peanut Dressing and Zucchini Dressing
Tomato Dressing
You will need:
3 apricots
2 tomatoes
1 small spring onion
2 tbsp. of freshly squeezed lemon
juice
1 dried chili pepper
1 tbsp. of sugar
Preparation
Remove the stones of the apricots.
Now, put all ingredients in the mixing
container and run the programme
“Sauce”.
Done.
Now, add the dressing as desired with
salt to taste.
Enjoy!
Peanut Dressing
You will need:
½ red pepper
5 sprigs of parsley
100 g of peanuts
juice of half a lemon
some nely grated lemon rind
100 ml of milk
1 tbsp. of agave syrup
sea salt
Preparation
Remove seeds of the pepper, pluck
parsley leaves off the sprig.
Put all ingredients in the mixing
container and start the programme
“Sauce”. Add salt to taste.
Done!
Enjoy!
Zucchini Dressing
You will need:
1 small zucchini
1 clove of garlic
75 g of pine nuts
4 basil leaves
70 ml of water
2 tbsp. of lemon juice
sea salt
freshly ground white pepper
Preparation
Peel the zucchini and the garlic. Put
all ingredients in the mixing container.
Start the mixing process with the
programme “sauce”.
Add salt and pepper to taste.
Done!
Enjoy!
29
Recipes to try – Ice-cream
Coconut Raspberry Ice-cream
You will need:
200 g of frozen raspberries
100 g of cashew nuts
100-200 ml of solid coconut milk
Preparation
Put all ingredients in the mixing
container, close the lid without the
measuring cup and insert the tamper
through the opening.
Start the manual mode with a running
time of 1 minute and the speed level H.
During processing, use the tamper to
continuously press the frozen fruits on
the blades.
Depending on your taste, you can sip
the ice cream with some stevia or some
agave juice and mix it again.
Done.
Enjoy!
Pistachio Ice-cream
You will need:
3 small bananas
1 avocado
50 g of peeled green pistachios
3 dried stoned dates
½ vanilla pod
2 tbsp. of Cashew mush
50 ml of cold nut milk
1 tbsp. of pumpkin seed oil
Preparation
Peel the bananas and the avocado. Cut
them into small pieces and freeze them.
Put all ingredients in the mixing
container, close the lid without the
measuring cup and insert the tamper
through the opening.
Start the manual mode with a running
time of 1 minute and the speed level H.
During processing, use the tamper to
continuously press the frozen fruits on
the blades.
Done!
Enjoy!
Chocolate Ice-cream
You will need:
3 bananas
6 dried pitted dates
3 tbsp. of walnuts
2 tbsp. of cocoa powder
100 ml of milk nut
2 tbsp. of almond butter
3 tbsp. of chopped almonds
Preparation
Peel bananas and freeze them in
small pieces. Chop the almonds with
programme “Nuts” coarsely and
transfer them to a bowl.
Put all ingredients except the almonds
in the mixing container, close the lid
without the measuring cup and insert
the tamper through the opening.
Start the manual mode with a running
time of 1 minute and the speed level
H.
During processing, use the tamper to
continuously press the frozen fruits on
the blades.
Stir gently some chopped almonds to
the ice-cream.
Enjoy!
For these recipes, you must work with your Stampfer TM.
When using the stamper, always hold the mixing container with your hand!
EN30
Recipes to try – Fruit Smoothies
Fruit Smoothie
You will need:
½ mango (without stone)
½ grapefruit
½ orange
1 medlar
½ pomegranate
500 ml of fresh water
Preparation
Use the pomegranate seeds only. Peel
the orange with a vegetable peeler. Put
the ingredients in the mixing container
and start the programme “Nuts”. Done!
Enjoy!
Pina Colada Smoothie
You will need:
200 g of pineapple
200 g of raw Coconut Butter
100 ml of fresh water
Preparation
Peel off the pineapple and add it to
the other ingredients in the mixing
container. Use programme “Nuts” for
preparation.
Done!
Enjoy!
Cold Chocolate Smoothie
You will need:
3 bananas
500 ml of nut milk
5 tbsp. of agave syrup
5 tbsp. of cocoa powder
2 tbsp. of cocoa nibs (if available)
1 tbsp. of ground vanilla bourbon
Preparation
Peel the bananas and freeze them
in small pieces. Then put these with
the other ingredients in the mixing
container and start the programme
“Nuts”.
Done.!
Enjoy!
If you want to enjoy cold fruit smoothie,
you can reduce the amount of fresh water and add a few ice cubes.
31
Recipes to try – Soy Milk and Sesame Milk
Soy Milk
You will need:
100 g of soy beans
1 l of fresh water
sweetener
Preparation
Boil the beans for half an hour or let
them soak in water overnight Fill only
the soy beans with fresh water in the
mixing container. Start the manual
mode with a runtime of 6 minutes with
speed level H.
Done!
Enjoy!
Sesame Milk
You will need:
100 g of peeled sesame
1-2 pitted dates
1 banana
juice of one orange
2 tbsp. of juice of lemon
600 ml of fresh water
Preparation
Add the sesame seeds with the
remaining ingredients in the mixing
container and start the programme
“Soy Milk”.
Done!
Enjoy!
Tip: You can freeze a small supply of soybeans and use them as needed.
It is also possible to process the frozen beans directly.
EN32
Technical Data
forte 2.0
Voltage / Frequency 220 - 240V / 50-60Hz
Power 1,400 Watt
Rotation 1,500 U/Min. (Level 1) - up to 32,000 U/Min. (Level H)
Electrical power 6.8 Amps
Volume of mixing container 2 Liters, TRITAN plastic, BPA-free
Max. temperature 125 °C
Blade type and material 4 Stainless Steel blades, HCS (Japan)
Control Panel 4 preset programmes (Big and small volume selection),
On / Off button, Start / Stop button, Pause button, Pulse button
Keys for manual step and run time adjustment,
Display with speed and runtime display
Safety functions ( page 6) Overheating protection, Overload protection and Sensor for the Mixing Container
Device dimensions (h) 260 mm x (b) 240 mm x (t) 500 mm
Packaging dimensions (h) 330 mm x (b) 305 mm x (t) 430 mm
Net weight 4.56 kg
Gross weight 6 kg
Certication / Standard ITS -GS, CE, EMC, CB, LVD, CCC, PAH
Manufacturer’s warranty 2 years for motor block,
2 years for mixing container
2 years for tamper (except battery)
Power consumption in energy 0.343 Watt
saving mode
Power consumption without 0.222 Watt
mixing container
Type of use Household approval Not intended for commercial use.
Colour Black
Device dimensions (h) 300 mm x (b) 82 mm
Weight 0.16 kg
Max. temperature 125 °C
33
Disposal Note
The packaging protects the device from damage during transportation. The packaging materials have been chosen with
consideration of the environment and the disposal and are therefore recyclable.
The return of the packaging to the material cycle reduces the generated waste and saves raw materials. Dispose of not needed
packaging materials at the collection facilities of the collection system “Green Point”
Keep, if possible, the packaging during the warranty period, to be able to properly package the device in a warranty
case.
Device and packaging must be disposed of according to the local regulations for the disposal of electrical waste
and packaging materials. If necessary, inform yourself at your local waste management company
Do not dispose of electrical devices in household waste, use the collection facilities of the community. Ask your
municipal administration for the sites of the collection facilities. When electrical devices are disposed of without
control, dangerous substances can reach the groundwater during corrosion and therefore the food chain or
poison plants and animals for years.
EN34
Copyright © bianco di puro GmbH & Co. KG, 2017
Contact and Customer Service
Contact Customer service
GmbH & Co. KG GmbH & Co. KG
Maarweg 255 Maarweg 255
D-50825 Cologne D-50825 Cologne
Germany Germany
Phone +49 221 50 80 80-0 Phone +49 221 50 80 80-20
Fax +49 221 50 80 80-10 Fax +49 221 50 80 80-10
Mail info@biancodipuro.com Mail kundendienst@biancodipuro.com
Visit us on the Internet at www.biancodipuro.com.
35
Index
Preset programmes ......................................................................................................................................................................14
Standby Mode ...............................................................................................................................................................................13
Speed overview ............................................................................................................................................................................16
On/Off button ...............................................................................................................................................................................12
Start-up you forte 2.0...................................................................................................................................................................13
Energy Saving Mode .....................................................................................................................................................................13
Speed setting ................................................................................................................................................................................16
Time setting ..................................................................................................................................................................................16
Manual Mode ................................................................................................................................................................................16
Pause Function ..............................................................................................................................................................................15
Programme buttons ......................................................................................................................................................................12
Pulse Mode ...................................................................................................................................................................................12
Cleaning of mixing container and lid ............................................................................................................................................19
Cleaning the motor block .............................................................................................................................................................19
Sensor for mixing container ............................................................................................................................................................5
Tamper TM .................................................................................................................................................................................... 17
Start/Stop Button ..........................................................................................................................................................................12
Button PULSE ................................................................................................................................................................................12
Button SPEED +/- .........................................................................................................................................................................12
Button TIME+/- .............................................................................................................................................................................12
Overheating Protection ..................................................................................................................................................................5
Overload Protection .......................................................................................................................................................................5
EN36
36
Service Centre
Warranty Conditions
This Warranty does not cover
To process your Warranty Claim,
the following information are necessary: Important:
GmbH & Co. KG Phone +49 221 50 80 80-20
Maarweg 255 Fax +49 221 50 80 80-10
D-50825 Cologne Mail kundendienst@biancodipuro.com
Germany Internet www.biancodipuro.com
Please keep the date of purchase and the serial number oft the appliance handy. This number is found on the bottom of the appliance.
Attention
Read instructions before using
• Do not immerse in water
• Unplug when not in use.
• Do not open device! Risk of electrocution!
The warranty is from date of purchase as follows:
• 2 years on Motor Block
• 2 years on Mixing Container
• 2 years on Tamper (battery not included)
The warranty includes defects in materials, construction and workmanship of all parts.
The appliance has a household approval and is not intended for commercial use.
If your power blender exhibits defects during normal use within the warranty time, the manufacturer will decide if the appliance will either be
repaired, defective parts replaced free of charge, or exchanged for a replacement appliance.
To submit a warranty claim, you must thoroughly clean the entire appliance including all accessories, pack it well and send it to the Service
Centre. Please note: If individual parts or the appliance itself have not been cleaned, the Service Centre will charge you for cleaning them, irrespective of the
warranty claim. Please keep the original shipping box in case you need to send in your appliance.
Please always call the Service Centre before sending in an appliance. Often a phone call is enough to solve the problem and the packing and sending becomes
superuous. In any case, your Service Centre will solve your problem as quickly as possible.
If it is still necessary for you to send in your blender, please discuss the dispatch with your Service Centre. This will minimise your dispatch costs.
1. Defects that do not result from the workmanship and production of the appliance, such as careless damage, accidents, etc.
2. Use not in accordance with the user manual, careless handling, technical changes, accident
3. Damage caused by parts not provided by an authorised dealer or repairs carried out by non- authorised personnel
1. Your name, address, phone number
2. Serial number and model number
3. Problem
4. Date of purchase
5. Seller
6. Copy of the invoice
7. If damaged during dispatch, name of the parcel service and the
package number.
When sending in your power blender, pack all parts in
the original packing and make sure that you have included all parts. Do
not forget to write your address on the outside of the packaging.
TIP
Keep the original packaging in case it is necessary to send in your
blender in to the Service Centre
32


Need help? Post your question in this forum.

Forumrules


Report abuse

Libble takes abuse of its services very seriously. We're committed to dealing with such abuse according to the laws in your country of residence. When you submit a report, we'll investigate it and take the appropriate action. We'll get back to you only if we require additional details or have more information to share.

Product:

For example, Anti-Semitic content, racist content, or material that could result in a violent physical act.

For example, a credit card number, a personal identification number, or an unlisted home address. Note that email addresses and full names are not considered private information.

Forumrules

To achieve meaningful questions, we apply the following rules:

Register

Register getting emails for Bianco di puro Forte 2.0 at:


You will receive an email to register for one or both of the options.


Get your user manual by e-mail

Enter your email address to receive the manual of Bianco di puro Forte 2.0 in the language / languages: English as an attachment in your email.

The manual is 1.06 mb in size.


You will receive the manual in your email within minutes. If you have not received an email, then probably have entered the wrong email address or your mailbox is too full. In addition, it may be that your ISP may have a maximum size for emails to receive.

Others manual(s) of Bianco di puro Forte 2.0

Bianco di puro Forte 2.0 User Manual - German - 36 pages


The manual is sent by email. Check your email

If you have not received an email with the manual within fifteen minutes, it may be that you have a entered a wrong email address or that your ISP has set a maximum size to receive email that is smaller than the size of the manual.

The email address you have provided is not correct.

Please check the email address and correct it.

Your question is posted on this page

Would you like to receive an email when new answers and questions are posted? Please enter your email address.


Info