577256
9
Zoom out
Zoom in
Previous page
1/88
Next page
GP30
Ultra Lite LED Projector
User Manual
Table of contents2
Ta b l e o f c o n t e n t s
Important safety
instructions ................... 3
Introduction.................. 6
Projector features.....................................6
Shipping contents ......................................7
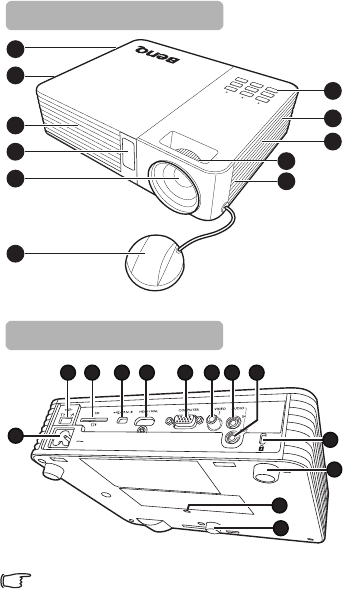
Projector exterior view...........................8
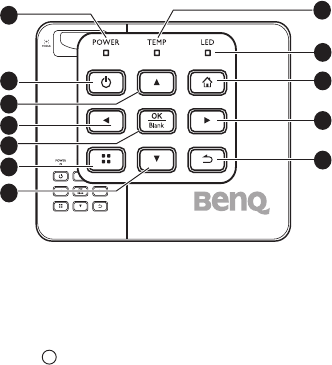
Controls and functions ............................9
Positioning your
projector ..................... 14
Obtaining a preferred projected
image size..................................................14
Connection ................. 16
Connecting the power...........................16
Connecting a computer.........................17
Connecting video source devices........19
Connecting an HDMI source device ..20
Connecting an MHL source device.....21
Connecting a component video
source device ...........................................22
Connecting a composite video
source device ...........................................23
Connecting an external speaker..........24
Connecting to an external memory
device.........................................................25
Playing sound through
the projector............................................26
Operation ................... 27
Starting up the projector ......................27
Switching input signal .............................28
Adjusting the projected image .............29
Hiding the image......................................30
Securing the projector...........................31
Firmware upgrade .................................. 33
Selecting the aspect ratio...................... 34
Optimizing the image............................. 35
Operating in a high altitude
environment............................................. 37
Adjusting the sound ............................... 37
Displaying images with PC and
video source devices.............................. 39
Using PC/ Video pop-up menus .......... 40
Displaying files with internal memory,
USB drive and SD card.......................... 44
Using USB streaming ............................. 56
Using wireless streaming ...................... 58
Setting up Wi-Fi Network.................... 69
Using settings menu ............................... 72
Shutting down the projector ............... 78
Maintenance ............... 79
Care of the projector............................ 79
Troubleshooting......... 81
Specifications.............. 82
Projector specifications......................... 82
Dimensions .............................................. 83
Timing chart............................................. 84
Warranty and Copyright
information................. 88
Important safety instructions 3
Important safety instructions
Your projector is designed and tested to meet the latest standards for safety of information
technology equipment. However, to ensure safe use of this product, it is important that
you follow the instructions mentioned in this manual and marked on the product.
Safety Instructions
1. Please read this manual before
you operate your projector. Save
it for future reference.
2. Do not look straight at the
projector lens during operation.
The intense light beam may damage
your eyes.
3. Refer servicing to qualified
service personnel.
4. In some countries, the line voltage is
NOT stable. This projector is
designed to operate safely within a
mains voltage of 19 volts DC, but
could fail if power cuts or surges of
10 volts occur. In areas where the
mains voltage may fluctuate or
cut out, it is recommended that
you connect your projector
through a power stabilizer, surge
protector or uninterruptible
power supply (UPS).
5. Do not block the projection lens with
any objects when the projector is
under operation as this could cause
the objects to become heated and
deformed or even cause a fire.
Important safety instructions4
Safety Instructions (Continued)
6. Never replace any electronic
components unless the projector is
unplugged.
7. Do not place this product on an
unstable cart, stand, or table. The
product may fall, sustaining serious
damage.
8. Do not attempt to disassemble this
projector. There are dangerous high
voltages inside which may cause
death if you should come into
contact with live parts. Refer
servicing only to suitably qualified
professional service personnel.
9. When the projector is under
operation, you may sense some
heated air and odor from its
ventilation grill. It is a normal
phenomenon and not a product
defect.
10. Do not place this projector in any
of the following environments.
- Space that is poorly ventilated or
confined. Allow at least 50 cm
clearance from walls and free flow of
air around the projector.
- Locations where temperatures may
become excessively high, such as the
inside of a car with all windows rolled
up.
- Locations where excessive humidity,
dust, or cigarette smoke may
contaminate optical components,
shortening the projector's life span
and darkening the image.
Important safety instructions 5
Safety Instructions (Continued)
- Locations near fire alarms
- Locations with an ambient temperature
above 40°C / 104°F
- Locations where the altitudes are higher
than 3000 m (10000 feet).
11. Do not block the ventilation holes.
- Do not place this projector on a blanket,
bedding or any other soft surface.
- Do not cover this projector with a cloth
or any other item.
- Do not place inflammables near the
projector.
If the ventilation holes are seriously
obstructed, overheating inside the
projector may result in a fire.
12. Always place the projector on a level,
horizontal surface during operation.
13. Do not stand the projector on end
vertically. Doing so may cause the
projector to fall over, causing injury or
resulting in damage to the projector.
14. Do not step on the projector or place
any objects upon it. Besides probable
physical damage to the projector,
doing so may result in accidents and
possible injury.
15. Do not place liquids near or on the
projector. Liquids spilled into the
projector may cause it to fail. If the
projector does become wet,
disconnect it from the power outlet
and call BenQ to have the projector
serviced.
3000 m
(10000 feet)
0 m
(0 feet)
Introduction
6
Introduction
Projector features
The projector integrates high-performance optical engine projection and a user-friendly
design to deliver high reliability and ease of use.
The projector offers the following features.
Advanced LED light source
Long lasting LEDs provides a longer life span than traditional lamps.
Optical engine with DLP technologies
WXGA resolution and a bright picture.
Wireless Display
Supports wireless projection for PC (Windows and MAC) and mobile devices (iOS,
Android).
•SRS WOW HD
™ technology
Significantly improves the audio playback quality with deeper bass tones and
high frequency clarity for crisper detail.
Various useful features
Supports iPhone/iPad, android devices, multimedia players, document viewer, internal
memory, SD card, USB flash drive, and USB display.
•Easy to carry
The projector is small and light, making it useful for business trips and leisure activities.
You can view documents, videos and photos anywhere.
Multiple input ports
Multiple input ports, including PC, AV, HDMI/MHL, USB, and SD card provide flexible
connectivity with peripheral devices.
Audio input & output
Equipped with 3W x 2 speakers with RCA & mini-jack input ports and phone jack
output port.
Convenient menu items
Friendly menu is used for all types of inputs, making the projector easy to use.
The apparent brightness of the projected image will vary depending on the ambient lighting
conditions, selected input signal contrast/brightness settings, and is proportional to
projection distance.
The lamp brightness will decline over time and may vary within the lamp manufacturers
specifications. This is normal and expected behavior.
Introduction
7
Shipping contents
Carefully unpack and verify that you have all of the items shown below. If any of these items
are missing, please contact your place of purchase.
Standard accessories
The supplied accessories will be suitable for your region, and may differ from those illustrated.
*The warranty card is only supplied in some specific regions. Please consult your dealer for
detailed information.
User manual and wireless dongle manual are inside the projector’s internal memory. You can
view them directly in "Home screen/Internal memory/Document" via projector or use USB
cable to link PC/notebook and projector device and choose "Home screen/USB streaming/USB
File transfer". Meanwhile, the projector will be treated as external storage and you can access
user manual and wireless dongle manual via PC/Notebook.
Projector Power cord VGA cable
Quick start guide Warranty card* MHL cable
Pull the tab before using
the remote control.
Remote control with
battery
Wi-Fi dongle
Q
uick Start Guid
e
Mini Projector
Introduction
8
Projector exterior view
Do not block the ventilation openings. Blocking the ventilation openings can cause your
projector to overheat and may cause it to fail.
1. Vent (cold air intake)
2. Internal Speakers
3. Vent (heated air exhaust)
4. Front IR remote sensor
5. Projection lens
6. Lens cover
7. External control panel
(See "Projector" on page 9 for
details.)
8. Focus ring
9. AC power jack
10. Type A USB jack
11. SD card slot
12. Mini-B USB jack
13. HDMI / MHL input jack
14. RGB (PC)/Component Video
(YPbPr/ YCbCr) signal input jack
15. Video input jack
16. Audio input jack
17. Audio output jack
18. Kensington anti-theft lock slot
19. Adjuster feet
20. Tripod socket
3
4
1
2
5
6
3
1
2
7
8
Front/upper side
10
11
9
12
13 14 15 16 17
18
19
20
19
Introduction
9
Controls and functions
Projector
4. Left key
When the On-Screen Display (OSD)
menu is on:
- Navigate left to select the desired menu
items.
- Make adjustments. (e.g. brightness,
contrast, etc.)
When the On-Screen Display (OSD)
menu is off: (Only applied to SD card,
internal memory and USB Drive)
- Play previous video and audio file.
- Press and hold to rewind video and
audio file.
5. OK/Blank
Short press:
- Confirms a selected function when a
menu is displayed.
- Plays or pauses a video, music, photo
slideshow. (Only applied to SD card,
internal memory and USB Drive)
Long press (3 seconds):
To g g l e s t h e B l a n k .
6. Menu
Turns on the Pop-up setting menu.
7. Down/Volume down key
When the On-Screen Display (OSD)
menu is on:
- Navigate to down to select the desired
menu items.
- Make adjustments. (e.g. manual,
keystone, etc.)
When the On-Screen Display (OSD)
menu is off:
- Reduces the projector volume level.
1. POWER indicator light
Lights up or flashes when the projector is
under operation.
2. Power
Toggles the projector between standby
mode and on.
See "Starting up the projector" on page 27
and "Shutting down the projector" on page
78 for details.
3. Up/Volume up key
When the On-Screen Display (OSD)
menu is on:
- Navigate up to select the desired menu
items.
- Make adjustments. (e.g. manual, keystone,
etc.)
When the On-Screen Display (OSD) menu
is off:
- Magnifies the projector volume level.
2
4
10
3
6
5
7
9
8
1
11
12
I
I
Introduction
10
Keypad functions are not available when an MHL source is selected. When using MHL as input
source, please use remote control or your MHL device for operation.
8. Temperature indicator light
Lights up red if the projector's
temperature becomes too high.
9. LED indicator light
Indicates the status of the light source.
Lights up or flashes when the light source
has developed a problem.
10. Home
Directly returns to home screen from
lower level of OSD.
Exits application/pop-up message and back
to home screen directly.
11. Right key
When the On-Screen Display (OSD) menu
is on:
- Navigate right to select the desired menu
items.
- Make adjustments. (e.g. brightness,
contrast, etc.)
When the On-Screen Display (OSD) menu
is off: (Only applied to SD card, internal
memory and USB Drive)
- Play next video and audio file.
- Press and hold to fast-forward video and
audio file.
12. Back
Goes back to previous OSD menu, exits
and saves menu settings.
Introduction
11
Remote control
1. POWER
Toggles the projector between standby
mode and on. See "Starting up the
projector" on page 27 and "Shutting down
the projector" on page 78 for details.
2. Mute
Toggles projector audio between on and
off.
3. Up key
When the On-Screen Display (OSD)
menu is on:
- Navigate up to select the desired menu
items.
- Make adjustments. (e.g. manual
keystone, etc.)
When the On-Screen Display (OSD) is
off:
- Magnifies the projector volume level.
4. Left key
When the On-Screen Display (OSD)
menu is on:
- Navigate left to select the desired menu
items.
- Make adjustments. (e.g. brightness,
contrast, etc.)
When the On-Screen Display (OSD)
menu is off: (Only applied to SD card,
internal memory and USB Drive)
- Plays previous video, music, photo
slideshow or document.
- Press and hold to rewind video and
audio file.
5. Down key
When the On-Screen Display (OSD)
menu is on:
- Navigate to down to select the desired
menu items.
- Make adjustments. (e.g. manual
keystone, etc.)
When the On-Screen Display (OSD) is
off:
- Reduces the projector volume level.
6. Menu
Turns on or off the Pop-up setting menu.
7. Home
Directly returns to home screen from
lower level of OSD.
Exits application/pop-up message and
back to home screen directly.
8. Prev.
Plays previous video, audio, photo
slideshow or document file. (Only
applied to SD card, internal memory,
USB Drive and MHL)
9. Play
Plays or pauses video, music or photo
slideshow. (Only applied to SD card,
internal memory, USB Drive and MHL)
1
2
3
5
7
9
4
6
8
14
13
12
11
10
16
17
18
19
15
I
I
Introduction
12
Certain remote control functions might not work under MHL operation because the MHL
device being used may not support these functions. Please check your MHL device for available
functions.
10. Rewind
Rewinds video and audio file. (Only applied
to SD card, internal memory, USB Drive
and MHL)
11. Auto
Automatically determines the best picture
timings for the displayed computer image.
See "Auto-adjusting the image" on page 29
for details.
12. Volume up key
Magnifies the volume level.
13. Volume down key
Reduces the volume level.
14. Right Key
When the On-Screen Display (OSD) menu
is on:
- Navigate right to select the desired menu
items.
- Make adjustments. (e.g. brightness,
contrast, etc.)
When the On-Screen Display (OSD) menu
is off: (Only applied to SD card, internal
memory and USB Drive)
- Plays next video, music, photo slideshow
or document.
- Press and hold to fast-forward video and
audio file.
15. OK/Blank
Short press:
- Confirms a selected function when a
menu is displayed.
- Plays or pauses video, music, or photo
slide show. (Only applied to SD card,
internal memory and USB drive)
Long press (3 seconds):
- Toggles Blank on and off. See "Hiding the
image" on page 30 for details.
16. Back
Returns to upper level of OSD.
Closes pop-up setting menu of OSD.
Returns to home screen.
Leave current application of OSD.
17. Next
Plays next video, audio, photo slideshow
or document. (Only applied to SD card,
internal memory, USB Drive and MHL)
18. Fast-forward
Fast-forwards video and audio file. (Only
applied to SD card, internal memory,
USB Drive and MHL)
19. Pause
Pauses video and audio file. (Only applied
to SD card, internal memory, USB Drive
and MHL)
Introduction
13
Remote control effective range
Infra-Red (IR) remote control sensor is located on
the front of the projector. The remote control must
be held at an angle within 15 degrees perpendicular
to the projector's IR remote control sensor to
function correctly. The distance between the remote
control and the sensor should not exceed 7 meters
(~ 23 feet).
Make sure that there are no obstacles between the
remote control and the IR sensor on the projector
that might obstruct the infra-red beam.
Replacing the remote control battery
1. Pull out the battery holder.
Please follow the illustrated instructions. Push and hold
the locking arm while pulling out the battery holder.
2. Insert the new battery in the holder. Note the
positive polarity should face outward.
3. Push the holder into the remote control.
Avoid excessive heat and humidity.
There may be battery damage if the battery is
incorrectly replaced.
Replace only with the same or equivalent type recommended by the battery manufacturer.
Dispose of the used battery according to the battery manufacturer’s instructions.
Never throw battery into a fire. There may be danger of an explosion.
If the battery is dead or if you do not plan to use the remote control for a long time, remove
the battery to prevent damage to the remote control from possible battery leakage.
A
p
p
r
o
x
.
1
5
°
Connection
24
Connecting an external speaker
You can hear sound through an external speaker instead of the internal speakers built into
the projector.
To connect the projector to an external speaker source device:
1. Connect an appropriate stereo cable to the external speaker and the audio output
jack on the projector.
When the audio cable is connected to the audio output jack, the internal speaker is muted.
Connection
25
Connecting to an external memory device
Connecting an SD card
To connect the projector to an SD card:
Connect an SD card to the SD card slot on the projector.
The maximum memory capacity supported for an SD(HC) card is 32 GB. (The maximum
capacity supported for external memory is based on our factory test. Your experience may
differ depending on the manufacturer of the memory device.)
The projector may not be compatible with some SD cards.
Connecting a USB storage device
To connect the projector to a USB storage device:
Plug the USB storage device into the Type A USB socket.
This product supports USB memory device and HDD (Hard Disk Drive). Only the partition
that was most recently used will be mounted. (The maximum capacity supported for
external memory is based on our factory test. Your experience may differ depending on the
manufacturer of the memory device.)
The Type A USB port provides up to 500 mA of power for HDDs when connected to this
projector. In the event that large capacity HDDs cannot be read by this projector, it may be
due to insufficient power. In this case, connect the HDD to an external power source with a
Y-type USB cable to provide HDD with extra power.
This product does not support multi-card readers.
This product does not work if the USB storage device is connected by a USB HUB.
Products that do not comply with standard USB specifications might not operate normally.
(USB flash drive)
Connection
26
A USB storage device with an automatic recognition application or its own driver might not
operate normally.
A USB storage device that uses only a designated driver might not be recognized.
Recognition speed for USB storage device may vary by device.
Do not turn off the product or pull a connected USB storage device out while the USB
storage device is in use. Doing so may result in damage to the USB storage device or stored
file.
Use a USB storage device which contains normal files. Abnormal files can cause a
malfunction or the files may not play.
USB storages must be formatted in FAT16/FAT32/NTFS. FAT32 and NTFS are
recommended for HDD (Hard Disk Drive).
As the data in the USB storage device can be damaged, please back up important data to
avoid loss. The user is responsible for data management. BenQ shall not be held liable for
any data loss.
File tree in USB storage should be as simple as possible. Too many or too many layers of
folders will result in lag of access time.
If an external memory device does not operate after you have connected it to the projector,
try to connect it to a PC. If it still does not operate normally, contact the memory device
manufacturer service center or related customer center.
Playing sound through the projector
You can make use of the projector speaker in your presentations, and also connect
separate amplified speakers to the audio output jack of the projector.
The table below describes the connection methods for different devices, and where the
sound is from.
The selected input signal determines which sound will be played by the projector speaker,
and which sound will be output from the projector when audio output jack is connected.
There’s no need to connect to an audio input jack because the projector can play the sound
from an HDMI / MHL, external memory and iPhone/iPad source device. However, you can
connect to an external device to play the sound.
USB display does not support audio function.
Device PC/Component video Video
Audio input jack
Audio input (L/R)
AUDIO-IN
Audio input (L/R)
The projector can play the
sound from...
Audio input (L/R)
AUDIO-IN
Audio input (L/R)
Audio output jack
Operation
27
Operation
Starting up the projector
1. Connect the power using the power cord. The Power indicator turns into orange.
2. Press Power on the projector or remote
control to start the projector. The Power
indicator lights green when the projector is
on.
The start up procedure takes several seconds.
In the later stage of start up, a startup logo is
projected.
(If necessary) Rotate the focus ring to adjust
the image clearness.
3. If the projector is activated for the first time, select your OSD language following the
onscreen instructions.
4. If you are prompted for a password, press the
arrow keys to enter a six digit password. See
"Utilizing the password function" on page 31
for details.
5. Switch all of the connected equipment on.
6. The projector will display the home screen.
If the frequency/resolution of the input signal exceeds
the projector's operating range, you will see the
message 'Out of Range' displayed on a blank screen.
Please change to an input signal which is compatible with the projector's resolution or set the
input signal to a lower setting. See "Timing chart" on page 84 for details.
I
I
Operation
28
Switching input signal
Selecting an input source
The projector can be connected to multiple devices
at the same time. However, it can only display one
full screen at a time. Press / on the projector
or remote control to select your desired input
signal.
The input signal type affects the options available
for the Picture Mode. See "Selecting a picture
mode" on page 35 for details.
The native display resolution of this projector is in
16:10 aspect ratio. For best display picture results, you should select and use an input signal
outputting at this resolution. Any other resolutions will be scaled by the projector
depending upon the 'aspect ratio' setting, and this may result in image distortion or loss of
picture clarity. See "Selecting the aspect ratio" on page 34 for details.
Setting quick auto search
To set your projector to automatically search for input signals:
1. Go to Settings > Basic > Quick Auto Search menu, press OK, and a pop-up
menu appears.
2. Select On and press OK.
3. To leave the OSD menu, press or .
Changing color space
In the unlikely event that you connect the projector to a DVD player via the projector’s
HDMI input and the projected picture displays wrong colors, please change the color space
to YUV.
1. Press and press to highlight Color Space Conversion and press OK, a pop-
up menu appears.
2. Select a suitable color space and press OK.
This function is only available when the HDMI input port is in use.
Operation
29
Adjusting the projected image
Adjusting the image height
The projector is equipped with 2 adjuster feet. These adjusters change the image height.
To adjust the projector:
Screw the adjuster feet to adjust the image
height.
To retract the feet, screw the adjuster feet in
reverse direction.
If the projector is not placed on a flat surface or
the screen and the projector are not
perpendicular to each other, the projected image
becomes trapezoidal. To correct this situation, see
"Correcting keystone" on page 30 for details.
Do not look into the lens while the lamp is on. The strong light from the lamp may cause
damage to your eyes.
Be careful when you screw the adjuster foot as it is close to the exhaust vent where hot air
comes from.
Fine-tuning the image clarity
Rotate the focus ring to sharpen the image.
Auto-adjusting the image
In some cases, you may need to optimize the picture quality.
Using the remote control
Press AUTO.
Within 3 seconds, the built-in Intelligent Auto
Adjustment function will re-adjust the values of
Frequency and Clock to provide the best picture
quality.
The current source information will be displayed
on the upper left corner of the screen for 3
seconds.
This function is only available when PC signal (analog RGB) is selected.
Operation
30
Correcting keystone
Keystoning refers to the situation where the projected image is noticeably wider at either
the top or bottom. It occurs when the projector is not perpendicular to the screen.
Correcting keystone when an image is displayed on the screen:
To correct this, besides adjusting the height of the projector, you will need to manually
correct it following these steps.
1. Press and then press to highlight
Keystone. The Keystone pop-up menu
displays.
2. Press to correct keystoning at the
bottom of the image or press to correct
keystoning at the top of the image.
Hiding the image
In order to draw the audience's full attention to the presenter, you can:
Using the remote control
Press and hold Blank for three seconds on the
remote control to hide the screen image. Press
Blank again or any keys on the remote control to
restore the image.
Using the projector
Press and hold Blank for 3 seconds on the projector
to hide the screen image. Press Blank again or any
keys on the projector to restore the image.
Do not block the projection lens from projecting as this
could cause the blocking object to become heated and
deformed or even cause a fire.
Press .
Press .
Operation
40
Using PC/ Video pop-up menus
The projector has a multilingual OSD that allows you to make image adjustments and
change a variety of settings. This menu is for the settings to be used in computer,
composite video, component and HDMI modes.
Using the menu
1. To open the OSD menu, press on the projector or remote control when the
projection screen is displayed.
2. When the OSD is displayed, press / to select the desired item and adjust the
settings by using / .
3. To leave the OSD, press again.
Operation
47
Description of each menu
FUNCTION DESCRIPTION
Screen
Settings
Wall Color
Corrects the projected picture’s color when the projection surface
is not white. See "Using Wall Color" on page 36 for details.
Auto Keystone
Auto corrects any keystoning of the image.
Keystone
Corrects any keystoning of the image. See "Correcting
keystone" on page 30 for details.
Picture Mode
Settings
Picture Mode
Pre-defined picture modes are provided so you can optimize
your projector image set-up to suit your program type.
Reference Mode
Selects a picture mode that best suits your need for the image
quality and further fine-tune the image based on the selections
listed on the same page below.
This function is only available when User mode is selected.
Brightness
Adjusts the brightness of the image.
Contrast
Adjusts the degree of difference between dark and light in the
image.
Color Temperature
Adjusts the color temperature. Cool makes images appear
bluish white. Normal maintains normal colorings for white.
Warm makes images appear reddish white.
Save Settings
Saves the settings made for User mode.
Play Settings
Play Mode
Choose to play one video or all videos in a folder.
Play Order
Select the playback order of video files.
Repeat
Select whether to repeat video playback.
9


Need help? Post your question in this forum.

Forumrules


Report abuse

Libble takes abuse of its services very seriously. We're committed to dealing with such abuse according to the laws in your country of residence. When you submit a report, we'll investigate it and take the appropriate action. We'll get back to you only if we require additional details or have more information to share.

Product:

For example, Anti-Semitic content, racist content, or material that could result in a violent physical act.

For example, a credit card number, a personal identification number, or an unlisted home address. Note that email addresses and full names are not considered private information.

Forumrules

To achieve meaningful questions, we apply the following rules:

Register

Register getting emails for BenQ GP30 LED at:


You will receive an email to register for one or both of the options.


Get your user manual by e-mail

Enter your email address to receive the manual of BenQ GP30 LED in the language / languages: English as an attachment in your email.

The manual is 8,72 mb in size.


You will receive the manual in your email within minutes. If you have not received an email, then probably have entered the wrong email address or your mailbox is too full. In addition, it may be that your ISP may have a maximum size for emails to receive.

Others manual(s) of BenQ GP30 LED

BenQ GP30 LED User Manual - German - 91 pages

BenQ GP30 LED User Manual - Dutch - 88 pages

BenQ GP30 LED User Manual - French - pages


The manual is sent by email. Check your email

If you have not received an email with the manual within fifteen minutes, it may be that you have a entered a wrong email address or that your ISP has set a maximum size to receive email that is smaller than the size of the manual.

The email address you have provided is not correct.

Please check the email address and correct it.

Your question is posted on this page

Would you like to receive an email when new answers and questions are posted? Please enter your email address.


Info