These instructions shall also be available on website: docs.bauknecht.eu
YOUR SAFETY AND THAT OF OTHERS IS HIGHLY IMPORTANT.
This manual and the appliance itself provide important safety warnings, to be read and observed at all
times.
This is the attention symbol, pertaining to safety, which alerts users to potential risks to themselves
and others.
All safety warnings are preceded by the attention symbol and the following terms:
indicates a hazardous situation which, if not avoided, will cause
serious injury.
indicates a hazardous situation which, if not avoided, could cause
serious injury.
All safety warnings specify the potential danger/warning to which they refer and indicate how to reduce
the risk of injury, damage and electrical shock resulting from incorrect use of the appliance. Comply with
the following instructions:
•Installation or maintenance must be carried out by a specialized technician, in compliance with the
manufacturer’s instructions and local safety regulations. Do not repair or replace any part of the
appliance unless specifically requested in the user manual.
•The appliance must be disconnected from the power supply before carrying out any installation work.
•Earthing of the appliance is compulsory. (Not necessary for class II hoods identified by the symbol
on the specifications label).
•The power supply cable must be long enough to permit connecting the appliance to the mains socket
outlet.
•Do not pull the power supply cable in order to unplug the appliance.
•The electrical components must no longer be accessible to the user after installation.
•Do not touch the appliance with any wet part of the body and do not operate it when barefoot.
•This appliance may be used by children older than 8 years of age and by persons with reduced physical,
sensory or mental capacities or with inadequate experience and knowledge only if they are supervised
or if they have been taught how to use the appliance in conditions of safety and if they are aware of the
dangers involved. Children must not play with the appliance. Cleaning and maintenance must not be
carried out by children, unless they are supervised by adults.
•Do not repair or replace any part of the appliance unless specifically indicated in the manual. Defective
parts must be replaced using genuine parts. All other maintenance services must be carried out by a
specialized technician.
•Children must be supervised to ensure they do not play with the appliance.
WARNING:
DANGER:
GB4
•When drilling through a wall or the ceiling, pay attention not to damage electric connections and/or
pipes.
•The ventilation ducts must always discharge to the outside.
•Exhaust air must not be vented through a flue used for removal of fumes produced by appliances
burning gas or other fuels, but must have a separate outlet. All national regulations governing
extraction of fumes must be observed.
•If the hood is used together with other appliances operating on gas or other fuels, the negative
pressure in the room must not exceed 4 Pa (4 x 10
-5
bar). For this reason, make sure the room is
adequately ventilated.
•The Manufacturer declines any liability for improper use or incorrect setting of the controls.
•Regular cleaning and maintenance is essential to correct functioning and good performance of the
appliance. Frequently clean all encrustations from dirty surfaces to prevent the accumulation of grease.
Regularly clean or replace the filters.
•Never flame cook food (flambé) under the appliance. Using free flames might cause fire.
•Do not leave frying pans unattended when frying, as the frying oil may catch fire.
•Failure to observe the instructions for cleaning the hood and replacing the filters may result in a fire.
•The fume extractor hood must never be opened without the grease filters installed and it should be
kept under constant supervision.
•Gas appliances must be used under the extractor hood only with pans resting.
•When using more than three gas cooking points, the hood should be operating at power level 2 or
greater. This will eliminate heat congestion in the appliance.
•Before touching the bulbs, first ensure that they are cold.
•Do not use or leave the hood without its lamps correctly installed - risk of electric shock.
•Wear work gloves for all installation and maintenance operations.
•The product is not suitable for outdoor use.
•When the hob is in use, accessible parts of the hood may become hot.
KEEP THIS BOOKLET FOR FUTURE CONSULTATION.
Declaration of conformity
• This appliance has been designed, manufactured and marketed in compliance with:
- safety objectives of the “Low Voltage” Directive 2014/35/EU;
- the ecodesign requirements of european regulations n. 65/2014, and n. 66/2014 in conformity to the european standard EN 61591
- the protection requirements of Directive “EMC” 2014/30/EU.
Electrical safety of the appliance can only be guaranteed if it is correctly connected to an approved earthing system.
Energy saving tips
• Switch ON the hood at minimum speed when you start cooking and kept it running for few minutes after cooking is finished.
• Increase the speed only in case of large amount of smoke and vapour and use boost speed(s) only in extreme situations.
• Replace the charcoal filter(s) when necessary to maintain a good odour reduction efficiency.
• Clean the grease filter(s) when necessary to maintain a good grease filter efficiency.
• Use the maximum diameter of the ducting system indicated in this manual to optimize efficiency and minimize noise.
GB5
After unpacking the appliance, check for any transport damage. In the event of problems, contact the dealer or your nearest After-sales Service. To prevent any
damage, only remove the appliance from its polystyrene foam packaging at the time of installation.
PREPARING FOR INSTALLATION
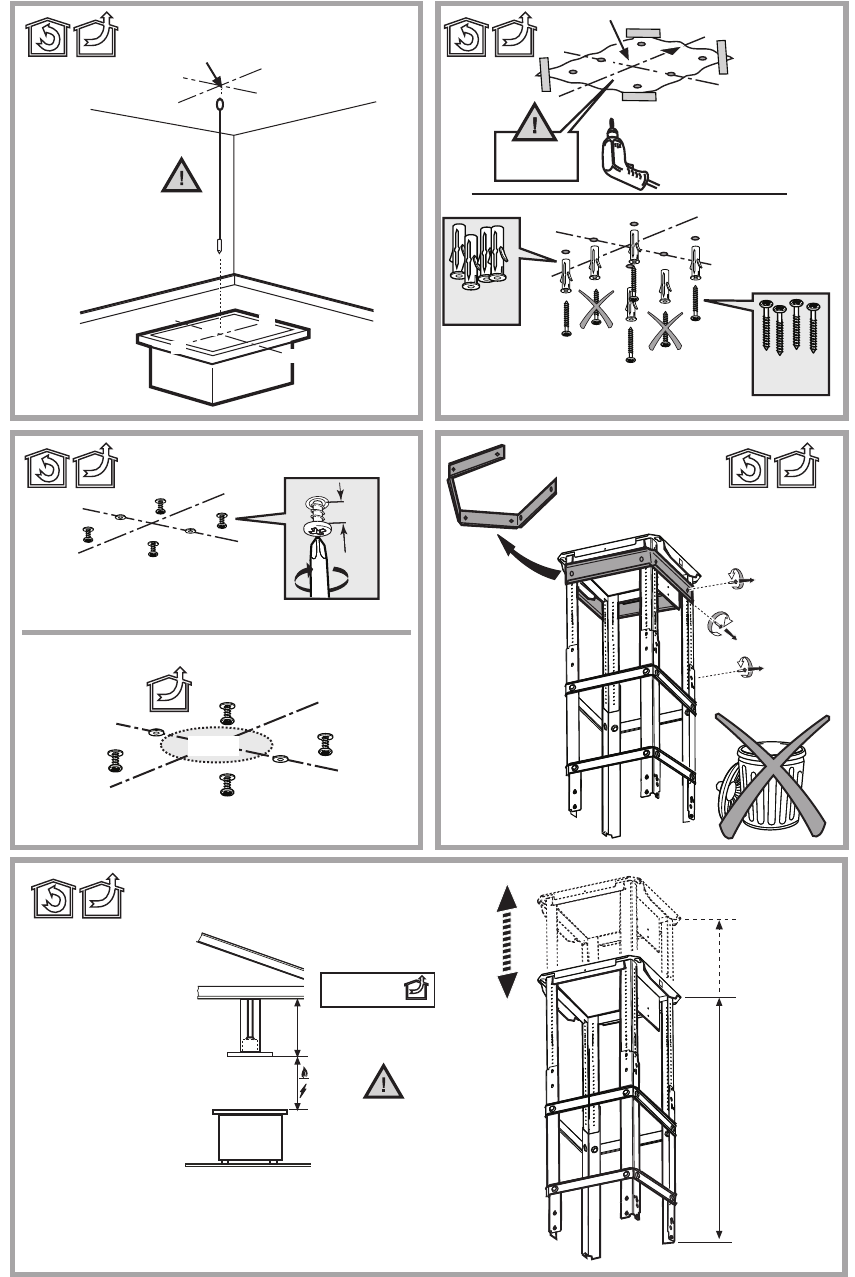
this is a heavy product; the hood should only be lifted and installed by two or more people.
The minimum distance between the support of the cooking pans on top of the cooker and the bottom of the hood must not be less than 50 cm for electric
cookers and 65 cm for gas or mixed cookers. Before installation also check the minimum distances stated in the manual of the cooker.
If the installation instructions for the cooker specify a greater distance between cooker and hood, this distance must be observed.
ELECTRICAL CONNECTION
Make sure the power voltage specified on the appliance rating plate is the same as the mains voltage.
This information may be found on the inside of the hood, under the grease filter.
Power cable replacement (type H05 VV-F 3 x 0,75 mm²) must be carried out by a qualified electrician. Contact an authorized service centre.
If the hood is fitted with an electric plug, connect the plug to a socket complying with current regulations, located in an accessible place after installation. If no
plug is fitted (direct wiring to the mains), or if the socket is not located in an accessible place, install a standardised double pole power switch that will enable
complete isolation from the mains in case of category III overvoltage conditions, in accordance with installation rules.
If the cable is not fitted with a plug, connect the wires according to the following table:
WARNING:
INSTALLATION
AIR VENT (for the suction versions)
Connect the hood and discharge holes on the walls with a diameter equivalent to the air outlet (connection flange).
Using the tubes and discharge holes on walls with smaller dimensions will cause a diminution of the suction performance and a drastic increase in noise.
Any responsibility in the matter is therefore declined.
! Use a duct of the minimum indispensible length.
! Use a duct with as few elbows as possible (maximum elbow angle: 90°).
! Avoid drastic changes in the duct cross-section.
! The company declines any responsibility whenever these regulations are not respected.
FILTERING OR DUCTING?
! Your cooker hood is ready to be used in suction version.
To use the hood in filtering version the special ACCESSORY KIT must be installed.
Check on the first pages of this manual if the ACCESSORY KIT is furnished or must be bought separately.
Note: If furnished, in certain cases, the additional activated carbon filtering system may be installed on the hood.
Information about the conversion of the hood from suction version to filtering version is present in this manual.
Ducting version
In this case the fumes are conveyed outside of the building by means of a special pipe connected with the connection ring located on top of the hood.
Attention! The exhausting pipe is not supplied and must be purchased apart.
Diameter of the exhausting pipe must be equal to that of the connection ring.
Attention! If the hood is supplied with active charcoal filter, then it must be removed.
Filter version
The aspirated air will be degreased and deodorised before being fed back into the room.
In order to use the hood in this version, you have to install a system of additional filtering based on activated charcoal.
Mains voltage
and frequency
Wire connection
220-240 V
50 Hz
: yellow/green
N: blue
L: brown
GB7
Before calling the After-Sales Service:
1.See if you can solve the problem yourself with the help of the suggestions given in the "Troubleshooting guide".
2.Switch the appliance off and back on again it to see if the fault persists.
If after the above checks the fault still occurs, get in touch with the nearest After-Sales Service.
Always specify:
•A brief description of the fault;
•The exact type and model of the appliance;
•The service number (number after the word "Service" on the rating plate), located on the inside of the appliance. The service number is also indicated on
the guarantee booklet;
•Your full address;
•Your telephone number.
If any repairs are required, please contact an authorised After-sales Service (to guarantee that original spare parts will be used and repairs carried out
correctly).
The hood is fitted with a control panel with aspiration speed selection control and a light switch to control cooking area lights.
Model with SOFT-TOUCH control panel
To select hood functions, simply touch the controls.
T1. Button ON/OFF suction motor
T2. Button to select medium suction speed (power)
T3. Button to select high and intensive suction speed (power)
Press once to select high suction speed (power) (LED L3 on);
Press again to select intensive suction speed (power) (LED L3 flashing).
Note: The intensive suction (power) speed lasts for approximately 5 minutes, then the high suction speed (power) is set automatically.
T4. Automatic shutdown button (Timer) and saturation indicator for charcoal filter:
Automatic shutdown:
Press this button to set the automatic shutdown of the active suction speed (power):
Silent suction speed (power): 20 minutes
Medium suction speed (power): 15 minutes
High suction speed (power): 10 minutes
Saturation indicator charcoal filter
When flashing, perform maintenance of the charcoal filter, if installed, then keep the button T1pressed for a long time to stop the flashing.
T5. Button to select ‘silent’ suction speed (power) and saturation indicator for grease filter
Note: when flashing, perform maintenance of the grease filter; then keep the button T1 pressed for a long time to stop the flashing.
T6. Button ON/OFF lighting
T2+T3+T4 flashing: automatic operation under high temperature conditions (see relevant paragraph)
Activation of the charcoal filter saturation indicator
This indicator is normally deactivated. To activate it, proceed as follows:
With the hood off, press and keep pressed simultaneously T2 and T3: T3 starts flashing first, then T2 as well, to indicate successful activation.
Deactivation of charcoal filter saturation LED: repeat the operation described above; T3and T2start flashing, then only T3to indicate successful
deactivation.
Automatic operation under high temperature conditions
The hood is equipped with a sensor which detects the temperature. When this becomes too high, the sensor automatically turns on the medium suction speed
(power). The hood turns off as soon as the temperature detected by the sensor is lowered significantly.
CONTROLS
AFTER-SALES SERVICE
GB8
Cleaning
Clean using ONLY the cloth dampened with neutral liquid detergent. DO NOT CLEAN WITH TOOLS OR INSTRUMENTS. Do not use abrasive products. DO NOT
USE ALCOHOL!
Perimeter aspiration panel
Clean the perimeter aspiration panel with the same frequency as the ant-fats filter, using a cloth and not too concentrated liquid detergent. Do not use abrasive
substances.
Maintenance of the anti-grease filters
Traps cooking grease particles.
This must be cleaned once a month (or when the filter saturation indication system – if envisaged on the model in possession – indicates this necessity) using
non aggressive detergents, either by hand or in the dishwasher, which must be set to a low temperature and a short cycle.
When washed in a dishwasher, the grease filter may discolour slightly, but this does not affect its filtering capacity.
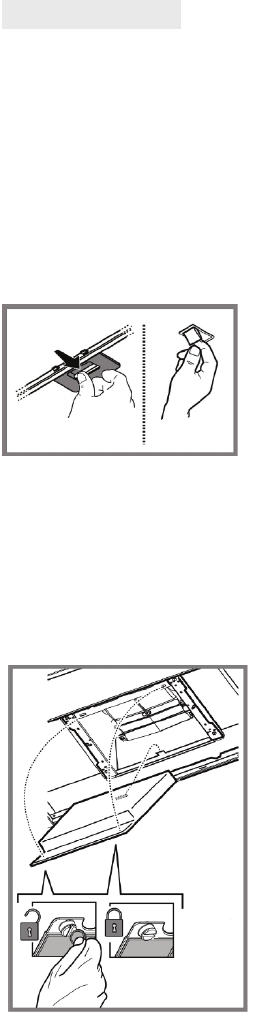
To remove the grease filter, pull the spring release handle.
Maintenance of the charcoal filter
It absorbs unpleasant odours caused by cooking.
The saturation of the charcoal filter occurs after more or less prolonged use, depending on the type of cooking and the regularity of cleaning of the grease filter.
In any case it is necessary to replace the cartridge at least every four mounths (or when the filter saturation indication system – if envisaged on the model in
possession – indicates this necessity).The charcoal filter may NOT be washed or regenerated.
Assembly: Hook the charcoal filter at the back on the metal tongue of the hood first, then on the front with the two knobs.
Disassembly
Remove the charcoal filter by turning the knobs fixing it to the hood by 90°.
Replacing lamps
The hood is equipped with a lighting system based on LED technology.
The LEDs guarantee an optimum lighting, a duration up to 10 times as long as the traditional lamps and allow to save 90% electrical energy.
For replacement, contact the technical service.
MAINTENANCE
GB9
Please check the plate in order to verify the total absorption and the light absorption.
The hood is equipped with a lighting system based on LED technology.
For replacement, contact the technical service.
Components not provided with the product
ModelHeight (cm)Width (cm)Depth (cm)Ø of exhaust tube (cm)
Libble takes abuse of its services very seriously. We're committed to dealing with such abuse according to the laws in your country of residence. When you submit a report, we'll investigate it and take the appropriate action. We'll get back to you only if we require additional details or have more information to share.
Product:
Forumrules
To achieve meaningful questions, we apply the following rules:
First, read the manual;
Check if your question has been asked previously;
Try to ask your question as clearly as possible;
Did you already try to solve the problem? Please mention this;
Is your problem solved by a visitor then let him/her know in this forum;
To give a response to a question or answer, do not use this form but click on the button 'reply to this question';
Your question will be posted here and emailed to our subscribers. Therefore, avoid filling in personal details.
Register
Register getting emails for Bauknecht DBIBS92 at:
new questions and answers
new manuals
You will receive an email to register for one or both of the options.
Get your user manual by e-mail
Enter your email address to receive the manual of Bauknecht DBIBS92 in the language / languages: English as an attachment in your email.
The manual is 4,38 mb in size.
You will receive the manual in your email within minutes. If you have not received an email, then probably have entered the wrong email address or your mailbox is too full. In addition, it may be that your ISP may have a maximum size for emails to receive.
If you have not received an email with the manual within fifteen minutes, it may be that you have a entered a wrong email address or that your ISP has set a maximum size to receive email that is smaller than the size of the manual.
The email address you have provided is not correct.
Please check the email address and correct it.
Your question is posted on this page
Would you like to receive an email when new answers and questions are posted? Please enter your email address.