Děkujeme vám za zakoupení parního ohřívače kojeneckých láhví značky Babymoov. Pro
správné používání výrobku si pozorně prostudujte tento návod k použití. Návod k
použití pečlivě uschovejte pro případ další potřeby.
FUNKCE
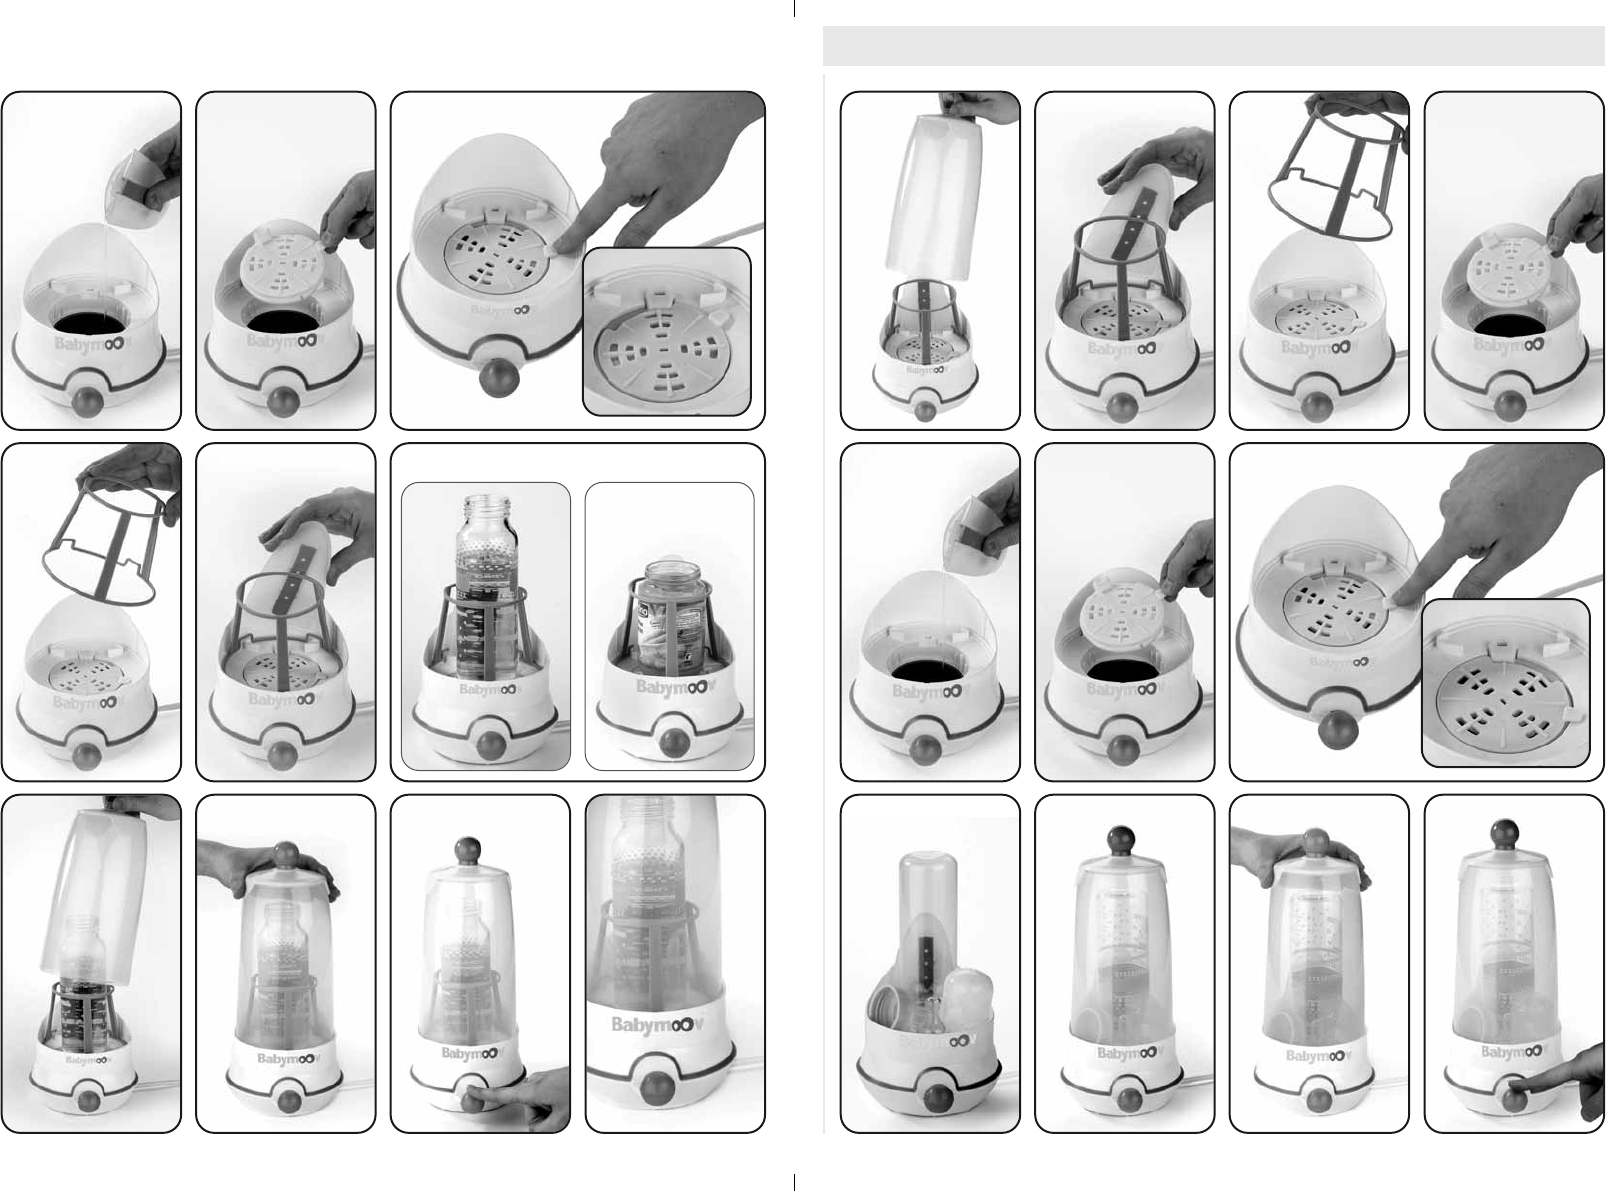
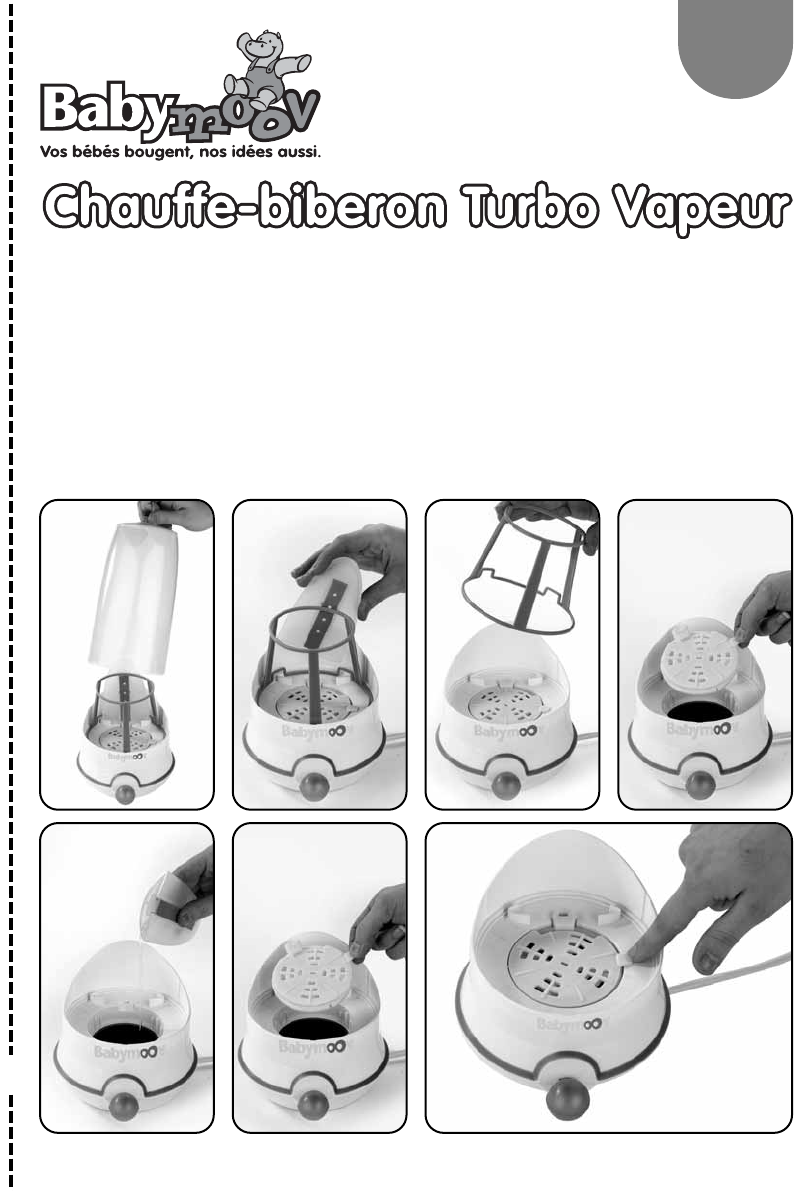
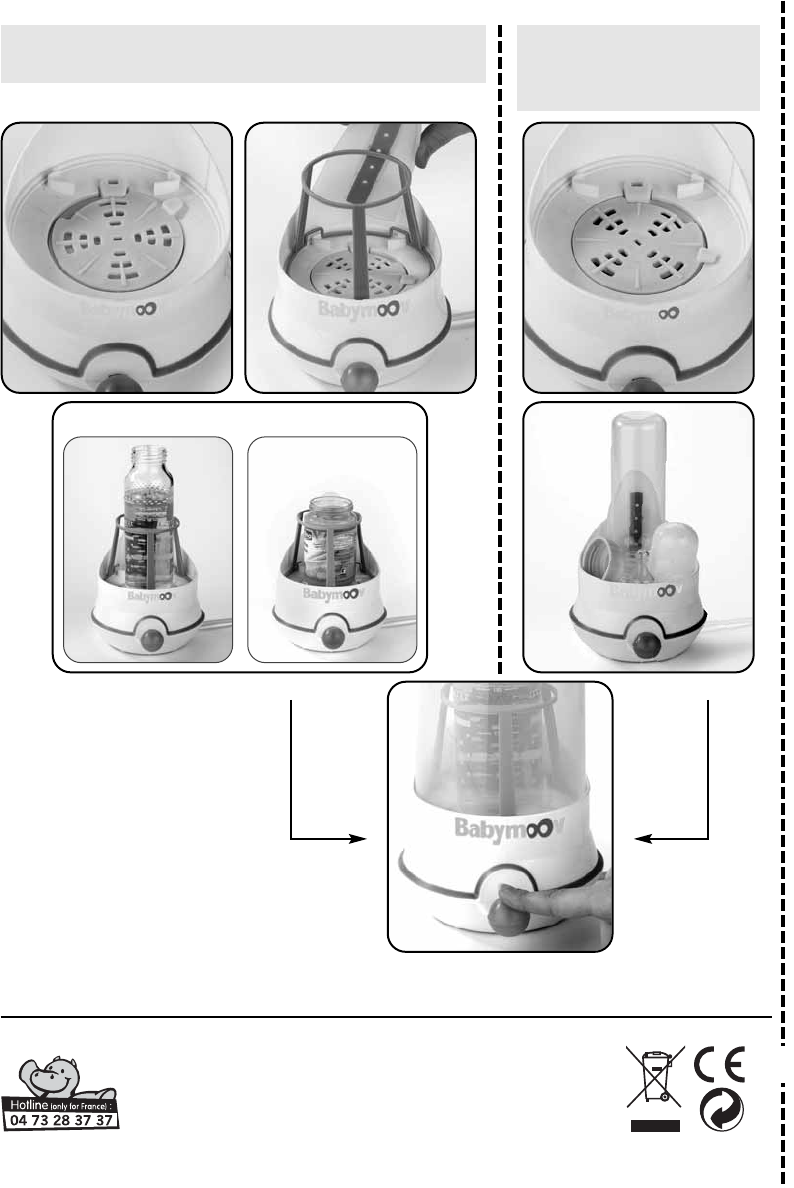
• Ohřívání všech typů kojeneckých láhví a nádobek s dětskou
výživou díky jedinečnému systému: pára vychází z jazýčku
po celé výšce láhve pro zajištění rovnoměrné teploty
ohřívaného mléka či přesnídávky.
• Systém 2 v 1: ohřívač kojeneckých láhví a sterilizátor.
• Vysoký výkon: 320 W / 230 V.
• Univerzální výrobek: vhodný pro všechny typy
kojeneckých láhví.
• Bezpečnost: automatické vypnutí po skončení cyklu.
UPOZORNĚNÍ
• Tento přístroj je určený pouze pro použití v domácnosti či
v jiných podobných zařízeních, jako jsou například:
- kuchyňské kouty vyhrazené pro zaměstnance prodejen,
kanceláří a jiných pracovišť,
- zemědělské usedlosti,
- používání klienty, kteří jsou ubytovaní v hotelích,
motelech a jiných ubytovacích zařízeních,
- používání v hotelových pokojích a podobných
ubytovacích prostorách.
• Je-li napájecí kabel poškozený, je třeba ho vyměnit.
Výměnu může provést výrobce, pracovník autorizovaného
servisu nebo jiná kvalifikovaná osoba, aby se zabránilo
jakémukoliv nebezpečí.
• Dávkování vody uvedená v tabulce jsou pouze
informativní. Pokud se domníváte, že teplota výživy je
pro vaše dítě příliš vysoká nebo příliš nízká, použijte menší
nebo větší množství vody.
Poznámka: materiál, tloušťka kojenecké láhve a snímatelné
dno kojenecké láhve jsou prvky, které mohou mít vliv na
teplotu láhve.
• DŮLEŽITÉ UPOZORNĚNÍ: abyste zabránili nebezpečí
popálení, provádějte systematicky kontrolu teploty výživy,
než ji podáte dítěti. Před podáním láhev s mlékem dobře
protřepejte, aby se mléko dobře promíchalo. Kápněte
kapku mléka na vnitřní stranu zápěstí, abyste zkontrolovali
teplotu výživy. Po ohřátí nádobky s dětskou výživou její
obsah promíchejte a ochutnáním zkontrolujte, zda výživa
není příliš horká.
• Tento přístroj není určený pro používání osobami (či dětmi)
se sníženými fyzickými, smyslovými nebo duševními
schopnostmi nebo osobami, které nemají zkušenosti s
používáním přístroje nebo které s ním nebyly obeznámeny,
s výjimkou případů, kdy jsou pod dohledem osoby, která
odpovídá za jejich bezpečnost nebo na ně dozírá nebo je
předem poučila o používání přístroje.
BEZPEČNOSTNÍ POKYNY
• Během fungování přístroje nenechávejte dítě bez dohledu.
• Zkontrolujte, zda napětí elektrické sítě odpovídá napětí
přístroje (hodnoty jsou uvedené na spodní straně přístroje).
• Přístroj používejte pouze pro ohřívání kojeneckých láhví
a nádobek s dětskou výživou a pro sterilizaci kojeneckých
láhví a jejich příslušenství. Používání přístroje za jakýmkoliv
jiným účelem může být nebezpečné.
• Přístroj zásadně nezapínejte, pokud v něm není voda.
Přístroj spouštějte pouze v případě, že jste do něj nalili
dostatečné množství vody.
• Do vody nepřidávejte žádné přísady (slanou vodu, léky,
detergenty), jinak hrozí nebezpečí poškození přístroje.
• Před přípravou láhve si pečlivě umyjte ruce.
• Ohřívač kojeneckých láhví nepoužívejte ve vlhkém prostředí
a nemyjte ho přímo ve vodě nebo pod proudem vody.
• Přístroj neumísťujte v blízkosti zdrojů tepla, jako jsou
například radiátory topení, okna, do nichž svítí prudké
slunce, atp.
• Přístroj používejte na dokonale rovné a suché ploše.
• Tento ohřívač kojeneckých láhví je určený pouze pro
používání v místnosti. Ohřívač kojeneckých láhví
nepoužívejte venku.
• Láhve ani nádobky s dětskou výživou neohřívejte příliš dlouho.
• Po skončení ohřevu jsou láhve velmi horké. Při vyjímání
láhví z přístroje buďte velmi opatrní.
• Přístroj se spuštěným cyklem zásadně nepřemísťujte.
• Během provozu se přístroj může zahřát na velmi vysokou
teplotu. Sahejte pouze na držadlo a spínač.
• Před čištěním nebo plněním vody přístroj vždy vytáhněte
ze zásuvky.
• Po každém použití přístroj vytáhněte ze zásuvky, abyste
zabránili samovolnému spuštění.
• Přístroj umístěte mimo dosah dětí, protože obsahuje velmi
horkou páru. Zkontrolujte, zda je napájecí šňůra umístěná
mimo dosah dětí.
• Dohlížejte na děti, aby si s přístrojem nehrály.
• Přístroj zásadně nezvedejte uchopením za držadlo poklopu.
• Do přístroje vkládejte pouze otevřené láhve (bez dudlíku a
víčka). Z nádobek s dětskou výživou vždy odšroubujte víčko.
CZ
PARNÍ OHŘÍVAČ KOJENECKÝCH LÁHVÍ • Návod k použití
28