467224
39
Zoom out
Zoom in
Previous page
1/44
Next page
U s e r m a n u a l
Manuale d’installazione e d’uso
ATAG WiZe
programmable modulating room thermostat
cronotermostato ambiente modulante programmabile
8X.52.03.01/03.10
GB / I / TR
2
3
Contents
Page
1 Key functions .....................................................................4
1 Specications ....................................................................6
2 Mounting and initial operation ...........................................9
2.1 Mounting ..................................................................9
2.2 Initial operation .......................................................11
3 Manual mode ..................................................................12
3.1 Activating manual mode .........................................12
3.2 Manual thermostat mode .......................................12
4 Clock program central heating ........................................14
4.1 Activating central heating’s clock program .............14
4.2 Set the three required room temperatures .............15
4.3 Select a pre-programmed weekly program ............17
4.4 Amend the weekly program ...................................18
4.5 Adjusting temperature temporarily .........................23
5 User settings ...................................................................24
5.1 Summary of user menu ..........................................24
5.2 Comfort / Economy setting .....................................25
5.3 Using central heating timer ....................................29
5.4 Reading device information ...................................30
5.5 Adjusting hot water and central heating setpoint ...32
5.6 Summary of settings menu ....................................34
5.7 Resetting the exact day and time
(e.g. summer/winter time) ......................................35
5.8 User recommendations / holidays ..........................36
6 Fault indicator ..................................................................37
6.1 Dismantling and loss of voltage .............................39
7Technicalspecications ..................................................42
4
Key functions
1 Time bar (24 hours) of the clock program (from 03.00 to
03.00 hours).
The bar displays the day program set.
2 Tap symbol for tap water Comfort/Economy setting.
•Symbolvisible:Comfortsettingalwaysonorswitchingon/
off automatically.
•Symbolnotvisible:Economysetting.
3 Radiator symbol for central heating operation.
•Symbolvisible=centralheatingoperationpossible.
•Symbolnotvisible=centralheatingoperationnotpos-
sible.
4 This symbol is visible when the boiler is set to the Economy
position and no central heating operation is possible. Room
temperature is now kept at approximately 5°C (anti-freeze
protection).
5 The hand symbol is visible when the room temperature of
the clock program has been adjusted using the arrow keys
(this applies until the next temperature change of the clock
program).
6 The sun symbol is visible if during a switched on weather
dependent setting the average daily temperature remains
above or around 18°C.
7 The fault symbol is visible as soon as a fault becomes ap-
parent.
8 Theamesymbolisvisiblewhentheboilersburnerison.
9 Arrow keys and , with which settings such as room
temperature can be adjusted.
5
10Currentroomtemperature(measured).Aashing°Csym-
bol indicates that switch-on optimization is active.
11 Menu key . Pressing this key displays the user menu
(chapter 5.1 refers). The standard display will reappear
when pressing this key again or when no key is being pres-
sed for 2 minutes.
12 The arrow symbols become visible when the correspon-
ding key has a function.
13 Function keys. The numbers are not printed on the keys
but only mentioned in this instruction manual.
14 The text bar is used to provide information.
15 Day and time display.
6
1. Specications
This chapter explains how the clock thermostat
and some of its functions work.
• Nobatteries.
• Lossofvoltage
• Manualmode
• Centralheating’sclockprogram.
• Self-learningswitch-onoptimization:Comfortablywarmon
time.
• AdditionalsavingsinEconomysetting.
• On-screendeviceinformation.
• Modulatingcentralheatingcontrol.
• Weatherdependentcontrol.
• Timerfunction.
No batteries
For its functioning the clock thermostat receives its energy
fromtheconnectedboiler.Nobatteriesrequired.
Loss of voltage
In the case of loss of voltage all settings are saved in the clock
thermostat’s memory. After a 4 hour loss of voltage only the
day and time setting has to be reset. However, for it to work the
clock thermostat should have been connected for a minimum
of 1 hour. To save energy during loss of voltage no information
is being displayed on the screen.
Operational mode selection:
a. Manual mode
The clock thermostat can be used as an ‘ordinary’ room ther-
mostat, i.e. without using the clock program. In this case you
can switch on the thermostat in the morning, adjust it during
the day as required and reset it to the night temperature in the
evening.
Refer to chapter 3 for additional information.
b. Automatic mode
(Clock program for central heating)
The thermostat has a clock program which automatically con-
trols room temperature every day of the week. Every day and
every half an hour a different temperature can be preset.
Refer to chapter 4 for additional information.
7
Self-learning: Comfortably warm on time
(only in automatic mode)
The self-learning switch-on optimization ensures that the re-
quired temperature is reached at the time programmed. Since
outside temperatures vary daily, the thermostat re-determines
every day at what time the boiler has to start up in the morning
to ensure it being warm on time. If that temperature has not
been reached at the time set, it will start heating up earlier the
next morning. The same applies the other way round. This
switch on optimization also applies when the thermostat setting
is lowered during the day and the home is heated up again in
the afternoon. In this case, the switch-on optimization in the
morning(before12:00hours)willbedifferentthanintheafter-
noon(after12:00hours).Thisisbecausecoolingdownduring
the day is slower than at night. It may take about a week
before the thermostat ‘has learned how to work’.
ThisfunctionisfactorysettoOFF.Whendesiredyourinstaller
can change this setting for you.
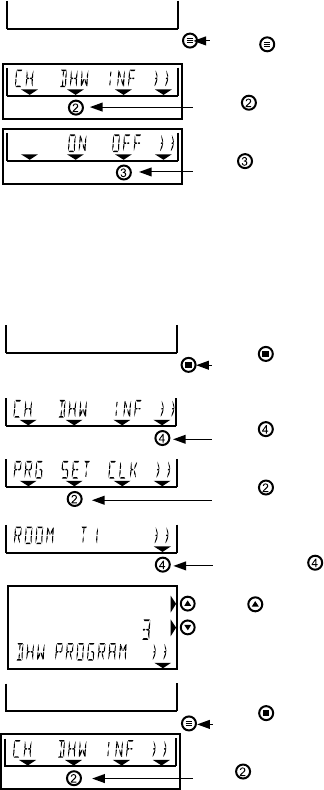
Additional savings in Economy setting
(Does not apply to ATAG Q-Series)
Using the thermostat it is possible to switch any available Com-
fort settings for hot water mode on or off. In the Comfort setting
the boilers hot water input is set to retain its temperature for
quickhotwaterinput.Whenthepipeconnectionstothetap
are short, at night or when you are away, this Comfort setting
is not required and you can switch the boiler setting back to
Economy. There are 4 alternatives for Comfort and Economy
settings.
Additional information can be found in chapter 5.2.
Communication language
TheWiZeclockthermostatcommunicateswiththeconnected
boilerviatheATAGZ-bus(OpenTherm),auniversalcommu-
nication language for boilers. By means of a double core cable
this language is used to exchange information between the
thermostat and connected boiler.
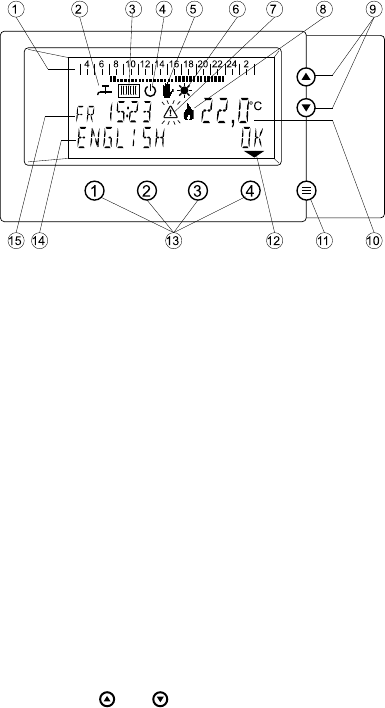
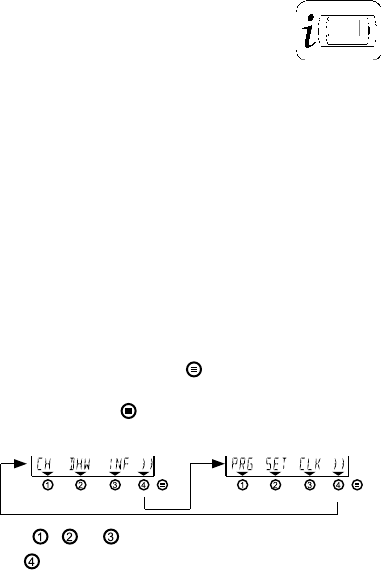
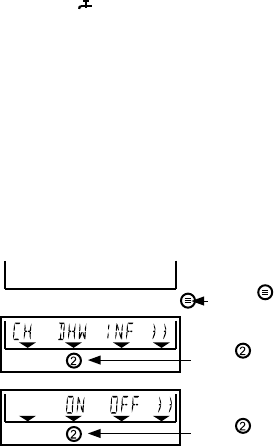
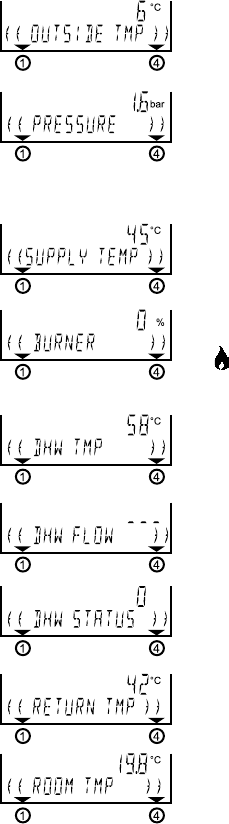
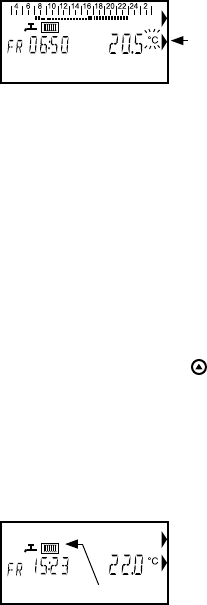
On-screen device information
Using the thermostat certain boiler data can be read. For
instance,theamesymbolindicateswhethertheboilerisonor
not. The information menu, amongst other things, can display
the outside temperature or boiler pressure. It depends on the
boiler type whether all menu information is displayed because
related sensors have to be available and installed.
Refer to chapter 5.4 for additional information.
8
Modulating central heating control
TheWiZeclockthermostatmeasurestheroomtemperature
and uses it to determine the area’s heat demand. Depending
on room temperature the thermostat determines the water
temperature required by the boiler. As a result the boiler also
determines the capacity required resulting in optimum heat
input to the house combined with the lowest energy consump-
tion possible.
Weather dependent control
TheWiZeclockthermostatcanalsobeusedasaweatherde-
pendent control. The major difference as opposed to ordinary
room temperature control is that when the weather dependent
control is switched on the boiler input temperature is being
controlled instead of the temperature of the room where the
thermostat is located. The control is called ‘weather dependent’
because it uses an optional outside temperature sensor. In
combination with thermostatic radiator valves throughout the
house, room temperatures for each room can be controlled
individually. Depending on measured outside temperatures
and the heating curve set on the thermostat, the boilers water
temperaturewillincreaseordecrease.Effectively:Thecolder
it gets outside, the hotter the boilers water will get and vice
versa.
Refer to chapter 5.8 for additional information.
Timer function
Using the timer function you can select either a set time or a
xedtemperature.Duringalongerabsence,forinstance,ital-
lows you to temporarily select a lower temperature or a higher
temperature for a party or when you are doing overtime.
Refer to chapter 5.3 for additional information.
9
RIGHT
WRONG WRONG
2. Mounting and initial operation
2.1 Mounting 9
2.2 Initial operation 11
2.1 Mounting
A .Choose a suitable location for mounting the thermostat.
Suitablemountinglocation:
At a height of approx. 1.5 m, away from windows and doors;
on an internal wall without obstacles around the room ther-
mostat.
Wrongmountingplaces:
•Inaplacewherethesuncanshinedirectlyonthether-
mostat.
•Onacoldoutsidewall(maybettinginsulationmaterial
behind the thermostat).
•Ina“blindspot”,forinstancebehindacupboard;
•Aboveaheatsourcesuchasaradiator,lamporTV-set;
10
B. Remove the rear panel
C. Mount the rear panel on the wall (A refers)
Use the rear panel as a template to mark the holes! Seal the
hole where the wiring originates to prevent likely draught.
Use the screws and plugs supplied.
D. Fit wiring to rear panel
Make sure that the boiler plug has been removed from its
socket!
OnlyconnectthewiringtotheZ-ready/busthermostat
connectionoftheboiler.Wrongconnectionsmaycause
considerable damage to the thermostat! It does not matter
where the conductor is connected. Prevent the wires from
runningpast230Vcables.
E. Snap the housing onto the rear panel
(hold thermostat with both hands)
The thermostat hinges at the top and is clamped at the
bottom (in the middle).
11
2.2 Initial operation
Plugtheboilersplugintothesocket.Whenvoltagehasbeen
suppliedtothethermostatforthersttime,youwillseethis
screen. Select language
(English is default)
Italian and Turkish are also
possible, select using arrow
keys.
Press
(OK).Youhave
now set the language.
Setting day and time
Press
(DAY)andthe
dayindicatorstartsashing;
Set the correct day using the
arrow keys;
Press
(HOUR)andthe
hourindicatorstartsashing;
Set the correct hour using
the arrow keys;
Press
(MIN)andthemi-
nuteindicatorstartsashing;
Set the correct time using the
arrow keys;
Press the menu key
and the adjusted time has
been set.
After these settings the thermostat will work immediately in
accordance with clock program 1 for heating (chapter 4.3
refers)andtheComfortsetting‘ON’forthehotwaterinput
(chapter 5.2 refers). Refer to chapters 3, 4 and 5.2 for any
adjustments of these factory settings.
Refer also to chapter 5.7, setting the correct day and time.
12
3. Manual mode
3.1 Activating manual mode 12
3.2 Manual thermostat mode 13
3.1 Activating manual mode
Youcanalsousethisthermostatwithouttheclockprogram
being switched on.
No clock bar = manual mode
If you do not see a clock bar
on the screen, then proceed to
chapter 3.2.
Clock bar visible = clock pro-
gram active (automatic).
Whenyoudoseetheclock
bar on the screen, then please
activate manual mode.
Youcanactivatemanual
modeasfollows:
Press the menu key
:
Press
(CH);
Press
(ON);
Press the menu key
.
The thermostat has now been set to manual mode. Continue
with chapter 3.2
13
actual room temperature
3.2 Manual mode thermostat
(clock program not activated)
Oncethethermostathasbeensettomanualmode(3.1
refers)youcanchangetherequiredtemperatureasfollows:
The standard screen will
display the current room
temperature.
Press an arrow key once
and the set required
temperature will start
ashing.
Increase or decrease the
set temperature using
the arrow keys and the
new required value you
see displayed will be set
instantly.
The temperature can be
adjusted by 0.5°C at a
time.
After 6 seconds or after pressing the menu key
,thea-
shing will stop and you will see the current room temperature
again.
Chapter 5.8 refers to temperature setting recommendations.
temperature set
14
4. Clock program central
heating
4.1 Activating central heating’s clock program 14
4.2 Set the three required room temperatures 15
4.3 Select a pre-programmed weekly program 17
4.4 Amend the weekly program 18
4.5 Adjusting temperature temporarily 23
4.1 Activating clock program for CH
Checkwhethertheclockprogramhasbeenactivated:
Youcanactivatetheclockprogramasfollows:
Clock bar visible = clock pro-
gram active (automatic).
If you do see a clock bar on the
screen, then proceed to chapter
4.2.
No clock bar = manual mode
If you do not see the clock bar
on the screen, then activate the
clockprogramasfollows:
Press the menu key
;
Press
(CH);
Press
(AUTO);
The thermostat has now been set to automatic mode in accor-
dance with the clock program.
The standard screen now
displays the clock bar.
Continue with chapter 4.2
15
4.2 Set the three desired room
temperatures (low – medium – high)
Three temperatures can be selected for the clock program con-
trolling automatic temperatures, every half hour of the day you
can select one of these three temperatures. In the example
below the indicated temperatures represent factory settings.
Thesmallblocksindicatethesettemperatures:
•Onesmallline=T1(low)
•Onesmalllineand1smallblockabove=T2(middle)
•Onesmalllineand2smallblocksabove=T3(high)
Chapter 5.8 refers to temperature setting recommendations.
Youcanadjusttherequiredtemperaturesasfollows:
Press the menu key
;
Press
(»);
Press
(SET);
Set the required (lowest)
temperature T1 using the
arrow keys.
Thesettemperatureashes
and is set immediately.
Press
(»);
Thisclockbardisplaysthefollowing:
-03:00-07:00hour:=T1=15°C(low)
-07:00-08:00hour:=T2=20°C(middle)
-08:00-16:00hour:=T1=15°C(low)
-16:00-23:00hour:=T3=21°C(high)
-23:00-03:00hour:=T1=15°C(low)
factory setting = 15,0°C)
16
Set the required (middle)
temperature T2 using the
arrow keys.
Whenyoupress
you will
return to the previous screen
(T1);
Made a mistake?
Press the menu key
for the starting screen.
Thesettemperatureashes
and is set immediately.
Press
(»);
Set the required (highest)
temperature T3 using the
arrow keys.
Press the menu key
to return to the standard
screen.
Continue with chapter 4.3
(factory setting = 20,0°C)
(factory setting = 21,0°C)
17
4.3 Select a pre-programmed weekly
program
To make settings easier 5 week programs have been pre-
programmed. Se below (1 to 5 incl.). Here you can select a
program best suited to the week program required in the end.
Chapter 4.4. tells you how the selected program can be further
adjusted.
Thesmallblocksindicatethesettemperatures:
•Onesmallline=T1(low)
•Onesmalllineand1smallblockabove=T2(middle)
•Onesmalllineand2smallblocksabove=T3(high)
The time bar runs from 03.00 hrs at night until 03.00 hrs the
following night. Program 1 is the standard setting.
Whenyouselectprogram1thenpleasecontinueto4.4
Please follow the explanation below should you wish to select
anotherprogram:
Press the menu key
;
Press
(»);
Then press
(PRG);
Then press
(PRE);
18
Made a mistake?
Press the menu key
for the starting screen.
Using the arrow key to select
one program (no’s 1 to 5).
Followingselectionpress:
(OK):
Program has been adjusted
or
(CANCEL):
Program not adjusted.
After this the program menu
is displayed again.
Continue with chapter 4.4
4.4 Adjusting the weekly program
Belowpleasendanexampleoffurtheradjustmentofapre-
programmed day (this example refers to week program 1).
The clock bar for Monday displays the standard adjacent
picture.
Supposeyouwishtosetthisdayinthemannershownbelow:
From7:00-16:00hours=T2.
From16:00-24:00hours=T3.
ATTENTION! As a result of the self-learning behaviour the re-
quired temperature is reached at the time set. Refer to chapter
1 for additional information.
Thisclockbardisplaysthefollowing:
-03:00-07:00hour:T1 (e.g.17°C)
-07:00-08:00hour:T2 (e.g.20°C)
-08:00-16:00hour:T1 (e.g.17°C)
-16:00-23:00hour:T3 (e.g.21°C)
-23:00-03:00hour:T1 (e.g.17°C)
19
Youcanadjustthedaysettingasfollows:
Whenyouareintheprogrammenu(asshownat*),continue
at*).
If you are not in the program menu;
Press the menu key
;
Press
(»);
Press
(PRG);
Youarenowintheprogram
menu.
Made a mistake?
Press the menu key
for the starting screen.
*)
MO=Monday.
Press
(DAY);
By pressing
(DAY)repe-
atedly you are going through
the days of the week.
Select Monday (MA) by
pressing continuously
until you see ‘MA’ again.
Press
(SET).
Thisclockbardisplaysthefollowing:
-03:00-07:00hour:T1 (e.g.17°C)
-07:00-16:00hour:T2 (e.g.20°C)
-16:00-23:00hour:T3 (e.g.21°C)
-23:00-03:00hour:T1 (e.g.17°C)
20
Press (NONE).
Now,usingthearrowkeys,
you can run through the time
bar without the temperature
changing.
Use the arrow key to proceed
to 7.00 hours;
Press
(SET);
Press
(T2);
Use the
key to run
through the time bar until
16:00hoursappearsonthe
screen.
The small blocks which are
nolongerashinghavebeen
set,i.e.for7:00to16:00
hours inclusive T2 has been
set.
Made a mistake?
Didyougotoofarwhenchangingthetemperature?Youcan
correct this as follows.
Press
(SET) and select the required temperature.
(T1=
;T2= andT3= )
Return using
or and the temperature has been set
differently again.
Press
(SET);
Press
(NONE);
21
Run through the time bar
using the arrow keys
up
until23:00hoursinclusive;
Press
(SET);
Press
(T3);
Run through the time bar
using the
key up until
00:00hoursinclusive;
The small blocks that are no
longerashinghavebeen
set.Consequently,for16:00
to00:00hoursinclusive
(=24:00)T3hasnowbeenset.Straightawaythechangehas
now been implemented.
Copy day program to the following day
WhenthescreenshowsMOyoucanusethearrowkeysinthe
time bar to proceed to the next or previous day. For instance,
youwillseeMO(Monday)changeintoTU(Tuesday).Inthis
wayyoucanprogramthewholeweek.Youcanalsocopythe
MondaysettingtoTuesday.Proceedasfollows:
Using this example you can program every day to meet your
requirements. The week program works immediately in ac-
cordance with the time and
temperatures set.
Move to the day you wish to
copy, for instance. Monday
(MO);
Press
(COPY);
Press
(DAY);
Youarenowonthenextday,
Tuesday (TU).
YoucannowseethatTues-
day is set the same way as
Monday.
22
Summary setting of week program
ThescreendisplayedinthePROGRAMMENU.
Consecutively press
,
(»),
(PRG) and you will
see the program menu;
Press
(SET) and here
select‘NONE’ifyouwishto
go to a certain time without
changing anything.
Run through the time bar
with the arrow keys
and
.
Theclock’stimeisrunningalongjustlikethesmallashing
blocks in the time bar.
SelectT1=
,T2= orT3= at“SET”whenyouareon
the“TIME”atwhichyouwishtochangethetemperature.
Continue with the
and right up until the time you wish
to adjust.
Youseethesmallblockschangeandrunalongwiththetime.
Press the menu key
when you wish to stop.
Made a mistake? Press
for the starting screen.
23
4.5 Temporary adjustment of the temp.
(with activated clock program)
Youcantemporarilyadjustthetemperatureasfollows:
Onthescreenyouseethe
current room temperature.
Press once on an arrow key
or .
Younowseetheprogram-
med temperature (required).
Using the arrow keys
and
you increase or
decrease the programmed
temperature (by 0.5°C).
After 6 seconds the screen
returns to its original situation
(or after pressing the menu
key (
).
In the case of a different temporary temperature setting the
screen displays the hand symbol
.
The temperature set manually is maintained until the clock pro-
gram changes to another programmed temperature. In doing
so the hand symbol disappears again.
24
5. User settings
This chapter explains how you can adjust certain
settings. It gives recommendations with which
you yourself can determine the best setting for your installa-
tion. At the same time it explains how you can read information
from the boiler, such as boiler pressure.
5.1 Summary of user menu 24
5.2 Comfort / Economy setting 25
5.3 Using central heating timer 29
5.4 Reading device information 30
5.5 Adjusting hot water and central heating set point 32
5.6 Summary of settings menu 34
5.7 Resetting the exact day and time
(e.g. summer/winter time) 35
5.8 User recommendations / holidays 36
5.1 Overview of users menu
Whenyoupressthemenukey you end up in the USER
MENU.
Press the menu key
again to return to the standard screen
or do not press any key for 2 minutes.
Press
, or
to proceed to the corresponding menu
and
for the other screen.
Chapter refers
CH Central heating menu 3.1, 4.1 and 5.3
DHW Hot water menu 5.2
INFO Information menu 5.4
PRG Program menu 4.3 and 4.4
SET Settings menu 5.5 and 5.6.
CLK Clock menu 5.7
25
5.2 Setting Comfort - / Economy setting
(hot water) (with exception of Q-Series)
Whentheboilerhasthatfacility,thethermostatcanbeused
to set the boilers hot water function to Comfort or Economy.
Check the boilers manual for any settings required for this pur-
pose.WhatdoestheComfort/Economysettingimply?Most
combination boilers have a function to supply hot water quickly,
the so-called Comfort setting (with exception of the Q-series).
This is particularly useful for longer pipe runs because you do
not have to wait that long for hot water.
Thefollowingappliestoacombinationboiler:
•Comfort=heatretentionsettingtapwateron(ON).
•Economy=heatretentionsettingoff(OFF)=
yes, hot water but waiting time is a bit longer.
The following applies to a boiler with a separate (indirectly
heated)boiler:
•Comfort=boileron(ON)
•Economy=boileroff(OFF)=
no more hot water when the boiler is empty.
Tap symbol visible:ComfortsettingalwaysonorComfort/
Economy in accordance with clock program. Tap symbol not
visible:Economysetting.
Thefollowinghotwater-Comfortsettingsarepossible:
1. Continuous Comfort (no clock program) (factory settings)
2. Continuous Economy (no clock program)
3. Automatic switching between Comfort/Economy settings in
accordance with central heating’s clock program
4. Automatic switching between Comfort/Economy settings in
accordance with own hot water clock program
Thesettingsforthesefourpossibilitiesaredescribedbelow:
1 Continuous Comfort:(Tapsymbolvisible).
Press
;
Press
(DHW);
Press
(ON);
(factory setting)
26
(=Comfort OFF)
2 Continuous Economy:
(Tapsymbolnotvisible).(=Comfortoff)
Press
;
Press
(DHW);
Press
(OFF);
3 Automatic switching between Comfort/Economy settings
in accordance with central heating’s clock program
During the day the Comfort setting is on (during T2 and T3)
andatnighttheEconomysetting(duringT1).Ofcoursethis
only works when the central heating’s clock program has
beenactivated:thetimebarhastobevisibleatthetopofthe
screen. 4.1 refers.
Press
;
Press
;
Press
(SET);
Press 3 times
(»);
Use
to change the value
from 1 to 3
(3=programaccording
to central heating’s clock
program).
Press
2 times;
Press
(DHW);
27
Press (AUT);
Youarenowreturningtothe
standard screen.
4 Automatic switching between Comfort/Economy settings
in accordance with own hot water clock program
Using this option you can determine when you want the boiler
set to Comfort and when to Economy, automatically 7 days a
week. This separate hot water program differs from the central
heating’s clock program and can also be used when you have
switched the thermostat to manual mode. During ( ) the
boiler is set to Economy and during (
) to Comfort.
Press
;
Press
(»);
Press
(SET);
Press 3 times
(»);
Use
to change the value
from 1 to 2
(2=programaccording
to own hot water clock
program).
Press
2 times;
Press
(DHW);
Press
(AUT);
Youarenowreturningtothe
standard screen.
28
*
Press ;
Press
;
Press
(PRG). If you do
not see this screen, refer to
previous section.
Press
(DHW);
Press
(PRE);
Use arrow keys to select
program 1 or 2. Refer to fol-
lowing information.
Then press
.
Youmay
select 2 pre-
programmed day
programs.
T1=
=EconomysettingT2= =Comfortsetting.
For every day of the week you can now program at what time
the boiler has to be in the Comfort setting and when in the
Economysetting.Startagainwith*onthispage.
Usingtheoption‘ZET’(SET)youcanselectT1=(
) or T2
=(
).
29
5.3 Use the central heating’s timer
(party program)
Onlywhenthecentralheating’sclockprogramisactiveyou
can temporarily set a different temperature using the central
heating’stimer.Withaminimumof30minutesandmaximum
of 12 hours.
Press
;
Press
(CH);
Press
(TMR);
Press
(TIME);
Using the arrow keys set
the required duration of the
period during which you wish
to retain the temperature
(e.g. 3 hours).
Press
(SETP);
Set the required temperature
using the arrow keys.
Press
;
Youwillnowseetheword
‘TIMER’ on the screen.
The times is activated.
Additional explanations can be found on the following page.
After the set time the clock program will be resumed automa-
tically.
30
If you wish to end the set time earlier, just select the previous
setting.
Press
;
Press
(CH);
a If you do use the clock
program:
Press
(AUT)
(clock bar is again visible on
the screen).
bIf you do not use the clock
program:
Press
(ON);
Using the central heating’s timer when the thermostat is set to
“manualmode”impliesthatattheendoftheTIMERfunction
the temperature will not return to the temperature set initially.
So, if you use the thermostat without the clock program, this
TIMER function has no function.
5.4 Reading device’s information
Certainboilerdatacanbereadfromthethermostat’sINFOR-
MATIONMENU.Belowpleasendinstructionsexplaininghow
you end up in this menu and what the displayed information
means.
ATTENTION! The data are only displayed if the boiler is
equipped with the required sensors and relays
the data to the thermostat.
Press
;
Press
(INF);
YouarenowintheINFORMATIONMENU(9data)
31
1.Outsidetemperature.If_
__°Cappearsonthescreen,
then there is no outside sensor
connected or it is not working.
2. Pressure of central heating
installation.
The correct pressure has to be
between 1.4 and 1.7 bar. Also
have a look at the boiler to read
the water pressure allowing you
a proper check and top up if
required.Youmayalsoreferto
the boilers manual.
3. Central heating’s input tem-
perature inside the boiler
4. Burner capacity
0%=offorlowsetting
100%=fullload
The
symbol on the standard
screen tells you whether the
burner is on.
5.Hotwatertemperature(Not
every boiler type displays this
temperature)
6.Notapplicable.
7.
1:Boileroperationalforhot
water (or the waiting time
afterwards)
0:boilernotoperationalforhot
water
8. Central heating’s return tem-
perature inside the boiler
9. Current room temperature
(as measured by the clock ther-
mostat). This value is accurately
displayed per 0.1°C.
previous next
previous back to start
32
previous next
Recommendation:
Do not change the setpoint
if it is not urgently required.
previous next
5.5 Adjusting DHW and CH set point
All ATAG boilers allow for adjustment of the hot water tem-
peraturesetting(=tapwatersetpoint)andmaximumcentral
heatingtemperature(=centralheatingsetpoint).Whenthe
WiZethermostatisconnectedtotheboiler,theseadjustments
may be set on both the boiler and thermostat. The last setting
is always the current setting, regardless of where (boiler or
thermostat) the setting has been activated. Please refer also to
the boilers manual.
Youcanadjustthecentralheating’ssetpointasfollows:
Press
;
Press
(»);
Press
(SET);
Press a number of times on
(») until you see MAX
SUPPLY.
MAXSUPPLY=CHsetpoint(=maximumowtemperature).
ATTENTION! Withsome
boilers the central heating’s
maximum input temperature
may exceed this value by
5°C.
Press the arrow keys to
adjust the value. The value
is set immediately.
previous setting
next setting
Press
once, after you
have set the required value
and you will return to the
standard screen.
33
Recommendation:
Do not change the setpoint
if it is not urgently required.
previous next
Youcanadjustthetapwatersetpointasfollows:
Press
;
Press
(»);
Press
(SET);
Press a number of times on
(»)untilyouseeDHW
SETP.
DHWSETP=DHW-setpoint
(=controlvalueforhotwater
temperature).
ATTENTION! This setting
is not the same as the hot
water temperature coming
out of the tap.
Press the arrow keys to
adjust the value. The value
is set immediately.
previous setting
next setting
Press
, when you have
set the required value and
you will again return to the
standard screen.
34
5.6 Overview of settings menu
Settings for the room thermostat and boiler.
Press
;
Press
(»);
Press
(SET);
Using the arrow keys (
and
) you can change
the settings.
ATTENTION!Whenthe
on-screen value changes,
then it has been adjusted
instantly.
(Refer
chapter 5.2
for further
informa-
tion)
Standard Range
ROOMT1 1st temperature for the clock pro-
gram, refer to chapter 4.2
15,0 7-35*
ROOMT2 2nd temperature for the clock
program, refer to chapter 4.2
20,0 7-35*
ROOMT3 3rd temperature for the clock pro-
gram, refer to chapter 4.2
21,0 7-35*
DHWPRO-
GRAM
Economy/Comfort setting for heat
retentiontapwater:
1 1-3
1:Noclockprogram(butON/OFFviaHOTWATER
MENUpossible).The‘AUTO’optionintheHOTWA-
TERMENUisnotvisibleatthisstage.
2:SeparateDHWclockprogramcanbeset.(the
PROGRAMMENUnowhasanadditionalprogram-
mingpossibilityforDHW.Nowalsoselect“AUTO”in
HOTWATER-MENU.
3:ActivationaccordingtoCHclockprogram.(Eco-
nomyatT1andComfortatT2andT3):Nowalso
select“AUTO”intheHOTWATER-MENU.
DHWSETP DHWSetpointoftheboiler.Chapter
5.5 refers (taken from boiler during
1st start up)
58** 0-70
MAXSUPPLY Maxsetpointowtemperatureof
the boiler. Chapter 5.5 refers (taken
from boiler during 1st start up)
80** 0-90
*
Valuetobeadjustedper0.5
**
Samples of temperatures, settings depending on connected
boiler type.
Urgent recom-
mendation:
do NOT adjust
these setpoints.
35
5.7 Resetting the exact day and time
(e.g. summer/winter time)
Youcansettherighttimeasfollows:
Press
;
Press
(»);
Press
(CLOCK);
Press
(DAY)andthe
dayindicatorstartsashing.
Set the correct day using
the arrow keys
and .
Press
(HOUR)and
the hour indicator starts
ashing.
Set the correct hour using
the arrow keys
and .
Press
(MIN)andthe
minute’s indicator starts
ashing.
Set the correct time using
the arrow keys
and .
Press the menu key (
)
again and the adjusted time
has been set.
36
5.8 User recommendations / holidays
Keep radiators placed in the area with the room thermostat
always open.
The actual temperature and room temperature measured by
the thermostat may differ slightly depending on the installation
and position of the room thermostat . This may be the case, for
instance, when the thermostat is mounted on an outside wall.
Consult your installer for further information.
Night temperature setting
It is recommended not to set the night temperature more than
5°C below the day temperature. For installations with just
oorheatingitshouldnotbesetlowerthan2°Conaccountof
havingtoretheboilerfollowingthelowernightsetting.
Holidays / temporary xed temperatures
Whenyouleavehomeforacertainperiodoftimeandwish
totemporarilysetaxedlowtemperature,youcansetthe
thermostat to manual mode. Chapters 3.1 and 4.1 provide ad-
ditional explanations in this respect.
Weather dependent control
Usually the weather dependent control is active when an out-
doorsensorhasbeentted.Youmaycheckthisbyreferringto
chapter 5.4 or checking whether the outside temperature (no.1)
isdisplayed.Whenyouseeanoutsidetemperaturedisplayed,
thenanoutdoorsensoristted.Alsoconsultyourinstallerif
required.Whenusingthethermostat’sweatherdependentcon-
trolcertainsettingshaveadifferentmeaning:
•ThesettemperaturesT1,T2andT3nolongerindicatethe
required room temperatures but a shift on the heating curve.
Whenthesettemperatureishigherthan20°C,thenthe
central heating’s water temperature will get higher than the
onesetbytheinstaller.Whenthesettingislowerthan20°,
the central heating’s temperature will also decrease (for in-
stance at night). Consequently, using the settings T1, T2 and
T3 you can either increase or decrease the central heating’s
temperature.
-T<20°C:thecentralheating’swatertemperatureisgetting
less warm.
-T>20°C:thecentralheating’swatertemperatureisgetting
warmer.
•Ifyouwantatemperaturethatistemporarilyhigherorlower
than the programmed heating curve, you can manually incre-
ase or decrease it temporarily. Chapter 4.5 refers.
Consult your installer for further information.
37
Prevent freezing of your central heating installation
WhenthethermostathasbeenswitchedoffforboththeCom-
fort setting and the central heating (the (!) symbol is visible),
the thermostat will keep room temperature at a minimum of
5°C(Frostprevention).Thisisthecasewhen‘UIT’(OFF)has
been selected in the central heating menu and the tapwater
menu. However, it is advisable not to set the thermostat lower
than approx. 12°C. This reduces the risk that parts of your cen-
tral heating system or water pipes will freeze considerably, in
particular when the pipes are located in a frost-exposed area.
6 Trouble-shooter
This chapter explains some faults and questi-
ons you may have regarding the functioning of
the thermostat.
Questions / complaints about your heating installation
Explanations are given in respect of likely questions.
Faults
Explanations are also given in respect of faults usually indica-
ted by the
!
symbol. Check whether you can solve the faults
yourself and call your installer if necessary. These faults may
also be caused by a connected boiler. Therefore, also check
the boilers display screen and refer to the corresponding
manual.
Questions / complaints about your
heating installation
Heating up takes a long time in the morning.
• Areallradiatorvalvesopen?Checkitout.
• Isthenighttemperaturesettoolow?Youmayincreasethe
current night temperature by 1 or 2 degrees to prevent slow
heat up.
• Consultyourinstallerifthecomplaintpersists.
38
The boiler comes on earlier than the time set on the cen-
tral heating’s clock program.
• Thethermostatwillwanttoreachtherequiredtemperature
at the time set. As a result the boiler will start heating up ear-
lier, this is the so-called self-learning switch-on optimization
(chapter 1 refers).
The boiler’s starting time may be different every day, be-
cause the moment the thermostat has to come on to reach
the required temperature on
time is being recalculated every
day. This is a normal situation.
During this self-learning process
the ‘°C’-symbol on the screen
willbeashing.
Sometimes getting hot water takes longer than usual
•Thethermostatmayswitchtheboiler’sheatretentionsetting
on(Comfort)oroff(Economy).OnceintheComfortsetting
the boiler usually supplies hot water quicker than in the Eco-
nomy setting. Refer to chapter 5.3 for additional information
regarding this setting.
It is too cold inside the house
Whenitistoocoldandthethermostatdoesnotindicate
a fault, then this may have several causes. The following
causesmayapply:
•Havealltheradiatorsbeenopenedproperly?Checkitout
and open them up further if necessary.
•Theboilermaystillbebusyheatingup.Checkitout.Check
the thermostat and you will see the temperature measured
by the thermostat. Press the
- key once and you will see
therequiredtemperature.Whenthesetemperaturesare
roughly the same then both the thermostat and boiler are
working properly.
Setahighertemperatureifrequired:
- Refer to chapter 3.2 manual mode.
- Refer to chapter 4.2 for setting clock program.
• Canyouseetheradiator
symbol on the screen?
If you do not see it, the
thermostat for the central
heating program is switched UIT
(OFF).Theradiatorsymbolhas
to be visible in order to be able
to heat up the central heating
system.
- Refer to chapter 3.1 to activate manual mode.
- Refer to chapter 4.1 to activate the clock program.
radiator-symbol
39
Display faults on the thermostat’s screen
Thethermostatcanalsorelayboilerfaults.Therefore,rst
check whether the fault is not caused by the connected boiler.
Refer to the boilers manual for additional explanation regar-
ding the boiler fault.
Ifitreads“Err”insteadofthe
temperature then there is so-
mething wrong with the boilers
thermostat. Check whether the
wiring has been properly connec-
tedtotheboiler(totheZ-ready/
bus-thermostat connection) and
inside the thermostat itself (refer to chapter 2.1). Consult your
installer if the complaint persists.
•Istheboilerpluggedinto
the socket?.
•Checkwhetherthewiringto
the boiler is correct.
•Maybethethermostatis
faulty. Consult your installer.
A connected boiler displays a fault. There are minor faults
which sort themselves out
and also disappear automa-
tically. To be sure still check
out the boiler.
If the fault persists you can
press
(»);
The adjacent screen displays
the current error code (other
error codes may be pos-
sible, error code no. 5 is an
example).
Refer to the boilers manual
to see what this error code
means and what you can do
to solve it.
Press
(»);
Youwillnowseetheadjacentscreen.
It involves either a boiler fault or the central heating’s pressure
is too low.
(blank screen)
40
Press
(»);
Youcanseetheboiler’s
error-history.
Whenyoupress
(») you
will see a list of errors that
occurred in the past.
Press the menu key (
) and you will return to the standard
screen. Refer to the boilers manual to see a description of the
codes.
The central heating’s pres-
sure is too low. Top up the
central heating system.
Refer to the boilers manual
for additional explanations in
this respect.
This fault implies that the
thermostat is not working.
Consult your installer.
This fault implies that the
thermostat is not working.
The thermostat may supply
some heat (central heating’s
input temperature ±40°C,
but the thermostat needs
replacing.
In the case of error codes or information not covered by
this chapter:
Check whether your boiler is working properly and consult your
installer.
41
Dismantling and loss of voltage
Loss of voltage
The thermostat works without batteries and obtains its required
energyviatheboiler.Whenthethermostatisremovedfrom
itsmountingplate,allsettingsarestoredinthememory.Only
after an interruption of approximately 4 hours do you have to
reset the day and time.
Dismantling
Disconnect the boiler from the mains (pull the plug
from its socket or use the on/off button).
•Thethermostathingesatthetopandisclamped
at the bottom (in the middle).
Remove the thermostat from its mounting plate by
rmlygrabbingholdofitwith2handsandreleasing
the bottom by pulling it forward.
Retting
•Hookthetopofthethermostatonthemounting
plate and tip it downwards until it snaps at the
bottom.
•Reconnecttheboilertothemains.Set,when
the thermostat asks you to do so, the correct time
and day and the thermostat will be ready for use
again. Bear in mind that it may take a while before
the boiler is back on standby due to the automatic de-aeration
program. Depending on the boiler type this may take between
7 and 17 minutes (refer to the boilers manual).
•Refertochapter5.7forexplanationsregardingsettingthe
correct day and time.
42
7 Technical specications
Technical specications
dimensions(hxwxd): 77,5x155x28mm
weight: approx.136grams
electricalsupply: nominalapprox.5V(from
connected boiler)
communicationprotocol: Z-bus(OpenTherm)
electricalconnection: 2-wire,polarityinsensitive
IP-class: IP30
storageconditions: 0-40°C/10-90%humidity
(no condensation)
clockfunctiontolerance:±10minutes/year
roomtemperaturetolerance: ±0.5°C
This revised publication supersedes all previous installation
instructions.
Youmaydownloadanactualdigitalversionfromwww.ataghe-
ating.co.uk
87
Wereservetherighttomakechanges•Wijzigingenvoorbehouden
Sousréservedemodications•ÄnderungenundIrrtümervorbehalten
Cisiriservaildirittodiapportareeventualimodiche
www.atagheating.com
39


Need help? Post your question in this forum.

Forumrules


Report abuse

Libble takes abuse of its services very seriously. We're committed to dealing with such abuse according to the laws in your country of residence. When you submit a report, we'll investigate it and take the appropriate action. We'll get back to you only if we require additional details or have more information to share.

Product:

For example, Anti-Semitic content, racist content, or material that could result in a violent physical act.

For example, a credit card number, a personal identification number, or an unlisted home address. Note that email addresses and full names are not considered private information.

Forumrules

To achieve meaningful questions, we apply the following rules:

Register

Register getting emails for ATAG WiZe at:


You will receive an email to register for one or both of the options.


Get your user manual by e-mail

Enter your email address to receive the manual of ATAG WiZe in the language / languages: English as an attachment in your email.

The manual is 1,2 mb in size.


You will receive the manual in your email within minutes. If you have not received an email, then probably have entered the wrong email address or your mailbox is too full. In addition, it may be that your ISP may have a maximum size for emails to receive.

Others manual(s) of ATAG WiZe

ATAG WiZe Installation Guide - Dutch - 2 pages

ATAG WiZe User Manual - Dutch - 28 pages

ATAG WiZe User Manual - French - 84 pages


The manual is sent by email. Check your email

If you have not received an email with the manual within fifteen minutes, it may be that you have a entered a wrong email address or that your ISP has set a maximum size to receive email that is smaller than the size of the manual.

The email address you have provided is not correct.

Please check the email address and correct it.

Your question is posted on this page

Would you like to receive an email when new answers and questions are posted? Please enter your email address.


Info