108608
10
Zoom out
Zoom in
Previous page
1/38
Next page
NL 15NL 14
montage (vervolg)
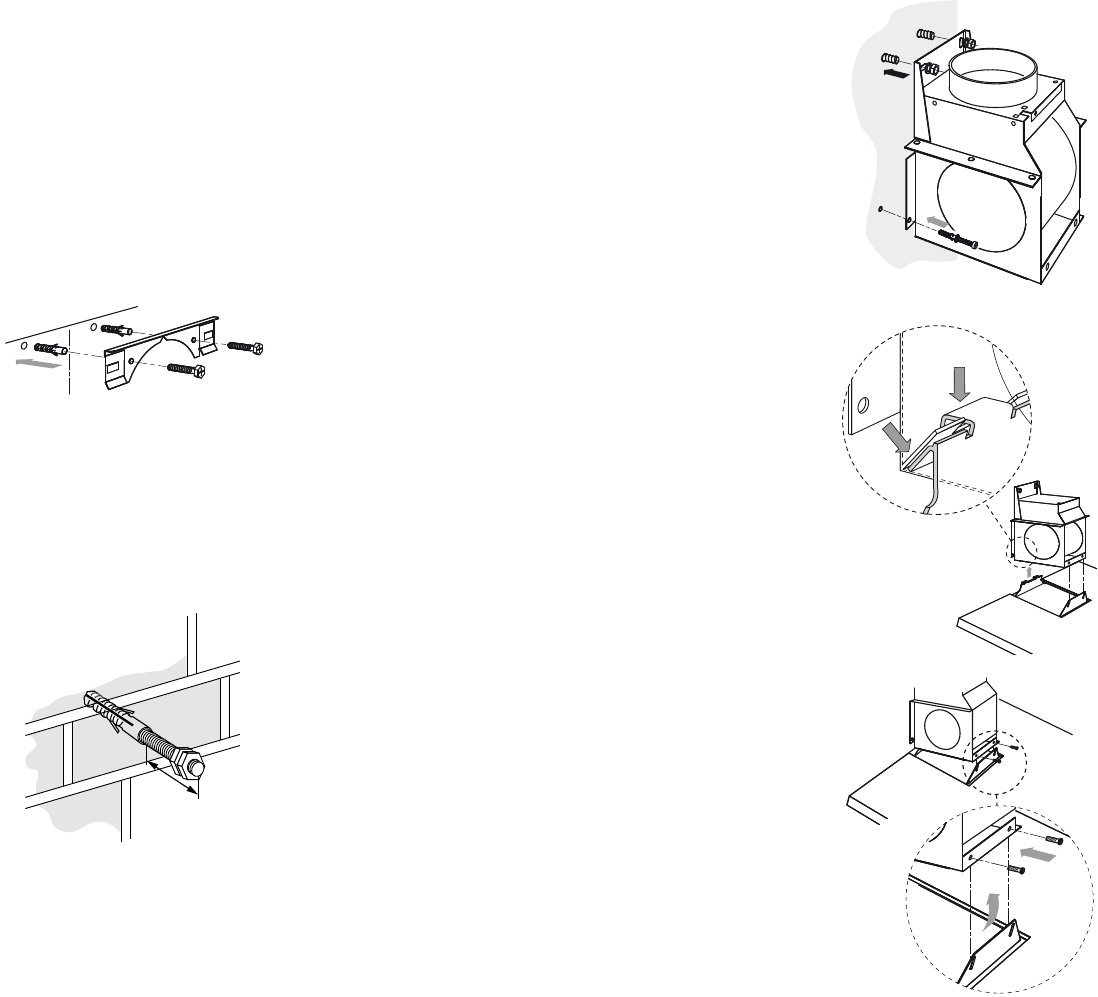
Hang de motormodule aan de draadeinden (1). Draai de
moeren aan. Zorg ervoor dat de module exact waterpas
hangt.
Boor de borggaten (2x ø 6 mm) en borg de motormodule met
de bijgeleverde kozijnpluggen 6 x 60 (2).
Monteer het afvoerkanaal.
Breng de elektrische aansluiting tot stand.
kap ophangen
Monteer de kap aan de motormodule. Haak eerst de
achterzijde van de kap van onderaf in de motormodule (1).
Kantel vervolgens de voorzijde omhoog (2), zodat de twee
bijgeleverde bouten M5 x 12 ingedraaid kunnen worden (3).
Stel met deze bouten de kap waterpas.
Maak de stekkerverbindingen in de kap.
1
1
2
2
3
NL 14
montage (vervolg)
inbouwen wandmodellen
Op de vorige pagina zijn de belangrijkste afmetingen
aangegeven. U kunt de hoogte van de telescooppijp
instellen. Houd wel rekening met de toegestane toleranties.
Monteer de afvoer en de elektrische aansluiting zodanig dat
u ze straks makkelijk op de kap kunt aansluiten.
Verwijder voor montage eerst de transportbeveiliging, zie
pagina 12.
aftekenen en monteren bevestigingsmateriaal
Zet een verticale hartlijn op de muur (midden van de kap).
Houd de bevestigingsbeugel zo tegen de wand, dat hij tegen
het plafond rust. De markering geeft het midden van de
afzuigkap aan. Markeer de bevestigingsgaten.
Boor de bevestigingsgaten (ø 8 mm).
Monteer de pluggen in de muur en bevestig de
bevestigingsbeugel aan de muur met de bijgeleverde
schroeven 5 x 50 mm.
motormodule aftekenen en monteren
Teken de onderzijde van de kap af op de muur (houd hierbij
rekening met de minimale afstand tot de kookplaat). Geef
ook de (verticale) hartlijn aan.
Vouw of knip de aftekenmal volgens type en teken de
bovenste bevestigingsgaten af.
Boor de bevestigingsgaten (2x ø 10 mm).
Bevestig de pluggen. Draai twee moeren in tegengestelde
richting op de draadeinden. Draai de draadeinden tot 20 mm
diep de muur in (zie illustratie). Verwijder de moeren.
20
10


Need help? Post your question in this forum.

Forumrules


Report abuse

Libble takes abuse of its services very seriously. We're committed to dealing with such abuse according to the laws in your country of residence. When you submit a report, we'll investigate it and take the appropriate action. We'll get back to you only if we require additional details or have more information to share.

Product:

For example, Anti-Semitic content, racist content, or material that could result in a violent physical act.

For example, a credit card number, a personal identification number, or an unlisted home address. Note that email addresses and full names are not considered private information.

Forumrules

To achieve meaningful questions, we apply the following rules:

Register

Register getting emails for ATAG WG 411 U at:


You will receive an email to register for one or both of the options.


Get your user manual by e-mail

Enter your email address to receive the manual of ATAG WG 411 U in the language / languages: English, German, Dutch, French as an attachment in your email.

The manual is 1,05 mb in size.


You will receive the manual in your email within minutes. If you have not received an email, then probably have entered the wrong email address or your mailbox is too full. In addition, it may be that your ISP may have a maximum size for emails to receive.

Others manual(s) of ATAG WG 411 U

ATAG WG 411 U User Manual - English, German, Dutch, French - 34 pages


The manual is sent by email. Check your email

If you have not received an email with the manual within fifteen minutes, it may be that you have a entered a wrong email address or that your ISP has set a maximum size to receive email that is smaller than the size of the manual.

The email address you have provided is not correct.

Please check the email address and correct it.

Your question is posted on this page

Would you like to receive an email when new answers and questions are posted? Please enter your email address.


Info