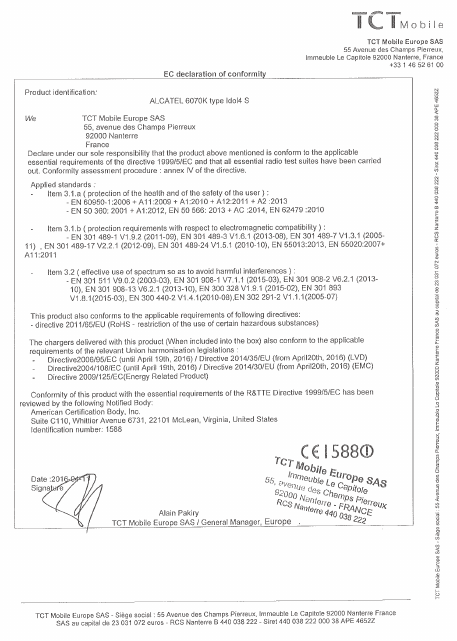
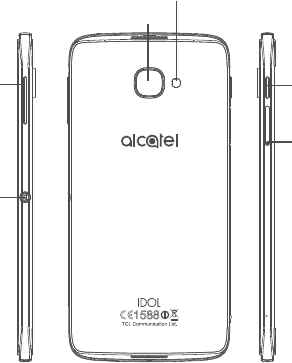
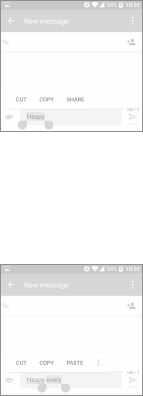
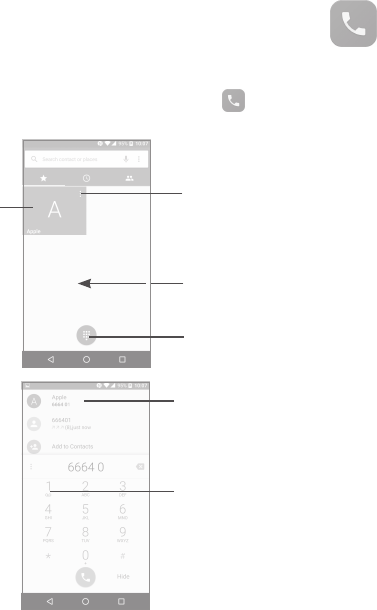
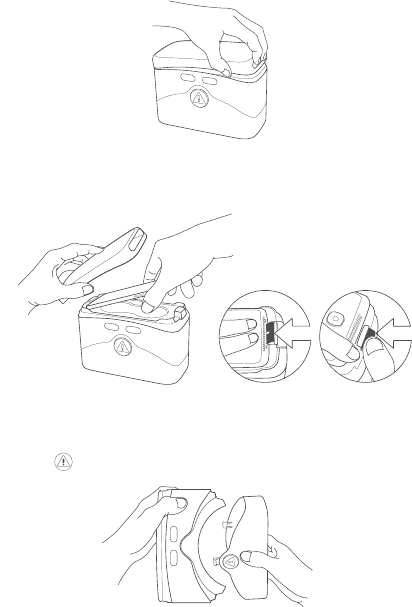
636105
115
Zoom out
Zoom in
Previous page
1/137
Next page
1
Table of Contents
Safety and use ��������������������������������������������������������������������������������������� 4
General information ���������������������������������������������������������������������������17
1 Your mobile �����������������������������������������������������������������������������������19
1.1 Keys and connectors .........................................................................19
1.2 Getting started ...................................................................................25
1.3 Home screen .......................................................................................26
2 Boom Key ��������������������������������������������������������������������������������������34
3 Text input ���������������������������������������������������������������������������������������35
3.1 Using the Onscreen Keyboard ........................................................35
3.2 Text editing ..........................................................................................36
4 Call, Call log and Contacts ���������������������������������������������������������37
4.1 Call ........................................................................................................37
4.2 Call log .................................................................................................44
4.3 Contacts ...............................................................................................45
5 Messaging and Email ������������������������������������������������������������������51
5.1 Messaging ............................................................................................51
5.2 Email .....................................................................................................56
6 Calendar & Time & Calculator ��������������������������������������������������58
6.1 Calendar ...............................................................................................58
6.2 Clock ....................................................................................................60
6.3 Calculator .............................................................................................63
Note:
This is a shared user manual for alcatel IDOL 4 (6055K, 6055P) and
alcatel IDOL 4S (6070Y, 6070K).
2
7 Getting connected �����������������������������������������������������������������������64
7.1 Connecting to the Internet..............................................................64
7.2 Browser ................................................................................................66
7.3 Connecting to Bluetooth devices ..................................................73
7.4 Connecting to a computer...............................................................74
7.5 Sharing your phone's mobile data connection ............................74
7.6 Connecting to virtual private networks ........................................76
7.7 Connecting with devices through NFC ........................................77
8 Multimedia applications �������������������������������������������������������������79
8.1 Camera/Camcorder ...........................................................................79
8.2 Gallery ..................................................................................................82
8.3 Music ....................................................................................................84
9 Others���������������������������������������������������������������������������������������������86
9.1 Files .......................................................................................................86
9.2 Sound Recorder ..................................................................................86
9.3 Compass ..............................................................................................87
9.4 Boost ....................................................................................................87
9.5 Radio .....................................................................................................87
9.6 Xender File Transfer ..........................................................................89
9.7 Waves MaxxAudio .............................................................................89
9.8 Other applications .............................................................................89
10 Google applications ���������������������������������������������������������������������90
10.1 Chrome ................................................................................................90
10.2 Gmail .....................................................................................................90
10.3 Maps .....................................................................................................90
10.4 YouTube ................................................................................................91
10.5 Play Store .............................................................................................91
10.6 Drive .....................................................................................................91
10.7 Play Music ...........................................................................................91
10.8 Play Movies & TV...............................................................................92
10.9 Hangouts .............................................................................................92
10.10 Photos ..................................................................................................92
10.11 Keep ......................................................................................................92
3
11 Settings ������������������������������������������������������������������������������������������93
11.1 Wireless & networks .........................................................................93
11.2 Device ..................................................................................................97
11.3 Personal ............................................................................................ 102
11.4 System ............................................................................................... 107
12 VR goggles ���������������������������������������������������������������������������������� 111
12.1 Getting started ................................................................................ 111
12.2 Troubleshooting ............................................................................... 116
12.3 Safety information ..........................................................................117
13 Making the most of your phone ������������������������������������������� 118
13.1 Smart Suite .......................................................................................118
13.2 Upgrade ............................................................................................119
14 Accessories ��������������������������������������������������������������������������������� 121
15 Warranty ������������������������������������������������������������������������������������� 122
16 Troubleshooting ������������������������������������������������������������������������ 124
17 Specifications (alcatel IDOL 4) ���������������������������������������������� 131
18 Specifications (alcatel IDOL 4S) �������������������������������������������� 133
PROTECT YOUR HEARING
To prevent possible hearing damage, do not listen at high volume
levels for long periods. Exercise caution when holding your device
near your ear while the loudspeaker is in use.
www.sar-ck.com
This product meets applicable national SAR limits of 2.0
W/kg. The specific maximum SAR values can be found on
page 8 of this user guide.
When carrying the product or using it while worn on your
body, either use an approved accessory such as a holster
or otherwise maintain a distance of 10 mm from the body
to ensure compliance with RF exposure requirements.
Note that the product may be transmitting even if you are
not making a phone call.
4
Safety and use �����������������������������������
We recommend that you read this chapter carefully before using your phone.
The manufacturer disclaims any liability for damage, which may result as a
consequence of improper use or use contrary to the instructions contained
herein.
TRAFFIC SAFETY:
Given that studies show that using a mobile phone while driving a vehicle
constitutes a real risk, even when the hands-free kit is used (car kit, headset���),
drivers are requested to refrain from using their mobile when the vehicle is
not parked�
When driving, do not use your phone and headphone to listen to music or to
the radio. Using a headphone can be dangerous and forbidden in some areas.
When switched on, your phone emits electromagnetic waves that can interfere
with the vehicle’s electronic systems such as ABS anti-lock brakes or airbags. To
ensure that there is no problem:
- do not place your phone on top of the dashboard or within an airbag
deployment area,
- check with your car dealer or the car manufacturer to make sure that the
dashboard is adequately shielded from mobile phone RF energy.
CONDITIONS OF USE:
You are advised to switch off the telephone from time to time to optimise its
performance.
Switch the phone off before boarding an aircraft.
Switch the phone off when you are in health care facilities, except in designated
areas. As with many other types of equipment now in regular use, mobile
telephones can interfere with other electrical or electronic devices, or equipment
using radio frequency.
Switch the phone off when you are near gas or flammable liquids. Strictly obey
all signs and instructions posted in a fuel depot, petrol station, or chemical plant,
or in any potentially explosive atmosphere.
When the phone is switched on, it should be kept at least 15 cm from any
medical device such as a pacemaker, a hearing aid or insulin pump, etc. In
particular when using the phone, you should hold it against the ear on the
opposite side to the device, if any.
5
To avoid hearing impairment, pick up the call before holding your phone to your
ear. Also move the handset away from your ear while using the "hands-free"
mode because the amplified volume might cause hearing damage.
Do not let children use the phone and/or play with the telephone and
accessories without supervision.
If your phone has a removable cover, note that your phone may contain
substances that could create an allergic reaction.
If your phone is a unibody device, the back cover and battery are not removable.
If you disassemble your phone the warranty will not apply. Disassembling the
phone may damage the battery, and may cause leakage of substances that could
create an allergic reaction.
Always handle your phone with care and keep it in a clean and dust-free place.
Do not allow your phone to be exposed to adverse weather or environmental
conditions (moisture, humidity, rain, infiltration of liquids, dust, sea air, etc). The
manufacturer’s recommended operating temperature range is -10°C to +40°C
(1)
.
At over 40°C the legibility of the phone’s display may be impaired, though this is
temporary and not serious.
Emergency call numbers may not be reachable on all mobile networks. You
should never rely only on your phone for emergency calls.
Do not open, dismantle or attempt to repair your mobile phone yourself.
Do not drop, throw or bend your mobile phone.
Do not use the phone if the glass made screen, is damaged, cracked or broken
to avoid any injury.
Do not paint it.
Use only batteries, battery chargers, and accessories which are recommended by
TCL Communication Ltd. and its affiliates and are compatible with your phone
model. TCL Communication Ltd. and its affiliates disclaim any liability for damage
caused by the use of other chargers or batteries.
Remember to make back-up copies or keep a written record of all important
information stored in your phone.
Some people may suffer epileptic seizures or blackouts when exposed to flashing
lights, or when playing video games. These seizures or blackouts may occur even
if a person never had a previous seizure or blackout. If you have experienced
seizures or blackouts, or if you have a family history of such occurrences, please
consult your doctor before playing video games on your phone or enabling a
flashing-lights feature on your phone.
(1)
For alcatel IDOL 4: -20°C to +40°C
6
Parents should monitor their children’s use of video games or other features that
incorporate flashing lights on the phones. All persons should discontinue use
and consult a doctor if any of the following symptoms occur: convulsion, eye or
muscle twitching, loss of awareness, involuntary movements, or disorientation.
To limit the likelihood of such symptoms, please take the following safety
precautions:
- Do not play or use a flashing-lights feature if you are tired or need sleep.
- Take a minimum of a 15-minute break hourly.
- Play in a room in which all lights are on.
- Play at the farthest distance possible from the screen.
- If your hands, wrists, or arms become tired or sore while playing, stop and rest
for several hours before playing again.
- If you continue to have sore hands, wrists, or arms during or after playing, stop
the game and see a doctor.
When you play games on your phone, you may experience occasional discomfort
in your hands, arms, shoulders, neck, or other parts of your body. Follow the
instructions to avoid problems such as tendinitis, carpal tunnel syndrome, or
other musculoskeletal disorders.
PROTECT YOUR HEARING
To prevent possible hearing damage, do not listen at high volume levels
for long periods. Exercise caution when holding your device near your
ear while the loudspeaker is in use.
PRIVACY:
Please note that you must respect the laws and regulations in force in
your jurisdiction or other jurisdiction(s) where you will use your mobile
phone regarding taking photographs and recording sounds with your mobile
telephone� Pursuant to such laws and regulations, it may be strictly forbidden
to take photographs and/or to record the voices of other people or any of
their personal attributes, and duplicate or distribute them, as this may be
considered to be an invasion of privacy It is the user's sole responsibility to
ensure that prior authorisation be obtained, if necessary, in order to record
private or confidential conversations or take a photograph of another person;
the manufacturer, the seller or vendor of your mobile phone (including the
operator) disclaim any liability which may result from the improper use of the
mobile phone�
7
BATTERY:
Following new air regulation, the battery of your product is not charged. Please
charge it first.
Please note your phone is a unibody device, the back cover and battery are not
removable. Observe the following precautions:
- Do not attempt to open the back cover,
- Do not attempt to eject, replace and open battery,
- Do not punctuate the back cover of your phone,
- Do not burn or dispose of your phone in household rubbish or store it at
temperature above 60°C.
Phone and battery as a unibody device must be disposed of in accordance with
locally applicable environmental regulations.
This symbol on your telephone, the battery and the accessories means
that these products must be taken to collection points at the end of
their life:
- Municipal waste disposal centres with specific bins for these items
of equipment
- Collection bins at points of sale.
They will then be recycled, preventing substances being disposed of in the
environment, so that their components can be reused.
In European Union countries:
These collection points are accessible free of charge.
All products with this sign must be brought to these collection points.
In non European Union jurisdictions:
Items of equipment with this symbol are not to be thrown into ordinary bins if
your jurisdiction or your region has suitable recycling and collection facilities;
instead they are to be taken to collection points for them to be recycled.
CAUTION: RISK OF EXPLOSION IF BATTERY IS REPLACED BY AN INCORRECT
TYPE. DISPOSE OF USED BATTERIES ACCORDING TO THE INSTRUCTIONS.
8
CHARGERS
Mains powered chargers will operate within the temperature range of: 0°C to
40°C.
The chargers designed for your mobile phone meet with the standard for safety
of information technology equipment and office equipment use. They are also
compliant to the ecodesign directive 2009/125/EC. Due to different applicable
electrical specifications, a charger you purchased in one jurisdiction may not
work in another jurisdiction. They should be used for this purpose only.
RADIO WAVES:
Proof of compliance with international standards (ICNIRP) or with European
Directive 1999/5/EC (R&TTE) is required of all mobile phone models before
they can be put on the market. The protection of the health and safety for the
user and any other person is an essential requirement of these standards or this
directive.
THIS DEVICE MEETS INTERNATIONAL GUIDELINES FOR EXPOSURE TO
RADIO WAVES
Your mobile device is a radio transmitter and receiver. It is designed not to
exceed the limits for exposure to radio waves (radio frequency electromagnetic
fields) recommended by international guidelines. The guidelines were developed
by an independent scientific organisations (ICNIRP) and include a substantial
safety margin designed to assure the safety of all persons, regardless of age
and health.
The radio wave exposure guidelines use a unit of measurement known as the
Specific Absorption Rate, or SAR. The SAR limit for mobile devices is 2 W/kg.
Tests for SAR are conducted using standard operating positions with the device
transmitting at its highest certified power level in all tested frequency bands.
The highest SAR values under the ICNIRP guidelines for this device model are:
6055K:
Maximum SAR for this model and conditions under which it was recorded�
Head SAR
LTE Band 8+Wi-Fi 0.840 W/kg
Body-worn SAR
LTE Band 1+Wi-Fi 0.899 W/kg
9
6055P:
Maximum SAR for this model and conditions under which it was recorded�
Head SAR
LTE Band 8+Wi-Fi 0.840 W/kg
Body-worn SAR
LTE Band 1+Wi-Fi 0.899 W/kg
6070Y:
Maximum SAR for this model and conditions under which it was recorded�
Head SAR
LTE Band 3+Wi-Fi 1.192 W/kg
Body-worn SAR
LTE Band 1+Wi-Fi 0.875 W/kg
6070K:
Maximum SAR for this model and conditions under which it was recorded�
Head SAR
LTE Band 1+Wi-Fi 1.134 W/kg
Body-worn SAR
LTE Band 1+Wi-Fi 0.746 W/kg
During use, the actual SAR values for this device are usually well below the
values stated above. This is because, for purposes of system efficiency and
to minimize interference on the network, the operating power of your mobile
device is automatically decreased when full power is not needed for the call. The
lower the power output of the device, the lower its SAR value.
Body-worn SAR testing has been carried out at a separation distance of 10 mm.
To meet RF exposure guidelines during body-worn operation, the device should
be positioned at least this distance away from the body.
If you are not using an approved accessory ensure that whatever product is used
is free of any metal and that it positions the phone the indicated distance away
from the body.
Organisations such as the World Health organisations and the US Food and Drug
Administration have stated that if people are concerned and want to reduce their
exposure they could use a hands-free device to keep the phone away from the
head and body during phone calls, or reduce the amount of time spent on the
phone.
For more information you can go to www.alcatel-mobile.com
10
Additional information about electromagnetic fields and public health are
available on the following site: http://www.who.int/peh-emf.
Your telephone is equipped with a built-in antenna. For optimal operation, you
should avoid touching it or degrading it.
As mobile devices offer a range of functions, they can be used in positions other
than against your ear. In such circumstances the device will be compliant with the
guidelines when used with headset or usb data cable. If you are using another
accessory ensure that whatever product is used is free of any metal and that it
positions the phone at least 10 mm away from the body.
Please note by using the device some of your personal data may be shared with
the main device. It is under your own responsibility to protect your own personal
data, not to share with it with any unauthorised devices or third party devices
connected to yours. For products with Wi-Fi features, only connect to trusted
Wi-Fi networks. Also when using your product as a hotspot (where available),
use network security. These precautions will help prevent unauthorised access
to your device. Your product can store personal information in various locations
including a SIM card, memory card, and built-in memory. Be sure to remove
or clear all personal information before you recycle, return, or give away your
product. Choose your apps and updates carefully, and install from trusted
sources only. Some apps can impact your product’s performance and/or have
access to private information including account details, call data, location details
and network resources.
Note that any data shared with TCL Communication Ltd. is stored in
accordance with applicable data protection legislation. For these purposes
TCL Communication Ltd. implements and maintains appropriate technical
and organisational measures to protect all personal data, for example against
unauthorised or unlawful processing and accidental loss or destruction of or
damage to such personal data whereby the measures shall provide a level of
security that is appropriate having regard to
(i) the technical possibilities available,
(ii) the costs for implementing the measures,
(iii) the risks involved with the processing of the personal data, and
(iv) the sensitivity of the personal data processed.
You can access, review and edit your personal information at any time by logging
into your user account, visiting your user profile or by contacting us directly.
Should you require us to edit or delete your personal data, we may ask you to
provide us with evidence of your identity before we can act on your request.
11
LICENCES
microSD Logo is a trademark.
The Bluetooth
®
word mark and logos are owned by the Bluetooth
SIG, Inc. and any use of such marks by TCL Communication Ltd.
and its affiliates is under license. Other trademarks and trade
names are those of their respective owners.
alcatel 6055K
alcatel 6055P
Bluetooth Declaration ID D030257
alcatel 6070Y
alcatel 6070K
Bluetooth Declaration ID D029817
The Wi-Fi Logo is a certification mark of the Wi-Fi Alliance.
The device is operated in 5150-5350 frequency range. It is
restricted to indoor environment only.
Google, the Google logo, Android, the Android logo, Google
Search
TM
, Google Maps
TM
, Gmail
TM
, YouTube, Google Play Store,
Google Latitude
TM
and Hangouts
TM
are trademarks of Google Inc.
The Android robot is reproduced or modified from work created and shared by
Google and used according to terms described in the Creative Commons 3.0
Attribution License (the text will show when you long press Google legal in
Settings\About phone\Legal information).
(1)
You have purchased a product which uses the open source (http://opensource.
org/) programs mtd, msdosfs, netfilter/iptables and initrd in object code and
other open source programs licensed under the GNU General Public License
and Apache License.
(1)
May not be available in all countries.
12
We will provide you with a complete copy of the corresponding source codes
upon request within a period of three years from the distribution of the product
by TCL.
You may download the source codes from http://sourceforge.net/projects/
alcatel/files/. The provision of the source code is free of charge from internet.
We hereby point out that the end user warranty for infringement IPR is solely
limited to the EU.
If and to the extent that the Product is exported, taken with or used by
end customer or end user outside the EU any responsibility, warranty or
indemnification of manufacturer and its suppliers in regard to the Product
expires (including any indemnification in regard to infringement IPR).
13
Regulatory information
The following approvals and notices apply in specific regions as noted.
6055K:
14
6055P:
15
6070Y:
16
6070K:
17
General information �������������������������
•Internet address: www.alcatel-mobile.com
•Hot Line Number: see "TCL Communication Services" leaflet or go
to our website.
•Manufacturer: TCL Communication Ltd.
•Address: Flat/RM 1910-12A, Block 3, China HongKong City, 33
Canton Road, Tsimshatsui, Kowloon, Hong Kong.
•Electronic labeling path: Touch Settings\Regulatory & safety or press
*#07#, you can find more information about labeling
(1)
.
On our website, you will find our FAQ (Frequently Asked Questions) section. You
can also contact us by e-mail to ask any questions you may have.
An electronic version of this user guide is available in English and other languages
according to availability on our server:
www�alcatel-mobile�com
Your telephone is a transceiver that operates on GSM in quad-band
(850/900/1800/1900 MHz), UMTS in quad-band (850/900/1900/2100 MHz),
or LTE B1/3/7/8/20/28A.
This equipment is in compliance with the essential requirements and other
relevant provisions of Directive 1999/5/EC. The entire copy of the Declaration
of Conformity for your telephone can be obtained through our website:
www.alcatel-mobile.com.
Protection against theft
(2)
Your telephone is identified by an IMEI (phone serial number) shown on the
packaging label and in the phone’s memory� We recommend that you note the
number the first time you use your telephone by entering * # 0 6 # and keep
it in a safe place� It may be requested by the police or your operator if your
telephone is stolen� This number allows your mobile telephone to be blocked
preventing a third person from using it, even with a different SIM card�
(1)
It depends on countries.
(2)
Contact your network operator to check service availability.
18
Disclaimer
There may be certain differences between the user manual description and the
phone’s operation, depending on the software release of your telephone or
specific operator services.
TCL Communication shall not be held legally responsible for such differences,
if any, nor for their potential consequences, which responsibility shall be borne
by the operator exclusively.This handset may contain materials, including
applications and software in executable or source code form, which is submitted
by third parties for inclusion in this handset ("Third Party Materials"). All third
party materials in this handset are provided "as is", without warranty of any kind,
whether express or implied, including the implied warranties of merchantability,
fitness for a particular purpose or use/third party application, interoperability
with other materials or applications of the purchaser and non-infringement of
copyright. The purchaser undertakes that TCL Communication has complied with
all quality obligations incumbent upon it as a manufacturer of mobile devices and
handsets in complying with Intellectual Property rights. TCL Communication will
at no stage be responsible for the inability or failure of the Third Party Materials to
operate on this handset or in interaction with any other devices of the purchaser.
To the maximum extent permitted by law, TCL Communication disclaims
all liability for any claims, demands, suits or actions, and more specifically
but not limited to tort law actions, under any theory of liability, arising out
of the use, by whatever means, or attempts to use, such Third Party Materials.
Moreover, the present Third Party Materials, which are provided free of charge
by TCL Communication, may be subject to paid updates and upgrades in the
future; TCL Communication waives any responsibility regarding such additional
costs, which shall be borne exclusively by the purchaser. The availability of the
applications may vary depending on the countries and the operators where
the handset is used; in no event shall the list of possible applications and
software provided with the handsets be considered as an undertaking from
TCL Communication; it shall remain merely as information for the purchaser.
Therefore, TCL Communication shall not be held responsible for the lack
of availability of one or more applications wished for by the purchaser, as
its availability depends on the country and the operator of the purchaser.
TCL Communication reserves the right at any time to add or remove Third
Party Materials from its handsets without prior notice; in no event shall TCL
Communication be held responsible by the purchaser for any consequences that
such removal may have on the purchaser regarding the use or attempt to use
such applications and Third Party Materials.
19
1
Your mobile ���������������������������������
1�1 Keys and connectors
alcatel IDOL 4:
Microphone
Bottom microphone
Sensor
Micro-USB connector
Front camera
Headset connector
LED indicator/
Front flashlight
Home key
Touch screen
Boom Key
Back key
Overview key
Speaker
Speaker
20
Camera
Camera Flash/Flashlight
Volume key
Boom key
Power key
NFC antenna
SIM card slot/
microSD card
slot
21
alcatel IDOL 4S:
Microphone
Bottom microphone
Sensor
Micro-USB
connector
Front camera
Headset connector
LED indicator
Front flashlight
Home key
Touch screen
Boom Key
Back key
Overview key
Speaker
Speaker
22
Camera
Camera Flash/Flashlight
Volume key
Boom key
Power key
SIM card
slot/microSD
card slot
23
Boom Key
Boom Key settings are available at: Settings\Boom Key.
If Boom Key is enabled,
•From Home screen, press the key to show weather effect.
•Press the key to instantly take a photo when your phone
is locked.
•Press and hold the key to take burst shot when your phone
is locked.
•Press the key to trigger audio effect when a song or movie
is played.
•Press the key to enhance voice quality during a call.
•Press the key from Gallery Moments to create a photo
collage.
•Press the key to trigger special effect such as sequence
change when a movie is played.
•You can also customise the Boom Key function. For
example, enable screenshot taking or application running
by pressing the Boom Key when the screen is locked.
•When phone is locked (display off):
- press to screen-on;
- double press to instant shot (800ms);
- long press to continuously shot.
Overview key
•Touch to switch between individual app activities and
documents.
Home key
•From any application or screen, touch to return to the
Home screen.
•Long press to turn on Google Now. You can get help such
as getting directions and restaurant information based on
the content detected on the screen.
24
Back key
•Touch to go back to the previous screen, or close a dialog
box, options menu, the notification panel, etc.
Power key
•Press: Lock the screen/Light up the screen.
•Press and hold: Show the popup menu to select from
Power off/Restart/Aeroplane mode.
•Press and hold the Power key and Volume up key to reset.
•Press and hold the Power key and Volume down key to
make a screenshot.
•Press and hold the Power key for at least 10 seconds to
force reboot.
Volume Keys
•In call mode, adjusts the earpiece or headset volume.
•In Music/Video/Streaming mode, adjusts the media
volume.
•In general mode, adjusts the ringtone volume.
•Mutes the ringtone of an incoming call.
•In camera preview mode, press Volume up or down key to
take a photo or press and hold to make burst shoot.
25
1�2 Getting started
1�2�1 Set up
Inserting or removing the SIM/microSD card
You must insert your SIM card to make phone calls. You do not need
to power off your phone before inserting or removing the SIM card as
this phone supports hot swap.
Your phone only supports nano-SIM cards. Do not attempt to
insert other SIM types like mini and micro cards; otherwise this
may cause damage to your phone.
Charging the battery
You are advised to fully charge the battery ( ). Charging status is
indicated by a percentage displayed on screen while the phone is
powered off. The percentage increases as the phone is charged.
To reduce power consumption and energy waste when the
battery is fully charged, disconnect your charger from the plug;
switch off Wi-Fi, GPS, Bluetooth or background-running
applications when not in use; reduce the backlight time, etc.
1�2�2 Power on your phone
Hold down the Power key until the phone powers on, unlock your
phone (Swipe, PIN, Password or Pattern) if necessary and confirm. The
Home screen is displayed.
If you do not know your PIN code or forget it, contact your network
operator. Be sure to keep your PIN code well.
26
1�2�3 Power off your phone
Hold down the Power key until options appear, select Power off.
1�3 Home screen
You can bring all the items (applications, shortcuts, folders and widgets)
you love or use most frequently to your Home screen for quick access.
Touch the Home key to switch to the Home screen.
Touch to enter the applications list.
Status bar
•Status/Notification indicators
•Touch and drag down to
open the notification panel.
Touch an icon to open an
application, folder, etc.
Favourite tray applications
•Touch to enter the application.
•Long press to move or remove applications.
Search bar
•Touch to enter text search screen.
•Touch to enter voice search screen.
The Home screen is provided in an extended format to allow more
space for adding applications, shortcuts etc. Slide the Home screen
horizontally left and right to get a complete view.
Reversible screen
The phone supports the reversible function. From the Home screen,
touch to open the applications list, then touch Settings\Display\
Reversible. Switch the toggle to enable the function.
27
1�3�1 Using the touchscreen
Touch
To access an application, touch it with your finger.
Long press
To enter the available options for an item, long press the item. For
example, select a contact in Contacts, long press this contact, an
options list will appear.
Drag
Place your finger on the screen to drag an object to another location.
Slide/Swipe
Slide the screen to scroll up and down the applications, images, and
web pages. You can slide the screen horizontally too.
The device also supports one finger zooming in the Camera and
Gallery functions. Double touch the screen to zoom in/out.
Flick
Similar to swiping, but flicking makes it move quicker.
Pinch/Spread
Place two fingers on the screen surface and draw them apart or
together to scale an element on the screen.
28
Rotate
Automatically change the screen orientation from portrait to landscape
by turning the phone sideways to have a better screen view.
1�3�2 Status bar
From the status bar, you can view both phone status (on the right side)
and notification information (on the left side).
Drag down the status bar to view notifications and drag again to enter
the quick settings panel.
Touch and drag up to close it. When there are notifications, you can
touch them to access notifications.
Notification panel
When there are notifications, touch and drag down the Status bar to
open the Notification panel to read more detailed information.
Touch to clear all event–based notifications
(other ongoing notifications will remain).
Touch to switch to the quick settings panel.
29
Quick settings panel
Touch and drag down the Notification panel or touch to open the
Quick settings panel. You can enable or disable functions or change
modes by touching the icons. Touch the icon to customise your
Quick settings panel.
Touch to enter user screen to edit and
save owner's name, phone number,
and other information.
Touch to customise your Quick settings panel.
Touch to access Settings, where you can
set more items.
1�3�3 Search bar
The phone provides a Search function which can be used to locate
information within applications, the phone or the web.
30
Search by text
• Touch the Search bar from the Home screen.
•Enter the text/phrase you want to search for.
•Touch the icon on the keyboard if you want to search on the web.
Search by voice
•Touch from the Search bar to display a dialog screen.
•Speak the word/phrase you want to search for. A list of search
results will display for you to select from.
1�3�4 Lock/Unlock your screen
To protect your phone and privacy, you can lock the phone screen by
choosing slide or creating a pattern, PIN or password, etc.
To create a screen unlock pattern
•From the Home screen, touch to open the applications list, then
touch Settings\Lock screen\Screen lock\Pattern.
•Draw your own pattern.
31
To lock phone screen
Press the Power key once to lock the screen.
To unlock the phone screen
Press the Power key once to light up the screen, slide to draw the
unlock pattern you have created or enter your PIN or password, etc.
to unlock the screen.
If you have chosen Swipe as the screen lock, you can press the Power
key to light up the screen, then swipe up to unlock the screen, swipe
the camera icon left to enter Camera or swipe the Voice search icon
right to enter Voice search.
Swipe right to
enter Voice search
Double touch to enter
the detailed screen
Swipe left to
enter Camera
Swipe up to
unlock the screen
1�3�5 Personalise your Home screen
Add
You can long press a folder, an application or a widget to activate the
Move mode, and drag the item to your preferred Home screen.
32
Reposition
Long press the item to be repositioned to activate the Move mode,
drag the item to the desired position and then release. You can move
items both on the Home screen and the Favourite tray. Hold the icon
on the left or right edge of the screen to drag the item to another
Home screen.
Remove
Long press the item to be removed to activate the Move mode, drag
the item up to the top of the X icon, and release after the item turns
red.
Create folders
To improve the organisation of items (shortcuts or applications) on the
Home screen and the Favourite tray, you can add them to a folder by
stacking one item on top of another. To rename a folder, open it and
touch the folder’s title bar to input the new name.
Wallpaper customisation
Long press the empty area in the Home screen, then touch
WALLPAPERS to customise wallpaper.
1�3�6 Widgets and recently-used applications
Consult widgets
Long press the empty area in the Home screen, then touch WIDGETS
to display all widgets.
Touch the selected widget and slide it to move to your preferred
screen.
33
Consult recently-used applications
To consult recently-used applications, touch the Overview key. Touch
a thumbnail in the window to open the application.
Touch one thumbnail and slide it right/left or touch X to close the
application.
Touch at the bottom of the screen to close all the running
applications.
1�3�7 Volume adjustment
Using the volume key
Press the Volume key to adjust the volume. To activate the vibrate
mode, press the Volume down key until the phone vibrates.
Using the settings menu
From the Home screen, touch to open the applications list, then
touch Settings\Sound & notification\Sound to set the volume of
media, ringtone, alarm, etc. to your preference.
34
2
Boom Key ������������������������������������
Boom Key settings are available at: Settings\Boom Key.
If Boom Key is enabled,
•From Home screen, press the key to show weather effect.
•Press the key to instantly take a photo when your phone is locked.
•Press and hold the key to take burst shot when your phone is locked.
•Press the key to trigger audio effect when a song or movie is played.
•Press the key to enhance voice quality during a call.
•Press the key from Gallery Moments to create a photo collage.
•Press the key to trigger special effect such as sequence change when
a movie is played.
•You can also customise the Boom Key function. For example, enable
screenshot taking or application running by pressing the Boom Key
when the screen is locked.
•When phone is locked (display off):
- press to screen-on;
- double press to instant shot (800ms);
- long press to continuously shot.
35
3
Text input ������������������������������������
3�1 Using the Onscreen Keyboard
Onscreen Keyboard settings
Touch Settings\Language & input, touch the keyboard you want to set
up and a series of settings will become available.
Adjust the Onscreen Keyboard orientation
Turn the phone sideways or upright to adjust the onscreen keyboard
orientation. You can adjust it by changing the settings (Touch Settings\
Display\Auto-rotate screen). Also your phone screen is reversible.
(Touch Settings\Display\Reversible).
3�1�1 Android keyboard
Touch to switch
between symbol and
numeric keyboard.
Long press to
select symbols.
Touch to enter text
or numbers.
Long press to show input options.
Touch to switch between
"abc/Abc" mode;
Long press to switch to
"abc/ABC" mode.
36
3�2 Text editing
You can edit the texts you entered.
•Long press or double touch within the texts you want to edit.
•Drag the tabs to change the checked texts.
•The following options will show: SELECT ALL, CUT, COPY and
SHARE.
You can also insert new texts if preferred
•Touch where you want to type, or long press the blank, the cursor will
blink and the tab will show. Drag the tab to move the cursor.
•If you have cut or copied any text, touch the tab to show the PASTE
icon which allows you to complete pasting immediately.
37
4
Call, Call log and Contacts ������
4�1 Call ������������������������������������������������������������������������
4�1�1 Making a call
You can launch a call by using Call. Touch the icon on the Home
screen to access the Call application.
Touch to enter the contact
details screen. You can
choose to edit, delete,
share the contact, or send
a message to the contact.
Touch to call
the previewed
number.
Slide to access
the RECENTS
and CONTACTS.
Touch to display keyboard.
Display the
suggested number(s).
Long press to
access voicemail.
38
Enter the desired number from the keyboard and touch to place
the call or select a contact from CONTACTS or RECENTS by sliding or
touching tabs, then to make the call.
The number you entered can be saved to Contacts by touching
and then touching Create new contact.
If you make a mistake, you can delete the incorrect digits by touching
.
To hang up a call, touch .
International call
To dial an international call, long press to enter “+”, then enter the
international country prefix followed by the full phone number and
touch .
Emergency call
If your phone has network coverage, dial the emergency number and
touch to make an emergency call. This works even without a SIM
card and without typing the PIN code.
39
4�1�2 Answering or rejecting a call
When you receive a call:
•Slide the icon to the right to answer;
•Slide the icon to the left to reject;
•Slide the icon upwards to reject the call by sending a preset
message.
To mute the ringtone volume of an incoming call, press the Volume
up/down key, or turn the phone over (when the Settings\Gestures\
Turn over to mute option is activated).
For your convenience, your phone features a unique Reversible
UI, which ensures functionality, including normal call, even the
phone is held in reverse (upside-down) position.
40
4�1�3 Calling your voicemail
Your voicemail is provided by your network to avoid missing calls. It
works like an answering machine that you can consult at any time.
To access your voicemail, long press .
To set your voicemail number: Long press , then touch ADD
NUMBER\Voicemail\Setup\Voicemail number.
If you receive a voicemail, a voicemail icon appears on the Status
bar. Open the Notification panel and touch New voicemail.
4�1�4 During a call
To adjust the volume during a call, press the Volume up/down key.
41
Touch to end the current call.
Touch to activate the speaker during the current call.
Touch this icon again to deactivate the speaker.
Touch to mute the current call. Touch this icon again to
unmute the call.
Touch to display the Dial pad.
Touch to hold the current call. Touch this icon again to
retrieve the call.
Touch to add a call.
To avoid accidental operation of the touchscreen during a call,
the screen will be locked automatically when you put the
cellphone close to your ear; and it will be unlocked when the
cellphone is taken away from your ear.
4�1�5 Managing multiple calls
With this phone you can handle multiple calls at the same time.
Swap calls
When you accept two calls, touch the icon, you can now switch
between two lines. The current call will be put on hold and you are
able to join the other call.
42
Conference calls
(1)
You can set up a conference call as follows.
•Place a call to the first participant of the conference call.
•Touch the icon .
•Then touch the icon and then touch the icon to start the
conference.
•Touch to end the conference call and disconnect all callers.
4�1�6 Call settings
Touch from the Call screen, then touch Settings. The following
options are available:
Display options
•Sort by: Touch to sort the list by the first name or last name.
•Name format: Touch to choose whether to display first name first,
or last name first.
Sounds and vibrate
Touch to set incoming call ringtone, and mark the checkbox to enable
dial pad tones or vibrate for calls.
Quick response
Touch to edit quick response.
(1)
Depending on your network operator.
43
Calling accounts
•Dual call settings: select SIM 1 or SIM 2 to set under options.
(1)
- Voicemail
Service: Opens a dialog box where you can select your operator’s
voicemail service or another service.
Setup: If you are using your operator’s voicemail service, this opens
a dialog box where you can enter the phone number to use for
listening to and managing your voicemail. You can enter a comma (,)
to insert a pause into the number — for example, to add a password
after the phone number.
Sound: Touch to set the sound when a new voicemail arrives.
Vibrate: Mark the checkbox to enable vibration when a new
voicemail arrives.
- Fixed Dialling Numbers
Fixed dialling number (FDN) is a SIM service mode, where outgoing
calls are restricted to a set of phone numbers. These numbers are
added to the FDN list. The most common practical application of
FDN is for parents to restrict the phone numbers to which their
children can dial. For security reasons, you’ll be prompted to enable
FDN by entering SIM PIN2 which is usually acquired from your
service provider or SIM maker.
- Vibration reminder
Touch the switch to enable vibrate when call connects.
- Service Dialling Numbers
You can place a call from the SDN list.
- Turn on video calling
Mark the checkbox to enable video calling.
(1)
Only for 6055K, 6070K
44
- GSM call settings
Call forwarding: Touch to configure how your calls are forwarded
when you are busy, unanswered or unreachable.
Additional settings: Touch Caller ID to use default operator
settings to display your number in outgoing calls. Mark the Call
waiting check box to notify you of new incoming calls during a call.
Call barring: Touch to configure Call barring settings. Mark the
checkbox to activate the call barring for outgoing and incoming
calls.
Accessibility
Switch the toggle to enable hearing aids.
4�2 Call log
You can access your call memory by touching RECENTS tab from
the Call screen to view Missed calls, Outgoing calls and Incoming calls.
Touch a contact or number to view information or further operations,
you can launch a new call, send SMS to the contact or number, view
detailed information of the call, or clear the call.
Touch View full call history to view all call log, touch and Clear call
log to clear the entire call memory.
45
4�3 Contacts ��������������������������������������������������������������
Contacts enables quick and easy access to the contact you want to
reach.
You can view and create contacts on your phone and synchronise
these with your Gmail contacts or other applications on the web or
on your phone.
4�3�1 Consult your Contacts
To see your contacts, touch from the Home screen, then select
Contacts.
Touch to add new contact.
Touch to open Quick
Contact panel.
Touch to view
your favourites.
Long press to select
the current contact or
all contacts to delete.
Touch to search
in Contacts
46
Delete a contact
To delete a contact, long press the contact you want to delete, the
icon will turn to , then touch and confirm to delete. Touch
to select all contacts, then touch and confirm to delete all contacts.
The contact you have deleted will also be removed from other
applications on the phone or web the next time you synchronise
your phone.
Touch to display the contacts list option menu, following actions
are enabled:
•Contacts to
display
Choose contacts to display.
•Merge contacts
Select duplicate contacts to merge.
•Import/Export
Import or export contacts between phone, SIM
card, microSD card and phone storage.
•Blocked contacts
Touch to view your blocked contacts. You can
also unblock them.
•Accounts
Manage the synchronisation settings for different
accounts.
•Settings
Touch to change the display of the sort list and
contact names.
4�3�2 Adding a contact
Touch in the contact list to create a new contact.
You are required to enter the contact's name and other contact
information. By scrolling up and down the screen, you can move from
one field to another.
47
Touch to select a picture or
take a photo for the contact.
Touch to save.
Touch to select Phone, account, or SIM card.
Touch to add organisation.
Touch to add detailed name information.
Touch to add a number.
When finished, touch to save.
To exit without saving, you can touch and then touch Discard
changes.
Add to/remove from Favourites
(1)
To add a contact to favourites, you can touch a contact to view details
then touch to add the contact to favourites (the star will turn
white).
To remove a contact from favourites, touch the white star on the
contact details screen.
4�3�3 Editing your contacts
To edit contact information, touch in the contact details screen
to edit.
When finished, touch to save.
(1)
Only phone contacts can be added to Favourites.
48
4�3�4 Use Quick contact for Android
Touch a contact to open Quick contact for Android, then you can
touch or the number to make a call, touch to send a message.
The icons available on the Quick contact panel depend on the
information you have for the contact and the applications and
accounts on your phone.
4�3�5 Importing, exporting and sharing contacts
This phone enables you to import or export contacts between your
phone, SIM card and phone storage.
From the Contacts screen, touch to open the options menu, touch
Import/Export, then select Import/from SIM card, from SD storage,
from phone, Export/to SIM card, to SD storage, to phone storage or
Share visible contacts.
You can share a single contact or contacts with others by sending the
contact's vCard to them via Bluetooth, Gmail, etc.
49
Touch a contact you want to share, touch the icon and Share from
the contact details screen. Select the number you want to share and
touch the icon, and then select the application to perform this
action.
4�3�6 Displaying contacts
You can configure which list of contacts, for each account, you want
to display in the Contacts list. Touch and touch Contacts to display
from contacts list screen, then you can choose which contacts to
display.
Touch and Settings to sort the list by the given name or family
name, as well as viewing contact names by given/family name first.
4�3�7 Joining/Separating contacts
(1)
To avoid duplication, you can add any new contact information to
existing contacts in a single action.
Touch the contact which you want to add information to, touch to
enter edit contact screen, then touch again and touch Join.
At this time, you are required to select the contact whose information
you want to join with the first contact. The information from the
second contact is added to the first one, and the second contact will
no longer be displayed in the Contacts list.
To separate contact information, touch the contact whose information
you want to separate, touch to enter edit contact screen, then
touch again and touch Separate, touch OK to confirm.
(1)
Only applicable for phone contacts.
50
4�3�8 Accounts
Contacts, data or other information can be synchronised from multiple
accounts, depending on the applications installed on your phone.
To add an account, touch from the contacts list and touch
Accounts\ Add account, or from the home screen, touch then
Settings\Accounts\Add account.
You are required to select the kind of account you are adding, like
Google, Corporate, etc.
As with other account setup, you need to enter detailed information,
like username, password, etc.
You can remove an account to delete it and all associated information
from the phone. Touch the account you want to delete, touch and
select Remove account, then confirm.
Turn on/off the auto-sync
In the Accounts screen, touch and mark the Auto-sync data
checkbox. When activated, all changes to information on the phone or
online will be automatically synchronised with each other.
51
5
Messaging and Email ����������������
5�1 Messaging ������������������������������������������������������������
You can create, edit and receive SMS and MMS with this phone.
To send a message, touch from the Home screen then select
Messaging.
5�1�1 Write message
On the message list screen, touch the new message icon to write
text/multimedia messages.
Touch to create a new message.
•Touch to view the whole message thread.
•Long press to activate delete mode.
For saved contacts, touch the photo to open the Quick contact
panel to communicate with the contact. For unsaved contacts,
touch the photo to add the number to your Contacts�
52
Sending a text message
Enter the mobile phone number of the recipient in the To bar or touch
to add recipients. Touch the Send message bar to enter the text of
the message. Touch the icon to insert emoticons. When finished,
touch to send the text message.
An SMS message of more than 160 characters will be charged as
several SMS. A counter will be on the right of the text box to remind
you how many characters are allowed to be entered in one message.
Specific letters (accented) will also increase the size of the SMS,
this may cause multiple SMS to be sent to your recipient.
Sending a multimedia message
MMS enables you to send video clips, images, photos, animations,
slides and sounds to other compatible mobiles and e-mail addresses.
An SMS will be converted to MMS automatically when media files
(image, video, audio, slides, etc.) are attached or subject or email
addresses are added.
To send a multimedia message, enter the recipient's phone number in
the To bar and touch the Send message bar to enter the text of the
message. Touch to open the options menu, touch Add subject to
insert a subject. Touch the icon to attach a picture, video, audio
and so on.
When finished, touch to send the multimedia message.
5�1�2 Manage messages
When receiving a message, an icon will appear on the status bar as
a notification. Drag down the status bar to open the Notification panel,
touch the new message to open and read it. You can also access the
Messaging application and touch the message to open it.
Messages are displayed in conversational order.
53
Touch a message to enter the message composing screen:
•Touch to call the number;
•Touch to save the number to contacts or view the contact details
if the number has been saved;
•To reply to a message, enter the text, or touch to insert quick text,
contact etc., after edit then touch .
•Long press a message to show the following icons: copy text
, forward , view details , delete etc., touch to save the
message to SIM card.
5�1�3 Adjust message settings
You can adjust a range of message settings. From the Messaging
application screen, touch and touch Settings.
GENERAL
•SMS enable
Touch to change your default SMS app.
•Quick text
Touch to edit quick response text.
Storage
•Delete old
messages
Select to delete old messages when the
maximum number of stored messages is
reached.
•Text message limit
Touch to set the maximum number of text
messages to be saved per conversation.
•Multimedia
message limit
Touch to set the maximum number
of multimedia messages to be saved per
conversation.
54
Notifications
•Notifications
Select to display message notifications in the
status bar.
•Select ringtone
Touch to select a ringtone as a new message
notification tone.
•Vibrate
Select to have phone vibrate as a notification
when receiving a new message.
WAP message settings
•WAP message
enable
Touch to enable receipt of push messages
from network.
Cell Broadcast settings
•Cell broadcast
Mark the checkbox to enable receipt of cell
broadcast messages.
•Select CB ringtone
Touch to select CB ringtone when receiving
cell broadcast messages.
•Enable CB LED
indicator
Mark the checkbox to enable CB LED indicator.
•Enable light up
screen
Mark the checkbox to light up the screen
when receiving new cell broadcast.
•Vibrate
Select to have phone vibrate as a notification
when receiving a new message.
•Cell broadcast
settings
Touch to select channels and configure
languages.
•Emergency alerts
Touch to enter emergency alert settings,
including whether to show threats and alert
tones.
55
ADVANCED
Text message (SMS) settings
•Delivery reports
Select to request a delivery report for each
text message you send.
•Manage SIM
messages
Touch to manage text messages stored on
your SIM card.
•SMS Service Centre
Touch to edit or view the service centre
number.
•Validity period
Touch to select the validity period, during
which the network provider will continue to
try to send the message.
•Alphabet
management
Touch to select the Alphabet mode.
•SMS signature
Mark the checkbox to add the signature to the
messages you sent.
Multimedia message (MMS) settings
•Delivery reports
Select to request a delivery report for each
multimedia message you send.
•Read reports
Select to request a report on whether each
recipient has read a multimedia message sent
by you.
•Auto-retrieve
Select to download the full MMS message
(including message body and attachment)
automatically to your phone. Otherwise,
download only the MMS message header.
56
•Roaming auto-
retrieve
Select to download the full MMS message
(including message body and attachment)
automatically when roaming. Otherwise,
download only the MMS message header to
avoid extra charges.
•Creation mode
Select to change creation mode.
•Maximum message
size
Select to input the maximum message size.
•Priority
Touch to set the priority.
5�2 Email ��������������������������������������������������������������������
The first time you set up your phone, you can select to use an existing
Email or to create a new Email account.
You can also set up external POP3 or IMAP email accounts in your
phone.
To set up your email account, touch from the Home screen, then
select Email.
An email wizard will guide you through the steps to set up an email
account.
•Enter the email address and password of the account you want to
set up.
•Touch Next. If the account you entered is not provided by your
service provider in the phone, you will be prompted to go to the email
account settings screen to enter settings manually. Alternatively, you
can touch Manual setup to directly enter the incoming and outgoing
settings for the email account you are setting up.
•Enter the account name and display name in outgoing emails.
57
•To add another email account, you can touch the icon on the
upper left corner and select Settings. And then touch Add account.
To create and send emails
•Touch the icon from the Inbox screen.
•Enter recipient(s) email address(es) in the To field.
•If necessary, touch Cc/Bcc to add a copy or a blind carbon copy to
the message.
•Enter the subject and the content of the message.
•Touch to add an attachment.
•If you do not want to send the mail right away, you can touch and
Save draft or touch the Back key to save a copy.
•Touch to send.
If you do not want to send or save the email, you can touch and
then select Discard.
To add a signature to your emails, touch and select Settings, then
choose the account where you want to create or modify the signature,
touch Signature to edit.
58
6
Calendar & Time & Calculator
6�1 Calendar ������������������������������������������������������������
(1)
Use the Calendar to keep track of important meetings, appointments,
etc.
To view the calendar and create events, touch from the Home
screen, then touch Calendar.
6�1�1 Multimode view
You can display the Calendar by Schedule, Day, 3-day, Week, or
Month.
Day view
Schedule view
Week view
Month
view
3-day view
(1)
The icon will vary with date.
59
6�1�2 To create new events
You can add new events from any Calendar view.
•Touch to access a new event edit screen.
•Fill in all required information for this new event. If it is a whole-day
event, you can select All-day.
•Invite guests to the event. Enter the email addresses of the guests
you want to invite with commas to separate. The guests will receive
an invitation from Calendar and Email.
•When finished, touch SAVE from the top of the screen.
To quickly create an event from the Week view screens, touch an
empty spot to select a target area which will then turn , and touch
the icon to create the new event.
6�1�3 To delete or edit an event
To delete or edit an event, touch the event to enter its details screen,
touch the icon to edit the event, and touch DELETE to delete.
6�1�4 Event reminder
If a reminder is set for an event, the upcoming event icon will
appear on the Status bar as a notification when the reminder time
arrives.
Touch and drag down the status bar to open the notification panel,
touch an event name to view the Calendar notification list.
Touch the Back key to keep the reminders pending in the status bar
and the notification panel.
60
6�2 Clock �������������������������������������������������������������������
Your mobile phone has a built-in clock.
To view the current time, touch from the Home screen, then touch
Clock.
6�2�1 World clock
To view the world clock, touch on the Time screen.
Touch the icon to add a time zone.
6�2�2 Alarm
From the Time screen, touch to enter the Alarm screen.
Touch the switch to enable the alarm.
Touch to add a new alarm, the following options will appear:
•Time
Touch to set the alarm time.
•Repeat
Touch to select the days when you want the alarm to
work.
•Ringtone
Touch to select a ringtone for the alarm.
•Vibrate
Select to activate vibration.
•Label
Touch to set a name for the alarm.
Touch a currently existing alarm to enter the alarm editing screen.
Touch then touch to delete the selected alarm.
61
6�2�3 Countdown
From the Time screen, touch to enter the Countdown screen.
•Enter the time. The time should be typed in second, minute and hour
number sequence.
•Touch icon to activate Countdown.
•Touch the icon to set the countdown time in panel.
•Touch icon to deactivate Countdown.
•Touch icon to delete current countdown label.
6�2�4 Timer
From the Time screen, touch to enter the Timer screen.
•Touch to activate the timer.
•Touch to show a list of records according to the updated time.
•Touch to halt the total and lap times. These will only restart after
is touched.
•Touch to delete the record.
•Touch to share.
62
6�2�5 Adjust Clock settings
Touch the icon and then Settings, the following options can now
be adjusted:
•Style
Touch to set the clock style to Analogue or
Digital.
•Automatic home
clock
Mark the checkbox to enable the function
when travelling in an area where the time is
different, add a clock for home.
•Home time zone
Touch to set Home time zone.
•Change Date &
time
Touch to enable automatic data & time, or
change time manually.
•Silence after
Touch to set a temporary turn off time for an
alarm.
•Snooze length
Touch to set the duration of alarms.
•Alarm volume
Touch to set alarm volume.
•Gradually increase
volume
Touch to select the duration after which
the alarm volume increases, or disable this
function.
•Volume buttons Touch to set side Volume up/down key
behaviours when alarm sounds: None, Snooze
or Dismiss.
•Start week on
Touch to choose the start of a week.
•Timer ringtone
Touch to select the timer ringtone.
63
6�3 Calculator ������������������������������������������������������������
With the Calculator, you can solve many mathematical problems.
To use the calculator, touch from the Home screen, then touch
Calculator.
There are two panels available: Basic panel and Advanced panel.
To switch between panels, turn the device to the landscape mode from
the basic panel or swipe left to open the Advanced panel
(1)
.
Enter a number and the arithmetic operation to be performed, enter
the second number, then touch “=” to display the result. Touch
to delete digits one by one, long press to delete all at one time.
(1)
If Settings\Display\When device is rotated\Rotate screen contents is
enabled, this item will display.
64
7
Getting connected ��������������������
To connect to the internet with this phone, you can use GPRS/
EDGE/3G/4G networks or Wi-Fi, whichever is most convenient.
7�1 Connecting to the Internet
7�1�1 GPRS/EDGE/3G/4G
The first time you turn on your phone with your SIM card inserted, it
will automatically configure your network service: GPRS, EDGE , 3G
or 4G.
To check the network connection you are using, touch Settings\More\
Mobile networks\Access Point Names or Network operators.
To create a new access point
A new GPRS/EDGE/3G/4G network connection can be added to your
phone with the following steps:
•Touch Settings\More\Mobile networks\Access Point Names.
•Then touch the icon to enter the required APN information.
•When finished, touch the key and touch Save.
To activate/deactivate Data roaming
When roaming, you can decide to connect/disconnect to a data
service.
•Touch Settings\More\Mobile networks.
•Switch the toggle to activate data roaming.
•When Data roaming is disabled, you can still perform data exchange
with a Wi-Fi connection (refer to “7�1�2 Wi-Fi”).
65
To set preferred network mode
•Touch Settings\More\Mobile networks\Preferred network mode.
7�1�2 Wi-Fi
Using Wi-Fi, you can connect to the Internet when your phone is
within range of a wireless network. Wi-Fi can be used on your phone
even without a SIM card inserted.
To turn Wi-Fi on and connect to a wireless network
•Touch Settings\Wi-Fi.
•Touch the switch to turn on/off Wi-Fi.
•Once Wi-Fi is on, the detailed information of detected Wi-Fi
networks is displayed.
•Touch a Wi-Fi network to connect to it. If the network you selected
is secured, you are required to enter a password or other credentials
(you may contact the network operator for details). When finished,
touch Connect.
To activate notification when a new network is detected
When Wi-Fi is on and the network notification is activated, the Wi-Fi
icon will appear on the status bar whenever the phone detects an
available wireless network within range. The following steps activate
the notification function when Wi-Fi is on:
•Touch Settings.
•Touch Wi-Fi, then touch the icon and Advanced from the Wi-Fi
screen.
•Switch to toggle beside Network notification to activate/deactivate
this function.
66
To add a Wi-Fi network
When Wi-Fi is on, you may add new Wi-Fi networks according to your
preference.
•Touch Settings.
•Touch Wi-Fi, then touch the icon and Add network from the
Wi-Fi screen.
•Enter the name of the network and any required network information.
•Touch SAVE.
To forget a Wi-Fi network
The following steps prevent automatic connections to networks which
you no longer wish to use.
•Turn on Wi-Fi, if it’s not already on.
•In the Wi-Fi screen, touch the name of the saved network.
•Touch FORGET in the dialog that opens.
7�2 Browser
(1)
�������������������������������������������������������������
Using the Browser, you can enjoy surfing the Web.
To surf the web, touch from the Home screen, then touch Browser.
To go to a web page
On the Browser screen, touch the URL bar at the top, enter the
address of the web page, then confirm.
(1)
Only for alcatel IDOL 4
67
Touch to delete all contents
Touch to search and go to this address
Touch to go to the suggested web site
To set a homepage
•Touch the icon from Browser screen to display option menu, touch
Settings\Homepage.
•Choose a page or most visited website as your homepage.
•If you choose Other, enter the URL of the website you want to set
as your homepage, touch OK to confirm.
Viewing web pages
When opening a website, you can navigate on web pages by sliding
your finger on the screen in any direction to locate the information
you want to view.
68
To find text on a web page
•Touch the icon from Browser screen to display option menu, and
touch Find on page.
•Enter the text or phrase you want to find.
•The first word with matching characters will be highlighted on the
screen, and subsequent matches will be boxed.
•Touch the up or down arrow to switch to the previous or next
matching items.
•When finished, you can touch the Back key to close the search bar.
Further operations for the text on a web page
You can copy, share or search the text from a web page:
•Long press the text to highlight the text.
•Move two tabs to select the text.
•Touch the icon to show further actions, including share and search
on the page or the web.
•When finished, touch the Back key to deactivate the mode.
To open new window/switch between windows
Multiple windows can be opened at the same time for your convenience.
•Touch to open all windows' thumbnails.
•Slide up and down to view all windows, touch one to view it.
•Touch to open a new window.
•Touch icon and to open a window without any trace.
•To close a window, touch on the window you want to close or
slide it sideways.
69
Other options:
•
To refresh the current page.
•
To forward the pages you have opened.
•Bookmarks
To see the bookmarks and browsing history.
•
To add the current website page as a bookmark.
•History
To view your browsing history.
•Share page
To share the current page with your friends
in various ways, e.g. via Messaging, Email,
Bluetooth, etc.
•Find on page
To input contents you want to find on the
current page.
•Request desktop
site
To enable/disable computer version websites.
•Save for offline
reading
To save the web page for offline reading. You
can find it by touching the Menu key, then
Bookmarks\SAVED PAGES.
•Exit
To close all tabs and exit.
By touching the icon on the left of the URL, you can view more
information about the current page.
70
7�2�1 Manage links, history, downloads
To manage a link, phone number or address displayed on a web page
•Link
Touch the link to open the web page.
Long press the link to open options for further
operation, like open in new window, save link,
share link, copy link, etc.
•Phone number
Touch to call the phone number.
•Address
Touch to open Google Maps and locate the
address.
To download a web application/view your downloads
Before downloading a web application, you need to enable your
phone to install web applications (Touch Settings\Security, enable the
Unknown sources by switching the toggle).
To download an item, touch the item or the link you want to download.
To cancel a download, touch the downloaded item from the Notification
panel, select the item to be cancelled, and touch to confirm.
To view items you have downloaded, touch , then touch the
application Downloads.
7�2�2 Manage bookmarks
To bookmark a web page
•Open the web page you want to bookmark.
•Touch the icon and .
•Enter the name and the location if needed and touch OK to confirm.
71
To open a bookmark
•Touch the icon and Bookmarks.
•Touch the bookmark you want to open.
•You can also long press to display the options screen, then touch
Open or Open in new tab.
To edit a bookmark
•Touch the icon and Bookmarks.
•Long press the bookmark you want to edit.
•Touch Edit bookmark, and enter your changes.
•When finished, touch OK to confirm.
Long press a bookmark in the bookmark list to view these additional
options:
•Add shortcut to
home
To add a bookmark shortcut to the Home
screen.
•Share link
To share the bookmark.
•Copy link URL
To copy the bookmark link.
•Delete bookmark
To delete a bookmark.
•Set as homepage
To set this page as the homepage.
72
7�2�3 Settings
A series of settings are available for your adjustment. To access
Browser settings, touch the from the Browser screen, and touch
Settings.
General
•Homepage
Touch to set homepage.
•Set search engine
Touch to choose your search engine in the
phone.
•Form auto-fill
Switch the toggle to fill out web forms with a
single touch.
•Auto-fill text
Touch to set up text to auto-fill in web forms.
Advanced
•Privacy & Security
Touch to update the settings related to privacy
and security such as whether to remember
your passwords, enabling "Do not track"
mode, and application permissions.
•Accessibility
Touch to adjust the text size.
•Reset to default
Touch to restore Browser to default settings.
73
7�3 Connecting to Bluetooth devices
(1)
Bluetooth is a short-range wireless communication technology that
you can use to exchange data, or connect to other Bluetooth devices
for various uses.
To exchange data, touch Settings\Bluetooth, your device and other
available ones will show on the screen.
To turn on Bluetooth
•Touch Settings.
•Touch to activate/deactivate this function.
To make your phone more recognisable, you can change your phone's
name which is visible to others.
•Touch Settings\Bluetooth.
•Touch the icon and Rename this device.
•Enter a name, and touch RENAME to confirm.
To pair/connect your phone with a Bluetooth device
To exchange data with another device, you need to turn Bluetooth on
and pair your phone with the Bluetooth device with which you want
to exchange data.
•Touch Settings\Bluetooth.
•Touch and Refresh.
•Touch a Bluetooth device you want to be paired with in the list.
•A dialog will pop up, touch PAIR to confirm.
•If the pairing is successful, your phone connects to the device.
(1)
You are recommended to use alcatel Bluetooth headsets, which have
been tested and proved compatible with your phone. You can go to
www.alcatel-mobile.com for more information about the alcatel Bluetooth
headset.
74
To disconnect/unpair from a Bluetooth device
•Touch the Settings icon beside the device you want to unpair.
•Touch FORGET to confirm.
7�4 Connecting to a computer
With the USB cable, you can transfer media files and other files
between your internal storage and a computer.
To connect your phone to the computer
Use the USB cable that came with your phone to connect the phone
to a USB port on your computer. You will receive a notification that
the USB is connected.
Open the Notification panel and select USB for file transfer.
Before using MTP, make sure that the driver (Windows Media
Player 11 or higher version) has been installed.
To locate the data you have transferred or downloaded in internal
storage, touch Files. All data you have downloaded is stored in Files,
where you can view media files (videos, photos, music and others),
rename files, install applications into your phone, etc.
7�5 Sharing your phone's mobile data connection
You can share your phone's mobile data connection with a single
computer via a USB cable (USB tethering) or with up to eight devices
at once by turning your phone into a portable Wi-Fi hotspot.
The functions below may incur additional network charges
from your network operator. Extra fees may also be charged in
roaming areas.
75
To share your phone's data connection via USB
Use the USB cable that come with your phone to connect the phone
to a USB port on your computer.
•Touch Settings\More\Tethering & portable hotspot.
•Touch the switch beside USB tethering to activate/deactivate this
function.
To share your phone's data connection as a portable Wi-Fi hotspot
•Touch Settings\More\Tethering & portable hotspot.
•Touch the switch beside Portable Wi-Fi hotspot to activate/
deactivate this function.
To rename or secure your portable hotspot
When a Portable Wi-Fi hotspot is activated, you can change the name
of your phone's Wi-Fi network (SSID) and secure its Wi-Fi network.
•Touch Settings\More\Tethering & portable hotspot�
•Touch Set up Wi-Fi hotspot to change the network SSID or set your
network security.
•Touch SAVE.
To play media files on device with Wi-Fi Display feature
You can share your phone’s data such as music and video file with your
TV by enabling the Wi-Fi display.
•Touch Settings\Display\Wi-Fi Display.
•To use Wi-Fi display, you must turn on WI-FI.
76
7�6 Connecting to virtual private networks
Virtual private networks (VPNs) allow you to connect to the resources
inside a secured local network from outside that network. VPNs are
commonly deployed by corporations, schools, and other institutions
so that their users can access local network resources when not inside
that network, or when connected to a wireless network.
To add a VPN
•Touch Settings\More\VPN and then touch .
•In the screen that opens, follow the instructions from your network
administrator to configure each component of the VPN settings.
•Touch SAVE.
The VPN is added to the list on the VPN settings screen.
Before adding a VPN, you should set a PIN code or password
for your phone.
To connect/disconnect VPN
To connect to a VPN:
•Touch Settings\More\VPN.
•VPNs you have added are listed; touch the VPN you want to connect
with.
•In the dialog that opens, enter any requested credentials and touch
CONNECT.
To disconnect:
•Open the Notification panel and touch the notification for the VPN
disconnection.
77
To edit/delete a VPN
To edit a VPN:
•Touch Settings\More\VPN.
•VPNs you have added are listed; touch the icon beside the VPN
you want to edit.
•After editing, touch SAVE.
To delete:
•Touch the icon beside the VPN you want to delete, then touch
FORGET.
7�7 Connecting with devices through NFC
NFC, short for Near Field Communication, is a short-range high
frequency wireless communication technology which enables the
exchange of data between devices over about a 10 centimeter (around
4 inches) distance.
NFC devices can be used in contactless payment systems, similar to
those currently used in credit cards and electronic ticket smartcards,
and allow mobile payment to replace or supplement these systems.
NFC can also be used in social networking situations, such as sharing
contacts, photos, videos or files, and entering multiplayer mobile
games.
To enable NFC function:
•Drag down notification panel and touch to access Settings.
•Touch More and switch on the toggle for NFC to turn on NFC
function. Or drag down notification panel and touch the NFC icon
to turn it on.
78
alcatel IDOL 4:
79
8
Multimedia applications ����������
8�1 Camera/Camcorder ������������������������������������������
Your mobile phone is fitted with a Camera and a Camcorder for taking
photos and shooting videos.
Before using the Camera or Camcorder, be sure to remove the
protective lens cover to avoid it affecting your picture quality.
To take a photo or video, touch from the Home screen and then
touch Camera.
Touch to
update settings
Pinch/spread two
fingers together
to zoom in/out
Touch to switch between
front/back camera
Touch to take a picture
Touch to switch to
Video mode
Touch the screen
to set a focus
Touch to view the
photos or videos
you have taken
Touch to select
flash mode
Slide left or right to change
the camera mode to
Manual, Pano, Auto, etc.
To take a picture
The screen acts as the viewfinder. First, position the object or
landscape in the viewfinder, touch the screen to focus if necessary
and touch the icon to take the picture which will be automatically
saved.
80
To shoot a video
Switch Camera mode to Video mode. First, position the object or
landscape in the viewfinder and touch the icon to start recording.
Touch the icon to stop recording. The video will be automatically
saved.
Further operations when viewing a picture/video you have taken
•Slide left or right to view the photos or videos you have taken.
•Touch the icon then Gmail, Bluetooth, MMS, etc to share the
photo or video.
•Touch the icon or slide down to return to Camera.
8�1�1 Modes and settings
Before taking a photo, slide left or right to change the camera mode.
Back camera shooting mode
•AUTO
Auto mode is turned on.
•PANO
Touch to turn on panorama function. Touch the
shutter button to start taking panoramic photo
and move the phone towards your capture
direction and overlap the two lines. Once the
slots are filled, the photo will be automatically
saved. If the slots are not fully filled, touch the
shutter button again to save the photo.
•MANUAL
Touch to manually set ISO, shutter speed, focal
length, or white balance as your wish.
•SLO-MO
Touch to start recording slow motion videos.
•MICRO-VIDEO
Press and hold to start recording a micro video.
81
Settings
Touch to set under options:
Photo
•Size
Touch to select picture size.
•Grid
Switch the toggle to enable/disable grid view. It
divides the screen into equal parts and helps you
take better photos by making it simple to align
compositional elements to the grid, such as the
horizon or buildings to the lines in the grid.
•Attention sound/
seeker
Switch the toggle to enable/disable the sound.
Video
•Back camera
video
Touch to select the video recording quality.
•EIS
Switch the toggle to enable the Electronic Image
Stabilization (EIS) feature. It helps reduce blurring
associated with the motion of a camera during
exposure.
General
•Storage
Touch to choose the phone or SD card to save
photos.
•GPS tagging
Switch the toggle to activate/deactivate the
function of tagging photos and videos with
your location. This option is available when
GPS location services and wireless network are
switched on.
82
•Shutter sound
Switch the toggle to enable/disable shutter
sound when taking a photo.
•Anti Banding
Touch to adjust camera settings to avoid
banding.
•Reset to factory
settings
Touch and confirm to reset the camera
settings.
8�2 Gallery �����������������������������������������������������������������
Gallery acts as a media player for you to view photos and play videos.
In addition, a set of further operations to pictures and videos are
available for your choice.
To view the photos you have taken, touch from the Home screen,
then touch Gallery.
Touch to select photos
for further operation.
Touch to access your albums.
Touch to select the
items shown in Gallery.
83
To view a picture/play a video
Pictures and videos are displayed by albums in the Gallery.
•Touch an album. All pictures or videos will spread across the screen.
•Touch the picture/video to view or play it.
•Slide left/right to view previous or next pictures/videos.
Working with pictures
You can touch one album, then slide left or right to view the pictures.
Touch a picture you want to work on, touch the icon to delete a
selected one. Touch to share selected ones.
Touch the icon to set them as contact ID or wallpaper, etc.
Touch to access more options.
84
Batch operation
The Gallery provides a multi-select function, so that you can work with
pictures/videos in batches.
Open the main Gallery window or an album, touch and touch Select
item to activate batch operation mode (you can also touch and hold
one album/picture), then touch videos/pictures you want to work on.
Touch the icon to delete selected files. Touch to share selected
files.
8�3 Music �������������������������������������������������������������������
Using this application, you can play music files stored in your phone.
Music files can be downloaded from your computer to the phone using
a USB cable.
To play a music file, touch from the Home screen, then touch
Music.
85
8�3�1 Playing music
Touch a song to play it.
Touch to access the menu.
Touch to change the song display
Touch to search for a song
Touch to access more functions
Touch to play or pause
Touch to play the next song
While playing songs with Music, the operation of pause, play or
skip is still available even if the screen is locked.
86
9
Others ��������������������������������������
9�1 Files ����������������������������������������������������������������������
To manage the files in your phone, touch from the Home screen,
then touch Files.
Files works with both external SD card and internal storage.
Files displays all data stored on the phone, including applications,
media files downloaded from Google Play Store, YouTube or other
locations; videos, pictures or audios you have captured; other data
transferred via Bluetooth, USB cable, etc.
When you download an application from PC to phone, you can locate
the application using Files, then touch it to install it in your phone.
Files allows you to perform and is really efficient with the following
common operations: create (sub) folder, open folder/file, view, rename,
move, copy, delete, play, share, etc.
9�2 Sound Recorder �������������������������������������������������
To record voice, touch from the Home screen, then touch Sound
Recorder.
Sound Recorder allows you to record voice/sound for seconds/hours.
87
9�3 Compass ��������������������������������������������������������������
Wave your phone in a figure 8 motion to have your detailed location.
9�4 Boost ��������������������������������������������������������������������
Boost provides you with the phone storage and battery status, and its
performance. You can manage and optimise your phone by using this
application.
9�5 Radio ��������������������������������������������������������������������
Your phone is equipped with a radio
(1)
with RDS
(2)
functionality. You can
use the application as a traditional radio with saved channels or with
visual information related to the radio program displayed if you turn to
stations that offer Visual Radio service.
To listen to a radio programme, touch from the Home screen, then
touch Radio.
To use it, you must plug in your headset, which works as an
antenna connected with your phone.
(1)
The quality of the radio depends on the coverage of the radio station in
that particular area.
(2)
Depending on your network operator and market.
88
Touch to play/stop.
Touch to enable/
disable the
loudspeaker.
Touch to go to next
saved channel.
Touch to open and view
the saved channels list.
Touch to add the current
station to favourites.
Drag to change
current frequency.
Touch to go to previous
saved channel.
Touch to decrease
0.1MHz.
Long press to search and
go to the nearest lower
frequency channel.
Touch to increase 0.1MHz.
Long press to search and
go to the nearest higher
frequency channel.
Available options:
•Save channel
Save the current station to the channel list.
•Edit name
Edit the channel name.
•Scan channels
Touch to search for channels.
•Delete
Delete the channel.
•Enter frequency
Enter the frequency manually to turn to the
channel.
•Exit
Turn off the radio.
89
9�6 Xender File Transfer �����������������������������������������
By using Xender, you can transfer the files in your phone to any other
devices including PC/MAC and Android/iOS/Windows phones.
9�7 Waves MaxxAudio �������������������������������������������
Touch to set the sound effect for music and movies.
9�8 Other applications
(1)
���������������������������������������������������
The previous applications in this section are preinstalled on your
phone. To read a brief introduction of the preinstalled 3rd party
applications, refer to the leaflet provided with the phone. You can also
download thousands of 3rd party applications by going to Google Play
Store on your phone.
(1)
Application availability depends on country and operator.
90
10
Google applications ��������������
Google apps are preinstalled on your phone to improve work efficiency
and help you enjoy life.
This manual briefly introduces the apps. For detailed features and
user guides, refer to related websites or the introduction provided in
the apps.
You are recommended to register with a Google account to enjoy all
the functions.
10�1 Chrome
A web browser with which you can surf the Internet.
Your bookmarks, browsing history, and settings across all devices with
the browser installed can be synchronised with your Google account.
10�2 Gmail
As the Google's web-based email service, Gmail is configured when
you first set up your phone. With this application, you can receive and
send mails, manage mails by labels, and archive mails, etc. Mails can be
automatically synchronised with your Gmail account.
10�3 Maps
Google Maps offers satellite imagery, street maps, 360° panoramic
views of streets, real-time traffic conditions, and route planning for
traveling by foot, car, or public transportation. By using this application,
you can get your own location, search for a place, and get suggested
route planning for your trips.
91
10�4 YouTube
YouTube is an online video-sharing application where users can upload,
view, and share videos. Available content includes video clips, TV clips,
music videos, and other content such as video blogging, short original
videos, and educational videos. It supports a streaming function that
allows you to start watching videos almost as soon as they begin
downloading from the Internet.
10�5 Play Store
Serves as the official app store for the Android operating system,
allowing users to browse and download applications and games.
Applications are either free of charge or at a cost.
In Play Store, search for the app you need, download it and then follow
the installation guide to install the app. You can also uninstall, update
an app, and manage your downloads.
10�6 Drive
A file storage and synchronisation service created by Google, which
allows users to store files in the cloud, share and edit files.
Files in Drive are well kept and you can reach your files from any
device by logging in to your Google account. Files or folders can be
shared privately with particular users having a Google account.
10�7 Play Music
A music streaming service and online music locker operated by Google.
You can upload and listen to a large number of songs for free. In
addition to offering music streaming for Internet-connected devices,
the Google Play Music app allows music to be stored and listened
to offline. Songs purchased through the Play Music are automatically
added to the user's account.
92
10�8 Play Movies & TV
Movies and television shows can be viewed online via Google Play
Movies & TV. You can also download movies and TV shows for offline
viewing. Some content is only available for rental or purchase.
10�9 Hangouts
Google Hangouts is a communication platform developed by Google
which includes instant messaging, video chat, SMS and VOIP features.
You should add a friend and then start chatting. All friends added via
Hangouts from the Web or device will be displayed in your friend list.
10�10 Photos
Google Photos stores and backs up your photos and videos. It also
automatically analyses photos and organises them into groups, so that
you can quickly locate the photos you need.
10�11 Keep
A note taking application developed by Google.
You can insert images, lists, and record voice in your notes, and set
time or location-based reminders for notes. Google Keep allows you
to categorise notes by labels, and notes are searchable based on their
colour, whether they have reminders, audio, images, or are lists.
93
11
Settings ������������������������������
To go to Settings, touch from the Home screen, then touch
Settings.
11�1 Wireless & networks
11�1�1 Wi-Fi
Using Wi-Fi you can now surf the Internet without using your SIM card
whenever you are in range of a wireless network. The only thing you
have to do is to enter the Wi-Fi screen and configure an access point
to connect your phone to the wireless network.
For detailed instructions on using Wi-Fi, refer to 7�1�2 Wi-Fi.
11�1�2 Bluetooth
Bluetooth allows your phone to exchange data (videos, images, music,
etc.) within a small range with another Bluetooth supported device
(phone, computer, printer, headset, car kit, etc.).
For more information on Bluetooth, refer to 7�3 Connecting to
Bluetooth devices.
11�1�3 SIM cards
(1)
Touch to choose SIM 1 or SIM 2 for connecting to the network, making
calls and sending SMS messages.
(1)
Only for 6055K and 6070K
94
11�1�4 Data usage
Mobile data
If you do not need to transmit data on mobile networks, turn off
mobile data to avoid incurring significant charges for data use on local
operator mobile networks, particularly if you do not have a mobile
data agreement.
Set mobile data limit
By enabling Set mobile data limit, your mobile data connection will
be disabled when the specified limit is reached. You can also choose a
data usage cycle to view the statistics and applications related to the
data use of your phone.
Data usage is measured by your phone, and your operator may
count differently.
11�1�5 More\Aeroplane mode
Touch the switch of Aeroplane mode to simultaneously disable all
wireless connections including Wi-Fi, Bluetooth and more.
11�1�6 More\NFC
Touch the switch to enable and disable NFC.
The function allows data exchange when the phone touches another
device.
11�1�7 More\Android Beam
Android beam can be activated only when NFC is on.
The function allows to transmit app content via NFC.
95
11�1�8 More\Tethering & portable hotspot
This function allows you to share your phone's mobile data connection
via USB or as a portable Wi-Fi access point (refer to “7�5 Sharing your
phone's mobile data connection”).
11�1�9 More\VPN
A mobile virtual private network (mobile VPN or mVPN) provides mobile
devices with access to network resources and software applications on
their home network, when they connect via other wireless or wired
networks. Mobile VPNs are used in environments where workers need
to keep application sessions open at all times, throughout the working
day, as the user connects via various wireless networks, encounters
gaps in coverage, or suspends-and-resumes their devices to preserve
battery life. A conventional VPN can't survive such events because the
network tunnel is disrupted, causing applications to disconnect, time
out, fail, or even the computing device itself to crash.
For more information on VPN, refer to “7�6 Connecting to virtual
private networks.
11�1�10 More\Mobile networks
Data roaming
If you don’t need to transmit data on other operators’ mobile networks,
disable Data roaming to avoid incurring significant roaming charges.
Preferred network mode
You can set your preferred network mode, such as GSM/WCDMA,
LTE etc.
96
Enhanced 4G LTE mode
Touch to improve the communication quality.
Show roaming reminder
Touch to select whether to show a reminder under roaming mode.
Access Point Names
You can select your preferred network with this menu.
Network operators
You can select a network operator.
11�1�11 Mobile plan
Touch to set the mobile plan.
11�1�12 Emergency alerts
Touch to enter emergency alerts settings, include whether to show
threats and alert Tone.
97
11�2 Device
11�2�1 Gestures
The following gestures can be used for quick operations:
(1)
•Touchless UI
(1)
Approach the screen with your finger to show
the effect.
•Glove mode
(1)
Enable glove mode then you can touch on the
screen with thin gloves.
•Turn over to mute
Switch the toggle to mute ringtones of
incoming calls by turning the phone over.
•Double tap screen
Switch the toggle to enable the function that
allows you to turn the screen on or off by a
double tap.
•Black screen
gesture
(1)
Enable the black screen gesture, draw a letter
on the black screen to quickly access an
application.
11�2�2 Display
In this menu, you can adjust your screen brightness, wallpaper, font
size, colour temperature of your screen, etc.
Press Power key twice for Camera
If enabled, you can quickly access Camera by double pressing the
Power key without unlocking your phone.
(1)
Only for alcatel IDOL 4S
98
Reversible
If activated, you can answer a call even if your phone is held upside
down.
Matrix FlipCase
If enabled,
•The cover will light up to show the time and weather when you press
the power key or double touch the screen area.
•Swipe left/right to play the previous/next song or channel when the
music player or radio is on.
•The cover will show the name or phone number of an incoming call.
You can swipe left/right to reject/answer the call, or swipe down to
end a call.
•The cover reminds you of the event details.
Auto-launch VR
(1)
If activated, the VR launcher starts automatically when VR headset
is plugged in, so that you can enjoy 3D images and movies with VR
glasses.
11�2�3 Lock screen
Func shortcuts
Touch to customise the application shortcuts displayed on your lock
screen.
(1)
It depends on countries. For detailed instructions, see “12 VR goggles.
99
WallShuffle
If this function is enabled, different wallpapers will be displayed on
your lock screen each time you press the power key to unlock your
phone.
Screen lock
Touch to set your screen unlock method. For example, you can unlock
your phone by sliding the screen, entering a password, or drawing a
pattern, etc.
Make pattern visible
This option only displays when you select Pattern to unlock your
phone. Touch to make pattern visible.
Automatically lock
Touch to select the duration to lock the phone after the screen is off.
Lock screen message
Touch to input owner information which will display on the locked
screen.
11�2�4 Sound & notification
Touch to adjust call and notification ringtones, music, and other audio
settings.
100
•Sound
Set volume for media, ringtone, and alarms.
•Headset mode
Mark the checkbox to enable headset mode.
Ringtones will only be heard from the headset
if it is plugged in.
•Also vibrate for
calls
Switch the toggle to enable vibration for
incoming calls.
•MaxxAudio
Touch to set the sound effect for music and
movies.
•Do Not Disturb
Touch to allow alarms, reminders, calls, etc.
when Do not disturb mode is enabled.
•Phone ringtone
Touch to set your incoming call ringtone.
•Default notification
ringtone
Touch to set the default sound for notifications.
•Mute power on &
off ringtone
Touch to enable/disable the power on & off
ringtone.
•Other sounds
Touch to set dial pad tones, screen locking
sounds, touch sounds and vibrate on touch.
•Pulse notification
light
Touch to enable light reminding when there is
a notification.
•When device is
locked
You can configure whether to show all
notification content or don't show notification
at all when your device is locked.
•App notifications
Touch to block or set priority for app
notifications.
•Notification access
Touch to view the notification listeners.
101
11�2�5 Boom Key
If Boom Key is enabled,
•From Home screen, press the key to show weather effect.
•Press the key to instantly take a photo when your phone is locked.
•Press and hold the key to take burst shot when your phone is locked.
•Press the key to trigger audio effect when a song or movie is played.
•Press the key to enhance voice quality during a call.
•Press the key from Gallery Moments to create a photo collage.
•Press the key to trigger special effect such as sequence change when
a movie is played.
•You can also customise the Boom Key function. For example, enable
screenshot taking or application running by pressing the Boom Key
when the screen is unlocked.
•When phone is locked (display off):
- press to screen-on;
- double press to instant shot (800ms);
- long press to continuously shot.
11�2�6 Apps
Touch to view details about the applications installed on your phone,
to manage their data usage and force them to stop.
In the App permissions menu of an application, you can grant
permissions for the app, such as allowing the app to access your
Camera, Contacts, Location, etc.
In the Notification menu, you can configure whether to block the
notifications from this app, hide sensitive content, etc.
11�2�7 Storage & USB
Use these settings to monitor the total and available space on your
phone.
102
11�2�8 Battery
Touch any category in the battery management screen to view its
power consumption.
You can adjust power use via the screen brightness or screen timeout
settings in the Display screen.
11�2�9 Memory
Touch to view the total memory and the memory used by applications.
11�2�10 Users
Touch to add an account for this phone.
11�3 Personal
11�3�1 Location
On
Touch the switch to enable the use of information from Wi-Fi
and mobile networks to determine your approximate location, for
use in Google Maps, when you search, and so on. When you select
this option, you’re asked whether you consent to share your location
anonymously with Google’s location service.
Mode
Touch to select High accuracy, Battery saving or Device only mode.
•High accuracy: Use GPS, Wi-Fi and mobile network to determine
location.
•Battery saving: Use Wi-Fi to determine location.
•Device only: Use GPS to determine location.
103
Recent location requests
This list shows the recent location requests.
11�3�2 Security
Encrypt phone
Requires a numeric PIN, pattern, or password to decrypt your phone
each time you power it on.
Prevent mis-operation
(1)
Switch the toggle to prevent mis-operation in double touch unlock
mode.
Set up SIM card lock
•Switch the toggle of Lock SIM card to lock the SIM card with a PIN
code.
•Touch Change SIM PIN to change the PIN code.
Make passwords visible
Switch the toggle to show passwords as you type.
Device administrators
Touch to view or deactivate device administrators.
Unknown sources
Switch the toggle to permit installation of applications that you obtain
from websites, emails, or other locations other than Google Play Store.
To protect your phone and personal data, download applications only
from trusted sources, such as Google Play Store.
(1)
Only for alcatel IDOL 4S
104
Trusted credentials
Touch to display trusted CA certificates.
Install from storage
Touch to install encrypted certificates from internal storage or SD card.
Clear credentials
Touch to remove all certificates.
Screen pinning
When this function is enabled, you can always keep a window in view
by touching the Overview button and then the pin icon. In this case,
the user cannot go to any other window or open any other app.
To stop pinning a window in view, long press both the Back and
Overview keys together, then entering your screen unlock password
or drawing your unlock pattern.
Apps with usage access
Touch to display the apps which can track what apps you are using,
and the using frequency. You can switch the toggle to turn on/off the
permission.
11�3�3 Language & input
Use the Language & input settings to select the language for the text
on your phone and for configuring the onscreen keyboard. You can
also configure voice input settings and the pointer speed.
Language
Touch to select the language and the region you want.
105
Spell checker
Switch the toggle to enable the system to show suggested words.
Personal dictionary
Touch to open a list of the words you’ve added to the dictionary. Touch
a word to edit or delete it. Touch the add button (+) to add a word.
Current Keyboard
Touch to select a default input method.
Text-to-speech output
•Preferred engine: Touch to choose a Preferred text-to-speech
engine, touch the settings icon to show more choices for each
engine.
•Speech rate: Touch to open a dialog where you can select how
quickly you want the synthesizer to speak.
•Listen to an example: Touch to play a brief sample of the speech
synthesizer, using your current settings.
Pointer speed
Touch to open a dialog where you can change the pointer speed, touch
OK to confirm.
106
11�3�4 Backup & reset
Back up my data
Touch the switch to back up your phone’s settings and other application
data to Google servers. If you replace your phone, the settings and
data you’ve backed up will be restored onto the new phone for the first
time you sign in with your Google account. If you mark this option, a
wide variety of settings and data are backed up, including your Wi-Fi
passwords, bookmarks, a list of the applications you’ve installed, the
words you’ve added to the dictionary used by the onscreen keyboard,
and most of the settings that you configure in the Settings application.
If you unmark this option, you stop backing up your settings, and any
existing backups are deleted from Google servers.
Backup account
Touch to set your backup account.
Automatic restore
Touch the switch to restore your backed-up settings or other data
when you reinstall an application.
Network settings reset
Touch to reset all network settings.
Factory data reset
Erase all of your personal data from internal phone storage, including
information about your Google account, any other accounts, your
system and application settings, and any downloaded applications.
Resetting the phone does not erase any system software updates
you’ve downloaded.
If you reset the phone in this way, you’re prompted to re-enter the
same kind of information as when you first started Android.
107
When you are unable to power on your phone, there is another way to
perform a factory data reset by using hardware keys. Press the Volume
up key and the Power key at same time until the screen lights up.
11�4 System
11�4�1 Date & time
Use Date & time settings to customise your preferences for how date
and time are displayed.
Automatic date & time
Touch the switch to use the network-provided date and time.
Automatic time zone
Touch the switch to use the network-provided time zone.
Set date
Touch to open a dialog where you can manually set the phone’s date.
Set time
Touch to open a dialog where you can manually set the phone’s time.
Select time zone
Touch to open a dialog where you can set the phone’s time zone.
Use 24-hour format
Touch the switch to display the time using the 24-hour clock format.
108
11�4�2 Accessibility
Use the Accessibility settings to configure any accessibility plug-ins you
have installed on your phone.
TalkBack
Touch to enable spoken feedback from your phone.
Captions
Touch to activate/deactivate captions for phone screen.
Magnification gestures
Touch to turn on/off to activate/deactivate zoom in/out function by
triple-tapping the screen.
Large text
Touch the switch to enlarge the screen text.
High contrast text
Touch the switch to activate high contrast text.
Power button ends call
Touch the switch to enable Power button ends call.
Auto-rotate screen
Touch the switch to activate auto-rotate screen. Content on the screen
or the keyboard will be automatically rotated when you rotate your
phone.
Speak passwords
Touch the switch to speak passwords while typing.
109
Accessibility shortcut
Touch to enable/disable quick activating for accessibility features.
Text-to-speech output
Touch to update the settings for text-to-speech output, such as the
speech rate.
Long press delay
Touch to adjust the duration of touch and hold delay. This function
enables your phone to differ touch and touch & hold, which may avoid
incorrect operations.
Colour inversion
Touch the switch to turn on/off colour inversion.
Colour correction
Touch to turn on/off colour correction.
11�4�3 Regulatory & safety
Touch to view product information.
11�4�4 About phone
This contains information ranging from Legal information, Model
number, Firmware version, Baseband version, Kernel version, Build
number to those listed below:
Updates
Touch to check for system updates.
110
Experience improvement
If this function is enabled, your device performance data will be
collected for improving the quality and performance of the device.
Status
This contains the status of the Battery status, Battery level, My phone
number, Network, Signal strength, etc.
111
12
VR goggles
(1)
����������������������������
12�1 Getting started
12�1�1 About the VR goggles
Use your VR goggles to experience virtual reality by inserting your
IDOL 4 or IDOL 4S and enjoy 2D and 3D content such as games,
videos or other VR applications.
VR goggles layout
Top cover
“Select” button“Back” button
Cushion
Lenses
Note:
Buttons are touch-sensitive and don’t need to be pressed
down.
(1)
It depends on countries.
112
12�1�2 Using the VR goggles for the first time
You can start VR by using the preinstalled “VR Launcher” application.
Before using the VR goggles, make sure VR Launcher has been set up
and received the necessary permissions.
Follow these steps before inserting your device into the VR goggles.
1. Start the “VR Launcher” application.
2. If VR Launcher does not have the
needed permissions, it will ask now.
Allow these.
3. Read and accept the safety warning by
touching the “GOT IT” button.
4. Insert your earphones and touch
“OPEN” to start VR display mode. After
this, you are ready to insert your device
into the VR goggles.
113
Follow these steps to insert your device into the VR goggles.
1. Put your fingertips in the hole slot and pull the top cover outward
to open.
2. Firmly press down on the clip to pull it back and insert your device
into the VR goggles. Make sure your device is powered on and the
screen unlocked.
Note: Don’t force the clip or it could break. Make sure it’s locked
tightly, or your device might fall out and be damaged.
3. Press the button to open the bottom cover.
114
4. Hold the VR goggles with two hands. Find the BACK and SELECT
buttons on the bottom.
The buttons are touch-sensitive and don’t need to be pressed down.
Notes:
•Keep the lenses clean and unscratched. You can clean them with the
lens cleaning cloth.
•The foam cushioning might deteriorate over time from sweat. Keep
your face clean and dry while wearing the VR goggles.
12�1�3 Configuring the VR Launcher
Follow these steps in VR mode after starting VR Launcher.
Note: The VR goggles recognize your head movement. You can move
the pointer in the center of the screen by moving your head in any
direction. Some applications might not display the pointer.
1. To interact while using the VR goggles, touch
the “SELECT” button or short press the
button on your earphones while aiming the
pointer at an icon.
115
2. VR Launcher recognizes content in the
VR-media, DCIM or Pictures folder on your
internal storage or SD card.
3. When opening the VR Launcher for the first time, you can configure
its settings. Later you can use the Settings shortcut on the main
screen of the VR Launcher.
•Brightness: Aim the pointer at the or and touch the SELECT
button to darken or brighten the screen.
•Volume: Aim the pointer at the or and touch the SELECT
button to raise or lower the volume.
•Look & Wait: This feature allows you to select an item by aiming
the pointer at it for 3 seconds. Aim the pointer at the for 3
seconds to turn this on or off.
Note:
Not all VR apps and screens support Look & Wait.
12�1�4 Using the VR Launcher
360 VR Gallery
Here you can see special photos that fill the complete virtual
space around you.
Note: Download more 360 photos from the VR Store application.
360 VR Video
Here you can watch special videos that fill the complete virtual
space around you.
Notes:
•Download more 360 videos from the VR Store or LittleStar
cinema applications.
116
•While watching videos, you can access the controls by
touching the SELECT button.
Pause playback.
Go to the previous or next video.
View a list of videos.
 / 
Raise or lower the volume.
VR Gallery
Here you can see photos and images on your device. There are
two different display styles. Select one by aiming at it and
touching the SELECT button.
Note: Photos and images in the DCIM, Pictures and VR-media
folder will be added here automatically.
VR Video
Here you can watch your normal videos in VR mode.
Games
Here you can access all installed VR games. Supported games will
be added here automatically when installed.
Note: Download more games from the VR Store application.
12�2 Troubleshooting
1. Your device becomes hot.
VR requires a higher amount of power than normal. When using it for
an extended period, your device might become hot. Stop using and
close the VR features or applications, remove your device from the
VR and wait until your device cools down before resuming use. This
is normal and does not affect your device’s lifespan or performance.
117
2. The VR Launcher does not start automatically when inserted into
the VR goggles.
a) Make sure you have granted the required permissions to VR
Launcher.
b) Verify that Auto-launch VR” is turned on in Settings > Display.
c) Make sure that device screen is unlocked when you insert the device
in VR googles.
12�3 Safety information
People suffering from seizures, loss of awareness, or other symptoms
linked to an epileptic condition should consult a doctor before using
the VR goggles.
The VR goggles should not be used by children under 13. Children
above 13 should be monitored by an adult as using it may affect the
hand eye coordination, balance, and multi tasking abilities.
Use only in safe environments. Avoid using it outdoors, near other
people, pointed objects, stairs, balconies, or in situations that require
attention such as cycling, driving, or walking.
Do not use the VR goggles when you are tired, under the influence of
alcohol or drugs, hung over, under emotional stress or anxiety, in need
of sleep, suffering from a cold, flu, headaches, migraines, or earaches,
or have digestive problems.
Take a 15 to 30 minutes break after every 15 minutes of use.
Prolonged use of the VR goggles can make your muscles, joints, or skin
hurt. If this occurs, rest for several hours before resuming use.
118
13
Making the most of your
phone ���������������������������������������
13�1 Smart Suite
You can download software upgrades for free from the website
(www.alcatel-mobile.com). Smart Suite includes:
•Contacts
Allows you to back up contact entries so that you don't have to
worry about losing, breaking, switching phones or changing service
providers.
•Messages
Frees you from painstakingly inputting text on the keypads. All of
your messages are easily accessible and well-organised.
•Calendar
Allows you to sync events freely between your phone and Outlook
and create and edit new events from a PC.
•Photos
Allows you to easily import photos from your PC or the handset and
organise them in different albums for better management.
•Videos
Allows you to insert video files from your PC for playback and then
upload them to a handset folder.
119
•Music
Allows you to quickly search for your favourites in your PC, manage
the ultimate Library, and enjoy the easiest digital jukebox in your own
mobile way.
•Application
Allows you to import downloaded mobile applications and have them
installed into your handset upon synchronisation.
•Backup
Allows you to back up your contacts, messages, calendar, photos and
applications, then import the backup files to your phone.
Supported Operating Systems
Windows XP/Vista/Windows 7/Windows 8.
13�2 Upgrade
You can use the Mobile Upgrade tool or FOTA Upgrade tool to update
your phone's software.
13�2�1 Mobile Upgrade
Download Mobile Upgrade from alcatel website
(www.alcatel-mobile.com) and install it on your PC. Launch the tool
and update your phone by following the step by step instructions
(refer to the User Guide provided together with the tool). Your phone’s
software will now have the latest software.
All personal information will be permanently lost following the
update process. We recommend you back up your personal
data using Smart Suite before upgrading.
120
13�2�2 FOTA Upgrade
Use the FOTA (Firmware Over The Air) Upgrade tool to update your
phone's software. To access Updates, touch the Application tab from
the Home screen, then select Updates or touch Settings\About
phone\Updates.
Touch and the phone will search for the latest software. If you want
to update the system, touch the button, and when that’s finished,
touch to complete the upgrade. Now your phone will have the
latest version of the software. You should turn on data connection or
Wi-Fi before searching for updates. Settings for auto-check frequency
are also available once you restart the phone. If you have chosen auto-
check, when the system discovers the new version, a dialog will pop
up to choose download or ignore, the notification will also appear in
status bar.
During FOTA downloading or updating, to avoid errors in locating the
correct update packages, do not change your default storage location.
121
14
Accessories �����������������������������
The latest generation of alcatel mobile phones offers a built-in
handsfree feature that allows you to use the telephone from a
distance, placed on a table for example. For those who prefer to keep
their conversations confidential, an earpiece is also available known
as the headset.
1. Charger
2. USB cable
3. Stereo headset
Only use the alcatel batteries, chargers, and accessories
included along with your device.
122
15
Warranty ����������������������������������
Your phone is warranted against any defect or malfunctioning which
may occur in conditions of normal use during the warranty period of
twelve (12) months
(1)
from the date of purchase as shown on your
original invoice.
Batteries
(2)
and accessories sold with your phone are also warranted
against any defect which may occur during the first six (6) months
(1)
from the date of purchase as shown on your original invoice.
In case of any defect of your phone which prevents you from normal
use thereof, you must immediately inform your vendor and present
your phone with your proof of purchase.
If the defect is confirmed, your phone or part thereof will be either
replaced or repaired, as appropriate. Repaired phone and accessories
are entitled to a one (1) month warranty for the same defect. Repair
or replacement may be carried out using reconditioned components
offering equivalent functionality.
This warranty covers the cost of parts and labor but excludes any
other costs.
This warranty shall not apply to defects to your phone and/or
accessory due to (without any limitation):
1) Non-compliance with the instructions for use or installation, or with
technical and safety standards applicable in the geographical area
where your phone is used,
(1)
The warranty period may vary depending on your country.
(2)
The life of a rechargeable mobile phone battery in terms of conversation
time standby time, and total service life, will depend on the conditions of
use and network configuration. Batteries being considered expendable
supplies, the specifications state that you should obtain optimal
performance for your phone during the first six months after purchase and
for approximately 200 more recharges.
123
2) Connection to any equipment not supplied or not recommended by
TCL Communication Ltd.,
3) Modification or repair performed by individuals not authorised by
TCL Communication Ltd. or its affiliates or your vendor,
4) Modification, adjustment or alteration of software or hardware
performed by individuals not authorised by TCL Communication
Ltd.,
5) Inclement weather, lightning, fire, humidity, infiltration of liquids or
foods, chemical products, download of files, crash, high voltage,
corrosion, oxidation…
Your phone will not be repaired in case labels or serial numbers (IMEI)
have been removed or altered.
There are no express warranties, whether written, oral or implied,
other than this printed limited warranty or the mandatory warranty
provided by your country or jurisdiction.
In no event shall TCL Communication Ltd. or any of its affiliates be
liable for indirect, incidental or consequential damages of any nature
whatsoever, including but not limited commercial or financial loss or
damage, loss of data or loss of image to the full extent those damages
can be disclaimed by law.
Some countries/states do not allow the exclusion or limitation
of indirect, incidental or consequential damages, or limitation of
the duration of implied warranties, so the preceding limitations or
exclusions may not apply to you.
124
16
Troubleshooting ���������������������
Before contacting the service centre, you are advised to follow the
instructions below:
•You are advised to fully charge ( ) the battery for optimal operation.
•Avoid storing large amounts of data in your phone as this may affect
its performance.
•Use the FOTA (Firmware Over The Air) Upgrade tool to update your
phone's software. To access Updates, touch the Application tab from
the Home screen, then select Updates or touch Settings\About
phone\Updates.
Touch and the phone will search for the latest software. If you
want to update the system, touch the button, and when that’s
finished, touch to complete the upgrade. Now your phone will
have the latest version of the software. You should turn on data
connection or Wi-Fi before searching for updates. Settings for auto-
check frequency are also available once you restart the phone. If you
have chosen auto-check, when the system discovers the new version,
a dialog will pop up to choose download or ignore, the notification
will also appear in status bar.
During FOTA downloading or updating, to avoid errors in locating
the correct update packages, do not change your default storage
location.
Use Factory data reset and Mobile Upgrade tool to perform phone
formatting or software upgrading (to reset factory data, hold down
the Power key and the Volume up key at the same time under power
off mode). ALL User phone data: contacts, photos, messages and
files, downloaded applications will be lost permanently. It is strongly
advised to fully back up the phone data and profile via Smart Suite
before doing formatting and upgrading.
125
After factory data reset is performed, you will be requested to
enter Google account credentials
(1)
used on this device before
reset. Otherwise you can't use the device. If you don't remember
your Google account credentials, please complete Google account
recovery procedure. In case you don’t succeed in it, apply to
authorised repair center, but remember that it will not be regarded
as warranty case.
and carry out the following checks:
My phone can't be switched on or is frozen
•When the phone can't be switched on, charge for at least 20 minutes
to ensure the minimum battery power needed, then try to switch
on again.
•When the phone falls into a loop during power on-off animation
and the user interface can't be accessed, press and hold the Volume
down key to enter Safe Mode. This eliminates any abnormal OS
booting issues caused by 3rd party APKs.
•If neither method is effective, please reset the phone using the
Power key and the Volume up key (holding both together) or
upgrade software via Mobile Upgrade tool.
My phone has not responded for several minutes
•Restart your phone by pressing and holding the Power key.
•If it still does not work, please use Factory data reset to reset the
phone or FOTA/Mobile Upgrade to upgrade software.
My phone turns off by itself
•Check that your screen is locked when you are not using your phone,
and make sure the Power key is not accidentally contacted while the
screen is unlocked.
•Check the battery charge level.
•If it still does not work, please use Factory data reset to reset the
phone or FOTA/Mobile Upgrade to upgrade software.
(1)
Applicable for Android OS versions starting from 5.1.
126
My phone can't charge properly
•Make sure you are using an alcatel battery and the charger from the
box.
•Make sure that your battery is not completely discharged; if the
battery power is empty for a long time, it may take around 20
minutes to display the battery charger indicator on the screen.
•Make sure charging is carried out under normal conditions (0°C to
40°C).
•When abroad, check that the voltage input is compatible.
My phone can't connect to a network or "No service" is displayed
•Try connecting in another location.
•Verify the network coverage with your operator.
•Check with your operator that your SIM card is valid.
•Try selecting the available network(s) manually
•Try connecting at a later time if the network is overloaded.
My phone can't connect to the Internet
•Check that the IMEI number (press *#06#) is the same as the one
printed on your warranty card or box.
•Make sure that the internet access service of your SIM card is
available.
•Check your phone's Internet connecting settings.
•Make sure you are in a place with network coverage.
•Try connecting at a later time or another location.
Invalid SIM card
•Make sure the SIM card has been correctly inserted.
•Make sure the chip on your SIM card is not damaged or scratched.
•Make sure the service of your SIM card is available.
Unable to make outgoing calls
•Make sure you have dialled a valid number and have touched .
•For international calls, check the country and area codes.
127
•Make sure your phone is connected to a network, and the network
is not overloaded or unavailable.
•Check your subscription status with your operator (credit, SIM card
valid, etc.).
•Make sure you have not barred outgoing calls.
•Make sure that your phone is not in Aeroplane mode.
Unable to receive incoming calls
•Make sure your phone is switched on and connected to a network
(check for overloaded or unavailable network).
•Check your subscription status with your operator (credit, SIM card
valid, etc.).
•Make sure you have not forwarded incoming calls.
•Make sure that you have not barred certain calls.
•Make sure that your phone is not in Aeroplane mode.
The caller’s name/number does not appear when a call is received
•Check that you have subscribed to this service with your operator.
•Your caller has concealed his/her name or number.
I can't find my contacts
•Make sure your SIM card is not broken.
•Make sure your SIM card is inserted properly.
•Import all contacts stored in SIM card to phone.
The sound quality of the calls is poor
•You can adjust the volume during a call by pressing the Volume Up/
Down key.
•Check the network strength .
•Make sure that the receiver, connector or speaker on your phone is
clean.
I am unable to use the features described in the manual
•Check with your operator to make sure that your subscription
includes this service.
128
•Make sure this feature does not require an alcatel accessory.
When I select a number from my contacts, the number can't be
dialled
•Make sure that you have correctly recorded the number in your file.
•Make sure that you have selected the country prefix when calling a
foreign country.
I am unable to add a contact in my contacts
•Make sure that your SIM card contacts are not full; delete some
files or save the files in the phone contacts (i.e. your professional or
personal directories).
My callers are unable to leave messages on my voicemail
•Contact your network operator to check service availability.
I can't access my voicemail
•Make sure your operator’s voicemail number is correctly entered in
"Voicemail number".
•Try later if the network is busy.
I am unable to send and receive MMS
•Check your phone memory availability as it might be full.
•Contact your network operator to check service availability and
check MMS parameters.
•Verify the server centre number or your MMS profile with your
operator.
•The server centre may be swamped, try again later.
SIM card PIN locked
•Contact your network operator to obtain the PUK code (Personal
Unblocking Key).
I am unable to connect my phone to my computer
•Install Smart Suite.
•Check that your USB driver is installed properly.
129
•Open the Notification panel to check if the Smart Suite Agent has
been activated.
•Check that you have marked the checkbox of USB debugging.
•Check that your computer meets the requirements for Smart Suite
installation.
•Make sure that you’re using the right cable from the box.
I am unable to download new files
•Make sure there is sufficient phone memory for your download.
•Select the microSD card as the location to store downloaded files.
•Check your subscription status with your operator.
The phone can't be detected by others via Bluetooth
•Make sure that Bluetooth is turned on and your phone is visible to
other users.
•Make sure that the two phones are within Bluetooth’s detection
range.
How to make your battery last longer
•Make sure you follow the complete charge time (minimum 100
(1)
minutes).
•After a partial charge, the battery level indicator may not be exact.
Wait for at least 20 minutes after removing the charger to obtain an
exact indication.
•Adjust the brightness of screen as appropriate.
•Extend the email auto-check interval for as long as possible.
•Update news and weather information on manual demand, or
increase their auto-check interval.
•Exit background-running applications if they are not being used for
a long time.
•Deactivate Bluetooth, Wi-Fi, or GPS when not in use.
(1)
For alcatel IDOL 4: 130 minutes
130
The phone will become warm following prolonged calls, game
playing, internet surfing or running other complex applications�
•This heating is a normal consequence of the CPU handling excessive
data. Ending above actions will make your phone return to normal
temperature.
After Factory data reset is performed, my device asks me to enter
Google account credentials and I can't use it avoiding this action
(1)
•After factory data reset is performed, you need to enter Google
account credentials used on this device before reset. Otherwise you
can't use the device. If you don't remember your Google account
credentials, please complete Google account recovery procedure. In
case you don’t succeed in it, apply to authorised repair center, but
remember that it will not be regarded as warranty case.
I don't hear when somebody calls/messages me� I just see missed
calls/messages notifications on display
•Check if Interruptions/Do not disturb mode is activated on your
device. If activated, you can see a “Star” symbol (for Android OS
5.X) or icon (for Android OS 6.X) displayed on notification panel.
In this case, you need to deactivate Interruptions/Do not disturb
mode. Just press volume up or down key and select "All" (on Android
5.X) or modify it in Settings\Sound & notifications\Interruptions
(for Android 5.X) or Do not disturb ( for Android 6.X).
My phone asks me to enter some password/code/key that I don't
remember or don't know due to this phone was used by another
person before and I can't get this password/code/key from him/her�
•Password/code/key request could be caused by the security feature
activated on this device. You can try to perform Factory data reset,
but remember that if it doesn't help, you need to apply authorised
repair center and it will not be regarded as warranty case.
(1)
Applicable for Android OS versions starting from 5.1.
131
17
Specifications
(alcatel IDOL 4) ����������������������
Processor
Qualcomm MSM8952
Platform
Android M
Memory
16GB ROM + 3GB RAM
Dimensions (LxWxT)
147 X 72.5 X 7.1 mm
Weight
135g
Display
5.2 FHD, full touch screen with 1920x1080
Network
GSM: 850/900/1800/1900
UMTS: 850/900/1900/2100
LTE: 1/3/7/8/20/28A or
1/3/7/8/20/28A/38/40
(Band frequency and data speed are operator
dependent.)
GPS
A-GPS
Connectivity
•Bluetooth V4.2
•Wi-Fi 802.11a/b/g/n (2.4GHz & 5GHz) or
802.11a/b/g/n/ac (2.4GHz & 5GHz)
•3.5 mm audio jack
•micro-USB
132
Camera
•13 megapixel back camera
•8 megapixel front camera
Audio supported
formats
AAC LC, AAC+, enhanced AAC+, AMR-NB,
AMR-WB, FLAC, MP3, MIDI, Vorbis, PCM/
WAVE
Video supported
formats
H.265, H.264, H.263, MPEG-4, XVID, VP8,
VC-1
Battery
(1)
•Rechargeable Lithium-ion battery
•Capacity: 2610 mAh
Expansion Slot
microSD™ memory card
(Availability of microSD card depends on
market)
Special Features
•GPS
•G-sensor
•Light Sensor
•Proximity Sensor
•E Compass
•Gyro
•Hall Switch
Note: Specifications are subject to change without prior notice.
(1)
(1)
The original battery has undergone rigorous safety inspections to meet
qualification standards, the use of non-original batteries may be dangerous.
133
18
Specifications
(alcatel IDOL 4S) ��������������������
Processor
Qualcomm MSM8976
Platform
Android M
Memory
16/32GB ROM + 3GB RAM
Dimensions (LxWxT)
153.9 X 75.4 X 6.99 mm
Weight
149g
Display
5.5 QHD, full touch screen with 2560X1440
Network
GSM: 850/900/1800/1900
UMTS: 850/900/1900/2100
LTE: 1/3/7/8/20/28A
(Band frequency and data speed are operator
dependent.)
GPS
Assisted GPS/Internal GPS antenna
Connectivity
•Bluetooth V4.2
•Wi-Fi 802.11a/b/g/n/ac (2.4GHz & 5GHz)
•3.5 mm audio jack
•micro-USB
134
Camera
•16 megapixel back camera
•8 megapixel front camera
Audio supported
formats
AAC LC, AAC+, enhanced AAC+, AMR-NB,
AMR-WB, FLAC, MP3, MIDI, Vorbis, PCM/
WAVE
Video supported
formats
HEVC, H.263, H.264 AVC, MPEG-4 SP, VP8/
VP9
Battery
(1)
•Rechargeable Lithium-ion battery
•Capacity: 3000 mAh
Expansion Slot
microSD™ memory card
(Availability of microSD card depends on
market)
Special Features
•GPS
•G-sensor
•Light Sensor
•Proximity Sensor
•E Compass
•Gyro
•Hall Switch
Note: Specifications are subject to change without prior notice.
(1)
(1)
The original battery has undergone rigorous safety inspections to meet
qualification standards, the use of non-original batteries may be dangerous.
135
alcatel is a trademark of Alcatel-Lucent
and is used under license by
TCL Communication Ltd.
© Copyright 2016 TCL Communication Ltd.
All rights reserved
TCL Communication Ltd. reserves
the right to alter material
or technical specification
without prior notice.
English - CJA61K0ALAAA
All "Signature" ringtones embedded in this phone have been composed,
arranged and mixed by NU TROPIC (Amar Kabouche).
115


Need help? Post your question in this forum.

Forumrules


Report abuse

Libble takes abuse of its services very seriously. We're committed to dealing with such abuse according to the laws in your country of residence. When you submit a report, we'll investigate it and take the appropriate action. We'll get back to you only if we require additional details or have more information to share.

Product:

For example, Anti-Semitic content, racist content, or material that could result in a violent physical act.

For example, a credit card number, a personal identification number, or an unlisted home address. Note that email addresses and full names are not considered private information.

Forumrules

To achieve meaningful questions, we apply the following rules:

Register

Register getting emails for Alcatel Idol 4 - 6055P at:


You will receive an email to register for one or both of the options.


Get your user manual by e-mail

Enter your email address to receive the manual of Alcatel Idol 4 - 6055P in the language / languages: English as an attachment in your email.

The manual is 22,8 mb in size.


You will receive the manual in your email within minutes. If you have not received an email, then probably have entered the wrong email address or your mailbox is too full. In addition, it may be that your ISP may have a maximum size for emails to receive.

Others manual(s) of Alcatel Idol 4 - 6055P

Alcatel Idol 4 - 6055P User Manual - German - 146 pages

Alcatel Idol 4 - 6055P User Manual - Dutch - 141 pages

Alcatel Idol 4 - 6055P User Manual - French - 150 pages


The manual is sent by email. Check your email

If you have not received an email with the manual within fifteen minutes, it may be that you have a entered a wrong email address or that your ISP has set a maximum size to receive email that is smaller than the size of the manual.

The email address you have provided is not correct.

Please check the email address and correct it.

Your question is posted on this page

Would you like to receive an email when new answers and questions are posted? Please enter your email address.


Info