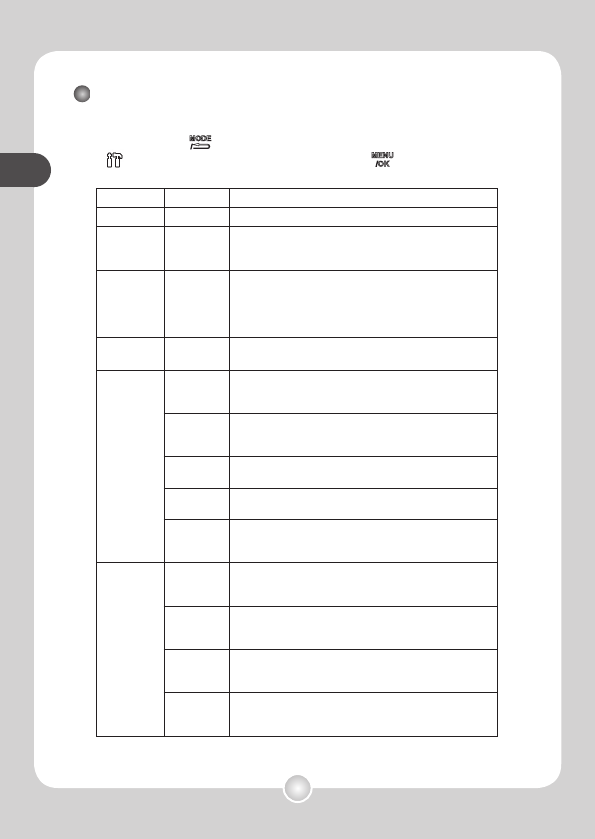
Menüelemente im Einstellungsmodus (1)
Schalten Sie den Camcorder ein. → Drücken Sie die MODE/
Zurück-Taste ( ) → Aktivieren Sie den Einstellungsmodus
( ) → Drücken Sie die MENU/OK-Taste ( ).
Element Optionen Beschreibung
Pieper
Ein/Aus
Die Tastentöne ein- oder ausschalten.
Startfi lm
Ein/Aus
Die Wiedergabe einer Videosequenz beim
Einschalten des Camcorders aktivieren oder
deaktivieren.
Auto-Aus
Aus ~ 5
Min.
Hier stellen Sie ein, wann der Camcorder
automatisch ausgeschaltet wird. Wenn [Aus]
gewählt wird, dann bleibt der Camcorder
eingeschaltet, bis Sie ihn ausschalten oder der
Akku leer ist.
Datum/
Zeit
-
Das Datum und die Uhrzeit einstellen.
USB-
Modus
Menü
Der Camcorder zeigt ein Menü an, damit Sie einen
Verbindungsmodus auswählen können, wenn der
Camcorder mit einem PC verbunden wird.
Disk
Beim Anschluss an einen PC wechselt
der Camcorder automatisch in den [Disk]
(Wechseldatenträger)-Modus.
PC-Cam
Beim Anschluss an einen PC wechselt der
Camcorder automatisch in den [PC-Cam]-Modus.
Ladegerät
Beim Anschluss an einen PC wird der Akku
automatisch aufgeladen.
Drucker
Beim Anschluss an einen PictBridge-kompatiblen
PC wechselt der Camcorder automatisch in den
[Drucker]-Modus.
AV-Modus
Menü
Der Camcorder zeigt ein Menü an, damit Sie einen
Verbindungsmodus auswählen können, wenn der
Camcorder mit einem Gerät verbunden wird.
Kopfhörer
Beim Anschluss an einen PC wechselt der
Camcorder automatisch in den [Kopfhörer]-
Verbindungsmodus.
AV-
Ausgang
Beim Anschluss an einen PC wechselt der
Camcorder automatisch in den [AV-Ausgang]-
Verbindungsmodus.
AV-
Eingang
Beim Anschluss an einen PC wechselt der
Camcorder automatisch in den [AV-Eingang]-
Verbindungsmodus.