642838
3
Zoom out
Zoom in
Previous page
1/11
Next page
EN
Deluxe Self Propelled Steel Transit Chair
VA166BLACK,BLUE,HAM,PINK,RED
SGLY00100818A
Assembly and Operating Instructions
Assembly and Operating Instructions Ver. 4 01/14 (2286)
2
This file is available to view and download as a PDF at
www.aidapt.co.uk. Sight impaired customers can use a
free PDF Reader (such as adobe.com/reader) to zoom
in and increase the text size for improved readability.
READ BEFORE USE
Before using your new Transit Chair, you and each person that may assist you
in its use should take time to read this manual and follow all instructions.
PLEASE NOTE:
Your transit chair has a unique identification serial number. This is located on
the main cross brace below the seat canvass and should be used in all
correspondence.
Write your serial number here for future ref: ………………………………………
Model VA166 can be wheeled by the person sitting in the chair and has pram
handles for assistance pushing.
The maximum user weight is 115 kg; under no circumstances should
this be exceeded
Before each use please take the time to check your chair for any loose parts.
Any modification to this product without the express permission from Aidapt
will invalidate your guarantee.
SAFETY SUMMARY
The following recommendations are made for the safe use of the chair.
NOTE: Do not assemble or use this equipment without first reading and
understanding this instruction manual.
If you cannot understand the instructions, please contact Aidapt, a Healthcare
Professional or a Dealer before installing this equipment.
Before using this product, care must be taken to ensure that fitments are
secure, the castors/wheels are in good working order, the chair is
properly balanced and all wheels must be in contact with the floor at all
times during use.
For safe operation, the following points must be remembered:
i. Always observe the limits regarding reaching objects, leaning
back, tilting and use of manual brakes, tyres and weights limits.
These are dealt with under the section headed Assembly and
Use.
Assembly and Operating Instructions Ver. 4 01/14 (2286)
3
ii. The footplates are designed only to support the feet while in the
seated position. DO NOT STAND ON THE FOOT PLATES.
iii. WARNING: Surface areas of your chair can get hot when the
chair is exposed to external sources of heat (e.g. sunlight).
Please now refer to the section on Assembly and use.
ASSEMBLY
1. First remove all contents from the box.
2. To open the chair, push seat rails and press downwards until the
chair is fully opened taking care to keep fingers clear of moving parts
(Fig. 1).
3. To close the chair, take the centre of the seat fabric at the front and
back edges and lift (Fig. 2).
Note: The seat rails must be fully engaged in the seat frame support
brackets before sitting down.
Fig. 1 Fig. 2
Note: When opening and closing your chair please keep fingers well
away from any possible entrapment areas.
The only part of the chair that can be adjusted are the leg rests. Ideally your
knees should be at 90 degrees with the seat. If you are not sure please
contact a healthcare professional or your local dealer for advice.
Assembly and Operating Instructions Ver. 4 01/14 (2286)
4
BRAKE OPERATION
Parking Brakes (Occupant)
See Fig. 7 which shows the chair with the parking brake not applied. To apply
the parking brake push the handle forward as in Fig. 7a until it ‘clicks’ and this
will apply the brake.
Fig. 7 Fig. 7a
BRAKE ADJUSTMENT
To adjust the parking brakes loosen bolt A (as per figure 7b) and move brake
unit sideways to adjust as required and then re-tighten bolt A.
Fig. 7b
Hex nuts
Assembly and Operating Instructions Ver. 4 01/14 (2286)
5
CORRECT USAGE
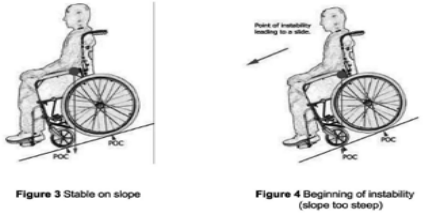
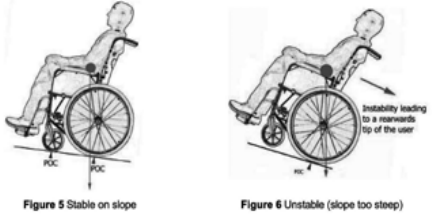
WARNING: The centre of balance is affected by a change in posture
body position or weight distribution.
Many activities require the transit chair user to reach, bend and transfer into
and out of the chair. These movements will cause a change to normal
balance, centre of gravity and weight distribution of the chair.
The design of your chair enables it to remain stable for normal everyday
usage if used correctly in accordance with the recommendations in this
manual.
N.B. Do not stand on the transit chair
1. Reaching/bending forward
Move the chair as close as possible to the object you wish to reach.
Position the front castors so that they are extended as far forward as
possible. Fully engage the wheel locks on the rear wheels. Only reach out
to take what is within arm’s length in normal sitting position. Only the
arms should extend beyond the seat of the chair.
2. Reaching/bending backwards
Move the chair as close as possible to the object you wish to reach.
Reach back only as far as your arm will extend without changing your
seating position. Do not lean over the top of the back upholstery as this
could change your centre of gravity and may cause you to tip over.
3. Reaching/leaning sideways
Move the chair as close as possible to the object you wish to reach.
Rotate the front castors to a line in the direction you will be reaching.
Fully engage the wheel locks on the rear wheels to prevent tipping over.
Do not shift your weight or sitting position towards the object you are
reaching as it may cause the chair to tip over.
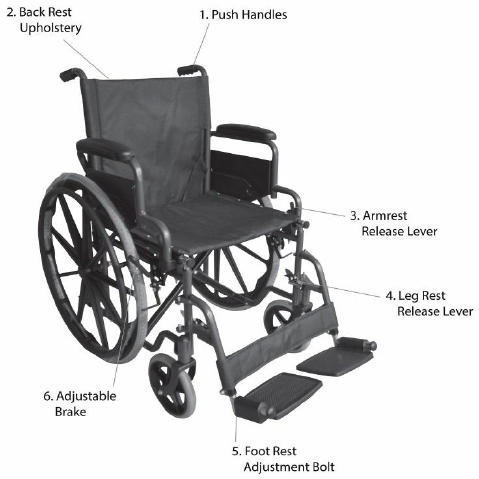
4. Transferring
Before attempting to transfer in and out of the chair, every precaution
should be taken to ensure the gap between the two seats is as small as
possible. The chair should be on a smooth, stable and level area. Be sure
to fully engage the wheel brakes when transferring in and out of the chair
or when in an elevator or chair lift. Turn both castors in the direction of the
seat to which you wish to move. Lift up the footplates and fold back the
supports to the side. Do not stand on the footplates. It is imperative that
the actual transfer procedure be supervised by a certified health care
professional until the chair owner is familiar with the procedure.
Assembly and Operating Instructions Ver. 4 01/14 (2286)
6
5. Negotiating Obstacles
5.1 Forwards
The chair should be tilted by the helper until the front castors have
passed over the kerbs. Move the chair forward until the rear wheels
touch the kerb and gently lower the front castors over the pavement.
Push down on the foot bars until the rear wheels have mounted the
kerb. The chair should not be lifted by the handles alone.
5.2 Backwards
The chair should be positioned so that the rear wheels are against
the kerb. The helper should then tilt the chair backwards and then
pull the chair until the rear wheels mount the kerb. The front castors
should only be lowered to the ground when the chair has been
pulled sufficiently away from the kerb.
5.3 Upward and Downward slopes
Always go straight up and down slopes to avoid the possibility of the
chair overturning. Avoid steep slopes, which may cause instability.
Abruptly changing directions whilst going down an incline could
cause instability or possible tipping over.
Do not use the parking brakes to slow your descent on an
incline.
Assembly and Operating Instructions Ver. 4 01/14 (2286)
7
6. Ramps
Be sure of your own capabilities, limitations and strength before attempting to
go up a ramp. Correct techniques on ramp negotiation should be shown to you
by a qualified professional. Assistance is recommended when going up or
down inclines greater than 10°. If you must stop on an incline, avoid sudden,
abrupt movement when you resume movement. Due to the backward angle of
the chair, sudden abrupt movement could cause instability. Attempting to use
the wheel hand brakes could result in accidental locking, tipping to one side,
or cause a sudden stop. Avoid changing direction when going down an incline,
as this could result in instability that may cause tipping.
AIDAPT GENERAL TRANSPORT GUIDANCE
The design of your chair enables it to remain stable for normal everyday
usage if used correctly in accordance with the recommendations in this
manual.
Aidapt recommend transit chair users should transfer from their chair to a
vehicle seat and use a 3-point occupant restraint system for the seated
position. Aidapt also recognises that due to reason of pain or discomfort,
transfer may not be possible.
Assembly and Operating Instructions Ver. 4 01/14 (2286)
8
GENERAL DESCRIPTION
The following diagram shows details of the chair terminology used in this
manual.
VA166: Self Propelled Steel Transit Chair
Assembly and Operating Instructions Ver. 4 01/14 (2286)
9
GENERAL DESCRIPTION continued.
1. Push Handles
The handles are designed for the helper to propel the chair. They must not be
used solely for lifting the chair over obstructions or kerbs (see negotiating
obstacles)
2. Backrest Upholstery
Periodically check the upholstery for signs of tears or sagging. Replace
immediately if the seat is damaged
3. Armrest Release Lever
Push the lever to release the armrests from the socket to allow them to be
flipped up.
4. Leg Rest Release Lever
Press the release lever towards you and swing the support to the outside of
the chair. If the support is to be removed, lift it upwards. To re-fit and return to
the original position, reverse the above procedure.
5. Footrest Adjustment Bolt
The footplates are intended as a foot support only when you are sitting in the
chair. On no account should you stand on the footplates. The heel loops or
calf straps (if fitted) can be used to secure the position of the feet. The
footplate assemblies can be adjusted in height by loosening the nut of the
base of the adjustment tube, positioning the plate at the required height and
tightening the nut to secure the assembly.
The footplate supports cannot be adjusted but are moveable from the
chair. They can be swung away to the outside of the chair. To carry out
this procedure, Castor and bearing
The front wheels have solid puncture proof tyres. These should be
checked at regular intervals to monitor any wear. Transit chairs become
difficult to steer and propel when surfaces have worn flat. It is
recommended that both front tyres are replaced at the same time to avoid
one side of the chair from being higher than the other.
The wheel is secured to the castor fork by an axle bolt and axle nut.
Periodically, this bolt and nut should be checked and tightened if
necessary to allow a snug but free spinning fit. The castor fork swivel
allows the chair to be steered. An adjustment locknut is located under the
castor cap. If the locknut is too tight, the chair will be difficult to steer.
Assembly and Operating Instructions Ver. 4 01/14 (2286)
10
6. Adjustable Brake
These are used to hold the chair in a stationary position, and are fitted on
either side of the chair. They should not be used when the chair is moving
or to slow it down. They should always be applied together.
To operate, push the brake lever forward towards the front of the chair.
This will immobilize the chair. To release the brake, move the lever
towards the rear of the chair.
ROUTINE CHECKS AND MAINTENANCE
1. Upholstery
Upholstery should be routinely cleaned with a mild soap and water
solution. Never use paint remover or thinners on upholstery.
2. Metal Parts
Clean all metal parts with a wax compound such as car wash to maintain
finish. Do not use any obtrusive cleanser that will scratch the finish on the
chair.
3. Cross Brace
Periodically lubricate the centre bolt on the cross brace with light machine
oil. Operation of the cross brace permits the chair to be opened and
closed easily. It should be inspected at regular intervals for signs of wear
and bending.
4. Tyres and Wheels
Examine tyres regularly for wear and replace as necessary. Solid tyres
should be replaced when they become loose on the rim or cracks appear
which expose the mounting wire groove. The large rear wheels should be
inspected at least once a month to ensure proper tightness. If the wheel
wobbles or is loose, release lock nut and tighten axle bolt slightly. Test for
proper tightness by learning chair to one side and spin adjusted wheel.
For pneumatic tyres, check tyre pressure is even and correct. Check that
the wheels run freely and that quick release axles are correctly locked.
If your chair is fitted with pneumatic tires and you have a puncture please
take your chair to the nearest dealer or bicycle repair centre.
5. Front Castors
The castors should be checked periodically and lubricated occasionally.
Lubricate them by removing the fork and greasing the castor stem
bearings. Lubricate the wheel bearings by removing the wheel from the
fork. Reassemble the fork and wheel by tightening the nuts until no play
remains, but the wheels can be roll freely. If the nut is too loose, the
castor will wobble, if too tight, the chair will be difficult to steer.
Assembly and Operating Instructions Ver. 4 01/14 (2286)
11
6. Brakes
Regularly check for effective operation and there is no wear or signs of
play.
7. General
Always check before use that the chair folds and unfolds correctly and
that movement both backwards and forwards is in a straight line.
8. Servicing
We recommend your chair is fully serviced every twelve months. For
parts information please contact Aidapt Bathrooms Limited (details on the
back page).
9. Recycling of your Transit Chair
Once the chair has reached its expected service life you can contact
Aidapt for disposal.
SPECIFICATIONS
ITEM DETAILS
Width (folded) 260 mm
Width (unfolded) 620mm
Height 915mm
Net weight 17.6kg
Net weight (without leg rests/wheels) 15.96kg
Maximum User Weight 115 kg
Seat size 457x400mm
Colour Various
Distributed by Aidapt Bathrooms Ltd, Lancots Lane, Sutton Oak,
St Helens, WA9 3EX
Telephone: +44 (0) 1744 745 020 Fax: +44 (0) 1744 745 001
Web: www.aidapt.com
Email: sales@aidapt.co.uk
Manufacturers Agent Kingsmead Service Ltd, 64 Totteridge
Common, London, NW1 0ND.
3


Need help? Post your question in this forum.

Forumrules


Report abuse

Libble takes abuse of its services very seriously. We're committed to dealing with such abuse according to the laws in your country of residence. When you submit a report, we'll investigate it and take the appropriate action. We'll get back to you only if we require additional details or have more information to share.

Product:

For example, Anti-Semitic content, racist content, or material that could result in a violent physical act.

For example, a credit card number, a personal identification number, or an unlisted home address. Note that email addresses and full names are not considered private information.

Forumrules

To achieve meaningful questions, we apply the following rules:

Register

Register getting emails for Aidapt VA166 at:


You will receive an email to register for one or both of the options.


Get your user manual by e-mail

Enter your email address to receive the manual of Aidapt VA166 in the language / languages: English as an attachment in your email.

The manual is 0,65 mb in size.


You will receive the manual in your email within minutes. If you have not received an email, then probably have entered the wrong email address or your mailbox is too full. In addition, it may be that your ISP may have a maximum size for emails to receive.

Others manual(s) of Aidapt VA166

Aidapt VA166 User Manual - German - 21 pages

Aidapt VA166 User Manual - French - 15 pages


The manual is sent by email. Check your email

If you have not received an email with the manual within fifteen minutes, it may be that you have a entered a wrong email address or that your ISP has set a maximum size to receive email that is smaller than the size of the manual.

The email address you have provided is not correct.

Please check the email address and correct it.

Your question is posted on this page

Would you like to receive an email when new answers and questions are posted? Please enter your email address.


Info