15
INSTALLER
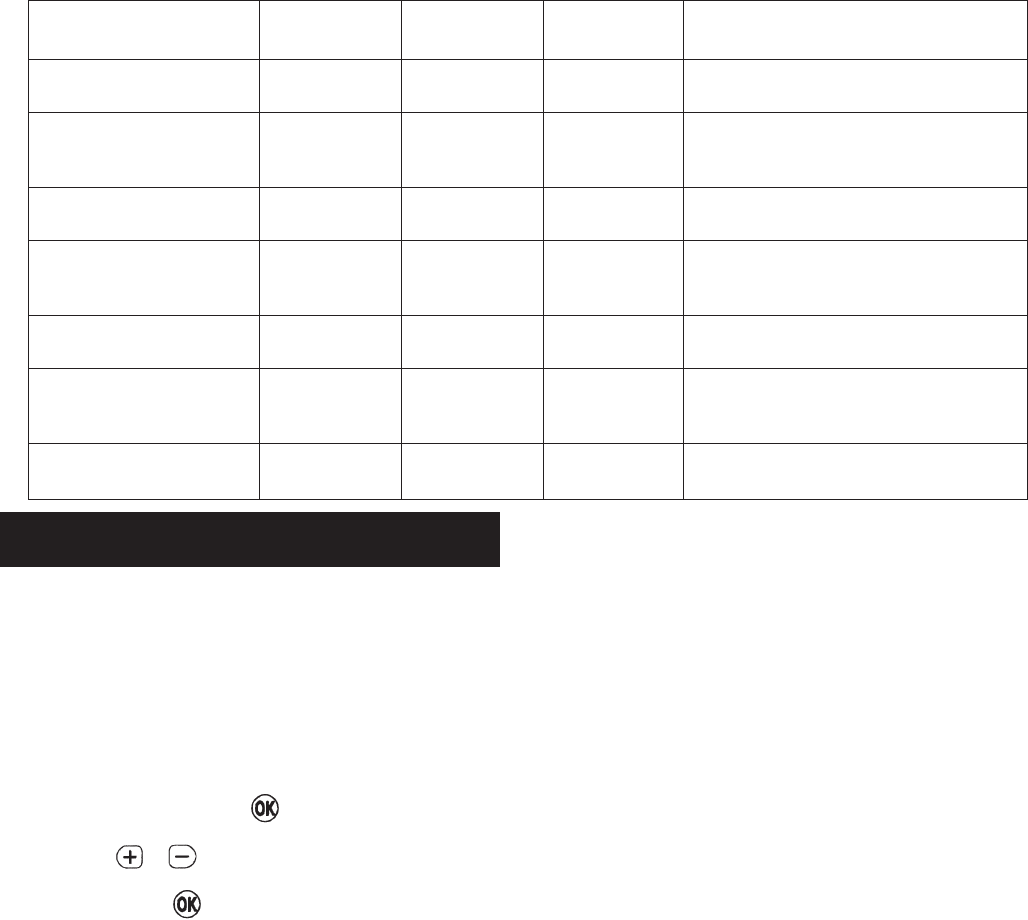
PARAMETER
Parameter
Number
Default
Value
Options Description
24 hr or am/pm
clock display
Configure backlight
operation
Enable/disable auto
time change
1-day or 5/2 day or
7-day operation
Number of ON/OFFs
per day
Select default time
programme
Reset all parameters
1
2
3
4
5
6
8
12
2
1
7
3
A
1
12, 24
0, 1, 2
0, 1,
1, 5, 7
2, 3
A, b, C
0, 1
12 = am/pm display
24 = 24hr display
0 = off
1 = on if button is pressed
2 = on continuously
1 = 1-day operation,
5 = 5/2-day operation,
7 = 7-day operation
0 = disabled
1 = enabled
2 = 2 on/offs per day,
3 = 3 on/offs per day
A = standard,
b = at home
C = Economy
0 = do not reset
1 = default parameters
How do I set the time only, if the programmer
clock is not correct?
Your programmer contains a very accurate digital clock
that is factory pre-set. Should you ever need to change
the time just follow this procedure:
a. Move the slider to the DAY/TIME position.
b. Keep pressing the green button until the message
‘SET THE TIME’ is displayed. To change the time,
press the or buttons until the correct time is
shown. The message ‘IS TIME OK?’ will be displayed.
Press the green button to confirm the time is
correct. If you have made a change the message
‘TIME SAVED’ will show, followed quickly by ‘DATE +
TIME COMPLETE’.
c. Move the slider to the RUN position, to complete
changing the time.
What do I do when the clocks go back in
October and forward in March?
Your programmer is factory-set to adjust the clock
automatically at the correct dates, so you should never
need to adjust the clock forward or backwards yourself. It
is possible to disable this particular feature, as described
in the section ‘Changing the Installer Parameters’ (See
Page 14). You may also check the section Configuration
and Service Data (See Page 16) to see how your
Installer has configured your product.
What should I do if I get ‘lost’ while
programming the programmer?
The Electronic Display on the programmer will provide
you with help and tips to work through the programming.
Should you ever get ‘lost, the simplest thing to do is to
move the slider to the RUN position, and then move it
back to the appropriate programming position where you
got lost. At this point just follow the instructions again.
What happens if there is a power failure?
In the event of a mains power failure, the programmer
display will go blank, the indicator lamps will go out, and
the control outputs will switch off. All programmes and
settings are stored in a special memory (call NV memory)
which requires no power to maintain information, and so
will be retained indefinitely.
On resumption of the power supply, the program selection
will always revert to the ‘AUTO’ setting irrespective of
whether ‘OFF’, ‘ONCE’ or ‘CONSTANT’ had previously
been chosen.
We recommend that during longer absence from home,
you should turn the cooker and/or boiler thermostats to
the ‘OFF’ position if you want to ensure that the appliance
remains OFF.
However, the date and time will be lost and will require re-
setting.
Should the correct time and date ever be lost, for
whatever reason, the message ‘SET DATE + TIME’ will
be displayed whilst the slider is in the RUN position. In this
case, simply follow the procedure under ‘Step 1: Setting
the Date and Time’ (see Page 9). It should not be
necessary to make any changes to your programmes.
FAQ AND TROUBLESHOOTING
INSTALLER
PARAMETER
Parameter
Number
Default
Value
Options Description
24 hr or am/pm
clock display
Configure backlight
operation
Enable/disable auto
time change
1-day or 5/2 day or
7-day operation
Number of ON/OFFs
per day
Select default time
programme
Reset all parameters
1
2
3
4
5
6
8
12
2
1
7
3
A
1
12, 24
0, 1, 2
0, 1,
1, 5, 7
2, 3
A, b, C
0, 1
12 = am/pm display
24 = 24hr display
0 = off
1 = on if button is pressed
2 = on continuously
1 = 1-day operation,
5 = 5/2-day operation,
7 = 7-day operation
0 = disabled
1 = enabled
2 = 2 on/offs per day,
3 = 3 on/offs per day
A = standard,
b = at home
C = Economy
0 = do not reset
1 = default parameters