IT ISTRUZIONI.....................................................25
NL GEBRUIKSAANWIJZING.....................28
PT MANUAL DE INSTRUÇÕES............31
s-bag® Ultra Long Performance
Ref: GR210S
Part nr: 9001684779
s-bag® Anti-allergy
Ref: GR206S
Part nr: 9001684761
s-bag® Anti-odour
Ref: GR203S
Part nr: 9001684753
s-bag® Classic Long Performance
Ref: GR201S
Part nr: 9001684746
aeg.com/shopElectrolux Hausgeräte GmbH
Fürther Straße 246
D-90429 Nürnberg
Germany
www.aeg-home.com
VISIT OUR WEBSITE TO:
Get usage advice, brochures,
trouble shooter, service information:
www.AEG.com
Register your product for better service:
www.AEG.com/productregistration
Buy Consumables & Accessories for
your appliance: www.AEG.com/shop
CUSTOMER CARE AND SERVICE
When contacting Service, ensure that you have the fol-
lowing data available:
- Model Number
- PNC number
- Serial number
The information can be found on the rating plate.
Model Number
PNC Number
Serial Number
Silent Parketto
Ref: AZE115
Part nr: 9001677930
Turbo Brush
Ref: AZE119
Part nr: 9001678011
Allergy Care
Ref: AKIT11
Part nr: 9001679621
Animal Care
Ref: AKIT13
Part nr: 9001679647
s-filter®
Hygiene non-Washable
Ref: AEF12
Part nr. 9001966697
Allergy Plus Washable
Ref: AFS1W
Part nr: 9001677690
360° Home & Car
Ref: AKIT12
Part nr: 9001679639
Crispy Bamboo
Ref: ASBA
Part nr: 9001677823
Brown Sugar & Fig
Ref: ASFI
Part nr: 9001677831
Tropical Breeze
Ref: ASCO
Part nr: 9001677849
Citrus Burst
Ref: ASMA
Part nr: 9001677856
Evening Rose
Ref: ASRO
Part nr: 9001677815
VX9 Starter Kit
Ref: ASKVX9
Part nr: 9001684803
CONSUMABLES & ACCESSORIES
www.AEG.com/shop
A06532803
1324
2www.AEG.com
1314
17
1618
5876
9
1211
2625
192022
21
15
10
23
24
3www.AEG.com
ENGLISH
Thank you for choosing AEG VX9 vacuum cleaner. Always use original
accessories and spare parts to get the best results. This product is designed
with the environment in mind. All plastic parts are marked for recycling
purposes.
BEFORE STARTING
• Read this manual carefully.
• Check that all parts described are included.
• Pay special attention to the safety precautions!
DESCRIPTION OF VX9 VACUUM CLEANER
A. Display (see versions later)
B. Exhaust filter lid
C. Exhaust filter
D. Parking slots
E. Power cord
F. Motor filter
G. Motor filter holder
H. S-bag®
I. S-bag® holder
J. Dust compartment cover
K. AeroPro 3in1 tool
L. AeroPro hose
M. AeroPro handle (see versions
later)
N. AeroPro telescopic tube
O. Parking clip
P. Display for models with rotary
knob manual control*
Q. Display for models with remote
control*
R. Display for models with remote
control and AUTO function*
S. AeroPro Classic handle*
T. AeroPro Ergo handle*
U. AeroPro Remote Control handle*
V. PrecisionFlow nozzle*
W. PrecisionFlow LED nozzle (with
front lights)*
X. AeroPro Turbo nozzle*
Y. AeroPro Mini Turbo nozzle*
Z. ParkettoPro nozzle*
AA. AeroPro FlexProPlus nozzle*
AB. AeroPro Long crevice nozzle*
* Certain models only
HOW TO USE THE VACUUM CLEANER
1 Open the dust compartment cover by pulling the S-BAG button. Check that
the dust bag (s-bag) is in place.
2 Insert the hose into the cleaner (to remove it, press the lock buttons and pull).
Insert the hose into the hose handle until the lock button clicks (to release it,
press the lock button
and pull).
3 Attach the telescopic tube to the nozzle. Attach the telescopic tube to the
hose handle (to remove it, press the lock button and pull).
4 Adjust the telescopic tube by holding the lock with one hand and pulling the
handle with the other hand.
STARTSTOP THE VACUUM CLEANER AND ADJUST SUCTION POWER
5 Pull out the power cord and plug it into the mains. Press the ON/OFF button
to turn the cleaner on/o. Indicators light up, MIN/MAX indicator lights up
from left to right and back (auto function models).* Models with remote con-
trol can also be operated by the ON/OFF button on the handle.*
6 Adjust suction power (manual control models): Turn the rotary knob on the
cleaner or use the air valve on the handle.*
7 Adjust suction power (remote control models): Press +/- button on the han-
dle. MIN/MAX and symbols indicators on display will show level of power.*
8 Adjust suction power (remote control models with AUTO): The cleaner starts
in AUTO mode (automatic power regulation). AUTO indicator is illuminated
on the display and MIN/MAX indicator pulses. To regulate power manually
press +/- button on handle. Press AUTO button to return to auto-function.*
9 After cleaning, push the REWIND button to rewind the cable.
PARKING POSITIONS
10 Use parking position on the side (A) or underneath (C) to carry and store the
cleaner. At the back (B) when you pause (save your back).
REPLACING THE DUSTBAG, SBAG®
11 Replace the s-bag when
- P* Models with rotary knob: S-BAG indicator lights up in red
- Q* Models with remote control: S-BAG symbol lights up red.
- R* Models with remote control and AUTO: S-BAG indicator lights up in red
(green light: bag is OK, yellow light: soon time to replace bag).
NB: Always change the s-bag when S-BAG indicator is illuminated or has
red light even if the s-bag is not full (it may be blocked) and after using
carpet cleaning powder. For best possible performance, use the Ultra Long
Performance bag which is especially developed for your cleaner. Other
synthetic s-bags can also be used. Do not use paper dust bags! www.s-bag.
com
12 Pull the S-BAG button to open the dust compartment. The handle of the
s-bag holder goes up. Pull the handle to remove the s-bag with holder. Do not
press the release button.
13 Hold the s-bag with holder over a dust bin. Press the button to release the
s-bag. Insert a new s-bag to the holder by inserting the cardboard at the back
of the holder.
14 Insert the s-bag with holder by pushing it straight down in its tracks. Make
sure the s-bag is not stuck under the holder. Close the lid. If the s-bag is not
properly placed or is missing, the lid will not close.
NB: When you start the cleaner after s-bag replacement, It takes 10 seconds
before the S-BAG indicator turns o (P* Models with rotary knob and Q*
Models with remote control) or turns green (R* Models with remote control
and AUTO).
REPLACING THE FILTERS
15 Replace/clean** the filter when (**washable filter only)
- P* Models with rotary knob: you have changed the s-bag 5 times
- Q* Models with remote control: FILTER symbol lights up in red
- R* Models with remote control and AUTO: filter indicator lights up in red.
Green light indicates that the filter is ok. It lights up briefly when you start the
vacuum cleaner.
16 Pull the FILTER button to open the filter lid. Use original s-filters. Remove the
filter and check the reference on the frame to define type. Replace with a new
filter or clean it**. Rinse the inside (dirty side) in lukewarm tap water. Tap the
filter frame to remove the water. Repeat the process four times. (*
*washable
filter only)
NB: Do not use cleaning agents. Avoid touching the filter surface. Let the
filter dry completely (min. 24 h in room temperature) before putting back
! Change the washable filter at least once a year or when it is very dirty or
damaged. Do not remove the L-shaped foam under the filter.
17 After replacing the filter, close the filter lid until it is clicked back into place. If
the filter lid comes o, position the hinges at the bottom and push the filter
lid until it is clicked back into place.
NB: When you start the cleaner after filter replacement, It takes 10 seconds
before the FILTER indicator turns green (models with remote control and
AUTO function) or turns o (remote control models).*
18 Replace the motor filter when dirty or after every 5th s-bag. Push the filter
holder down and pull it out. Exchange the filter and close the lid.
VACUUMING WITH THE UNIVERSAL NOZZLE V*, W*
19 Change nozzle setting with the pedal. Icon illustrates recommended floor
type.
20 PrecisionFlow LED nozzle*: Move the nozzle forward. The front light turns
on automatically after a few seconds. When the nozzle is not used, the light
turns o automatically after a few seconds.
CLEANING THE UNIVERSAL NOZZLE V*, W**
21 Disconnect the nozzle from the tube. Clean with the hose handle.
CLEANING THE TURBO NOZZLE X*
22 Disconnect the nozzle from the tube and remove entangled threads etc by
snipping them away with scissors. Use the hose handle to clean the nozzle. *
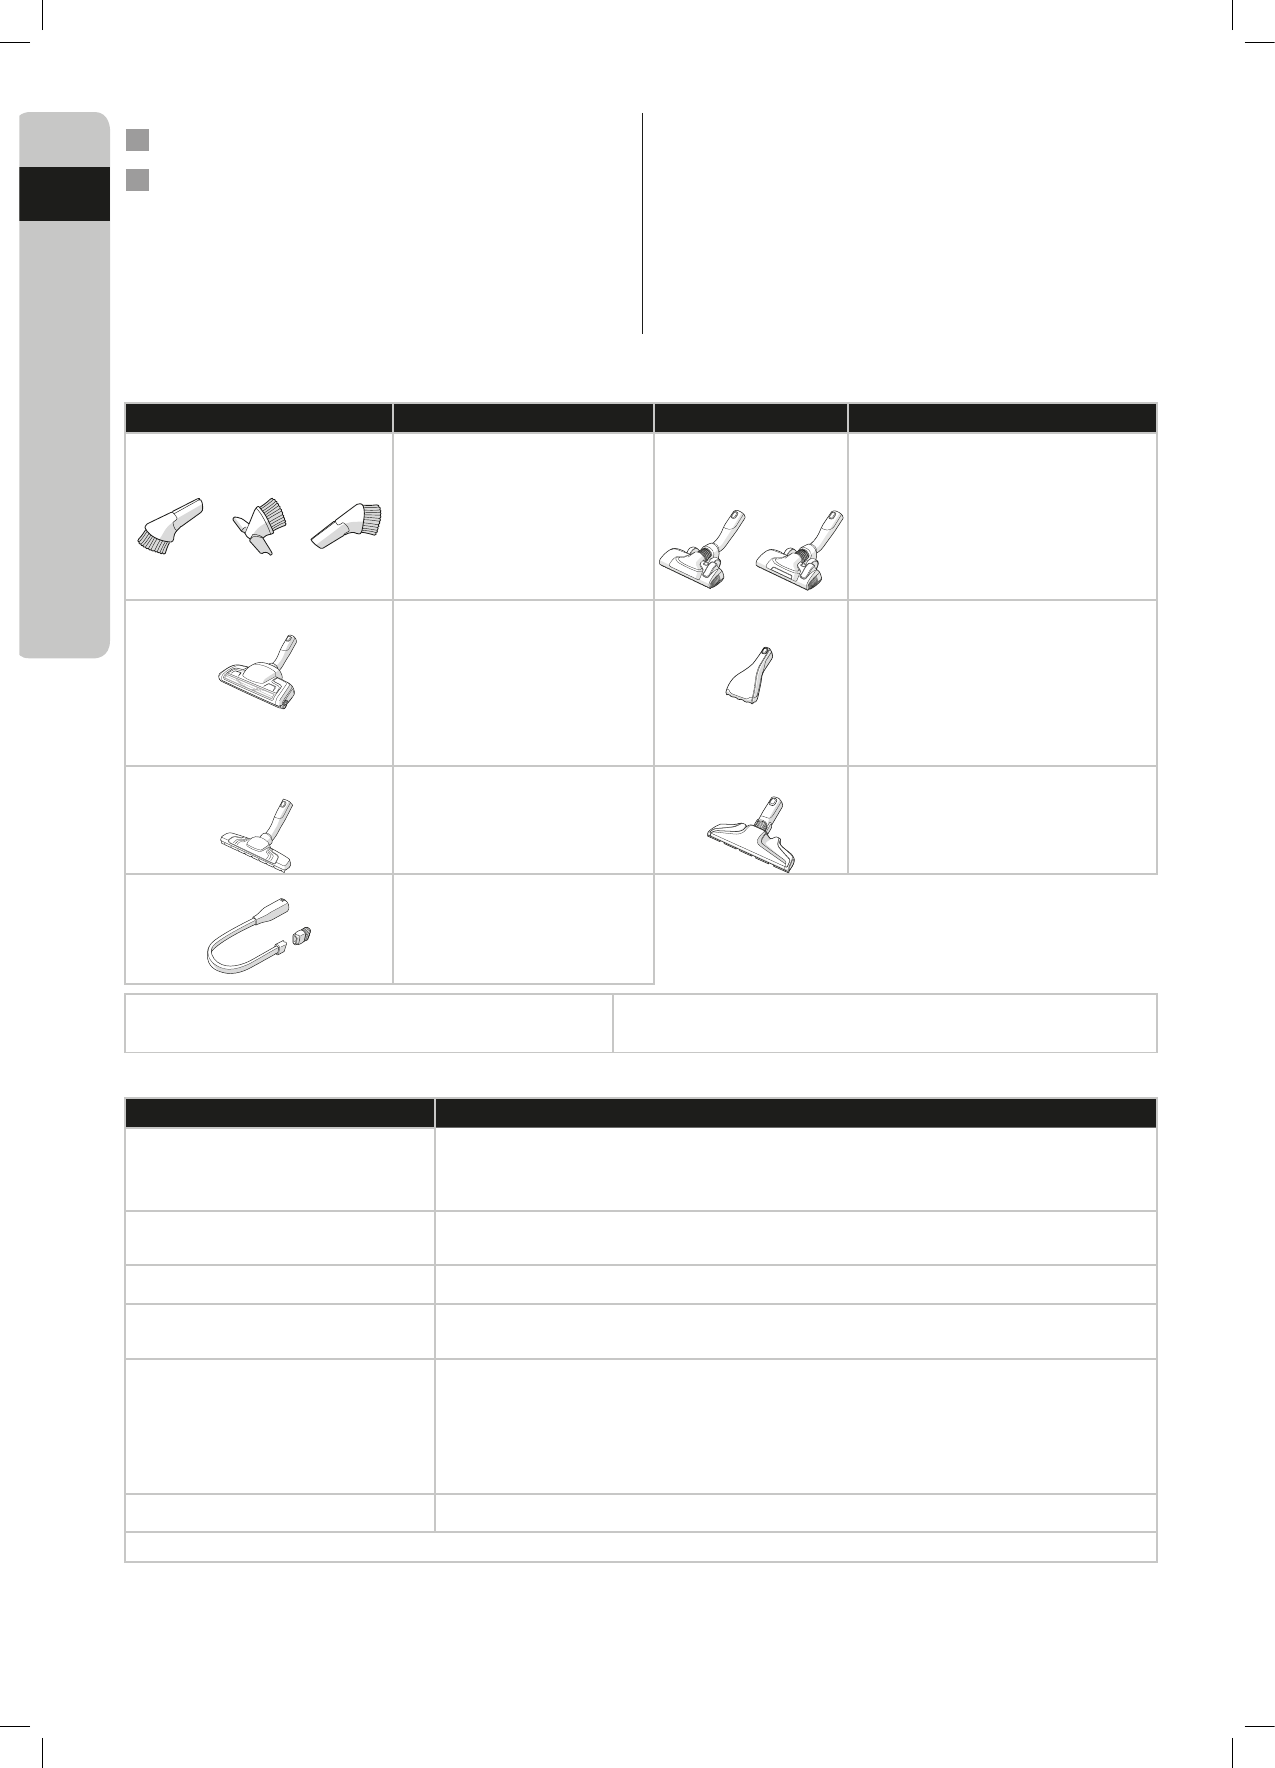
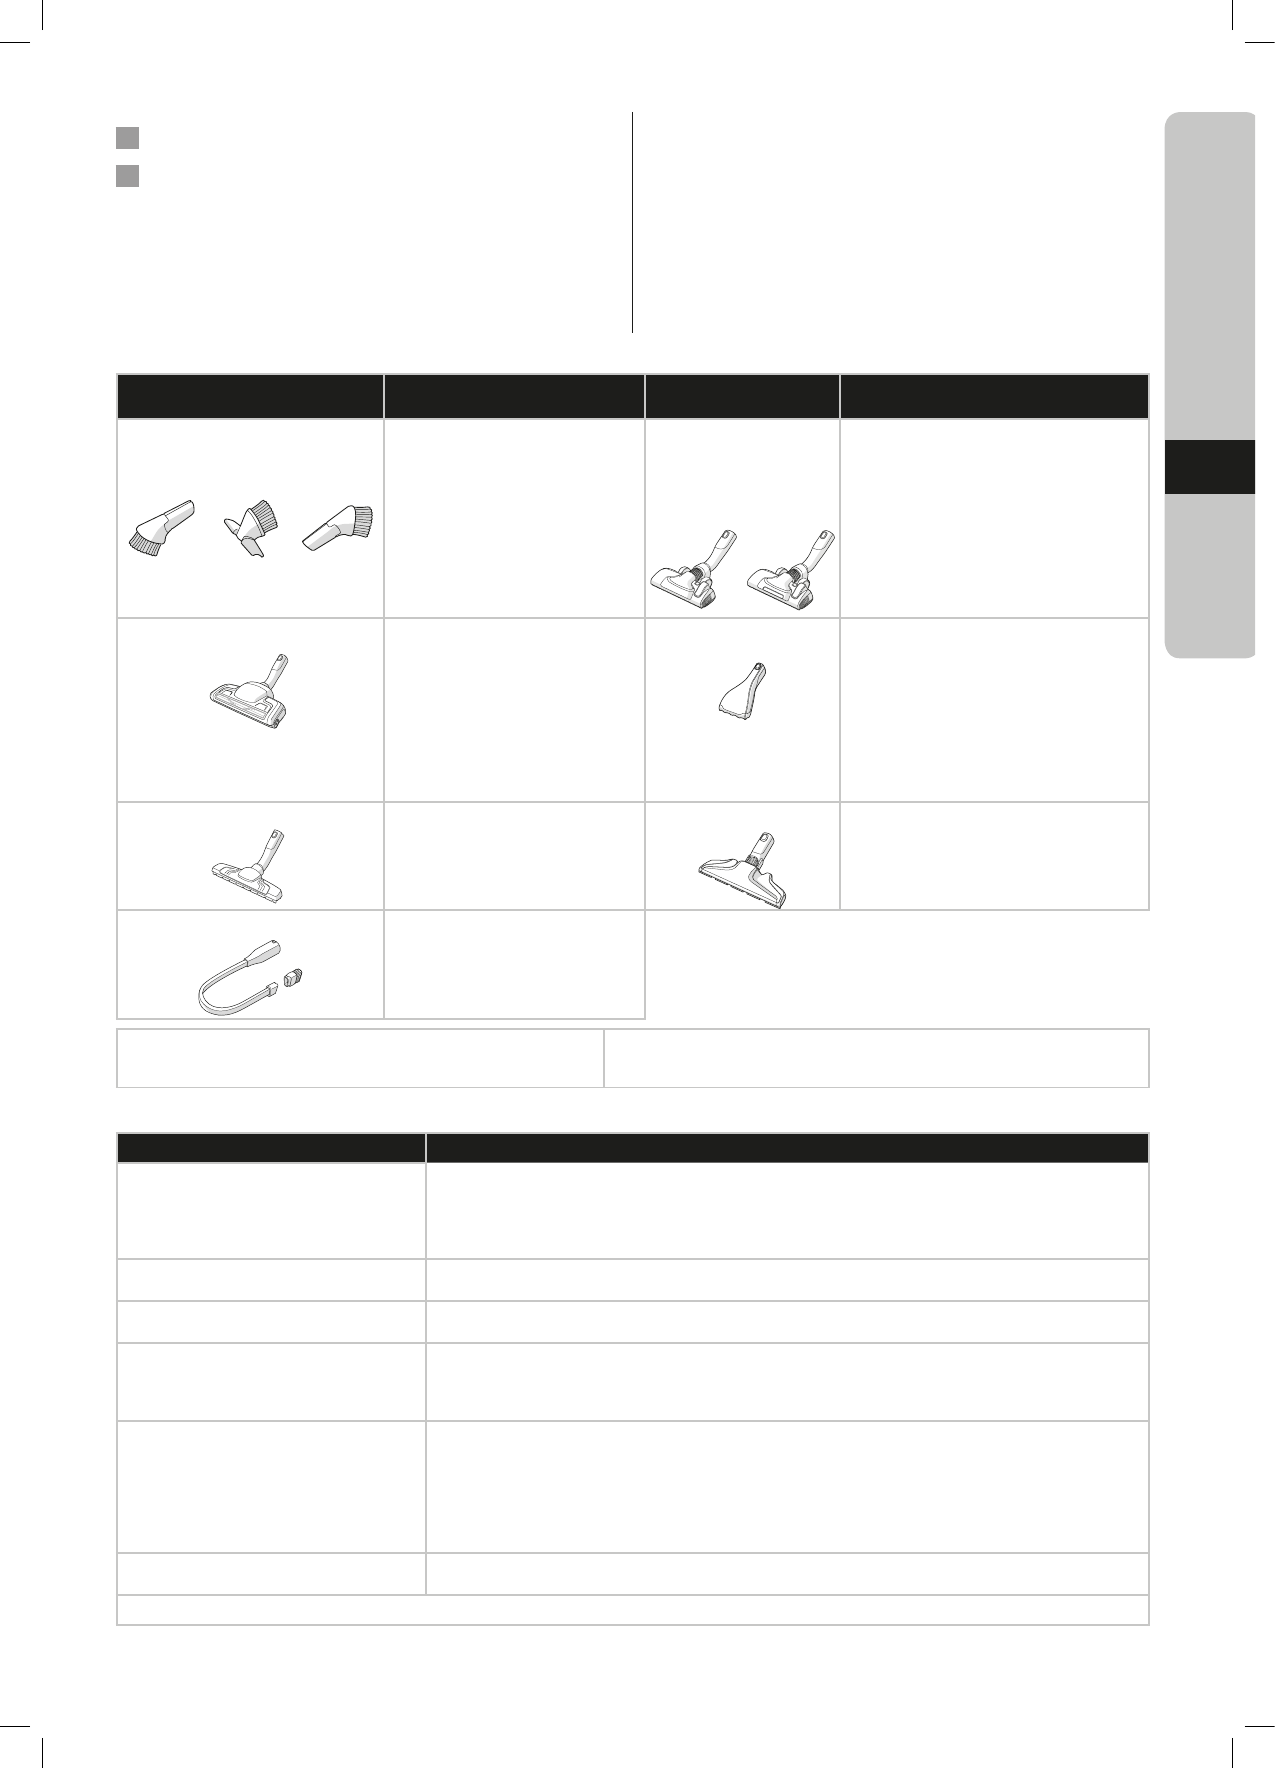
3IN1 ACCESSORY TOOL
23 Pull the textile tab to take out 3in1 tool. The tool has 3 functions, see pictures
on next page.
24 After usage, put it back in its place.
2www.AEG.com
2www.AEG.com
GB
DE
AR
ES
FA
FR
GR
IT
NL
PT
PRECAUÇÕES DE SEGURANÇA
Este aparelho pode ser utilizado por crianças com 8 anos ou mais e por pessoas com capacidades físicas,
sensoriais ou mentais reduzidas ou com pouca experiência e conhecimento se tiverem recebido supervisão
ou instruções relativas à utilização do aparelho de forma segura e compreenderem os perigos envolvidos.
As crianças não podem brincar com o aparelho.
A limpeza e a manutenção não devem ser efetuadas por crianças sem supervisão.
AVISO: As escovas turbo* possuem uma escova rotativa que pode aprisionar objetos. Utilize-as com cuidado
e apenas nas superfícies para as quais foram concebidas. Desligue o aspirador antes de remover qualquer
objeto que tenha ficado aprisionado e antes de limpar a escova.
As pilhas têm de ser removidas do controlo remoto da pega* / escova com luz LED* antes de o produto ser
enviado para eliminação**.
*Apenas alguns modelos.
**As instruções de remoção da pilha encontram-se na parte desdobrável das secções 25 e 26.
Desligue sempre a ficha da tomada elétrica antes de limpar ou efetuar alguma manutenção no aparelho ou
quando remover a pilha. A pilha deve ser eliminada em segurança.
Se o cabo estiver danificado, terá de ser substituído num Centro de Assistência Técnica AEG autorizado para
evitar perigos.
O aspirador VX9só deve ser utilizado para trabalhos de aspiração normal em espaços interiores de um ambiente doméstico. Certifique-se de que o aspirador é
guardado num local seco.
Todas as ações de manutenção e reparação terão de ser efetuadas num Centro
de Assistência Técnica AEG autorizado.
Os materiais da embalagem, por exemplo, os sacos de plástico, não devem ficar
ao alcance das crianças, para evitar o perigo de asfixia.
Nunca utilize o aspirador:
Em áreas molhadas.
Perto de gases inflamáveis, etc.
Quando o produto apresentar sinais de danos visíveis.
Sobre fluidos ou objetos aguçados.
Quando a escova de chão apresentar sinais de danos visíveis.
Sobre brasas de carvão quentes ou frias, pontas de cigarro acesas, etc.
Sobre pó fino, por exemplo, gesso, cimento, farinha ou cinzas quentes ou frias.
Não deixe o aspirador exposto à luz solar direta.
Evite expor o aspirador a calor forte e temperaturas negativas.
Nunca utilize o aspirador sem os filtros instalados.
Não tente tocar no rolo-escova com o aspirador ligado nem quando o rolo-
escova estiver a rodar.
Quando as rodas estão bloqueadas.
Precauções para o cabo de alimentação
Verifique a ficha e o cabo regularmente. Nunca utilize o aspirador se existirem
danos na ficha ou no cabo.
Os danos no cabo do aspirador não estão cobertos pela garantia.
Nunca puxe ou levante o aspirador pelo cabo de alimentação.
A utilização do aspirador nas condições indicadas acima pode causar ferimentos
graves ou danificar o produto. Estes ferimentos ou danos não estão cobertos
pela garantia nem pela AEG.
ASSISTÊNCIA E GARANTIA
Todas as ações de manutenção e reparação terão de ser efetuadas num Centro
de Assistência Técnica AEG autorizado.
Os danos no cabo do aspirador não estão cobertos pela garantia. Quaisquer
danos no motor que sejam causados por aspiração de algum líquido, pela
submersão do aparelho em algum líquido ou pela utilização do aparelho com
danos na mangueira ou na escova não estão cobertos pela garantia.
Utilize sempre os sacos de aspirador s-bag originais destinados a este aspirador;
consulte a secção 11. Quaisquer danos causados no aspirador por uma utilização
incorreta de sacos de pó não originais não estão cobertos pela garantia.
ELIMINAÇÃO
This symbol on the product indicates that this product contains a
battery which shall not be disposed with normal household waste.
Este símbolo no produto indica que o produto contém uma pilha
que não pode ser eliminada juntamente com os resíduos domésticos
comuns.
Este símbolo no produto ou na respetiva embalagem indica que o
produto não pode ser tratado como um resíduo doméstico.
Para reciclar o seu produto, coloque-o num ponto de recolha oficial ou
entregue-o num Centro de Assistência Técnica AEG, onde a pilha e as
peças elétricas serão removidas e enviadas para reciclagem de forma
correta e profissional. Siga os regulamentos do seu país relativos à
recolha separada de produtos elétricos e baterias recarregáveis.
A AEG Home Care & SDA declara que o Aspirador com equipamento de rádio de
tipo HER2 e HER3 está em conformidade com a Diretiva 2014/53/UE.
NOTAS SOBRE OS REGULAMENTOS DE ETIQUETA DE ENERGIA
Este aspirador é um aspirador de uso geral.
Para conseguir a eficiência energética e o desempenho de limpeza indicados
para carpete, utilize a escova universal substituível
“PrecisionFlow / PrecisionFlow LED”.
Para conseguir o desempenho de limpeza indicado para piso rígido com
frestas, utilize a escova específica para piso rígido “Parketto Pro” quando
especificada e incluída na embalagem. Caso contrário, utilize a escova
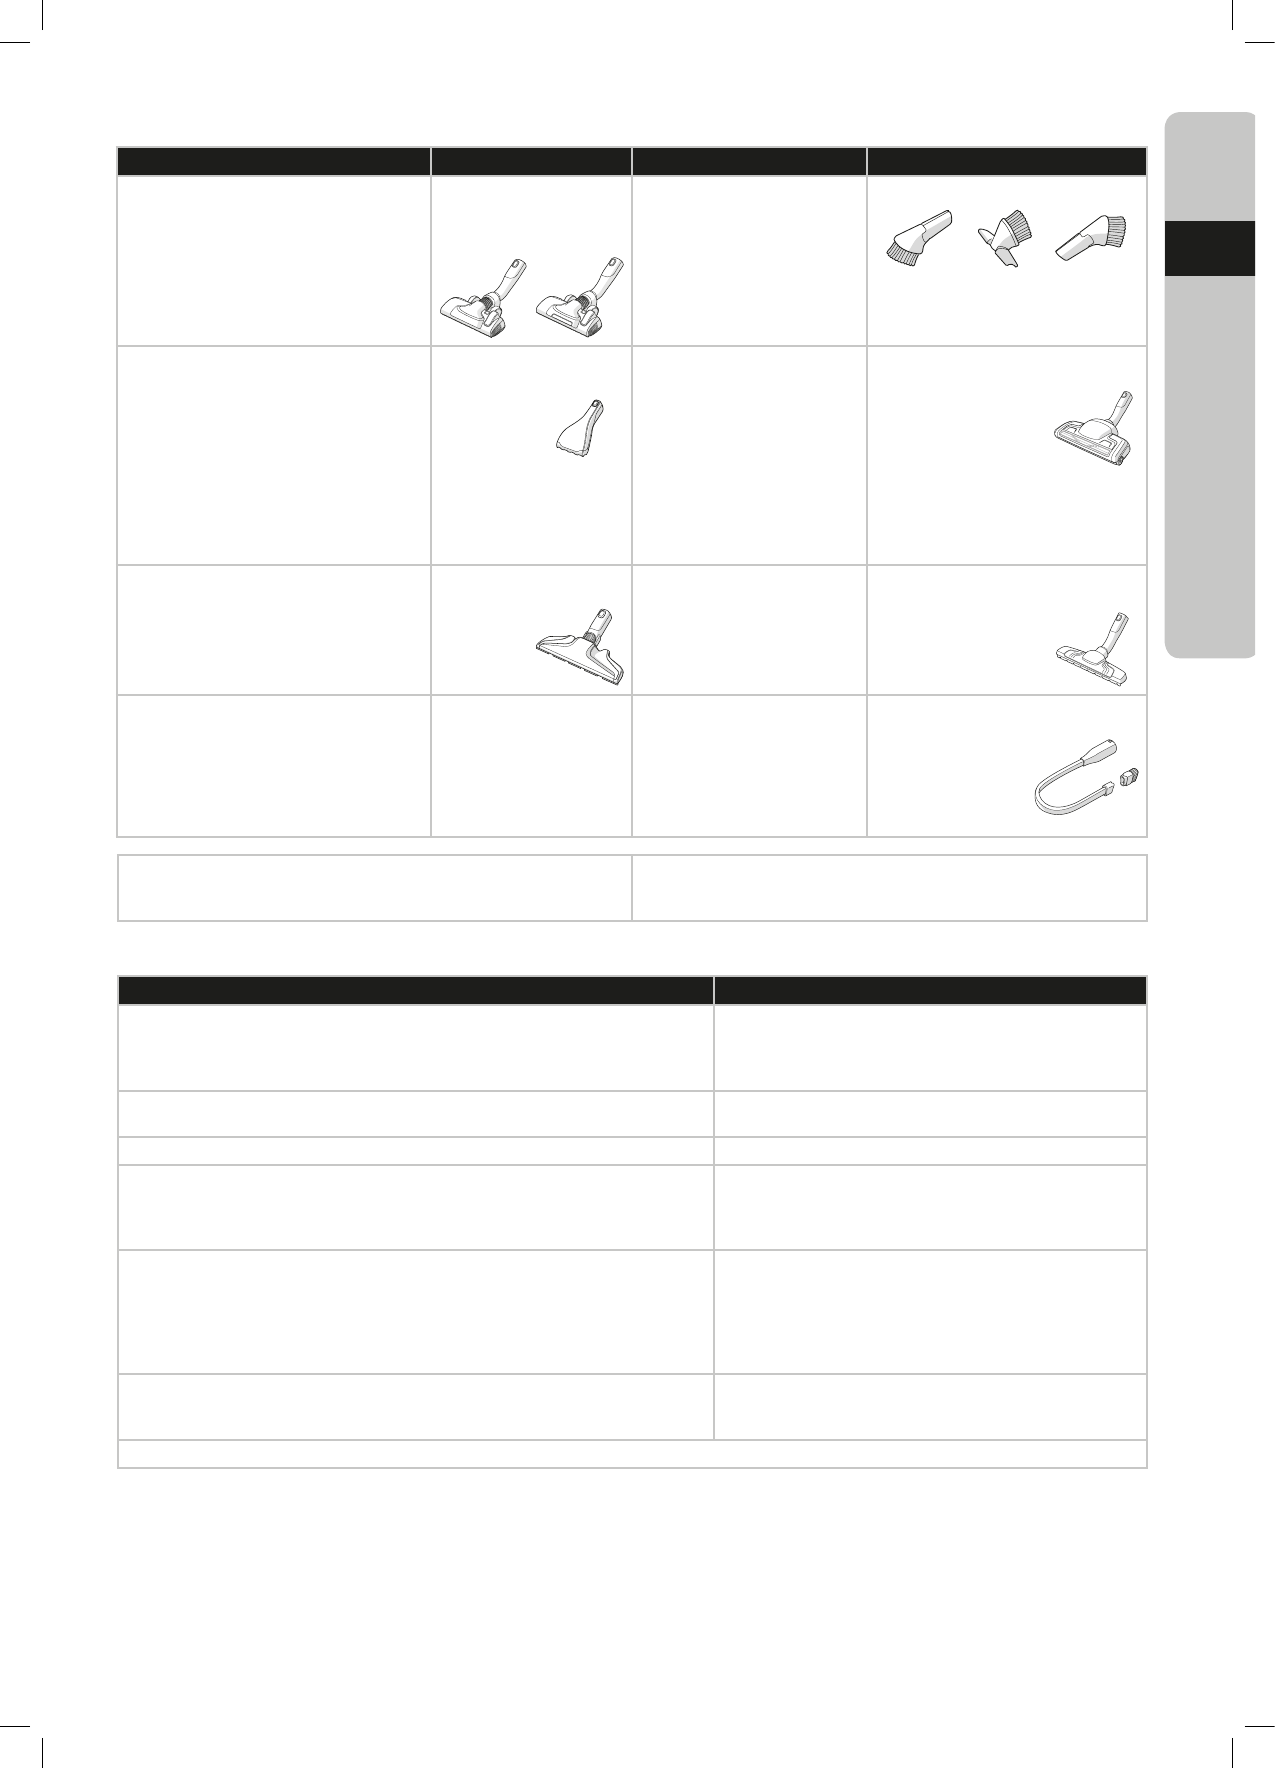
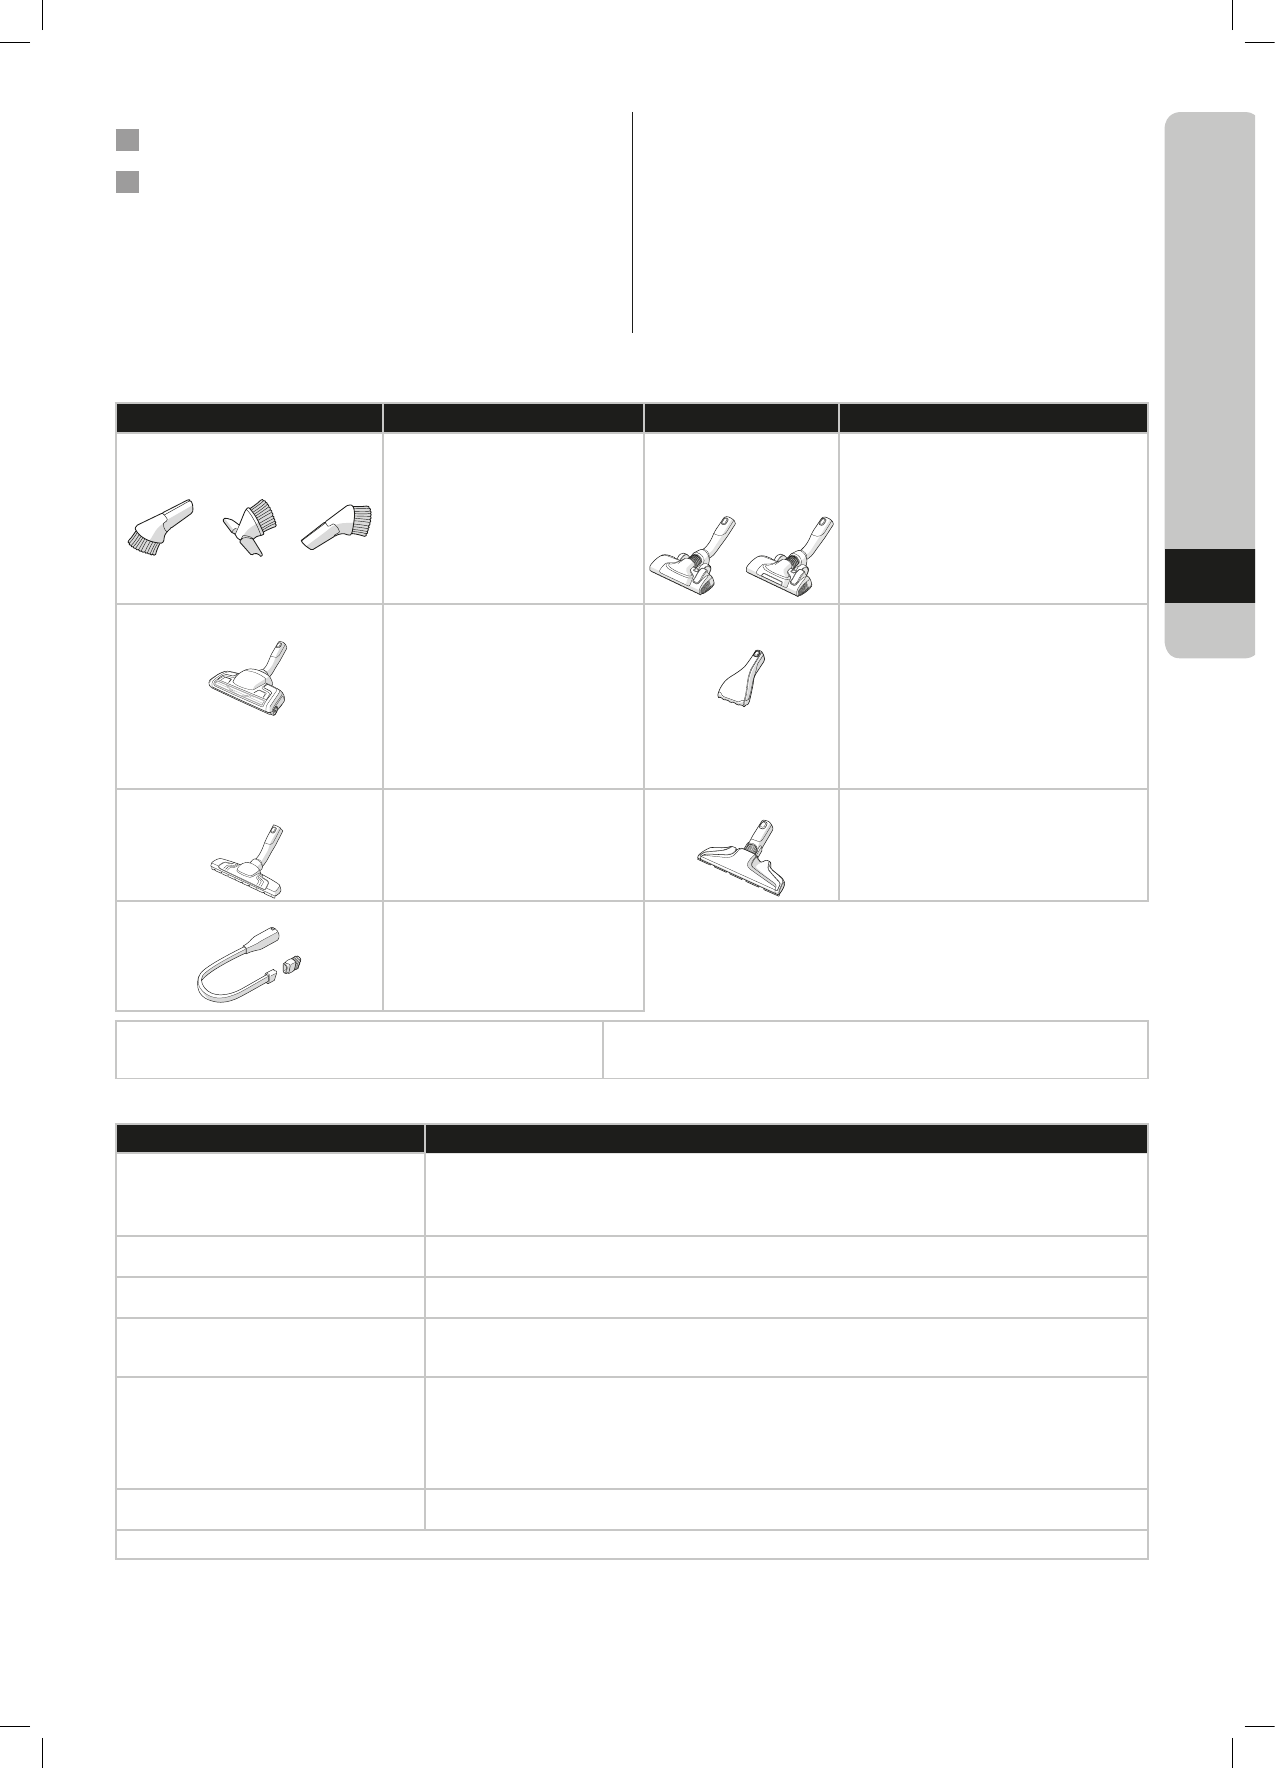
- La luce anteriore aiuta a vedere la polvere e lo
sporco negli spazi bui (sotto i mobili e così via).
Solo PrecisionFlow LED
123
X. Spazzola Turbo*Spazzola per moquette:
- Spazzola e aspira
contemporaneamente (perfetta per
raccogliere peli, fibre e così via).
- Il rullo spazzola è controllato dal
flusso di aria dell'aspirapolvere.
- Non adatta alla moquette alta e
con frange lunghe, alla moquette
antiscivolo tipo zerbini e alla moquette
impermeabile. Utilizzare la spazzola
combinata al suo posto.
Y. Spazzola Mini Turbo*Spazzola per tappezzeria:
- Spazzola e aspira contemporaneamente
(perfetta per raccogliere peli, fibre e così via).
- Per arredi in tessuto, sedili delle auto,
materassi e così via
- Il rullo a spazzola è controllato dal flusso di
aria dell'aspirapolvere.
-Non adatta per moquette alta e con frange
lunghe perché si possono incastrare nel rullo
rotante a spazzola.
Z. Spazzola ParkettoPro*Spazzola per pavimenti duri:
- Per pulire delicatamente i pavimenti
duri (parquet, pavimenti in legno,
piastrelle e così via).
- Migliori risultati di aspirazione
polvere su pavimenti duri con fessure.
AA. Spazzola FlexProPlus*Spazzola per pavimenti duri:
- Per passare sotto/in mezzo a mobili, angoli e
altri ostacoli.
- Può ruotare facilmente di 180° per accedere
direttamente negli spazi stretti.
AB. Bocchetta per fessure lunga*Accessorio extra lungo
- Per gli spazi diicili da raggiungere
(mensole e così via).
- Per gli spazi stretti (dietro i radiatori,
sotto i sedili delle auto e così via).
Modelli con regolazione manuale della potenza
- seguire i disegni sull'aspirapolvere per ottenere risultati eccellenti.
I modelli con funzione AUTO regolano automaticamente la potenza aspirante
per ottenere prestazioni eccellenti e praticità su ogni superficie. Per la regolazione
manuale, seguire gli schemi per le prestazioni ottimali.
RISOLUZIONE DEI PROBLEMI
PROBLEMASOLUZIONE
L'aspirapolvere non si avvia
• Accertarsi che il cavo sia collegato alla rete di alimentazione.
• Accertarsi che la spina e il cavo non siano danneggiati.
• Accertarsi che non ci siano fusibili bruciati.
• Accertarsi che la spia della batteria sull'impugnatura del telecomando risponda ai comandi (solo per alcuni modelli).
La spia s-bag® è accesa
• Controllare che l's-bag® non sia pieno o bloccato.
• Se l's-bag® è già stato sostituito, sostituire il filtro del motore.
La spia del filtro è accesa (solo su determinati
modelli)
Sostituire o lavare (se lavabile) il filtro d’uscita.
L'aspirapolvere si spegne e non funziona più
L'aspirapolvere potrebbe essersi surriscaldato: staccarlo dalla rete di alimentazione; controllare se spazzola, tubo, tubo
flessibile o filtri sono ostruiti. Far rareddare l'aspirapolvere per 30 minuti prima di collegarlo di nuovo.
Se l'aspirapolvere non funziona, contattare un centro di assistenza AEG autorizzato.
Riduzione della capacità di aspirazione rispetto
al solito
• Controllare che l's-bag non sia pieno o bloccato.
• Controllare se il filtro del motore è ostruito e va sostituito.
• Controllare se la spazzola è ostruita e va liberata.
• Controllare se il tubo flessibile è ostruito schiacciandolo delicatamente. Tuttavia, fare attenzione nel caso l'ostruzione
sia dovuta a vetro o aghi incastrati nel tubo flessibile.
Nota: la garanzia non copre danni al tubo flessibile causati dalla pulizia.
L'aspirapolvere ha aspirato dell'acqua
Sarà necessario sostituire il motore presso un centro assistenza autorizzato AEG.
Eventuali danni al motore causati dalla penetrazione di acqua non sono coperti dalla garanzia.
Per qualsiasi ulteriore problema, contattare un centro di assistenza autorizzato AEG.
GB
DE
AR
ES
FA
FR
GR
IT
NL
PT
27
www.aeg.com
NORME DI SICUREZZA
Quest’apparecchiatura può essere usata da bambini a partire dagli 8 anni e da adulti con limitate capacità fisiche,
sensoriali o mentali o con scarsa esperienza o conoscenza sull'uso dell'apparecchiatura, solamente se sorvegliati o
se sono stati istruiti relativamente all'uso dell'apparecchiatura e se hanno compreso i rischi coinvolti.
Evitare che i bambini giochino con l'apparecchiatura.
La pulizia e gli interventi di manutenzione non devono essere eseguiti dai bambini senza supervisione.
AVVERTENZA: le spazzola turbo* sono dotate di un rullo spazzola rotante che potrebbe intasarsi. Utilizzarli
con attenzione e soltanto sulle superfici adatte. Spegnere l'aspirapolvere prima di rimuovere eventuali oggetti
intrappolati o pulire la spazzola.
Togliere le batterie dal telecomando nell'impugnatura* / nella spazzola illuminata a LED* prima di rottamare il
prodotto**.
*Solo per alcuni modelli.
**Le informazioni su come estrarre la batteria sono riportate nella parte pieghevole nelle sezioni 25 e 26.
Scollegare sempre la spina dalla rete di alimentazione prima di eseguire interventi di pulizia o manutenzione
sull'apparecchiatura o durante la rimozione della batteria. La batteria va smaltita in sicurezza.
Se il cavo è danneggiato, la sostituzione va eseguita soltanto presso un centro di assistenza autorizzato AEG per
evitare possibili pericoli.
VX9 deve essere utilizzato soltanto per la normale pulizia interna e negli ambienti domestici. Conservare sempre l'aspirapolvere in un ambiente asciutto.
Qualsiasi intervento di manutenzione e riparazione deve essere eseguito presso un centro di assistenza autorizzato AEG.
Tenere il materiale di imballaggio, tra cui i sacchetti di plastica, fuori dalla
portata dei bambini per evitare il rischio di soocamento
Mai utilizzare l'aspirapolvere:
In aree bagnate.
In prossimità di gas infiammabili e così via.
Quando il prodotto mostra segni visibili di danneggiamento.
Su oggetti appuntiti o su liquidi.
Quando la spazzola presenta segni visibili di danneggiamento.
Su cenere calda o fredda, mozziconi di sigaretta accesi e così via.
Su polvere fine di intonaco, calcestruzzo, farina o cenere calda o fredda.
Non lasciare l'aspirapolvere esposto alla luce solare diretta.
Evitare di esporre l'aspirapolvere ad alte temperature di riscaldamento o
congelamento.
Mai usare l'aspirapolvere senza filtri.
Non toccare il rullo spazzola mentre l’aspirapolvere è acceso e il rullo spazzola
sta ruotando.
Quando le ruote sono bloccate.
Precauzioni con il cavo di alimentazione
Controllare regolarmente la spina e il cavo. Mai utilizzare l'aspirapolvere se la
spina o il cavo sono danneggiati.
Eventuali danni al cavo dell'aspirapolvere non sono coperti dalla garanzia.
Mai tirare o sollevare l'aspirapolvere dal cavo.
L'utilizzo dell'aspirapolvere nelle circostanze sopra indicate può causare gravi
lesioni personali o danni al prodotto. Tali lesioni o danni non sono coperti dalla
garanzia o da AEG.
MANUTENZIONE E GARANZIA
Qualsiasi intervento di manutenzione e riparazione deve essere eseguito presso
un centro di assistenza autorizzato AEG.
Eventuali danni al cavo dell'aspirapolvere non sono coperti dalla garanzia.
Eventuali danni al motore causati da aspirazione di liquidi, immersione
dell'apparecchiatura in un liquido o utilizzo dell'apparecchiatura con un tubo e
una bocchetta danneggiati non sono coperti da garanzia.
Utilizzare sempre i sacchetti s-bag adatti a questo specifico aspirapolvere. Vedere
la sezione 11. I danni causati all'aspirapolvere da un uso non corretto di sacchetti
non originali non sono coperti dalla garanzia.
SMALTIMENTO
Questo simbolo sul prodotto indica che il prodotto contiene una
batteria che non deve essere smaltita con i normali rifiuti domestici.
Questo simbolo sul prodotto o sulla confezione indica che il prodotto
non deve essere considerato come un normale rifiuto domestico.
Per riciclare il proprio prodotto, portarlo presso un punto di raccolta
uiciale o presso un centro assistenza AEG che possa estrarre
e riciclare la batteria e i componenti elettrici in maniera sicura e
professionale. Attenersi alle norme del proprio Paese per una raccolta
dierenziata dei componenti elettrici e delle batterie ricaricabili.
Con la presente, AEG Home Care and SDA dichiara che l'aspirapolvere con
strumentazione radio tipo HER2 ed HER3 è conforme alla direttiva 2014/53/
NOTE SULLE NORME INERENTI ALLE ETICHETTE ENERGETICHE
Questo aspirapolvere è di uso generico.
Per ottenere l'eicienza energetica e le prestazioni di pulizia indicate per la
moquette, utilizzare la bocchetta intercambiabile universale
“PrecisionFlow / PrecisionFlow LED”.
Per ottenere le prestazioni di pulizia indicate per i pavimenti duri con
fessure, utilizzare la bocchetta specifica per pavimenti duri "Parketto Pro"
quando specificato e in dotazione, diversamente utilizzare la bocchetta
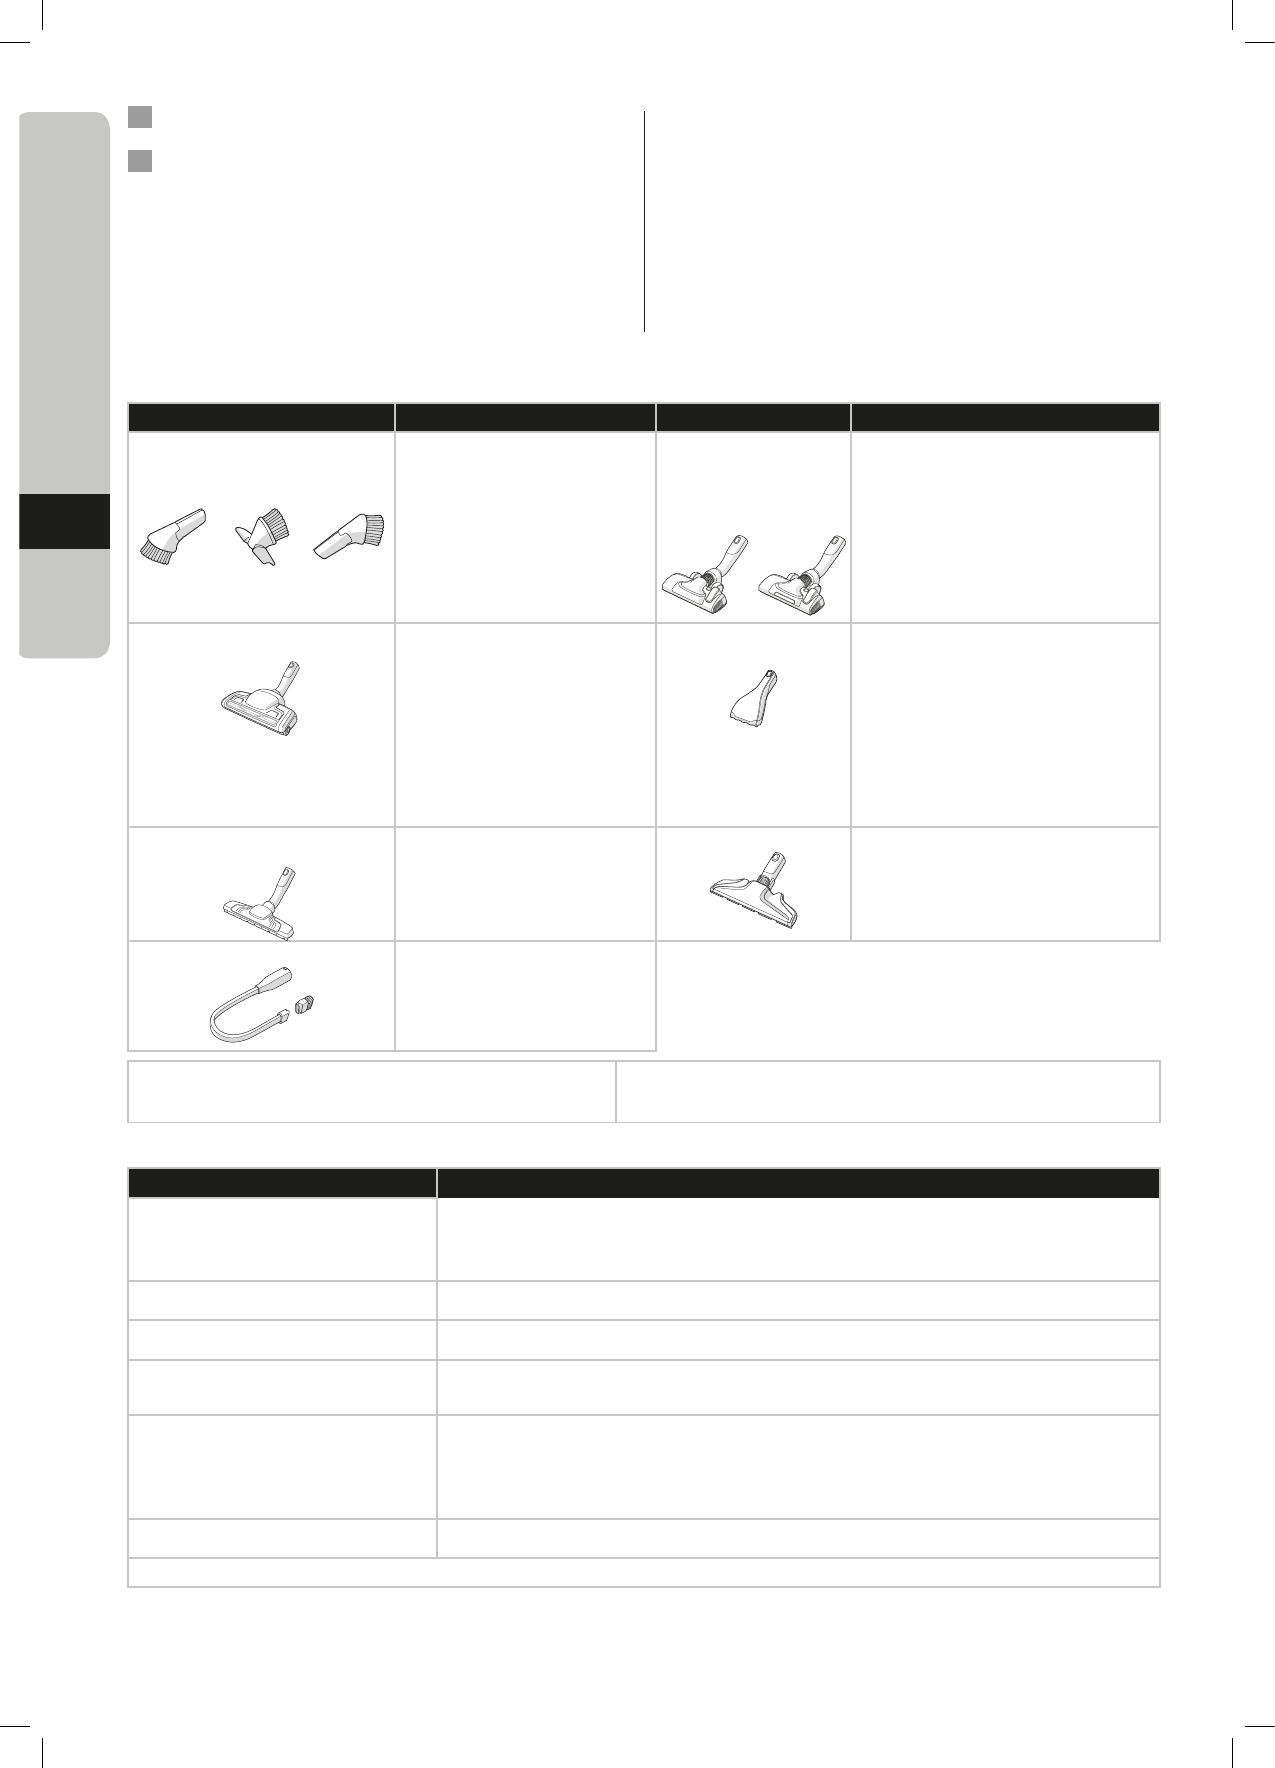
stofopname, zowel op tapijten als op harde vloeren.
- Wijzig de instelling van het mondstuk met de pedaal.
Het pictogram toont het aanbevolen vloertype.
- De voorverlichting helpt stof en vuil detecteren
(onder meubels enz.). Uitsluitend PrecisionFlow LED
123
X. Turbomondstuk*Tapijtmondstuk:
- Borstelt en stofzuigt tegelijkertijd
(optimale opname van haar, vezels enz.).
- De borstelrol wordt aangedreven door de
luchtstroom van de stofzuiger.
- Niet geschikt voor tapijten met zeer diepe
polen en lange franjes, antisliptapijten zoals
deurmatten of waterbestendige tapijten.
Hiervoor dient het universele mondstuk te
worden gebruikt.
Y. Mini Turbo-mondstuk*Bekledingmondstuk:
- Borstelt en stofzuigt tegelijkertijd (optimale
opname van haar, vezels enz.).
- Voor stoen meubels, autostoelen, matrassen enz.
- De borstelrol wordt aangedreven door de
luchtstroom van de stofzuiger.
- Niet geschikt voor tapijten met zeer diepe polen en
lange franjes, omdat de draaiende borstelrol hierop
kan vastlopen.
Z. ParkettoPro-mondstuk*Mondstuk voor harde vloeren:
- Voor een voorzichtige reiniging van harde
vloeren (parket, houten vloer, tegels enz.).
- Optimale stofopname op harde vloeren
met spleten.
AA. FlexProPlus-mondstuk*Mondstuk voor harde vloeren:
- Voor stofzuigen onder meubels, in hoeken en met
andere obstakels.
- Draait gemakkelijk 180 graden, voor directe toegang
tot nauwe ruimtes.
AB. Mondstuk voor lange spletenExtra lang mondstuk:
- Voor moeilijk te bereiken ruimtes
(bovenkant van rekken enz.).
- Voor nauwe ruimtes (achter radiatoren,
onder autostoelen enz.).
Modellen met handmatige vermogensregeling
– volg de afbeeldingen op de stofzuiger voor optimale prestaties.
Op modellen met AUTO-functie wordt het zuigvermogen automatisch aangepast
voor optimale reinigingsprestaties en comfort op alle oppervlakken. Voor een handmatige regeling
volgt u de afbeeldingen voor optimale prestaties.
PROBLEEMOPLOSSING
PROBLEEMOPLOSSING
De stofzuiger start niet
• Controleer of de kabel is aangesloten op het lichtnet.
• Controleer of de stekker en kabel niet beschadigd zijn.
• Controleer of er een zekering is doorgebrand.
• Controleer of het indicatielampje van de batterij in de handgreep met afstandsbediening reageert (alleen bepaalde modellen).
Het s-bag® indicatielampje brandt
• Controleer of de s-bag® vol of verstopt is.
• Als u de s-bag® al hebt vervangen, vervang dan het motorfilter.
Het filterindicatielampje brandt (alleen op speci-
fieke modellen)
Vervang of was het uitlaatfilter (als het uitwasbaar is).
De stofzuiger stopt
De stofzuiger kan oververhit zijn: koppel de stofzuiger los van het lichtnet; controleer of het mondstuk, de buis, de slang of de
filters verstopt zijn. Laat de stofzuiger 30 minuten afkoelen voor u de stekker opnieuw aansluit.
Als de stofzuiger nog steeds niet werkt, neem dan contact op met een erkend servicecentrum van AEG.
Vermindering van zuigvermogen
• Controleer of de s-bag vol of verstopt is.
• Controleer of het motorfilter verstopt is en toe is aan vervanging.
• Controleer of het mondstuk verstopt is en moet worden vrijgemaakt.
• Controleer of de slang verstopt is door er zachtjes op te knijpen. Wees hierbij echter wel voorzichtig, aangezien de obstructie
mogelijk is veroorzaakt door in de slang vastgeklemd glas of een naald.
Opmerking: De garantie dekt geen schade aan de slang die ontstaat bij de reiniging van de slang.
De stofzuiger heeft water opgezogen
De motor moet worden vervangen in een erkend servicecentrum van AEG.
Schade aan de motor veroorzaakt door het binnendringen van water wordt niet gedekt door de garantie
Neem voor verdere problemen contact op met een erkend servicecentrum van AEG.
GB
DE
AR
ES
FA
FR
GR
IT
NL
PT
30
www.aeg.com
VEILIGHEIDSVOORSCHRIFTEN
Dit apparaat mag worden gebruikt door kinderen vanaf 8 jaar oud en door personen met beperkte
lichamelijke, zintuiglijke of mentale capaciteiten of een ontoereikende ervaring en kennis, als dit gebeurt
onder toezicht of als ze hiervoor instructies hebben gekregen met betrekking tot het veilige gebruik van het
apparaat, en als ze begrijpen welke risico's hieraan zijn verbonden.
Kinderen mogen niet met het apparaat spelen.
Reiniging en onderhoud mag niet door kinderen worden uitgevoerd die niet onder toezicht staan.
WAARSCHUWING: Turbo-mondstukken* hebben een roterende borstel waarin deeltjes kunnen vastlopen.
Let bij het gebruik van deze accessoires goed op en gebruik ze alleen op de bedoelde oppervlakken. Schakel
de stofzuiger uit voordat u vastgelopen deeltjes verwijdert of de borstel schoonmaakt.
Voordat het product wordt weggegooid, moeten de batterijen worden verwijderd** uit de afstandsbediening
in de handgreep / het mondstuk met LED-verlichting*.
*Alleen bepaalde modellen
**Voor informatie over de verwijdering van de batterij, zie sectie 25 en 26 van het uitvouwgedeelte.
Koppel de stekker altijd los van het lichtnet voor u het apparaat reinigt of onderhoudt, of wanneer u de
batterij verwijdert. De batterij moet op een veilige wijze worden verwijderd.
Als de kabel beschadigd is, mag alleen een erkend servicecentrum van AEG deze vervangen, teneinde
gevaarlijke situaties te voorkomen.
VX9 mag alleen worden gebruikt voor normaal stofzuigen binnenshuis en in een huiselijke omgeving. Zorg dat de stofzuiger op een droge plek wordt opgeborgen.
Al het onderhoud of alle reparaties moeten worden uitgevoerd door een geautoriseerd AEG servicecentrum.
Het verpakkingsmateriaal, bijv. plastic zakken, moeten buiten het bereik van
kinderen worden gehouden, om verstikking te voorkomen.
Gebruik de stofzuiger nooit:
In natte omgevingen.
In de buurt van ontvlambare gassen, etc.
Wanneer het product zichtbare tekenen van beschadiging vertoont.
Op scherpe voorwerpen of vloeistoen.
Wanneer het vloermondstuk zichtbare tekenen van beschadiging vertoont.
Op hete of koude as, brandende sigarettenpeuken, etc.
Op fijnstof, bijvoorbeeld van pleister, beton, meel en warme of koude assen.
Laat de stofzuiger niet in direct zonlicht staan.
Stel de stofzuiger niet bloot aan sterke warmte of vriestemperaturen.
De stofzuiger mag nooit zonder de filters worden gebruikt.
Raak de borstel niet aan wanneer de stofzuiger is ingeschakeld en de rolborstel
draait.
Wanneer de wielen geblokkeerd zijn.
Voorzorgsmaatregelen stroomkabel
Controleer regelmatig de stekker en de kabel. Gebruik de stofzuiger nooit als de
stekker of de kabel beschadigd is.
Schade aan de kabel van de stofzuiger wordt niet gedekt door de garantie.
Trek nooit aan de stofzuiger of til deze nooit op met de kabel.
Als u de stofzuiger in de bovenstaande omstandigheden toch gebruikt, kan dit
ernstig persoonlijk letsel of schade aan het product tot gevolg hebben. Dergelijk
letsel of schade wordt niet door de garantie of door AEG gedekt.
ONDERHOUD EN GARANTIE
Al het onderhoud of alle reparaties moeten worden uitgevoerd door een
geautoriseerd AEG servicecentrum.
Schade aan de kabel van de stofzuiger wordt niet gedekt door de garantie.
Schade aan de motor veroorzaakt door: het stofzuigen van vloeistof, het
onderdompelen van het apparaat in vloeistof of het gebruik van het apparaat
met een beschadigde slang en mondstuk, wordt niet gedekt door de garantie.
Gebruik altijd originele s-bag stofzuigerzakken die geschikt zijn voor deze
specifieke stofzuiger, zie sectie 11. Schade die wordt toegebracht aan de
stofzuiger door het verkeerde gebruik van niet-originele stofzuigerzakken wordt
niet gedekt door de garantie.
VERWIJDERING
Dit symbool op het product geeft aan dat dit product een batterij
bevat die niet mag worden verwijderd met het gewone huishoudelijke
afval.
Dit symbool op het product of op de verpakking geeft aan dat het
product niet behandeld mag worden als huishoudelijk afval.
Breng uw product om het te recyclen naar een oicieel inzamelpunt of
naar een servicecentrum van AEG, waar de batterij en de elektrische
onderdelen op een veilige en professionele wijze kunnen worden
verwijderd en gerecycled. Volg de regels in uw land voor de aparte
inzameling van elektrische producten en heroplaadbare batterijen.
Hierbij verklaart AEG Home Care and SDA dat de stofzuiger met
radioapparatuur van het type HER2 en HER3 voldoet aan de eisen van Richtlijn
2014/53/EU
OPMERKINGEN OVER DE VOORSCHRIFTEN VOOR ENERGIELABELS
Deze stofzuiger is een stofzuiger voor algemene doeleinden.
Om de energie-eiciëntie en de reinigingsprestaties te verkrijgen die
aangewezen zijn voor tapijten, dient u het verwisselbare universele
mondstuk “PrecisionFlow / PrecisionFlow LED” te gebruiken.
Om de reinigingsprestaties te verkrijgen die zijn aangewezen voor een
harde vloer met spleten, dient u het specifieke vloermondstuk “Parketto
Pro” te gebruiken als dit wordt gespecificeerd en als het is opgenomen in
de verpakking. Als dit niet het geval is, dient u het verwisselbare universele
mondstuk “PrecisionFlow / PrecisionFlow LED” te gebruiken.
Dit instructieboek, de specifieke productkaart van de stofzuiger en het
energielabel kunnen worden gedownload op onze website, www.aeg.nl /
www.aeg.be.
De berekeningen zijn gebaseerd op de Gedelegeerde Verordening (EU)
nr. 665/2013 van de Commissie van 3 mei 2013, als aanvulling op Richtlijn
2010/30/EU. Alle procedures in deze instructies die niet gedetailleerder zijn
beschreven, werden gebaseerd op EN 60312-1:2013.
GB
DE
AR
ES
FA
FR
GR
IT
NL
PT
31
www.aeg.com
PORTUGUÊS
Obrigado por ter escolhido um aspirador AEG VX9. Para obter os melhores
resultados, utilize sempre acessórios e peças de substituição originais.
Este produto foi concebido a pensar no meio ambiente. Todas as peças de
plástico estão marcadas para efeitos de reciclagem.
ANTES DE INICIAR
• Leia este manual atentamente.
• Verifique se a embalagem inclui todas as peças mencionadas.
• Preste particular atenção ao capítulo “Precauções de segurança”!
DESCRIÇÃO DO ASPIRADOR VX9
A. Visor (ver versões mais à frente)
B. Tampa do filtro de saída
C. Filtro de saída
D. Ranhuras para estacionamento
E. Cabo de alimentação
F. Filtro do motor
G. Suporte do filtro do motor
H. Saco S-bag®
I. Suporte do saco S-bag®
J. Tampa do compartimento do pó
K. Acessório AeroPro 3-em-1
L. Mangueira AeroPro
M. Pega AeroPro (ver versões mais à
frente)
N. Tubo telescópico AeroPro
O. Encaixe de estacionamento
P. Visor dos modelos com controlo
manual por botão rotativo*
Q. Visor dos modelos com controlo
remoto*
R. Visor dos modelos com controlo
remoto e função AUTO*
S. Pega AeroPro Classic*
T. Pega AeroPro Ergo*
U. Pega AeroPro Remote Control*
V. Escova PrecisionFlow*
W. Escova PrecisionFlow LED (com
luzes à frente)*
X. Escova AeroPro Turbo*
Y. Escova AeroPro Mini Turbo*
Z. Escova ParkettoPro*
AA. Escova AeroPro FlexProPlus*
AB. Escova de frestas AeroPro Long*
* Apenas alguns modelos.
COMO UTILIZAR O ASPIRADOR
1 Abra a tampa do compartimento do pó premindo o botão S-BAG. Verifique
se o saco do aspirador (s-bag) está bem instalado.
2 Introduza a mangueira no aspirador (para remover, prima os botões de
bloqueio e puxe). Introduza a mangueira na respetiva pega até o botão de
bloqueio emitir um clique (para remover, prima o botão de bloqueio e puxe).
3 Encaixe o tubo telescópico na escova. Encaixe o tubo telescópico na pega da
mangueira (para remover, prima o botão de bloqueio e puxe).
4 Ajuste o tubo telescópico segurando o bloqueio com uma mão e puxando a
pega com a outra mão.
LIGARDESLIGAR O ASPIRADOR E AJUSTAR A POTÊNCIA DE SUCÇÃO
5 Puxe o cabo de alimentação para fora e ligue-o numa tomada elétrica. Prima
o botão ON/OFF para ligar/desligar o aspirador. Os indicadores acendem, o
indicador MIN/MAX acende da esquerda para a direita e retrocede (modelos
com função Auto).* Os modelos equipados com controlo remoto também
podem ser acionados com o botão ON/OFF da pega.*
6 Ajuste a potência de sucção (modelos com controlo manual): Rode o botão
rotativo do aspirador ou utilize a válvula de ar da pega.*
7 Ajuste a potência de sucção (modelos com controlo remoto): Prima o botão
+/- da pega. Os indicadores MIN/MAX e os símbolos no visor indicam o nível
de potência.*
8 Ajuste a potência de sucção (modelos com controlo remoto e AUTO): O
aspirador começa no modo AUTO (regulação automática da potência). O
indicador AUTO acende no visor e o indicador MIN/MAX fica intermitente.
Para regular a potência manualmente, prima o botão +/- da pega. Prima o
botão AUTO para voltar à função automática.*
9 Quando terminar a limpeza, prima o botão REWIND para recolher o cabo.
POSIÇÕES DE ESTACIONAMENTO
10 Utilize a posição de estacionamento da parte lateral (A) ou da parte inferior
(C) para transportar ou guardar o aspirador. Utilize a posição da parte de
trás (B) quando pretender fazer uma pausa (descansar as costas).
SUBSTITUIR O SACO DO ASPIRADOR SBAG®
11 Substitua o saco s-bag quando
- P* Modelos com botão rotativo: o indicador S-BAG acender a vermelho
- Q* Modelos com controlo remoto: o símbolo S-BAG acender a vermelho.
- R* Modelos com controlo remoto e AUTO: o indicador S-BAG acender
a vermelho (luz verde: o saco está bem, luz amarela: o saco terá de ser
substituído brevemente).
NB: Substitua sempre o saco s-bag quando o indicador S-BAG acender ou
quando surgir a luz vermelha, mesmo que o saco do pó não esteja cheio
(pode estar obstruído) e após utilizar um produto em pó para a limpeza
de carpetes. Para obter o melhor desempenho possível, utilize o saco Ultra
Long Performance que foi criado especificamente para o seu aspirador. Pode
utilizar outros sacos s-bag sintéticos. Não utilize sacos de aspirador em
papel! www.s-bag.com
12 Prima o botão S-BAG para abrir a tampa do compartimento do pó. A pega
do suporte do saco s-bag sobe. Puxe a pega para remover o saco s-bag com
o suporte. Não prima o botão de libertação.
13 Segure o saco s-bag com o suporte sobre um caixote do lixo. Prima o botão
para soltar o saco s-bag. Introduza um novo saco s-bag no suporte, inserin-
do o cartão na parte de trás do suporte.
14 Introduza o saco s-bag com o suporte pressionando-o para baixo em linha
reta nas guias. Certifique-se de que o saco s-bag não fica preso debaixo do
suporte. Feche a tampa. Se o saco s-bag não ficar bem posicionado ou se o
aspirador não tiver s-bag, a tampa não fecha.
NB: Quando ligar o aspirador após ter substituído o saco s-bag, o indicador
S-BAG demora cerca de 10 segundos a apagar-se (P* Modelos com botão
rotativo e Q* Modelos com controlo remoto) ou a ficar verde (R* Modelos
com controlo remoto e AUTO).
SUBSTITUIR OS FILTROS
15 Substitua/limpe** o filtro quando (**apenas no caso do filtro lavável)
- P* Modelos com botão rotativo: tiver substituído o s-bag 5 vezes
- Q* Modelos com controlo remoto: o símbolo FILTER acender a vermelho
- R* Modelos com controlo remoto e AUTO: o indicador do filtro acender
a vermelho. A luz verde indica que o filtro está em bom estado. Acende por
breves instantes quando o aspirador é ligado.
16 Prima o botão FILTER para abrir a tampa do filtro. Utilize filtros s-filter orig-
inais. Remova o filtro e verifique a referência na armação para saber qual é
o tipo de filtro. Substitua o filtro por um filtro novo ou lave-o**. Lave a parte
interior (lado sujo) em água corrente morna. Bata na armação do filtro para
remover a água. Repita o procedimento quatro vezes. (**apenas no caso do
filtro lavável)
NB: Não utilize produtos de lavagem. Evite tocar na superfície do filtro.
Deixe o filtro secar totalmente (mín. 24 h à temperatura ambiente) antes
de voltar a instalá-lo! Substitua o filtro lavável pelo menos uma vez por ano
ou quando verificar que está demasiado sujo ou danificado. Não remova a
esponja em forma de L que se encontra debaixo do filtro.
17 Após voltar a colocar o filtro, feche a tampa do filtro pressionando-a até
ouvir um clique de encaixe. Se a tampa do filtro se soltar, volte encaixar as
dobradiças na parte inferior e pressione a tampa do filtro até ouvir um clique
de encaixe.
NB: Quando ligar o aspirador após ter substituído o filtro, o indicador FILTER
demora cerca de 10 segundos a ficar verde (modelos com controlo remoto e
função AUTO) ou a apagar-se (modelos com controlo remoto).*
18 Substitua o filtro do motor quando estiver sujo ou após 5 substituições do
s-bag. Pressione o suporte do filtro para baixo e puxe-o para fora. Troque o
filtro e feche a tampa.
ASPIRAR COM A ESCOVA UNIVERSAL V*, W*
19 Mude a configuração da escova com o pedal. O ícone ilustra o tipo de piso
para o qual a configuração é recomendada.
20 Escova PrecisionFlow LED*: Desloque a escova para a frente. As luzes da
frente acendem-se automaticamente após alguns segundos. Quando a
escova não é utilizada, as luzes apagam-se automaticamente após alguns
segundos.
LIMPAR A ESCOVA UNIVERSAL V*, W**
21 Retire a escova do tubo. Limpe a pega da mangueira.
LIMPAR A ESCOVA TURBO X*
22 Retire a escova do tubo e remova os fios que estiverem enredados, cortan-
do-os com uma tesoura se for necessário. Utilize a pega da mangueira para
limpar a escova. *
FERRAMENTA DE ACESSÓRIOS 3EM1
23 Prima a aba de tecido para retirar a ferramenta 3-em-1. A ferramenta tem as
3 funções que estão ilustradas na página seguinte.
24 Quando terminar a utilização, volte a colocá-la no devido sítio.
GB
DE
AR
ES
FA
FR
GR
IT
NL
PT
32
www.aeg.com
A AEG tem o direito de alterar os produtos, informações e especificações
Libble takes abuse of its services very seriously. We're committed to dealing with such abuse according to the laws in your country of residence. When you submit a report, we'll investigate it and take the appropriate action. We'll get back to you only if we require additional details or have more information to share.
Product:
Forumrules
To achieve meaningful questions, we apply the following rules:
First, read the manual;
Check if your question has been asked previously;
Try to ask your question as clearly as possible;
Did you already try to solve the problem? Please mention this;
Is your problem solved by a visitor then let him/her know in this forum;
To give a response to a question or answer, do not use this form but click on the button 'reply to this question';
Your question will be posted here and emailed to our subscribers. Therefore, avoid filling in personal details.
Register
Register getting emails for AEG VX9 at:
new questions and answers
new manuals
You will receive an email to register for one or both of the options.
Get your user manual by e-mail
Enter your email address to receive the manual of AEG VX9 in the language / languages: English, German, Dutch, French, Italian, Portuguese, Spanish as an attachment in your email.
The manual is 19,22 mb in size.
You will receive the manual in your email within minutes. If you have not received an email, then probably have entered the wrong email address or your mailbox is too full. In addition, it may be that your ISP may have a maximum size for emails to receive.
The manual is sent by email. Check your email
If you have not received an email with the manual within fifteen minutes, it may be that you have a entered a wrong email address or that your ISP has set a maximum size to receive email that is smaller than the size of the manual.
The email address you have provided is not correct.
Please check the email address and correct it.
Your question is posted on this page
Would you like to receive an email when new answers and questions are posted? Please enter your email address.