684408
30
Zoom out
Zoom in
Previous page
1/37
Next page
- 0 -
112704
GEBRAUCHSANLEITUNG
INSTRUCTION BOOK
- 1 -
WICHTIGE SICHERHEITSHINWEISE
Beim Gebrauch eines Elektrogeräts sollten stets grundlegende Sicherheitsmaßnahmen beachtet werden.
Lesen Sie sämtliche Hinweise vor Gebrauch Ihre Haushaltsnähmaschine aufmerksam durch.
ACHTUNG – Zur Vermeidung von Verletzungen durch elektrischen Stromschlag:
Die Maschine nie unbeaufsichtigt lassen, wenn sie mit dem Stromnetz verbunden ist. Unmittelbar nach dem
Gebrauch sowie vor jeder Reinigung den Stecker aus der Steckdose ziehen.
Vor dem Einsetzen einer neuen Glühbirne den Netzstecker ziehen. Eine Glühbirne mit max. 15 Watt
verwenden.
VORSICHT – Zur Vermeidung von Bränden, elektrischen Stromschlägen und Personenschäden:
-
Die Maschine darf nicht als Spielzeug benutzt werden. Höchste Aufmerksamkeit ist geboten, wenn die
Maschine von Kindern oder im Beisein von Kindern benutzt wird.
-
Die Maschine darf ausschließlich zu dem in dieser Anleitung beschriebenen Zweck eingesetzt werden.
Benutzen Sie ausschließlich Zubehör, das vom Hersteller in dieser Anleitung empfohlen wird.
-
Die Maschine darf auf keinen Fall betrieben werden, wenn Kabel bzw. Stecker beschädigt sind, die
Maschine nicht ordnungsgemäß funktioniert, zu Boden gefallen oder beschädigt bzw. nass geworden ist.
Ist eine Überprüfung bzw. Reparatur notwendig oder sind elektrische bzw. mechanische Justierungen
erforderlich, so bringen Sie die Maschine zum nächstgelegenen Service-Kundendienst.
-
Diese Maschine ist mit einem Spezialkabel ausgestattet, das bei Beschädigung durch ein Kabel gleichen
Typs ersetzt werden muss. Ein Kabel gleichen Typs erhalten Sie bei Ihrem Händler.
-
Die Maschine darf nicht mit verstopften Belüftungsöffnungen betrieben werden. Halten Sie die
Belüftungsöffnungen der Maschine und des Fußanlassers frei von Flusen, Staub und losem Gewebe.
-
Keine Gegenstände in die Öffnungen der Maschine stecken bzw. fallen lassen.
-
Die Maschine nicht im Freien verwenden.
-
Die Maschine darf nicht an Orten betrieben werden, an denen Sprays oder reiner Sauerstoff verwendet
werden.
-
Keine Gegenstände auf den Fußanlasser stellen, da die Maschine unerwartet anlaufen könnte und Motor
bzw. Fußanlasser heißlaufen könnten.
-
Zum Ausschalten alle Schalter auf „AUS“ stellen und anschließend den Stecker aus der Steckdose ziehen.
-
Den Stecker nicht am Kabel herausziehen, sondern beim Herausziehen am Stecker festhalten.
-
Die Finger von allen beweglichen Teilen fernhalten. Besondere Vorsicht ist im Bereich um die Nähnadel
geboten.
-
Stets die korrekte Stichplatte verwenden. Eine falsche Stichplatte kann zu Nadelbruch führen.
-
Keine verbogenen Nadeln verwenden.
-
Das Nähgut beim Nähen nicht ziehen oder schieben. Dadurch könnte die Nadel verbogen werden bzw.
brechen.
-
Zur Durchführung von Arbeiten im Nadelbereich wie Einfädeln bzw. Auswechseln der Nadel oder
Wechseln des Nähfußes die Maschine stets ausschalten.
-
Zum Ausführen der in dieser Anleitung beschriebenen Wartungsarbeiten stets den Stecker der
Nähmaschine aus der Steckdose ziehen.
-
Ausschließlich Original-Ersatzteile verwenden.
DIESE ANLEITUNG BITTE GUT AUFBEWAHREN
Vorsicht
Bei Arbeiten im Nadelbereich sorgsam vorgehen, damit keine Fingerverletzungen auftreten.
Bei der ersten Inbetriebnahme der Maschine ein Stück Stoff unter den Nähfuß legen und die Maschine einige
Minuten uneingefädelt laufen lassen. Eventuell austretendes Öl mit einem Lappen abwischen.
.
- 2 -
Important
Safety
I
nstructions
When using an electrical appliance, basic safety precautions should always be followed, including the following:
Read all instructions before using your household sewing machine.
DANGER-To reduce the risk of electric shock:
Your household sewing machine should never be left unattended when plugged in. Always unplug your machine
from the electric outlet immediately after using and before cleaning.
Always unplug before changing lamp. Use a bulb 15 W max.
WARNING-TO reduce: the risk of burns, fire, electric shock or injury to persons
-
Do not allow to be used as a toy. Close attention is necessary when this sewing machine is used by or near
children.
-
Use this machine only for its intended use as described in this manual.
-
Never operate this sewing machine if it has a damaged cord or plug, if it is not working properly, if it has been
dropped or damaged or dropped into water. Return the sewing machine to the nearest authorized dealer or
service center for examination, repair, electrical or mechanical adjustment.
-
This machine is equipped with a special cord which, if damaged, must be replaced by an identical cord. This
can be obtained from your dealer.
-
Never operate the sewing machine with any air openings blocked. Keep ventilation openings of the sewing
machine and foot controller free from the accumulation of lint, dust and cloth.
-
Never drop or insert any object into the opening.
-
Do not use outdoors.
-
Do not operate where aerosol (spray) products are being used or where oxygen is being administered.
-
Do not put anything on the foot controller because the machine may accidentally start and the motor or the foot
controller may overheat.
-
To disconnect turn all controls to the off position, then remove plug from outlet.
-
Do not unplug by pulling on cord. To unplug, hold the plug, not the cord.
-
Keep fingers away from all moving parts. Special care is required around the sewing needle.
-
Always use the proper needle plate. The wrong plate can cause the needle to break.
-
Do not use bent needles.
-
Do not pull or push fabric while stitching. It may deflect the needle.
-
Switch the machine off when making any adjustments in the needle area, such as threading needle, changing
needle or changing presser foot and the like.
-
Always unplug the sewing machine from the electric outlet when making any user servicing mentioned in the
instruction manual.
-
Use only identical replacement parts
SAVE THESE INSTRUCTIONS
Warning
When working close to the needle be very careful not to prick your fingers. When you use the machine for the first
time, put a piece of cloth under the presser foot und run the machine without thread for some minutes. Dry any oil
spots which may appear.
- 3 -
INHALTSVERZEICHNIS
Hauptbestandteile ............................................................................................................................................................ 5
Zubehör ........................................................................................................................................................................... 6
In Betriebnahme der Nähmaschine ................................................................................................................................ 7
Entfernen des Anschiebtisches…………………………………………………………………………………………………… 8
Freiarmnähen................................................................................................................................................................... 8
Aufspulen ........................................................................................................................................................................ 9
Herausnehmen von Spulenkapsel und Spule ................................................................................................................. 10
Einsetzen der Spule in die Spulenkapsel ........................................................................................................................ 10
Einsetzen der Spulenkapsel in den Greifer ..................................................................................................................... 11
Einfädeln des Oberfadens ..............................................................................................................................................12
Heraufholen des Unterfadens .........................................................................................................................................13
Ändern der Nährichtung ..................................................................................................................................................13
Standfestigkeit der Maschine ..........................................................................................................................................14
Einstellen der Fadenspannung........................................................................................................................................ 15
Auswechseln der Nadel...................................................................................................................................................16
Einsatz “Stick- und Stopfplatte“ ....................................................................................................................................... 16
Stoff-Faden-Nadel-Tabelle .............................................................................................................................................. 17
Nähen (Stichmusterwähler) & Nähtischausstattung ........................................................................................................ 18
Nähbeginn....................................................................................................................................................................... 20
Stichbreite………………………………………………… ……………………………………………………………………… 20
Abschluss einer Naht ...................................................................................................................................................... 21
Geradstich....................................................................................................................................................................... 22
Zickzack Nähen............................................................................................................................................................... 22
Stretchsticheinstellung .................................................................................................................................................... 22
Versäubern - Overlockstich ............................................................................................................................................. 23
Blindstich....................................................................................................................................................................24 - 25
Annähen von Knöpfen.....................................................................................................................................................26
Stoffkante an Stoffkante nähen .......................................................................................................................................26
Einnähen eines Reißverschlusses ..................................................................................................................................27
Knopflöcher nähen – Einstufenknopfloch…………………………………………………………………………………….28 - 30
Säumen........................................................................................................................................................................... 31
Zwillingsnadel.................................................................................................................................................................. 32
Freihandsticken............................................................................................................................................................... 32
Kantenlineal .................................................................................................................................................................... 33
Saumführung................................................................................................................................................................... 33
Reinigen und Ölen........................................................................................................................................................... 34
Behebung von Störungen ............................................................................................................................................... 35
- 4 -
CONTENTS
Principal parts ...........................................................................................………............................................................. 5
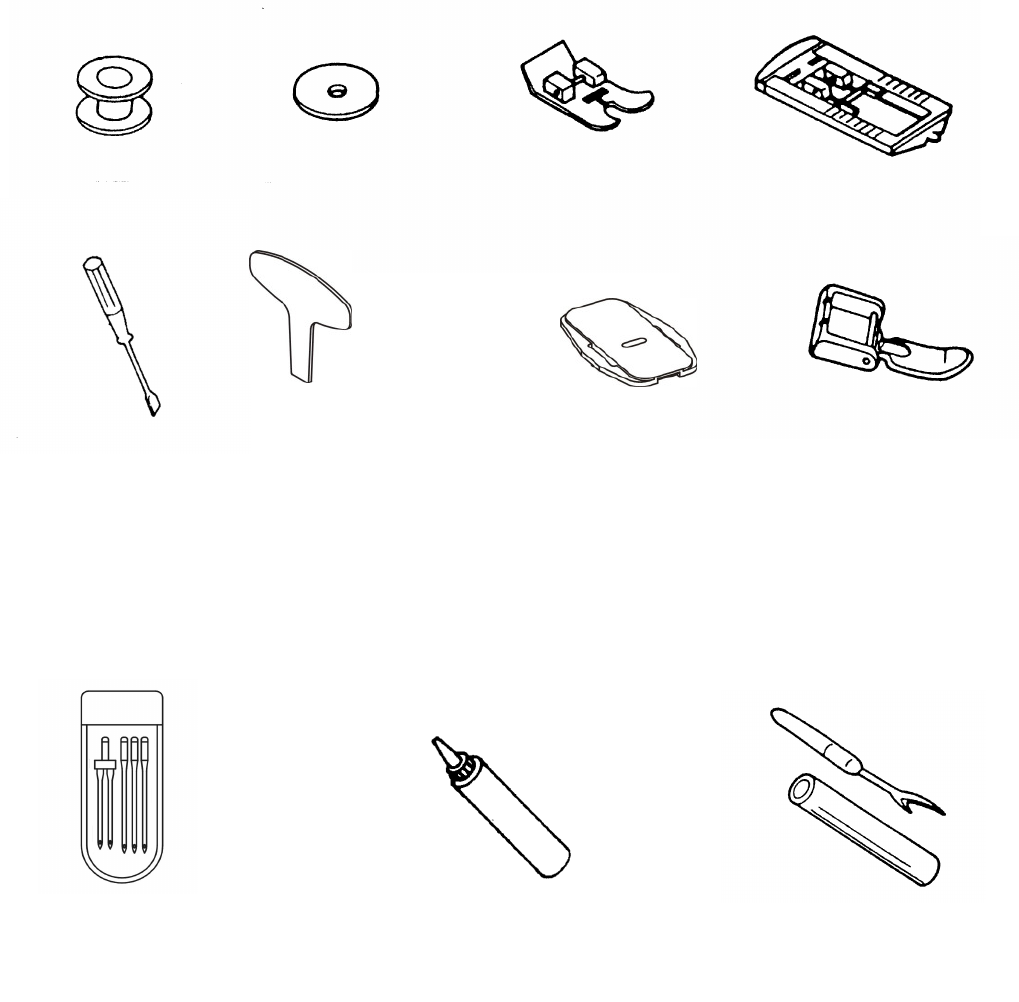
Accessories....................................................................................................................................................................... 6
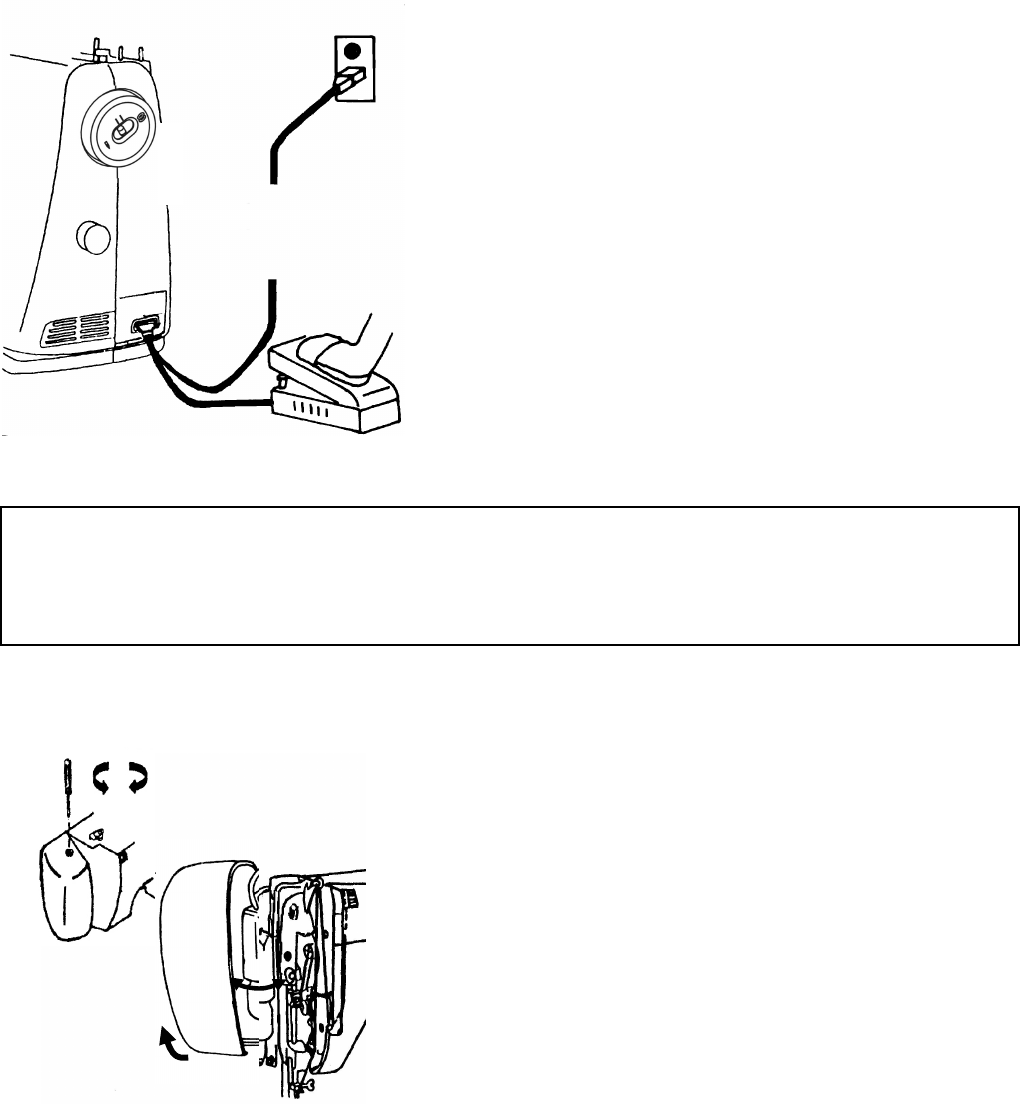
Before sewing .................................................................................................................................................................. 7
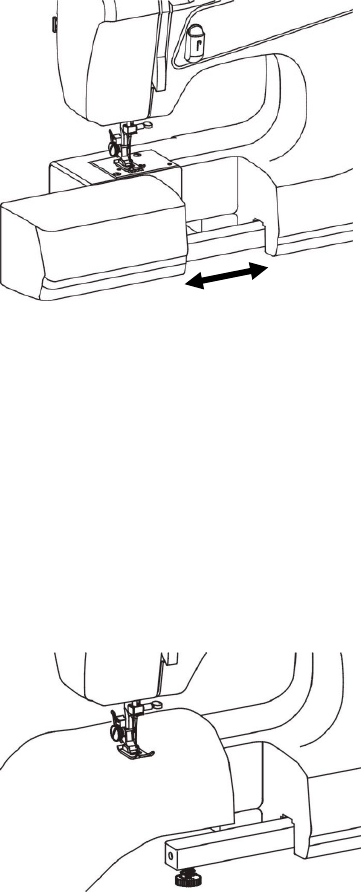
Removing extension table................................................................................................................................................ 8
Free arm sewing .............................................................................................................................................................. 8
Winding the bobbin .......................................................................................................................................................... 9
Removing bobbin case and bobbin..................................................................................................................................10
Inserting bobbin into bobbin case.....................................................................................................................................10
Inserting bobbin case into shuttle race............................................................................................................................. 11
Threading upper thread ...................................................................................................................................................12
Pulling up the bobbin thread ............................................................................................................................................13
Changing sewing directions .............................................................................................................................................13
Leveling machine .............................................................................................................................................................14
Adjusting thread tension...................................................................................................................................................15
Changing needle.............................................................................................................................................................. 16
Inserting “darning plate“ ...................................................................................................................................................16
Fabric-Thread-Needle-Chart ............................................................................................................................................ 17
Sewing (pattern selector) and operating chart ................................................................................................................. 18
Start sewing ..................................................................................................................................................................... 20
Stitch width…………………….……………………………………………………………………………………………………. 20
How to finish stitches .......................................................................................................................................................21
Straight stitch ................................................................................................................................................................... 22
Zigzag sewing ..................................................................................................................................................................22
Stretch stitch adjustement………………………………………………………………………………………………………… 22
Serging............................................................................................................................................................................. 22
Straight and Zigzag stretch stitches……………………………………………………………………………………………….23
Blind stitch...................................................................................................................................................................… 24
Button sewing ..................................................................................................................................................................26
Binding ............................................................................................................................................................................ 26
Zipper sewing................................................................................................................................................................... 27
Buttonhole sewing / One step button hole sewing ………………………………………………………………………… 29 - 30
Hemming.......................................................................................................................................................................... 31
Twin needle...................................................................................................................................................................... 32
Embroidery....................................................................................................................................................................... 32
Quilter .............................................................................................................................................................................. 33
Seam guide......................................................................................................................................................................33
Maintenance (Cleaning and oiling)................................................................................................................................... 34
Troubleshooting .............................................................................................................................................................. 35
- 5 -
HAUPTBESTANDTEILE / PRINCIPAL PARTS
14 15 16 1 2 17 19 18
3
7
8
5
4
6
9
10
11
12
13
22
21
20
1. Garnrollenstift
2. Spulerstop
3. Handrad
4. Stichwahlknopf
5. Stichlängenrad
6. Nadelklammer
7. Anschiebetisch
8. Greiferdeckel
9. Nähfuß
10. Knopfloch-Hebel
11. Rückwärtsknopf
12. Frontdeckel
13. Fadengeber
14. Spannungsknopf
15. Stichbreitenrad
16. Sichtfenster
17. Spuleinrichtung
18. Obere Fadenführung
19. Stretch-Stich-Justage-Schraube
20. Nähfußlifter
21. Nähfußschaftschraube
22. Stichplatte
1. Spool pin
2. Bobbin winder stopper
3. Hand wheel
4. Pattern selector dial
5. Stitch length dial
6. Thread guide and needle clamp
7. Extension table
8. Shuttle cover
9. Presser foot
10. One step button-hole lever
11. Reverse button
12. Face cover
13. Take up lever
14. Thread tension dial
15. Stitch width control
16. Pattern selector window
17. Bobbin winder spindle
18. Upper thread guide
19. Stretch stitch adjustment screw
20. Presser foot lever
21. Thumb screw
22. Needle plate
- 6 -
ZUBEHÖR / ACCESSORIES
3 Spulen
3 Bobbin
Filzscheiben
Felt
Universalfuß Zickzack Geradstich
(an der Maschine)
Zigzag foot (on machine)
Knopflochschiene
Buttonhole foot
Reißverschlussfuß
Zipper foot
Stick
-
und
Stopfplatte
Darning plate
Trennmesser
Buttonhole cutter
Nadeln
Needle
Schrauben
dreher
Screw driver
Schrauben
dreher
für Nadelplatte
Needle plate screw driver
Öltube
Machine oil tube
- 7 -
INBETRIEBNAHME DER NÄHMASCHINE / BEFORE SEWING
1.
Verbinden Sie den Stecker des Anlassers mit der Nähmaschine und
schließen Sie dann die Maschine an das Stromnetz an.
2. Die Nähgeschwindigkeit wird durch den Fußanlasser reguliert.
Benutzen Sie nur den Originalfußanlasser um Schäden zu vermeiden.
1. Connect foot controller with machine and plug in machine with
main socket.
2. Sewing speed can be varied by the foot control. Use only the original
foot controller with sewing machine in order to prevent damages.
ACHTUNG:
Wenn Sie die Maschine warten oder die Glühlampe tauschen, ziehen Sie stets den Netzstecker. Damit vermeiden
Sie Unfälle durch Stromschlag.
CAUTION:
When cleaning the machine or changing its lamp, disconnect it from the mains. You avoid accidents through
electric shock.
Austauschen der Glühlampe hinter dem Frontdeckel.
1. Um die Lampenklappe zu öffnen, müssen Sie die
Schraube
wie
angezeigt lösen.
2. Drehen Sie die Glühlampe gegen den Uhrzeigersinn heraus.
3. Schrauben Sie die Glühlampe im Uhrzeigersinn ein.
4. Verwenden Sie nur eine Glühlampe mit Schraubgewinde (E14) (max.
15W).
5. Nach dem Wechseln der Glühlampe und dem Schließen der
Lampenklappe schließen Sie die Verriegelung wieder wie angezeigt.
Bulb replacement:
1. Open face cover in direction of arrow.
2. Remove bulb by unscrewing it anti-clockwise.
3. Install a new bulb by screwing it in clockwise.
4. Use a screw type bulb with 15W. (max)
Fußanlasser
Speed Controller
Stromversorgung
Power supply
- 8 -
ENTFERNEN DES ANSCHIEBETISCHES /
REMOVING EXTENSION TABLE
Der Anschiebetisch lässt sich durch Ziehen und Schieben in
Pfeilrichtung an- oder abbauen.
Hold the left end of the table and pull it out in direction of the arrow.
FREIARMNÄHEN / FREE-ARM SEWING
Die Nähmaschine wird durch Entfernen des Anschiebetisches von einer
Flachbett Nähmaschine zur Freiarmnähmaschine; zum Nähen von Ärmeln,
Hosenbeinen, röhrenförmigen Stoffen usw.
Zum Nähen solcher Teile ziehen Sie diese einfach wie auf der Zeichnung
dargestellt über den Freiarm
.
This sewing machine can be used as a flat bed machine but easily
converts to a free arm machine by removing the extension table.
Especially useful for sewing sleeves, trousers legs, tubular fabrics etc.
To sew tubular items just slip the sleeve or leg of trousers on
the free arm as shown on the illustration.
- 9 -
5 cm Faden
5 cm thread
Richtig
Correct
AUFSPULEN / WINDING THE BOBBIN
Schieben Sie den Spuler in Pfeilrichtung, und wenn Sie mit
dem Spulen fertig sind wieder in die Ausgangsposition zurück.
Push bobbin winder spindle in direction of the arrow. When
bobbin winding is completed, return spindle to its original
position.
Wenn das Aufspulen nicht gleichmäßig erfolgt, lösen Sie die
Schraube der Vorspulerspannung und stellen Sie diese bei
Bedarf nach oben oder unten, bis gleichmäßig aufgespult wird.
When bobbin winding is uneven, release the screw of the upper
thread guide and adjust up or down until bobbin the winding is
balanced.
Spuler
Spindle
1. Drücken Sie am Handrad zum Spulen den Kupplungsknopf
Richtung Spulensymbol, um die Bewegung der Nadel beim
Spulvorgang zu stoppen und führen Sie den Faden von der
Garnrolle durch die Aufspulscheibe.
2. Führen Sie das Fadenende ca. 5cm von innen durch die Öff-
nung in der Spule und setzen Sie die Spule auf den Spuler,
dann drücken Sie den Spuler nach rechts.
3. Halten Sie das Fadenende fest und drücken Sie leicht auf
den Fußanlasser. Stoppen Sie den Spulvorgang, nachdem
der Faden sich einige Male um die Spule gewickelt hat.
Schneiden Sie das überstehende Fadenende dicht an der
Spule ab und spulen Sie fertig.
4. Nach dem Aufspulen drücken Sie den Kupplungsknopf
wieder Richtung Nadelsymbol, um den Kontakt
wieder herzustellen.
1. For bobbin winding push the knob in the handwheel towards
the bobbin symbol, in order to stop the needle movement
while winding and lead the thread from the spool through the
bobbin winder tension disc.
2. Now pull the end of the thread about 5 cm through the hole in
the bobbin from the inside to the top. Place the bobbin on the
bobbin winder and push the bobbin winder to the right.
3. Hold the end of the thread and step on the foot controller. As
soon as the bobbin is wound with the thread a few times
let the end of the thread go. Cut the excess thread close
to the bobbin and wind the bobbin.
4. When winding is finished, push the knob in direction of needle
symbol to get contact.
- 10 -
HERAUSNEHMEN VON SPULENKAPSEL UND SPULE /
REMOVING BOBBIN CASE AND BOBBIN
1. Bringen Sie die Nadel in die oberste Stellung und öffnen
Sie den Greiferdeckel.
1. Raise the needle to its highest position and open shuttle
race cover.
3. Wenn Sie den Kipphebel loslassen, fällt die Spule von selbst aus der Kapsel.
3. Release the latch and the bobbin will fall out easily.
EINSETZEN DER SPULE IN DIE SPULENKAPSEL
INSERTING BOBBIN INTO BOBBIN CASE
1. Lassen Sie 5 cm Faden überstehen, wenn Sie die Spule in
die Spulenkapsel setzen. (Siehe Abbildung)
1. Pull 5 cm of thread from bobbin and insert it into bobbin case
as shown.
3. Ziehen Sie den Faden durch den Schlitz und unter die Spannfeder
und ziehen Sie ca.10 cm Faden heraus.
3. Pull the thread through the slot and under the tension spring and pull
out about 10 cm of thread.
2. Öffnen Sie den Kipphebel der Spulenkapsel und
ziehen Sie diese aus der Maschine heraus.
2. Open the hinged latch of the bobbin case and pull the
bobbin case out of the machine.
2. Führen Sie das Fadenende in den Schlitz.
2. Guide the end of thread into the slot.
5 cm
Kipphebel
Hinged latch
10 cm
Spannfeder
Tension spring
- 11 -
Einset
zen
Insert
EINSETZEN DER SPULENKAPSEL IN DEN GREIFER /
INSERTING BOBBIN CASE INTO SHUTTLE RACE
1. Achten Sie darauf, dass sich die Nadel in der obersten Stellung befindet. Ziehen Sie den Faden nach vorn. Öffnen Sie den
Kipphebel und halten Sie die Kapsel daran fest.
1. Raise the needle to its highest position. Pull the thread to the front, open the latch of the bobbin case and hold it.
1. Setzen Sie die Spulenkapsel, wie angezeigt auf den mittleren Stift, so dass der Finger beim Einsetzen in die Aussparung greift.
2. Insert the bobbin case according drawing onto the centre pin in the shuttle and release latch.
Finger
Finger
Kipphebel
Hinged latch
- 12 -
EINFÄDELN DES OBERFADENS / THREADING UPPER THREAD
Einfädeln des Fadens von A - H.
Pass the thread from A to H as shown.
Einfädeln der Zwillingsnadel
Twin needle threading
F
C
D
E
A
E
B
C
D
G
H
G
F
H
- 29 -
ONE STEP BUTTON HOLE SEWING
Your machine works with a buttonhole automatic. Together with the button hole foot you can sew button holes size up to 3 cm.
Please try this function with an original piece of cloth. With very thin fabric put a piece of vlies under the cloth, so you can prevent
pulling of fabric.
Put your button in the opening
of the foot and slide the part towards the button
Fix your button hole foot with the
button. Put the cloth under the foot.
Put the stitch dial on 1.
Put the stitch length on the marker of button hole symbol.
Choose stitch width between 3 and 6.
Push button hole lever down and
to front
Pull the lever with the button hole symbol (left of button hole foot)
down and then towards you. This lever enables automatic sewing.
Start sewing your button hole. The machine will sew a latch and the size
of button hole is according the button.
For another button hole pull the lever to the front.
When the button holes are completed, push the lever up.
With the knife you can cut the button holes in the middle.
Tip: a pin at the end of the button hole will prevent deep cutting.
Pull slide to button
30


Need help? Post your question in this forum.

Forumrules


Report abuse

Libble takes abuse of its services very seriously. We're committed to dealing with such abuse according to the laws in your country of residence. When you submit a report, we'll investigate it and take the appropriate action. We'll get back to you only if we require additional details or have more information to share.

Product:

For example, Anti-Semitic content, racist content, or material that could result in a violent physical act.

For example, a credit card number, a personal identification number, or an unlisted home address. Note that email addresses and full names are not considered private information.

Forumrules

To achieve meaningful questions, we apply the following rules:

Register

Register getting emails for AEG 112704 at:


You will receive an email to register for one or both of the options.


Get your user manual by e-mail

Enter your email address to receive the manual of AEG 112704 in the language / languages: English, German as an attachment in your email.

The manual is 3,06 mb in size.


You will receive the manual in your email within minutes. If you have not received an email, then probably have entered the wrong email address or your mailbox is too full. In addition, it may be that your ISP may have a maximum size for emails to receive.

The manual is sent by email. Check your email

If you have not received an email with the manual within fifteen minutes, it may be that you have a entered a wrong email address or that your ISP has set a maximum size to receive email that is smaller than the size of the manual.

The email address you have provided is not correct.

Please check the email address and correct it.

Your question is posted on this page

Would you like to receive an email when new answers and questions are posted? Please enter your email address.


Info