654479
14
Zoom out
Zoom in
Previous page
1/54
Next page
1
S55i/X55i
Multimedia Projector
Operator's Guide
Thank you for purchasing this projector.
WARNING ►Before using this product, please read the "Product Safety
Guide" and related manuals to ensure the proper use of this product. After
reading them, store them in a safe place for future reference.
About this manual
Various symbols are used in this manual. The meanings of these symbols are
described below.
WARNING This symbol indicates information that, if ignored, could possibly
result in personal injury or even death due to incorrect handling.
CAUTION This symbol indicates information that, if ignored, could possibly
result in personal injury or physical damage due to incorrect
handling.
Please refer to the pages written following this symbol.
NOTEThe information in this manual is subject to change without notice.
The manufacturer assumes no responsibility for any errors that may appear in this manual.
The reproduction, transfer or copy of all or any part of this document is not permitted
without express written consent
.
Trademark acknowledgment
VGA and XGA are registered trademarks of International Business Machines Corporation.
Apple and Mac are registered trademarks of Apple Computer, Inc.
VESA and SVGA are trademarks of Video Electronics Standard Association.
Windows is a registered trademark of Microsoft Corporatio
n.
All other trademarks are the properties of their respective owners.
© 3M 2005. All Rights Reserved.
2
About this manual . . . . . . . . . . 1
Content . . . . . . . . . . . . . . . . . . 2
Projector features . . . . . . . . . .
3
Preparations . . . . . . . . . . . . . .
3
About contents of package . . . . . . . 3
Part names
. . . . . . . . . . . . . . . 4
Projector . . . . . . . . . . . . . . . . . . . . . 4
Control buttons . . . . . . . . . . . . . . . . 6
Remote control . . . . . . . . . . . . . . . . 6
Setting up . . . . . . . . . . . . . . . . 7
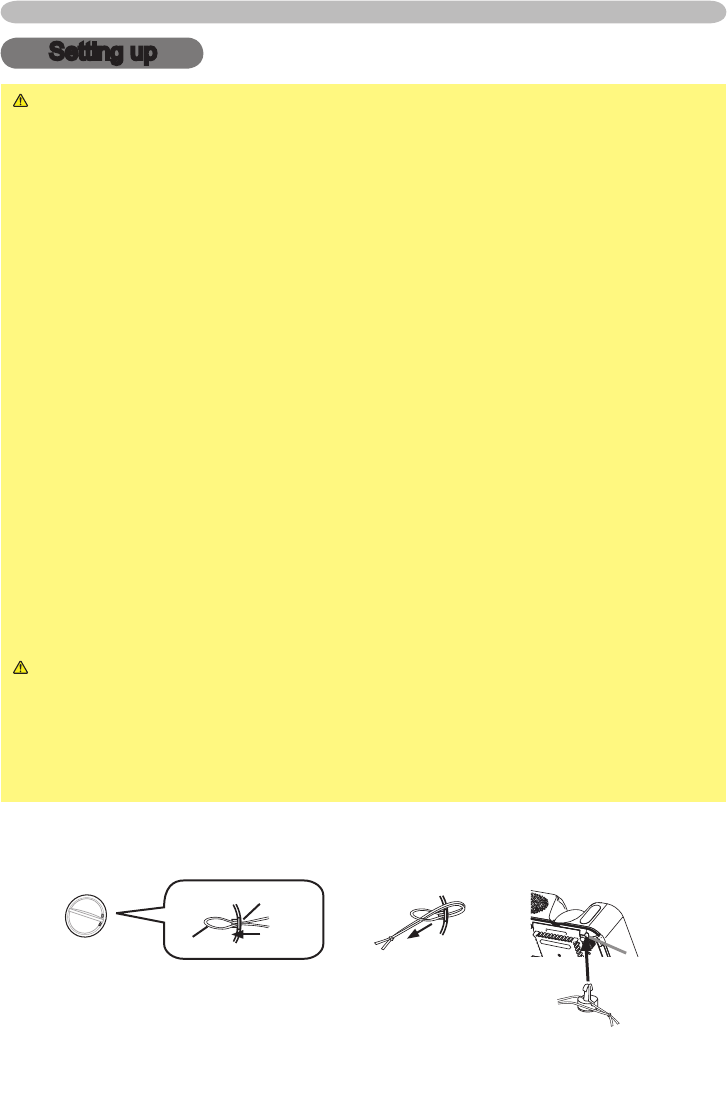
Fastening the lens cover . . . . . . . . . 7
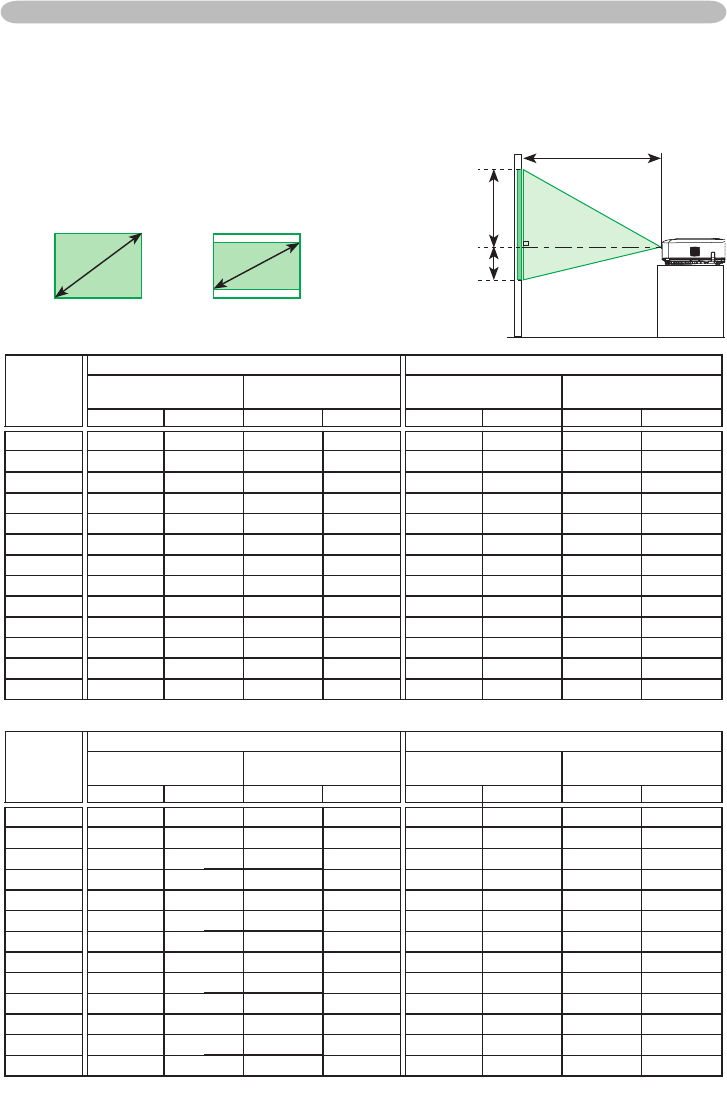
Arrangement . . . . . . . . . . . . . . . . . . 8
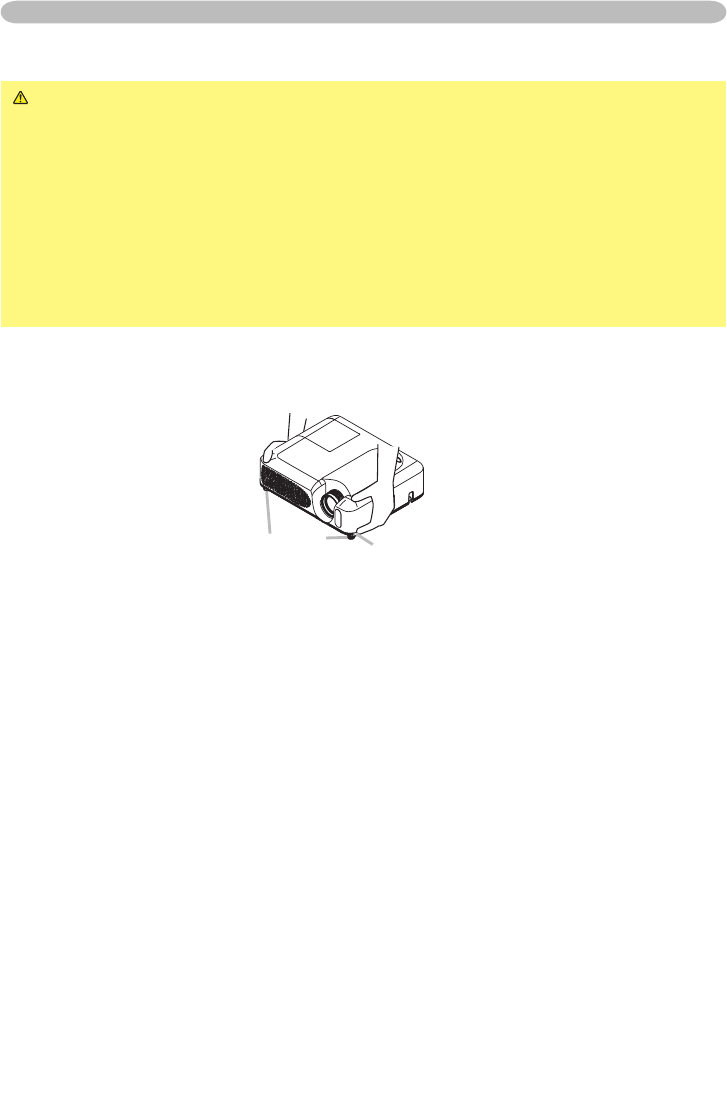
Adjusting the projector's elevator . . 9
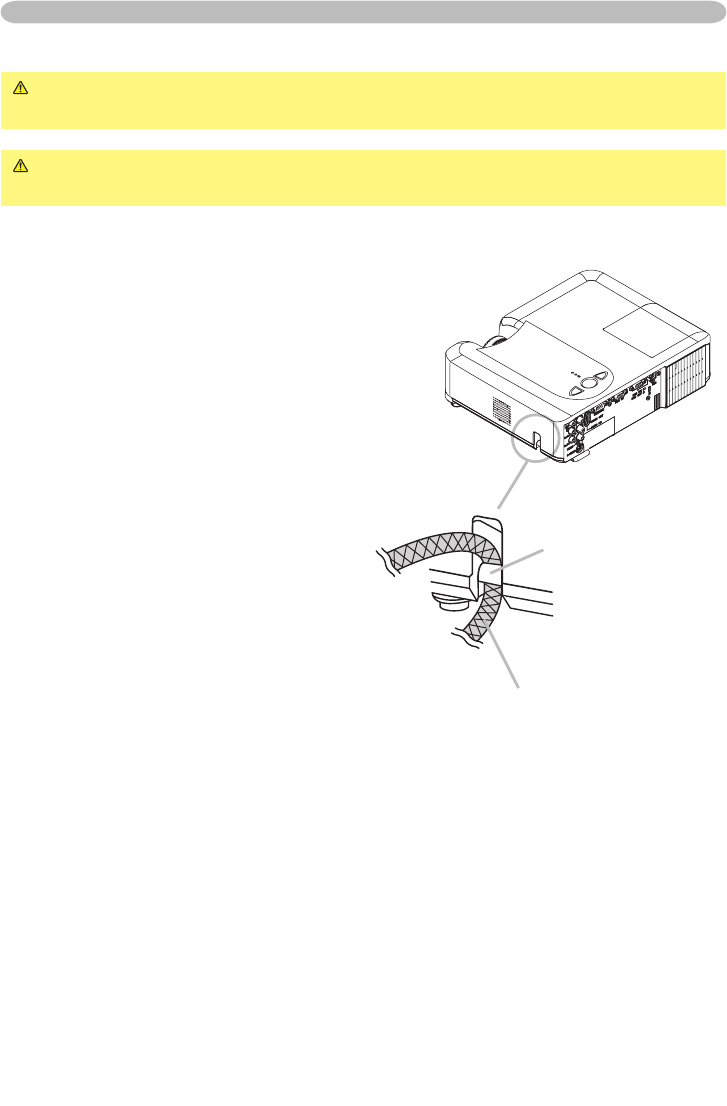
Using the Security Bar . . . . . . . . . . 10
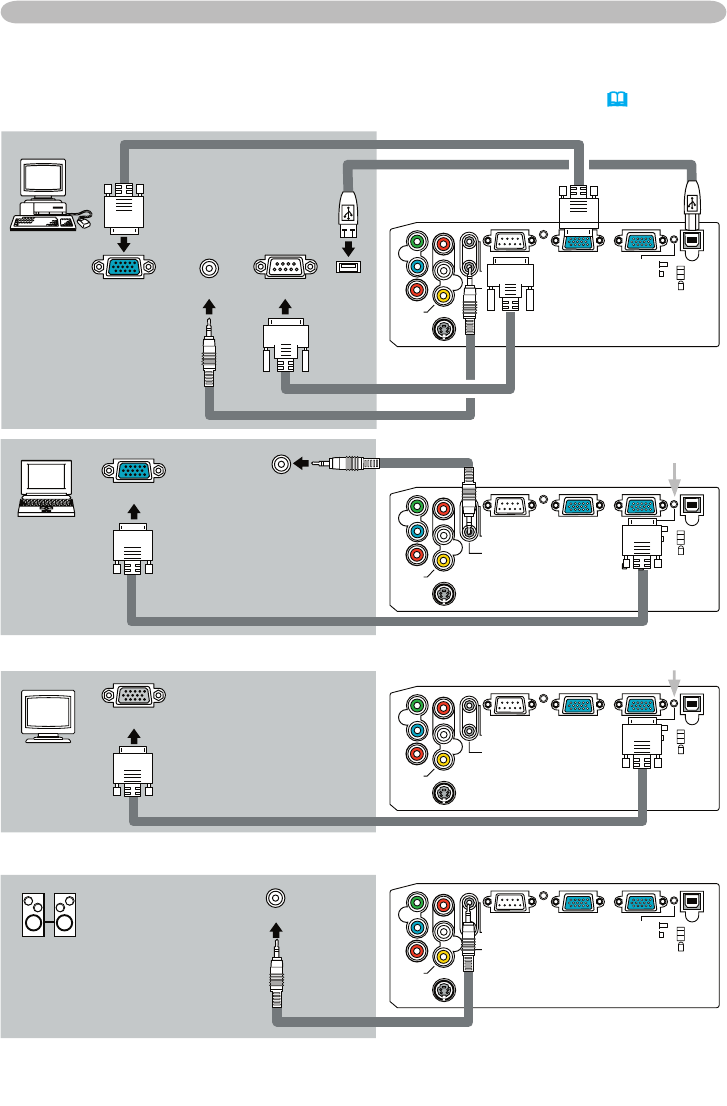
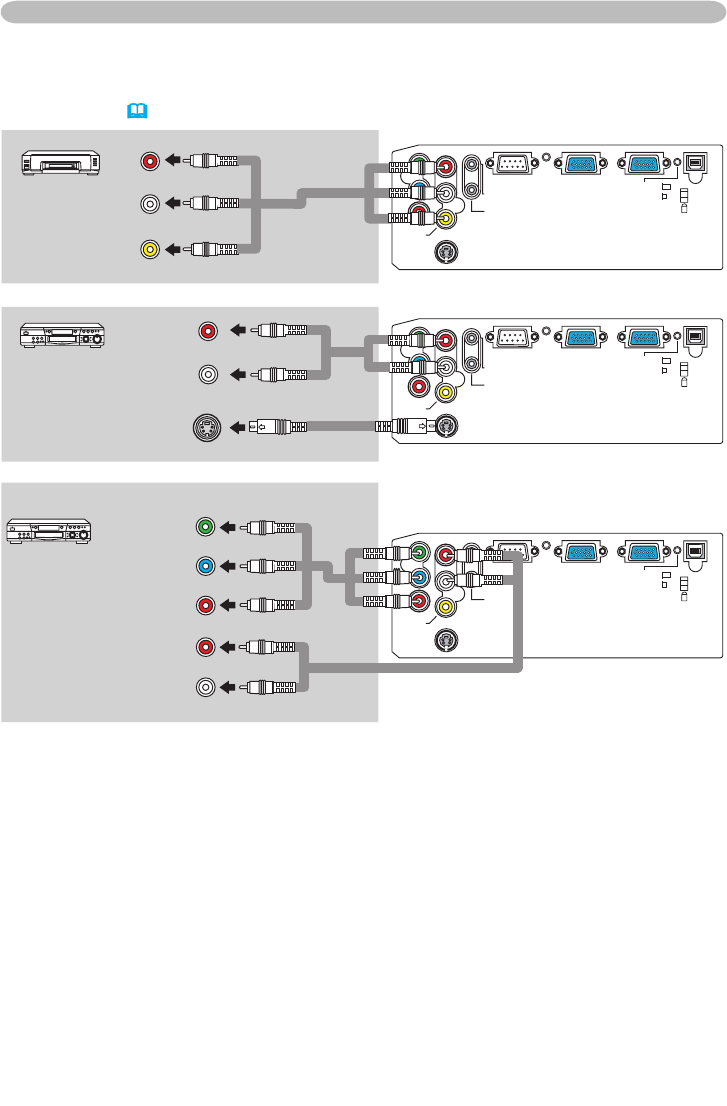
Connecting your devices . . . . . . . . .11
Connecting power supply . . . . . . . 14
Remote control . . . . . . . . . . .
15
Putting batteries . . . . . . . . . . . . . . 15
Using the remote control . . . . . . . . 16
Power on/off
. . . . . . . . . . . . . 17
Turning on the powe
r . . . . . . . . . . . 17
Turning off the power . . . . . . . . . . . 17
Operating . . . . . . . . . . . . . . . 18
Adjusting the volume . . . . . . . . . . . 18
Temporarily muting the sound . . . .
18
Selecting an input signal . . . . . . . . 18
Searcting an input signal . . . . . . . . 19
Selecting an aspect ratio . . . . . . . . 19
Adjusting the zoom and focus . . . . 19
Using the automatic adjustment feature
. 20
Adjusting the position . . . . . . . . . . 20
Correcting the keystone distortions 21
Using the magnify feature . . . . . . . 21
Freezing the screen . . . . . . . . . . . . 22
Temporarily blanking the screen
. . 22
Operating the computer screen . . . 23
Multifunctional settings . . . . 24
Using the menu function . . . . . . . . 24
Content
Content
EASY Menu . . . . . . . . . . . . . . . . . . 25
Aspect, Keystone, Mode, Brightness,
Contrast, Color, Tint, Sharpness,
Whisper, Mirror, Reset, Filter time,
Language,
Go to advanced menu
PICTURE Menu . . . . . . . . . . . . . . . 27
Brightness, Contrast, Gamma,
Color temp, Color, Tint, Sharpness,
Progressive, My memory
IMAGE Menu . . . . . . . . . . . . . . . . . 30
Aspect, Over scan, V. position, H. position,
H. phase, H. size, Auto adjust execute
INPUT Menu . . . . . . . . . . . . . . . . . 32
Color space, Component, Video format,
Frame lock, Information
SETUP Menu . . . . . . . . . . . . . . . . . 34
Keystone, Whisper, Mirror, Volume,
Audio
SCREEN Menu . . . . . . . . . . . . . . . 35
Language, Menu position, OSD bright.,
Blank, Start up, MyScreen,
MyScreen lock, Message
OPTION Menu . . . . . . . . . . . . . . . . 38
Auto
search, Auto off, Lamp time,
Filter time, Service
Maintenance . . . . . . . . . . . . . 40
Lamp . . . . . . . . . . . . . . . . . . . . . . . 40
Air filter
. . . . . . . . . . . . . . . . . . . . . 42
Other care . . . . . . . . . . . . . . . . . . . 44
Troubleshootin
g . . . . . . . . . . 45
Related messages . . . . . . . . . . . . . 45
Regarding the indicator lamps . . . . 46
Phenomena that may easily be
mistaken for machine defects . . . . 48
Specifications . . . . . . . . . . . .
51
Technical (English only)
(Please see the end of this book, although only in English.)
3M™ Digital Projector S55i/X55i
© 3M 2005. All Rights Reserved.
3
Projector features / Preparations
Projector features
This projector is used to project various computer signals as well as NTSC/PAL/
SECAM, Component (SD, HD) video signals onto a screen. It requires just a little
space for installation and gets a large image from short distance.
High Brightness
Newly developed 180W UHB (Ultra High Brightness) lamp gives you a higher
brightness image on a screen. The image can be still kept as bright and clean
enough for use in bright rooms.
Low Noise
WHISPER mode is available for reducing acoustic noise to realize quieter
operation. It is perfect for use in low luminance rooms where low noise is more
important than brightness.
Rich Connectivity
This projector has a variety of I/O ports. It can be easily connected to many
signal sources like PC, DVD and so on. The rich connectivity provides you
more options to make your presentation impressive.
Compact Body
Even with its many features, this projector is extremely compact and slim,
which gives you more flexibility and usability to use it where you want.
Preparations
About contents of package
Your projector should come with the items shown below. Contact immediately your
dealer if anything is missing.
NOTE
• Keep the original packing materials for future reshipment. For
moving the projector, be sure to use the original packing materials
. Use special
caution for the lens part.
RCA
Component cable
RCA
Video/Audio cable
VIDEO
RG
B
SEARC
H
FREEZE
OFF
ON
MAGNIFY
ASPECT
STANDBY/ON
AUTO
BLANK
MUTE
VOLUME
KEYSTONE
POSITION
ES
C
ENTE
R
MENU
RESE
T
HOME
PAGE UP
PAGE DOWN
END
Lens cover, Rivet and Strap
Soft case
S55i/X55i
USB cable
3M™ Digital Projector S55i/X55i
© 3M 2005. All Rights Reserved.
4
Part names
Part names
Lens (
17)
Filter cover (
42)
(Air filter and intake vent
are inside.)
Elevator button (
9)
Elevator foot (
9)
Remote sensor (
16)
Zoom ring (
19)
Focus ring (
19)
Vent (
7)
Projector
Lamp door (
41)
(Lamp unit is inside.)
Bottom side
Speaker
Lens cover (
3)
Security bar (
10)
(Use for attaching a
commercial anti-theft
chain or wire.)
Control buttons (
6)
WARNING ►During use or immediately after use, do not touch around the
lamp and vents of the projector. (
) It could cause a burn.
Front-Right side
3M™ Digital Projector S55i/X55i
© 3M 2005. All Rights Reserved.
5
Y R
L
AUDIO IN
2
AUDIO OU
T
CONTROL RGB IN
1
RGB IN
2
USB
RGB OU
T
AUDIO IN
1
VIDE
O
S-VIDEO
CB
/
PB
CR
/
PR
K
AC inlet (
14)
Power switch (
17)
Elevator button (
9)
COMPONENT
VIDEO ports (
13)
Y
C
B
/P
B
C
R
/P
R
S-VIDEO port (
13)
VIDEO port (
13)
CONTROL port (
12)
Elevator foot (
9)
Rear-Left side
Ports (See below.)
Vent (
7)
AUDIO-OUT po
rt (
12)
Ports
AUDIO IN1 port (
12)
(In the default setting, the AUDIO
IN1 port is the audio port for the
RGB IN1 and RGB IN2 ports,
however, it is possible to change
the settings.
34)
AUDIO IN2 L/R port (
13)
(In the default setting, the
AUDIO IN2 L/R port is the audio
port for the VIDEO, S-VIDEO
and COMPONENT VIDEO
ports, however it is possible to
change the settings.
34)
RGB IN1
port (
12)
RGB IN2 /RGB OUT port
(
12)
(Use the RGB IN OUT switch to select
RGB IN2 or RGB OUT for this port.)
RGB IN2 port: Inputs the RGB signal from
a PC.
RGB OUT port: When connected to a
monitor, outputs the signal input via RGB
IN1.
NOTE (*) About Restart switch: This projector is controlled by an internal
microprocessor. Under certain exceptional circumstances, the projector may not
operate correctly and the microprocessor will need to be reset. In such a case,
please push the Restart switch by using a cocktail stick or similar, and before
turning on again, make the projector cool down at least 10 minutes without
operating. Only push the Restart switch in these exceptional instances.
Restart switch (*) (
48)
RGB IN OUT switch
(
12)
Use this button to select either RGB IN2
or RGB OUT for the corresponding port.
When this switch is not pushed in, RGB
IN2 is selected.
When this switch is pushed in, RGB OUT
is selected.
Part names
USB port (
12)
3M™ Digital Projector S55i/X55i
© 3M 2005. All Rights Reserved.
6
SEARCH button (
19)
RGB button (
18)
VIDEO button (
19)
ASPECT button
(
19)
HOME button (
23)
MAGNIFY
ON button (
21)
OFF button (
21)
END button (
23)
FREEZE button (
22)
POSITION button (
20)
ESC button (
24)
Part names
Remote control
Battery cover (
15)
(on the back)
STANDBY/ON button
(
17)
AUTO
button (
20)
BLANK button (
22)
PAGE UP
button (
23)
VOLUME button (
18)
MUTE button (
18)
PAGE
DOWN button (
23)
KEYSTONE button
(
21)
MENU button (
24)
Cursor buttons
▲,▼,◄,► (
24)
ENTER button (
24)
RESET button
(
24)
VIDEO
RG
B
SEARC
H
FREEZE
OFF
ON
MAGNIFY
ASPECT
STANDBY/ON
AUTO
BLAN
K
MUTE
VOLUME
KEYSTONE
POSITION
ES
C
ENTE
R
MENU
RESE
T
HOME
PAGE UP
PAGE DOWN
END
Control buttons
LAMP indicator (
46, 47)
TEMP indicator
(
46, 47)
POWER indicator (
17)
Cursor buttons
▲,▼,◄,► (
24)
STANDBY/ON button
(
17)
INPUT button (
18)
3M™ Digital Projector S55i/X55i
© 3M 2005. All Rights Reserved.
7
Fastening the lens cover
To avoid losing the lens cover, please fasten it the lens cap to the projector using
the strap.
1.
Fix the strap to the strap ring of the lens cover.
2.
Put the strap into the groove on the rivet.
3.
Push the rivet into the strap hole.
Setting up
Setting up
WARNING ►Place the projector in a stable position horizontally. A fall or
a turnover could cause an injury and/or damage to the projector. Then using
damaged projector could result in a fire and/or an electric shock.
Do not place the projector on an unstable, slant or vibrant surface such as a
wobbly or inclined stand.
Do not place the projector in the side/front/rear-up position, except cleaning
the air filter.
►Place the projector in a cool place, and pay attention enough to ventilation.
The high temperature of the projector could cause a fire, a burn and/or
malfunction to the projector.
Do not stop up, block and cover the projector's vents.
Keep a space of 30 cm or more between the sides and other objects such as
walls.
• Do not place the projector on a metallic thing or anything weak in heat.
Do not place the projector on a carpet, cushion or bedding.
Do not place the projector in direct sunlight or near a hot object such as a
heater.
Put nothing about lens and vents of the projector. Put nothing on the projector.
Put nothing that is sucked or sticks to the bottom of projector. This projector
has some intake vents also on the bottom.
►Do not place the projector on the place that gets wet. Damping the projector
or inserting liquid in the projector could cause a fire, an electric shock and/or
malfunction to the projector.
Do not place the projector in a bathroom or the outdoors.
Put nothing containing the liquid near the projector.
CAUTION ►Avoid a smoky, humid or dusty place. Placing the projector
in such place could cause a fire, an electric shock and/or malfunction to the
projector.
• Do not place the projector near a humidifier, a smoking space or a kitchen.
►Adjust the direction of the projector to keep the light from directly hitting the
projector's remote sensor.
Strap ring
Strap
Strap hole
Bottom side
3M™ Digital Projector S55i/X55i
© 3M 2005. All Rights Reserved.
8
Arrangement
Refer to the illustrations and tables below to determine the screen size and projection distance.
The values shown in the table are calculated for a full size screen: S55i : 800×600, X55i :
1024×768
(a) The screen size (diagonal)
(b) Distance from the projector to the screen (±10%)
(c) The height of the screen (±10%)
Setting up
4:3
(a)
16:9
(a)
For the model X55i
For the model
S55i
(a) Screen
size
[inch (m)]
4 : 3 screen
16 : 9 screen
(b) Projection distance
[m (inch)]
(c) Screen height
[cm (inch)]
(b) Projection distance
[m (inch)]
(c) Screen height
[cm (inch)]
min.
max. down
up min. max.
down up
30 (0.8) 0.9 (36)
1.1 (43)
5 (2)
41 (16)
1.0 (39) 1.2 (47)
-1 (0) 39 (15)
40 (1.0) 1.2 (48) 1.5 (57) 6 (2) 55 (22) 1.3 (52) 1.6 (63) -2 (-1) 51 (20)
50 (1.3) 1.5 (60) 1.8 (72) 8 (3) 69 (27) 1.7 (65) 2.0 (79) -2 (-1) 64 (25)
60 (1.5) 1.8 (72) 2.2 (87) 9 (4) 82 (32) 2.0 (79) 2.4 (94) -2 (-1) 77 (30)
70 (1.8) 2.1 (84) 2.6 (101) 11 (4) 96 (38) 2.3 (92) 2.8 (110) -3 (-1) 90 (35)
80 (2.0) 2.4 (96) 2.9 (116) 12 (5) 110 (43) 2.7 (105) 3.2 (126) -3 (-1) 103 (41)
90 (2.3) 2.8 (109) 3.3 (130) 14 (5) 123 (49) 3.0 (118) 3.6 (142) -4 (-1) 116 (46)
100 (2.5) 3.1 (121) 3.7 (145) 15 (6) 137 (54) 3.3 (132) 4.0 (158) -4 (-2) 129 (51)
120 (3.0) 3.7 (145) 4.4 (174) 18 (7) 165 (65) 4.0 (158) 4.8 (190) -5 (-2) 154 (61)
150 (3.8) 4.6 (182) 5.5 (218) 23 (9) 206 (81) 5.0 (198) 6.0 (238) -6 (-2) 193 (76)
200 (5.1) 6.2 (242) 7.4 (291) 30 (12) 274 (108) 6.7 (264) 8.1 (317) -8 (-3) 257 (101)
250 (6.4) 7.7 (303) 9.3 (364) 38 (15) 343 (135) 8.4 (330) 10.1 (397) -10 (-4) 322 (127)
300 (7.6) 9.2 (364) 11.1 (437)
46 (18)
411
(162)
10.1 (397) 12.1 (476)
-12 (-5) 386 (152)
(a) Screen
size
[inch (m)]
4 : 3 screen
16 : 9 screen
(b) Projection distance
[m (inch)]
(c) Screen height
[cm (inch)]
(b) Projection distance
[m (inch)]
(c) Screen height
[cm (inch)]
min.
max. down
up
min.
max. down up
30 (0.8) 0.9 (36)
1.1 (43)
5 (2)
41 (16)
1.0 (39)
1.2 (47)
-1 (0) 39 (15)
40 (1.0) 1.2 (48) 1.5 (58) 6 (2) 55 (22) 1.3 (52) 1.6 (63) -2 (-1) 51 (20)
50 (1.3) 1.5 (60) 1.8 (73) 8 (3) 69 (27) 1.7 (66) 2.0 (79) -2 (-1) 64 (25)
60 (1.5) 1.8 (73) 2.2 (87) 9 (4) 82 (32) 2.0 (79) 2.4 (95) -2 (-1) 77 (30)
70 (1.8) 2.2 (85) 2.6 (102) 11 (4) 96 (38) 2.4 (93) 2.8 (111) -3 (-1) 90 (35)
80 (2.0) 2.5 (97) 3.0 (117) 12 (5) 110 (43) 2.7 (106) 3.2 (127) -3 (-1) 103 (41)
90 (2.3) 2.8 (109) 3.3 (132) 14 (5) 123 (49) 3.0 (119) 3.6 (143) -4 (-1) 116 (46)
100 (2.5) 3.1 (122) 3.7 (146) 15 (6) 137 (54) 3.4 (133) 4.0 (159) -4 (-2) 129 (51)
120 (3.0) 3.7 (146) 4.5 (176) 18 (7) 165 (65) 4.0 (159) 4.9 (192) -5 (-2) 154 (61)
150 (3.8) 4.6 (183) 5.6 (220) 23 (9) 206 (81) 5.1 (200) 6.1 (240) -6 (-2) 193 (76)
200 (5.1) 6.2 (244) 7.5 (294) 30 (12) 274 (108) 6.8 (266) 8.1 (320) -8 (-3) 257 (101)
250 (6.4) 7.8 (306) 9.3 (367) 38 (15) 343 (135) 8.5 (333) 10.2 (400) -10 (-4) 322 (127)
300 (7.6) 9.3 (367) 11.2 (441)
46 (18)
411
(162)
10.2 (400) 12.2 (480)
-12 (-5) 386 (152)
(c) up
(b)
(c) down
3M™ Digital Projector S55i/X55i
© 3M 2005. All Rights Reserved.
9
Adjusting the projector's elevator
CAUTION ►If you press the elevator button without holding the projector,
the projector might crash down, overturn, smash your fingers and possibly
result in malfunction. To prevent damaging the projector and injuring yourself,
always hold the projector whenever using the elevator buttons to adjust the
elevator feet.
►Do not incline the projector rightward or leftward. Also do not incline it
backward or forward exceeding 9 degrees. Exceeding these range could cause
malfunction, and could shorten the lifetime of the consumables.
►Except for inclining by the elevator feet adjustment, place the projector
horizontally.
You can use the elevator feet to make adjustments if the surface on which you
need to set the projector is uneven or if you otherwise need to adjust the angle of
projection. The adjustment range of the elevator feet is 0 to 9 degrees.
1.
After making sure that the projector is cool adequately, press and hold in the
elevator buttons while holding the projector.
The elevator buttons and the elevator feet are on the both sides.
2.
Raise or lower the projector to the desired height and release the elevator
buttons.
When you release the elevator buttons, the elevator feet will lock into position.
3.
If necessary, you can also finely adjust the height of the projector by twisting
the elevator feet by hand.
Setting up
Elevator feet
Elevator button
3M™ Digital Projector S55i/X55i
© 3M 2005. All Rights Reserved.
10
Setting up
Using the Security Bar
WARNING ►Do not use the security bar to prevent the projector from
falling. Dropping or knocking over the projector may cause damage or injury.
A commercial anti-theft chain or wire can be attached to the security bar on the
projector.
1.
How to attach
An anti-theft chain or wire can be attached as
shown in the illustration.
(Anti-theft chains or wires of up to 10mm in
diameter can be used)
Anti-theft chain or wire
[sold separately]
Security Bar
CAUTION ►The security bar is not a comprehensive theft prevention
measure. It is intended to be used as an extra theft prevention measure.
3M™ Digital Projector S55i/X55i
© 3M 2005. All Rights Reserved.
11
Setting up
Connecting your devices
CAUTION ►Turn off all devices prior to connecting them to the projector.
Attempting to connect a live device to the projector may generate extremely
loud noises or other abnormalities that may result in malfunction and/or damage
to the device and/or projector.
►Use the accessory cable or a designated-type cable for the connection.
Some cables have to be used with core set. A too long cable may cause a
certain picture degradation. Please consult with your dealer for details. For
cables that have a core only at one end, connect the core to the projector.
►Make sure that you connect devices to the correct port. Incorrect connection
may result in malfunction and/or damage to the device and/or projector.
NOTE • Whenever attempting to connect a laptop computer to the projector, be sure
to activate the laptop’s RGB external image output (set the laptop to CRT display or to
simultaneous LCD and CRT display). For details on how this is done, please refer
to the
instruction manual of the corresponding laptop computer.
• Secure the screws on the connectors and tighten.
• Some computers may have multiple display screen modes. Use of some of these
modes will not be possible with this projector.
• For some RGB signal modes, the optional Mac adapter is necessary.
• When the image resolution is changed on a computer, depending on an input,
automatic adjustment function may take some time and may not be completed. In this
case, you may not be able to see a check box to select “Yes/No” for the new resolution
on Windows. Then the resolution will go back to the original. It might be recommended
to use other CRT or LCD monitors to change the resolution.
About Plug-and-Play capability
Plug-and-Play is a system composed of the computer, its operating system and
peripheral equipment (i.e. display devices). This projector is compatible with VESA DDC
2B. Plug-and-Play can be achieved by connecting this projector to a computer is VESA
DDC (display data channel) compatible.
• Please take advantage of this function by connecting the accessory RGB cable to the
RGB IN1 port (DDC 2B compatible). Plug-and-Play may not work properly if any other
type of connection is attempted.
• Please use the standard drivers in your computer as this projector is a Plug-and-Play
monitor.
3M™ Digital Projector S55i/X55i
© 3M 2005. All Rights Reserved.
12
Setting up
Examples of connection with a computer
* In the default setting, the AUDIO IN1 port is the audio port for the RGB IN1 and RGB IN2
ports. To change the settings, refer to the AUDIO item in the SETUP menu.
(
34)
Y R
L
AUDIO IN
2
AUDIO OU
T
CONTROL RGB IN
1
RGB IN
2
USB
RGB OU
T
AUDIO IN
1
VIDE
O
S-VIDEO
C
B
/
P
B
C
R
/
P
R
K
Y R
L
AUDIO IN
2
AUDIO OU
T
CONTROL RGB IN
1
RGB IN
2
USB
RGB OU
T
AUDIO IN1
VIDE
O
S-VIDEO
CB
/
PB
CR
/
PR
K
Y R
L
AUDIO IN
2
AUDIO OU
T
CONTROL RGB IN
1
RGB IN
2
USB
RGB OU
T
AUDIO IN
1
VIDE
O
S-VIDEO
C
B
/P
B
C
R
/
P
R
K
Y R
L
AUDIO IN
2
AUDIO OU
T
CONTROL RGB IN
1
RGB IN
2
USB
RGB OU
T
AUDIO IN
1
VIDE
O
S-VIDEO
C
B
/
P
B
C
R
/
P
R
K
RGB IN2
RGB OUT
Audio out RS-232C
RGB out
Stereo mini audio cable
RGB cable
RGB in
RGB cable
Audio out
Stereo mini audio cable
RS-232C cable
Connecting to a monitor (output)
Connecting to a speaker with amplifier (output)
USB
RGB out
Use the RGB IN OUT
switch to select
RGB IN2 (RGB IN2 is
selected if the switch is
not pushed in).
Use the RGB IN OUT switch to select RGB OUT
(RGB OUT is selected if the
switch
is pushed in).
RGB cable
Audio in
USB cable
Stereo mini
audio cable
3M™ Digital Projector S55i/X55i
© 3M 2005. All Rights Reserved.
13
Y R
L
AUDIO IN
2
AUDIO OUT
CONTROL RGB IN
1
RGB IN
2
USB
RGB OU
T
AUDIO IN
1
VIDE
O
S-VIDEO
C
B
/
P
B
CR/PR
K
Y R
L
AUDIO IN
2
AUDIO OUT
CONTROL RGB IN
1
RGB IN
2
USB
RGB OU
T
AUDIO IN
1
VIDE
O
S-VIDEO
C
B/
P
B
CR/PR
K
Y R
L
AUDIO IN2
AUDIO OUT
CONTROL RGB IN
1
RGB IN
2
USB
RGB OU
T
AUDIO IN
1
VIDEO
S-VIDEO
C
B/
P
B
C
R/
P
R
K
Y R
L
AUDIO IN
2
AUDIO OUT
CONTROL RGB IN
1
RGB IN
2
USB
RGB OU
T
AUDIO IN
1
VIDE
O
S-VIDEO
CB/PB
CR/PR
K
Setting up
Examples of connection with a VCR/DVD player
Audio (R) out
Video out
Audio cable
Audio/Video
cable
Audio (R) out
S-Video
out
S-Video
cable
Audio (R) out
Component video out
Audio cable
Audio (L) out
Audio (L) out
Y
C
B
/P
B
C
R
/P
R
Audio (L) out
Component video cable
*
In the default setting, the AUDIO IN2 L/R port is the audio port for the VIDEO, S-VIDEO
and COMPONENT VIDEO ports. To change the settings, refer to the AUDIO item in the
SETUP menu.
(
34)
3M™ Digital Projector S55i/X55i
© 3M 2005. All Rights Reserved.
14
Connecting power supply
WARNING ►Please use extra caution when connecting the power cord, as
incorrect or faulty connections may result in fire and/or electrical shock.
• Only use the power cord that came with the projector. If it is damaged, contact
your dealer to newly get correct one.
• Only plug the power cord into an outlet rated for use with the power cord's
specified voltage range.
• Never modify the power cord. Never attempt to defeat the ground connection
of the three-pronged plug.
1.
Connect the connector of the power cord to the AC inlet of the projector.
2.
Firmly plug the power cord's plug into the outlet.
Setting up
AC inlet
Connector
of the power cord
3M™ Digital Projector S55i/X55i
© 3M 2005. All Rights Reserved.
14


Need help? Post your question in this forum.

Forumrules


Report abuse

Libble takes abuse of its services very seriously. We're committed to dealing with such abuse according to the laws in your country of residence. When you submit a report, we'll investigate it and take the appropriate action. We'll get back to you only if we require additional details or have more information to share.

Product:

For example, Anti-Semitic content, racist content, or material that could result in a violent physical act.

For example, a credit card number, a personal identification number, or an unlisted home address. Note that email addresses and full names are not considered private information.

Forumrules

To achieve meaningful questions, we apply the following rules:

Register

Register getting emails for 3m X55i at:


You will receive an email to register for one or both of the options.


Get your user manual by e-mail

Enter your email address to receive the manual of 3m X55i in the language / languages: English as an attachment in your email.

The manual is 7,56 mb in size.


You will receive the manual in your email within minutes. If you have not received an email, then probably have entered the wrong email address or your mailbox is too full. In addition, it may be that your ISP may have a maximum size for emails to receive.

Others manual(s) of 3m X55i

3m X55i User Manual - German - 53 pages


The manual is sent by email. Check your email

If you have not received an email with the manual within fifteen minutes, it may be that you have a entered a wrong email address or that your ISP has set a maximum size to receive email that is smaller than the size of the manual.

The email address you have provided is not correct.

Please check the email address and correct it.

Your question is posted on this page

Would you like to receive an email when new answers and questions are posted? Please enter your email address.


Info